Wednesday, August 31, 2011

It's been a month!

I haven't had time to do any stamping yet this week, but I wanted to share something to mark the end of my first month blogging (can't believe it's already been that long). So here is a thank-you card I made a few weeks ago:

Supplies (all Stampin' Up!®):
Stamps: Raining Flowers, Medallion, Tiny Tags
Ink and card stock: Pool Party, Real Red, Old Olive
Accessories: Old Olive 1/8" taffeta ribbon, Victoria crochet trim, Basic Pearls, linen thread, Dotted Scallop Ribbon Border punch, Jewelry Tag punch, Itty Bitty Shapes punch pack, Ticket Corner punch, Mini Glue Dots®, Dimensionals

I was really pleased with how this card turned out, and I even mailed it in a small padded envelope so it didn't get wrecked. (This picture doesn't do it justice, but since I don't have the card anymore, I can't take a better photo. Bummer.) For the focal image, I stamped the flower three times and cut out the different "rows" of petals, so I had a small flower, medium flower and large flower. Then I layered them on each other with Glue Dots, creating a little bit of dimension. With the stem, I also stamped and cut out an extra pair of leaves to place behind the flower. I wrapped the whole focal piece with a bit of ribbon, added a lace tab to the right side and adhered it to the card with Dimensionals. The tag, which is stamped "thanks {so much}," is tied onto the lace with linen thread.

I think the Medallion stamp works great in the background here; it's a strong image and balances the layout, but since it's stamped in the same color as the card stock, it doesn't overpower the focal point. I added three small punched flowers with pearl centers in the upper left corner, as well as a pearl on the main flower. Finally, the Dotted Scallop Ribbon Border punch gives a soft edge at the bottom of the card.

I hope you liked this card and the other projects I've posted during the last month. Thanks for stopping by!

Monday, August 29, 2011

Telescoping card

This weekend I decided to play along with the Virtual Stamp Night (VSN) challenges on SCS. Unfortunately, it was kind of a busy weekend, so I only had a chance to complete one of the challenges. There were several challenges that sounded interesting to me, though, so I might go back when I have more time and try them just for fun. Anyway, the challenge I participated in was to make a telescoping circle card. With this type of card, you have three circles that are stamped/decorated individually and then assembled (with largest on the bottom, smallest on top) in such a way that it looks complete when it's closed but when you pull a tab, it swings open so you can see all the circles. I think it's easier to understand when you see a picture, so here's the card I created:

This is a view of the card when it is closed.
Supplies (all Stampin' Up!® unless otherwise noted):
Stamps: Best Friends Forever, Curly Cute, Birthday Greetings
Paper: Carousel Notes II Cards & Envelopes (for the Kiwi Kiss scallop), Pink Lemonade large scallop circle and Espresso scallop circle (The Paper Cut), Very Vanilla, Pink Pirouette
Ink: Kiwi Kiss, Pink Pirouette, Early Espresso
Accessories: 5/16" neutrals brads, Victoria crochet trim, Basic Pearls, Itty Bitty Shapes punch pack, sponge, Glue Dots


Now, the easiest way to get three circles of graduating size is to use some type of die that cuts the shapes for layering. I do not yet have any such dies (well, I have oval ones, but no circles). And I wasn't sure that I had time to run around the apartment trying to find the right size circles to trace (plates, bowls, glasses, etc.) because most VSN challenges have a 45-minute time limit for making your card. But then I happened to remember these scallop circle die cuts I have, and lo and behold, they worked! The scallops don't line up perfectly because they are from different companies (the bottom is from Stampin' Up!, and the other two are from The Paper Cut), but they were close enough. I did end up having to trace circles for the three layers inside the scallop circles -- I think I used a spool of ribbon for the two smallest ones and a plastic storage container for the larger circle -- but that wasn't too bad.

This is a view with the top layer swung open so you
can also see the middle layer.

As you can see from these first two layers, I chose to keep the same "theme" going on all the layers of my card. Kind of a shabby chic/collage feel. Not my usual style, but I think it works here. (This stamp set is one of the ones I received at Convention, and this is the first time I've used it since completing my make-and-take projects from Convention.)

I looked at quite a few of the telescoping cards that other stampers made for the challenge, and some people made each layer completely different but still coordinating. I honestly didn't even consider that idea; I think with the time limit I was worried I wouldn't finish in time, so I just did what seemed like it would be the fastest. But I think next time I'll try something different for each of the layers. (I saw the absolutely cutest telescoping card made to look like a snowman; I think I'll be using that idea for some Christmas cards this year.)

This is a view of the card when it is completely open.
I left the bottom layer of my card pretty plain so there was room to write a message for the card recipient. But you could also do more stamping on the bottom layer and then use the back for a message.

To assemble the card, use brads to attach the bottom layer to the middle and then the middle layer to the top. the trick is to remember to attach the top edge of the bottom layer to the bottom edge of the middle layer and then the top edge of the middle layer to the bottom edge of the top layer. (Clear as mud?) So when the card is completely closed, the middle layer is actually upside down. And take your time when punching holes for the brads to be sure that they are opposite each other, or the card won't be straight when it is open. (My card is straight, I just don't have it sitting quite right in this picture.)

The last step is to add a tab at the top edge of the top layer to use for opening the card. This was the first time I've made a telescoping card, and it was much easier than I thought it would be. Give it a try!

I'm not sure how much time I'll have for writing blog posts in the next couple of weeks since I'm trying to get everything ready for my stamp-a-stack event in early September. I'll do my best to post every couple of days, but if you don't see anything for a bit, that's why. Thanks for stopping by!

Saturday, August 27, 2011

One more card set

After finishing my last card set yesterday, I decided I wanted to stamp another set today, but a set that was much easier to produce. I used pre-cut and -scored 3" x 3" cards and patterned paper -- two things that make it really simple to create a set of cards.

Supplies (all Stampin' Up!®, except crochet thread):
Stamps: Very Punny
Card stock: Whisper White, Daffodil Delight, Regal Rose, Old Olive, Pumpkin Pie, Pacific Point, Real Red, Rich Razzleberry, Melon Mambo, Brights Collection Patterns DSP Stack
Ink: Jet Black StazOn®, Daffodil Delight, Regal Rose, Old Olive, Pumpkin Pie, Pacific Point, Real Red, Rich Razzleberry, Melon Mambo, Blush Blossom, Early Espresso
Accessories: Aqua Painter®, crochet thread, Basic Rhinestomes,1-3/8" circle punch, Scallop Circle punch, Small Heart punch, Dimensionals

I really love this set of cards. They're simple, and there really isn't any "wow" factor to them, but they're cute and sweet, and sometimes that's all you need. I think the layout, bold colors, polka dot patterned paper and stamp set all work well together.

To color the images, I used an Aqua Painter and the individual ink pads. (Push down on the ink pad lid while it's closed, then open it and dip the Aqua Painter in the ink that is in the lid.) And they did need just a little embellishment, so I added a bit of crochet thread and a rhinestone in the corner of each card (a little bling is always good).

Since the cards turned out so cute, I didn't want the envelopes to be a plain, boring disappointment. So I used the Small Heart punch to punch two hearts out of the polka dot DSP for each color. Then I glued the hearts onto the front of the envelopes, so each card has a coordinating envelope (see photo below).

To package the cards, I made a simple gift box and glued one heart punch of each color on the box lid. I didn't take pictures of the box, but it's pretty basic. Maybe I'll show how to make the box in a future tutorial -- it's nice to be able to make an easy box in just about whatever size you need.

This type of card set is probably one of my favorite stamping projects. Once I decide on a layout, they are quick to create (not much thinking needed), but because each card is just a bit different, I don't get completely bored making them. And they're fun little gifts to have on hand. I think I now have four card sets ready to go, so I should be set for a while. Better start working on some other projects!

Thanks for stopping by!

Friday, August 26, 2011

Not so simple after all

Last weekend I pulled out my under-used Cricut to cut letters for name tags for work, and since I had everything set up and plugged in, I decided to incorporate it into some cards. I wish I used my Cricut cartridges more often for card-making, but I seem to have a hard time combining the cut-outs with my stamps and creating something I actually like. But one of the last cartridges I bought, "Just Because" Cards, is (obviously) designed for making cards. You can cut out the actual cards; various layers, including images, greetings and "punny" sayings; and even envelopes. So I decided to make a simple set of all-occasion notecards.

First of all, it took some trial and error to figure out which card sizes and shapes I could cut. (My Cricut only cuts up to 6" wide instead of 12".) But eventually I decided which card base and scalloped layer I wanted to use, and then I picked out patterned paper, colors and stamps. Here are the cards I created (I made two of each design for the full card set):

Supplies (all Stampin' Up!®, unless otherwise noted):
Stamps: So Happy for You
Card stock: Whisper White, Chocolate Chip, Brilliant Blue, Rose Red, So Saffron, Old Olive, Tall Tales DSP
Ink: Chocolate Chip, Brilliant Blue, Rose Red, So Saffron, Old Olive
Accessories: White grosgrain ribbon, Dimensionals, "Just Because" Cards Cricut cartridge (Provo Craft)

The So Happy for You stamp set seemed to fit really well with this patterned paper because it has a playful font and images. And I love that there is a different image to coordinate with each greeting. On the "thanks" card, I stamped the full butterfly image (with the dashed "flying line") once, and then I used markers to ink just the butterfly and stamp it additional times. The cards have a fairly simple layout, so for a little detail I added some white grosgrain ribbon and doodled a border around the white focal layer.

The cards took me a lot longer to make than they should have, so I was a little relieved to finally be done with them. I packed up my Cricut and all the accessories in the case and then realized that I forgot to cut out the envelopes. Argh! At that point I wasn't getting everything out again, so I decided to leave the cards and come back to them later ...

So tonight's project was to create envelopes for the cards. The cards are an odd size (about 5" long and 3 1/4" tall), so they don't really fit any pre-made envelopes I have. I also realized that I probably wouldn't be able to cut out envelopes with the Cricut after all, since I'd made almost the largest size card that I could, and the envelopes would have to be bigger. Instead I just made my own template (which was a little project in and of itself) and then manually traced, cut, scored and assembled all ten envelopes.

Supplies (all Stampin' Up!, unless otherwise noted):
Tall Tales DSP, Old Olive Patterns DSP, Simply Scored tool, Scor-Tape (Sookwang)

I used the Tall Tales DSP so the envelopes coordinate with the cards, and since the paper is double-sided, there's a fun print on the inside of the envelopes, too! I discovered, though, that I didn't have enough of the Tall Tales DSP to make all the envelopes. Argh (again)! Luckily I have a pack of Old Olive patterned paper, so I was able to make the last envelope and still have it coordinate (it's the green polka dot one on the right side). I used Scor-Tape to assemble the envelopes, and I also added a strip of Scor-Tape on the flap, so the backing just needs to be peeled off to seal the envelopes. Because some of the envelopes are darker colors, I am also including some blank white address labels with the card set so the recipient can use them for adding names and/or addresses on the envelopes. (The envelopes are 5 1/4" x 3 1/2" -- just over the postal service's minimum requirements of 5" x 3 1/2". Phew!)

So the supposed-to-be-simple card set is finally done, except for the packaging. Let's hope that doesn't become another project!

Wednesday, August 24, 2011

Ribbon barrettes: Part deux

I had so much fun making ribbon barrettes yesterday, that I had to make more this afternoon. Here is the second batch:

I'm seriously in love with making these! If I had more crafting space, I would have laid out all my ribbon and embellishments and just spent some time mixing and matching. I won't go into too much detail about these barrettes here since I included the tutorial in yesterday's post. But here are some close-up photos and the supplies used for each pair of barrettes.

Patriotic flowers supplies: Red stitched grosgrain ribbon (source unknown), Medium Heritage Sheer Blossoms and Leaves (Creative Impressions), Just Blooms (Close to My Heart), Primary brads (Making Memories)


Pink and yellow flower supplies: Uptown Red Elements Ribbon (American Crafts), Medium Tropical Iridescent and Small Tropical Sheer Blossoms and Leaves (Creative Impressions), Polo mini shimmer brads (Making Memories)


Orange and yellow flower supplies: Orange Essentials Elements Ribbon (American Crafts), Medium and Small Tropical Iridescent Blossoms and Leaves (Creative Impressions), Polo mini shimmer brads (Making Memories)


Pink gingham supplies: Pink Essentials Elements Ribbon (American Crafts), circle and flower buttons (Making Memories), crochet thread


I wish I knew more little girls to give these barrettes to. Actually, I wish I could think of something to make that would be a boy equivalent to these barrettes. Then I'd make these for the girls in my class and the other thing for the boys. Alas, I have yet to come up with any ideas.

Well, tomorrow I think I'll have to get back to some card making. Thanks for stopping by!

Tuesday, August 23, 2011

Ribbon barrettes tutorial

This afternoon I came home from work and sat down at my craft/dining room table to make some cute hair barrettes:


Decorative supplies (all Stampin' Up!®):
Masterpiece Ribbon Originals®, Elementary Ribbon Originals, Dress Up Ribbon Originals, Wisteria Wonder ruffled ribbon, Whisper White Baker's Twine, Sweet Pea stitched felt, Accents & Elements Fleurettes and Fleurettes II, Button Latte buttons, InColor printed brads

I've wanted to make some of these barrettes for awhile now. One of the girls in my toddler class wears barrettes like these, and I thought they would be fun gifts for my cousins' little girls. I even had most of the supplies; I just needed the clips. The problem was that I didn't know what the clips were called. I tried a few different online searches, but I wasn't coming up with what I needed. Then one day I happened to mention my idea to a coworker who used to work in a salon, and she steered me in the right direction -- they're single-pronged curl clips.

Anyway, with that problem solved I ordered the clips and started working on them today. I would say that each pair took only about five to ten minutes to make (not including the time it took me to decide which ribbon and embellishments to use!) so they're really quick, easy and cute! I've seen tutorials for making these barrettes on other blogs, but I thought I'd take a stab at creating my own tutorial.

You will need:
2 single-pronged curl clips
2 4-1/2" pieces of ribbon (the best width is 3/8"; Here I used the So Saffron ribbon from the Dress Up Ribbon Originals.)
2 desired embellishments (Here I used two large and two small buttons from the Button Latte set tied together with Whisper White Baker's Twine.)
Adhesive (I used a hot glue gun.)

Step 1
Hold the clip open and run adhesive along the inside of the top side of the clip. In this picture the top of the clip is in the back.

Because I was working with a hot glue gun, I applied the glue a little bit at a time so the glue didn't become too cool.
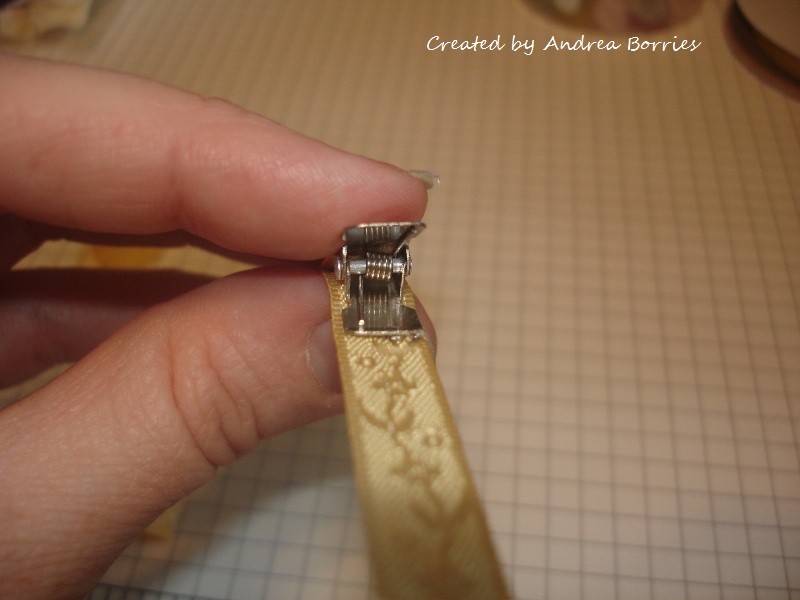

Step 2
Place the end of the ribbon in the clip close to the spring and press it into the glue. Be sure to place the back side of the ribbon on the glue. In this picture the top of the clip is in the front.


Step 3
Apply glue to the top of the clip, fold the ribbon over and press it into the glue. Be sure to align the sides of the ribbon and crease the folded end. Then glue the ribbon to the top of the spring end of the clip.


Step 4
Place glue inside the spring end of the clip, but not on the spring itself. As you press the ribbon into the glue, be sure to push it down between the ends of the clip so it touches the spring.


Step 5
Glue the end of the ribbon to the back of the clip. At this point I applied the glue directly on the ribbon instead of on the clip so I didn't apply too much glue.


Step 6
Glue the desired embellishments onto the front of the clip. Repeat the process for the second barrette. Note: The childcare teacher in me needs to point out that although hot glue is strong, the embellishments could be pulled off and become a choking hazard. Keep that in mind if you have an infant/toddler who likes to put things in her mouth.


I hope that tutorial was helpful. (It's my first one, so it was a bit of trial and error. It's tricky to take pictures while trying to use a hot glue gun!) Here are a couple of close-up pictures of all four sets of barrettes that I made:


I'm already thinking about all the other types of embellishments I could use for these barrettes. (You can see some additional barrette designs in another post on my blog.) Thanks for stopping by!

Sunday, August 21, 2011

Christmas in August

So that doesn't have quite the same ring as "Christmas in July," but, well, I missed that boat. It dawned on me last week that the summer is almost over, and I haven't worked on any Christmas cards. Once fall starts, things seem to get really crazy, and I've discovered that it's easier to get my Christmas cards (about 60 - 75 of them) done if I start making them, or at least start coming up with ideas, during the summer. Of course, it can be a challenge to think about winter when you're sweltering in 90°+ heat, and the humidity is so high that you feel like you're swimming as soon as you step out the door. Thankfully, the weather has been more enjoyable lately, so it's possible to see beyond shorts and t-shirts.

I came up with two Christmas card designs today. The first one is a pretty traditional card with a vintage feel:

Supplies (all Stampin' Up!®):
Stamps: Holiday Best
Card stock: Cranberry Crisp, Soft Suede, Very Vanilla
Ink: Cranberry Crisp, Soft Suede
Accessories: Vintage Wallpaper embossing folder, Basic Pearls, Cranberry Crisp stitched grosgrain ribbon, Dotted Scallop Ribbon Border punch, Scallop Edge Border punch, Decorative Label punch, Scallop Oval punch, Dimensionals

I stamped the focal image in Cranberry Crisp and Soft Suede and then cut the "Merry Christmas" greeting out of the Soft Suede piece and adhered it to the Cranberry Crisp image with a Dimensional. The scallops behind the focal image are from a scalloped oval, which I punched out of Soft Suede, cut in half and glued behind the top and bottom of the focal image. I used two additional Soft Suede accents: one piece, punched with the Dotted Scallop Ribbon Border punch, behind the ribbon and other piece, punched with the Scallop Edge Border punch, along the bottom of the card front. I added a few pearls on the embossed background and on the stamped focal image. I like the simple elegance (elegant simplicity?) of this card.

My second Christmas card of the day is much less traditional:

Supplies (all Stampin' Up!):
Stamps: Peaceful Season, Sage Advice
Card stock: Baja Breeze, Cherry Cobbler, Very Vanilla
Ink: Baja Breeze, Basic Gray
Accessories: Cherry Cobbler seam binding ribbon, Basic Pearls, Owl Builder punch, Ticket Corner punch, Dimensionals

Now I like Santa, snowmen and cute Christmas critters as much as anyone. But I really wanted to make a Christmas/holiday card that was meaningful and thoughtful, just not necessarily religious. (Inside the card is stamped "May love and joy live in your heart long after the season is past.") I really like the idea of this card, but I'm not quite sure this is the right layout. Or maybe the color combo is off (Baja Breeze, Cherry Cobbler, Basic Gray). When I have time I'll have to try making a few different versions and see which I like best.

I hope I've given you a little inspiration for your own holiday cards. Thanks for stopping by!

Friday, August 19, 2011

Back to school

When I was a kid I always loved getting ready to go back to school. Not that I wanted summer vacation to be over, but going back to school meant all kinds of newness: a new season; new clothes; new teachers, classes and friends; and, maybe most importantly, new school supplies. Walking up and down the aisles of school supplies at Target was -- and still is -- a little like being in a candy store. Picking out new notebooks, folders, binders (Trapper Keepers, anyone?), pens, pencils, crayons, markers. I would organize everything in my new backpack -- and then probably reorganize it a dozen more times before school actually started. Oh, the good ole' days.

This fall one of my cousins' daughters will be starting kindergarten. I thought it would be fun to send her a card to celebrate the occasion:

Vintage-looking card with embossed striped background and image of two kids ready for school.
Supplies (all Stampin' Up!®):
Stamps: Greeting Card Kids, Sweet Shoppe Alphabet Upper and Lower, School Lines
Card stock: Cherry Cobbler, Very Vanilla, Early Espresso
Ink: Early Espresso, Cherry Cobbler; Markers: Cherry Cobbler, Daffodil Delight, Marina Mist, Bashful Blue, Blush Blossom, Blushing Bride, Close to Cocoa, More Mustard, Creamy Caramel
Accessories: 2-1/2" circle punch, Itty Bitty Shapes punch pack, Perfect Pennants die, Stripes embossing folder, So Saffron 3/8" taffeta ribbon, Basic Pearls, Dimensionals, Glue Dots®, sponges

For the focal point I stamped one of the images from the Greeting Card Kids set, colored it with markers, punched it out with the 2-1/2" circle punch and matted it with a scallop circle from the Perfect Pennants Big ShotTM die. I used the Sweet Shoppe Alphabets (upper and lower) to spell out her name on the School Lines stamp. I love how the letters fit perfectly on the lines; I was able to eyeball the placement and managed to get the letters pretty straight. I also sponged Early Espresso ink on the edges of that piece, as well as on the focal image. I embossed the Cherry Cobbler card base with the Stripes embossing folder and wrapped a piece of So Saffron taffeta ribbon around the front. A few small flower punches, slightly crumpled and with pearls in the centers, add a cute little detail.

All this talk of school really makes me want to hit the back-to-school sales. I might just need a new pack of pens.

Wednesday, August 17, 2011

Trick or treat!

Yes, I realize that Halloween is still more than two months away. But any good crafter needs to get a jump on the holidays if she wants to have time to make cards and/or gifts and get them sent before the big day arrives. But in this case, I'm not really that much ahead of the game. As I've mentioned in earlier posts, I'm planning a stamp-a-stack event for early September. As part of that event, everyone will get to make one of these quick and easy Halloween treat bags:

Supplies (all Stampin' Up!®):
Stamps: Spooky Bingo Bits
Card stock: Whisper White, Pumpkin Pie, Lucky Limeade
Ink: Early Espresso
Accessories: 1" x 8" cellophane bags, 1" and 1-3/8" square punches, Early Espresso 1/8" taffeta ribbon, Dimensionals

They really are quick and easy -- I think I made all three of these from start to finish in probably about half an hour (and that includes some time to hem and haw about colors; once that decision is made, they go even faster). The Spooky Bingo Bits stamp set, which works perfectly with the 1" square punch, has great images for treat bag toppers -- and there are 24 different images to choose from!

But the most important part, of course, is what's inside the treat bags: Jelly Belly jelly beans. After chocolate, Jelly Belly jelly beans (not just any old jelly beans) are one of my favorite candies. So many yummy flavors (Pink Grapefruit! Juicy Pear! Kiwi! Dr. Pepper!) and colors that will coordinate with just about anything. For this project, I chose A&W Root Beer, Sunkist Tangerine, French Vanilla and Juicy Pear. (I was limited by the selection that was available at Target, but I think these colors worked out well.) And they're the perfect size for these new treat bags. Now I just have to leave the containers closed until the stamp-a-stack. Maybe I could eat just one ... or one of each flavor to keep it even ...

Disclaimer: I have not received any sort of compensation, monetary or otherwise, from the Jelly Belly company. Though I would gladly accept some free jelly beans. Just sayin'.

Tuesday, August 16, 2011

Short and sweet

I have just a short post today. This is a really quick and easy card I made last weekend:

Supplies (all Stampin' Up!®):
Stamps: Array of Sunshine
Card stock: Whisper White, Basic Gray, Daffodil Delight
Ink: Real Red, Daffodil Delight, Rich Razzleberry, Tangerine Tango, Lucky Limeade
Accessories: Vintage Wallpaper embossing folder, Basic Gray satin ribbon

I used three small pieces of a sheet of Whisper White card stock that I had filled with images from the Array of Sunshine stamp set. (Another piece of this Array of Sunshine sheet was used in one of the cards in my August 13 post.) I matted each piece with Basic Gray and adhered them to a Daffodil Delight card that was embossed with the Vintage Wallpaper embossing folder. Then I tied a piece of Basic Gray ribbon around the card front. Easy peasy - and pretty cute! Hope you liked it!

Monday, August 15, 2011

Two challenges in one

Look at me - back to the challenges! Now I've made three challenge cards in about a week. Woohoo! And with this card I was able to meet two challenges: Sketch Challenge 345 on SCS and the Thinking of You Creative Challenge on SoShelli.com (the blog of Shelli Gardner, the co-founder and CEO of Stampin' Up!®). It's also a card that's going in my next package for Operation Write Home. So here's my creation:

Supplies (all Stampin' Up!):
Stamps: Just Believe, Sincere Salutations
Card stock: Whisper White, Not Quite Navy, Old Olive, Paisley Petals DSP
Ink: Not Quite Navy, Baja Breeze, Old Olive, Always Artichoke
Accessories: Corner rounder, 1-3/8" circle punch, Whisper White taffeta ribbon, Blender Pens, Basic Pearls, Dimensionals

To make the focal image, I colored directly on the stamp with Baja Breeze and Old Olive markers then stamped the image. I then used a Blender Pen with Not Quite Navy and Always Artichoke inks on the stamped image to add some shading to the flowers and leaves. I used the Rock 'n' Roll technique for the circle image; I inked the stamp with Baja Breeze, rolled the edges of the stamp in Not Quite Navy and then stamped on Whisper White. A little ribbon and a few pearls are the perfect soft accents.

Thanks for stopping by!

Sunday, August 14, 2011

Cards for a good cause

I donate money to quite a few different charities through the mail. (As a result I already have about eight 2012 calendars and enough address labels to last two lifetimes - and I'm sure I've recycled about twice as many. Seriously.) One charity I donated to for the first time this summer is Operation Write Home. But I didn't donate just money, I donated cards, too.

Operation Write Home is an organization that supports American armed forces stationed overseas by sending them blank handmade greeting cards for them to send home to friends and family, as well as cards of gratitude to encourage them. It's the perfect thing for me: I can make all the cards I want, and when my own "stash" is full, I can donate them to a great cause where I know they'll be used and appreciated. And since they collect and send out cards on an ongoing basis, I don't have to worry about meeting a deadline or making a certain number of cards. My first package included twenty cards for different occasions, and this weekend I started working on my second donation (four cards done so far!).

For more information about where to send your cards, what types of cards are needed, etc., check out the  Operation Write Home Web site. And the next time you're looking way for a way to make a difference and be creative at the same time, consider making cards to donate to Operation Write Home!

Saturday, August 13, 2011

Is that your final answer?

I am a bad decision maker. I don't mean that I make bad decisions (at least not too often, I hope). But sometimes I have a ridiculously hard time making decisions. This morning I thought I had my card designs all set for the September stamp-a-stack I'm planning; I was just going to make new samples and polish them up a bit. But then I started playing with colors and embellishments and all that good stuff. And suddenly I can't decide: this ribbon or that ribbon? This punch or that punch? Argh. The basic card designs stayed pretty much the same, but the little details were giving me fits.

So right now, these are the three card designs I'm working with:

I won't give you the full supply list, but the Stampin' Up!® stamp sets used are Pennant Parade, Array of Sunshine and French Foliage. I like these designs, and they're definitely appropriate for different occasions. But I still can't quite commit to them. Maybe they're too plain. Or maybe I think I'll come up with something I like better. Who knows. But I need to decide in the next couple of days so I have enough time to order all the supplies and get everything prepared.

At this point, unless I have a very sudden and significant burst of inspiration within the next forty-eight hours or so, I'll probably use these designs as my basis for ordering. But I won't be surprised if the final cards end up looking just a bit different from these.

Thursday, August 11, 2011

New stamping goodies

Since it's been back to work for me this week, I haven't been able to do nearly as much stamping as I'd like. Sigh. Although my stamping time has been limited, I have been enjoying playing with my new goodies that arrived on Monday. Here is my first card:

Supplies (all Stampin' Up!® unless otherwise noted):
Stamps: Array of Sunshine, Pursuit of Happiness
Card stock: Whisper White, Early Espresso
Ink: Real Red, Daffodil Delight, Lucky Limeade, Melon Mambo, Regal Rose, Rich Razzleberry, Early Espresso marker
Accessories: Real Red satin ribbon, Designer Label punch, Styled Silver Hodgepodge Hardware, crystal brads (Making Memories), Basic Rhinestones, Dazzling Details, Mini Glue Dots®, Stampin' Dimensionals®, Color Spritzer Tool

I used the new hostess set Array of Sunshine (I love these solid, bold flowers!) and stamped the images all over a sheet of white card stock. I intended to cut up the sheet and use it on multiple cards for a one-sheet wonder technique, but I ended up cutting out some of the flowers from the rest of the sheet to use as a focal point on this card. (Sometimes stamping sacrifices have to be made ...)

It's hard to see in the picture, but on the main red flower, I cut out each of the three layers and adhered them together with Mini Glue Dots, then the whole flower is popped up with a double layer of Stampin' Dimensionals. The two yellow flowers and the leaves are cut out and then adhered with a single layer of Dimensionals, so there are several different levels of height. I punched out the greeting with the Designer Label punch and added a frame from the Styled Silver Hodgepodge Hardware. A rhinestone, some Dazzling Details and a couple of crystal brads add a little sparkle to this card.

I hope I'll be able to make some more cards tonight. Thanks for stopping by!

Tuesday, August 9, 2011

Pennant banner

In September I am holding a stamp-a-stack workshop, and everyone will be making twelve cards: four each of three different designs. I'm planning to make the designs appropriate for all occasions and then provide a few different sentiments so the cards can be customized a bit. This is one of the designs I'm thinking about using:

Supplies (all Stampin' Up!® except crochet thread):
Stamps: Pennant Parade
Card stock: Whisper White, So Saffron, Wisteria Wonder, Certainly Celery, Pool Party
Ink: VersaMark®, Wisteria Wonder
Accessories: Wisteria Wonder ruffled ribbon, crochet thread, Petite Pennant Builder Punch, Jewelry Tag punch, Dotted Scallop Ribbon Border punch, Itty Bitty Shapes punch pack, 1/16" hole punch, mini silver brads

I made this card appropriate for a birthday, but I also have sentiments for the tag that say "hello," "baby," "friends," or "thanks so much." I was able to include some new goodies on this card since I received my new Stampin' Up! order yesterday (yippee!): the tiny silver brads on the pennants and the Wisteria Wonder ruffled ribbon (try saying that out loud without sounding like Elmer Fudd). I like the soft colors and clean white background of this card, but I still have to create a few other designs, so we'll see if this one makes the final cut.

Thanks for stopping by!