Wednesday, July 31, 2013

Empty nests

A few weeks ago I mentioned in one of my posts about the bird nests being constructed on either side of our house. Well, it appears that all the baby birds have spread their wings and flown off as both nests have been empty since earlier this week. I didn't get pictures of the house finches -- their nest was squished between the air conditioner and the window frame in my sister's bedroom, so you could only really see them by standing on a stool next to the window and looking straight down; not the best photo set-up. I was, though, able to take several photos of the robin nest outside our dining room window, from the early stages of nest building to the almost-ready-to-fly babies. (I wish the lighting had been better, but the nest was shaded under the eaves, and I didn't want to use my flash and have it reflect off the window and/or scare the robins.)

June 23, 2013: Day one of nest building. Doesn't look like much, does it?

June 24, 2013: Day two. The nest is taking shape.

June 25, 2013: Day three, and the nest is complete. Wish you could build a house in three days?

July 5, 2013: We couldn't see into the nest, but we assume by this point that there were eggs in there. One day while the female robin (I think it was the female, anyway) was sitting on the nest, the male flew up and brought her some food. So maybe those cravings aren't unique to humans ...


July 22, 2013: New babies! They hatched sometime while I was at the Stampin' Up! convention -- my sister thought it might have been on July 17, the day I left -- and this was the first chance I had to get pictures. In the left picture you can see a little bald bird head, and in the right picture there is a little beak poking out. There were two babies in the nest.


July 28, 2013: Just a week later, and it's hard to believe how much the babies changed. When they stood up, like in these pictures, they looked huge. But they could still hunker down so far in the nest that we couldn't even see them. And it was funny to watch their "sibling rivalry" as they pushed and shoved each other in the nest. This was actually the last day we saw the robins. Sometime that night or early the next day, they were off on their own adventures. What an amazing nature lesson!

Thanks for stopping by!


Monday, July 29, 2013

Hello, Lovely

One of the stamp sets Convention attendees received as part of their registration was Hello, Lovely. I really liked this set when I first saw it in the catalog, so I was excited to get it. But when I sat down to actually use it, I was a little stumped. So to get the creativity ball rolling, I decided to start with my old reliable layout.

Supplies (all Stampin' Up!):
Stamps: Hello, Lovely; Sweet Essentials
Cardstock: Wild Wasabi, Very Vanilla, Basic Black
Ink: Jet Black StazOn, Wild Wasabi, Pistachio Pudding
Accessories: 1" square punch, rhinestones

I think this card is pretty self-explanatory, but I will mention that I cut out the stamped squares by hand and then layered them on the 1" punched black squares. Although it's a simple design, I think a group of these cards in different colors with different sentiments would make a great card set.

Supplies (all Stampin' Up!):
Stamps: Hello, Lovely; Gorgeous Grunge; Sweet Essentials
Cardstock: Whisper White
Ink: Baked Brown Sugar, Pistachio Pudding
Accessories: Decorative Label punch, Textured Impressions embossing folder, Candy Dots - Subtles, Soft Suede taffeta ribbon, Stamp-a-ma-jig, Dimensionals

I kept the background simple for this card with just a few stamped splatters and an embossed border. To make the focal point, I applied ink to only the frame portion of the image, stamped it, added the greeting inside the frame and then punched it out. I added ribbon tabs and Candy Dots and used Dimensionals to adhere it over the splatters.

Supplies (all Stampin' Up!):
Stamps: Hello, Lovely; Gorgeous Grunge
Cardstock: Whisper White, Summer Starfruit, Coastal Cabana
Ink: Summer Starfruit, Coastal Cabana, Gumball Green, Basic Gray, Smoky Slate
Accessories: 1-1/4" scallop circle punch, Petite Curly Label punch, rhinestones, Stamp-a-ma-jig, Dimensionals

This card was fun but definitely outside of my comfort zone. I started by stamping the row of arrows along the left side of the card (with the help of my Stamp-a-ma-jig). I used the Gorgeous Grunge stamp set to add a few colorful background elements. For the focal point, I stamped the sentiment in Basic Gray and cut it out. I punched a scallop circle out of Summer Starfruit cardstock, cut it in half and adhered the halves to the top and bottom of the sentiment. I used Dimensionals to adhere the focal piece to the card, and for an extra accent I added an arrow pointing to the sentiment.

Thanks for stopping by!


Sunday, July 28, 2013

Yippee skippee!

At the end of the closing general session of the Stampin' Up! Convention, all attendees received the stamp set Yippee-Skippee! I was excited to get that set because although I really liked a few of the greetings in the set, I wasn't sure about the others, so it was a stamp set I might not have bought myself. And after playing with it this weekend, I was really glad we received it. So, yippee skippee!

Supplies (all Stampin' Up!):
Stamps: Yippee-Skippee!; Gorgeous Grunge; Hello, Lovely
Cardstock: Soft Suede, Whisper White, Real Red
Ink: Soft Suede, Real Red, Crushed Curry, Bermuda Bay
Accessories: Sweet Buttons Embosslits die, Candy Dots - Subtles, paper-piercing tool, Stamp-a-ma-jig, Dimensionals

I have to say that I am really proud of this card, and I love how it turned out. Using my markers and Stamp-a-ma-jig, I combined two of the greetings I wasn't sure I would use -- "Never underestimate the power of two" and "I freakin' love you!" -- into one greeting I love -- "Never underestimate the power of you!" Seriously, I smile to myself when I look at this card. I left the inside blank because I thought this could be a great card either to encourage someone who is going through a rough time or to congratulate someone on a graduation, new job or other accomplishment. A few other details: I used a faux button to fill the extra space in the greeting (the holes in the button were made with a paper-piercing tool), and I love that the yellow Candy Dots, which are actually So Saffron, coordinate with the Crushed Curry ink. (One last grin. Okay, moving on ...)

Supplies (all Stampin' Up!):
Stamps: Yippee-Skippee!, Flower Shop
Cardstock: Soft Sky, Crushed Curry, Gumball Green
Ink: Tempting Turquoise, Crushed Curry, white gel pen
Accessories: Pansy Punch, Bird Builder punch, Brights Designer Buttons (retired), white baker's twine

I used a card on Page 37 of the 2013 - 14 Annual Catalog as inspiration for this layout. (Go on, go ahead and look for yourself.) If you're ever stumped for a card layout or color combo, that's a great place to start. For my card I used a Soft Sky card base to look like, well, the sky and added faux stitching around the edges of the card with a white gel pen (sorry it's nigh on impossible to see in this photo). I used a Tempting Turquoise button for the center of the flower and also stamped the greeting in that color. I rarely use Tempting Turquoise, but I like how it pairs with Soft Sky. The wing on the Bird Builder punch worked beautifully to create the leaf for my flower stem. I had the perfect birthday greeting to coordinate with the sentiment on the outside of this card, so inside the card reads, "Wishing you the happiest birthday yet!"

Stamps (all Stampin' Up!):
Stamps: Yippee-Skippee!
Paper: Crumb Cake, Basic Gray cardstock; This and That Epic Day Designer Series Paper (DSP)
Ink: Basic Gray
Accessories: Petite Pennants Builder punch, mini silver brads, linen thread, paper-piercing tool and mat, Essentials Paper-Piercing Pack, Glue Dots, Mono Multi liquid glue

I have a tendency to make most of my thank-you cards very floral and girly, so I wanted to make something a little more gender-neutral with this card. I punched five triangles out of the Epic Day DSP, decided how I wanted to arrange them for the banner and then used my paper-piercing tool to make holes for the brads. For the three triangles in the middle, I pierced a hole in both of the top corners; for the two end triangles, I pierced a hole only in the inner corner. I connected the triangles with mini silver brads and attached the two outer triangles to the card with Glue Dots. I also added a Glue Dot behind the middle triangle to keep the banner from shifting. I tied two bows with linen thread and used Mono Multi liquid glue to glue them to the ends of the banner. If you are feeling ambitious, you could pierce holes in the card front and actually tie the banner to the card; I went with the faster and easier method.

Supplies (all Stampin' Up! unless otherwise noted):
Stamps: Yippee-Skippee!, Storybook Friends, Gorgeous Grunge
Cardstock: Pacific Point, Baked Brown Sugar, Whisper White
Ink: Jet Black StazOn, Pacific Point, Baked Brown Sugar, Blushing Bride
Accessories: Pacific Point stitched grosgrain ribbon, linen thread, Argyle embossing folder, 1" circle punch, Itty Bitty Shapes punch pack, Crop-A-Dile (We R Memory Keepers), Dimensionals

Last, but certainly not least, is a card featuring the eponymous stamp from the Yippee-Skippee! stamp set. I thought this excited little puppy would be perfect for the sentiment; in fact, the puppy image actually includes the word "yippee!" but I just omitted that when I stamped it. To accent the focal layer, I punched two 1" circles from Pacific Point card stock, scored them and folded them in half. I adhered the folded circles on either side of the focal image and then punched a hole in each one with a Crop-A-Dile. I threaded the ribbon through one hole, wrapped it around the card front, threaded it through the other hole and then attached the layer to the card with Dimensionals. (You can attach the layer first, but it's a little easier to work with the ribbon this way.) I tightened the ribbon, used pieces of linen thread to secure it on either side and then trimmed the ends. I stamped a birthday greeting ("Birthdays are the best") inside this card, but it could also be a fun, whimsical congratulations or baby card.

I had such a fun weekend making cards with my new stamp sets from Convention. I have more to post tomorrow and then on Thursday -- to celebrate my blog's third birthday. Thanks for stopping by!

Friday, July 26, 2013

Color Me Christmas

At Stampin' Up! Conventions each attendee receives a colored wristband, and you win a prize if your color is announced. My first two Conventions, nothing. but this year, in celebration of the 25th anniversary, every color was a winner! I won three products from the Holiday Catalog: the Color Me Christmas stamp set, Season of Style Designer Series Paper (DSP) and Frosted Finishes embellishments. Here are my first few projects with the stamp set and DSP.

Supplies (all Stampin' Up!):
Stamps: Color Me Christmas
Paper: Whisper White, Crumb Cake, Cherry Cobbler cardstock; Season of Style DSP; red glimmer paper
Ink: Jet Black StazOn, Baked Brown Sugar, Chocolate Chip, Crumb Cake, Cherry Cobbler, Old Olive
Accessories: Northern Flurry embossing folder, Ovals Collection Framelits dies, Cupcake Builder punch, Cherry Cobbler baker's twine, rhinestones, Glue Dots, Dimensionals

I love just about any reindeer stamps, so this little guy was the first image I used from my new set. Just basic stamping and coloring for the focal image, but I did have to give him a shiny red nose -- the little circles on the Cupcake Builder punch and red glimmer paper were the perfect combo. I used the Oval Collection Framelits dies to cut out the focal image and a mat and adhered both pieces over a strip of chevron DSP on an embossed background. I used two pieces of Cherry Cobbler baker's twine to tie a bow and adhered it to the bottom of the focal image with a Glue Dot.

Supplies (all Stampin' Up!):
Stamps: Color Me Christmas
Paper: Whisper White, Cherry Cobbler, Crumb Cake cardstock; Season of Style DSP
Ink: Jet Black StazOn, Crumb Cake, Cherry Cobbler, Old Olive
Accessories: Perfect Pennants die, paper-piercing tool, Cherry Cobbler baker's twine, Dimensionals, Mono Multi liquid glue

These 3" x 3" cards would be perfect to tuck into a gift bag or to use as a tag on a present. On the left card, the present is paper-pieced; I stamped the image on two different DSP patterns, cut apart the appropriate parts of each image and glued them together. On the right card I colored the image with markers and then cut it out. With Dimensionals I adhered both presents to scalloped circles cut out with the Perfect Pennants die (for the left card I used a paper piercer to add the holes in the scallops) and then adhered the circles to the card bases.

Supplies (all Stampin' Up!):
Stamps: Color Me Christmas
Paper: Whisper White, Cherry Cobbler, Crumb Cake cardstock; Season of Style DSP
Ink: Jet Black StazOn, Crumb Cake, Cherry Cobbler, Old Olive, Chocolate Chip
Accessories: Ovals Collection Framelits dies, Occasions Paper-Piercing pack, paper-piercing tool and mat, Cherry Cobbler seam binding ribbon, rhinestones, Dazzling Details, Dimensionals

The middle piece of DSP on this card is 3" wide, and each side piece is 1" wide. I die cut an oval from the middle of the large piece and pierced a border around the oval. (I was disappointed that the paper piercing isn't more noticeable, but the pattern on the DSP camouflages it.) I stamped, colored and cut out the focal image, added Dazzling Details to the ornaments and star, and adhered the tree in the cut-out oval. I like the layout of this card, but something seems off to me; I may have to make another version with different DSP patterns.

Thanks for stopping by!

Thursday, July 25, 2013

Convention memories

It's taken me a few days to get back into the swing of things, but today I finally had time to sit down in my craft room after work and make some cards. I'll post them tomorrow, but first I wanted to share a few of my favorite photos from Convention.

Ready for the fun to begin! My three roommates, Tina, Faith and Jackie.

Masses of Convention-goers waiting to get into the opening general session. I was sort of in the middle of this "line"; it went quite a ways in either direction. I was really glad I don't have an issue with being in large crowds.

Convention friends Cassie and Sandy.

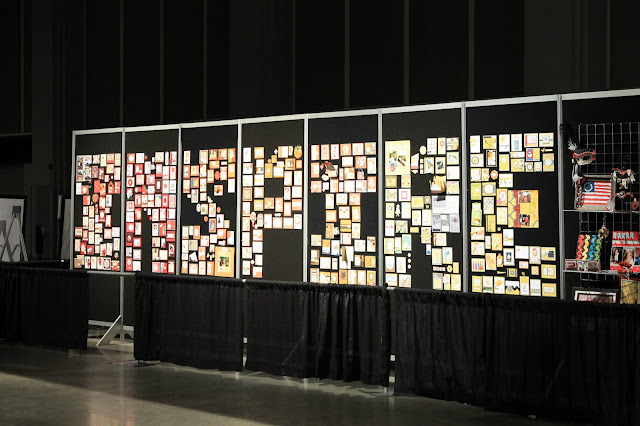
Display boards are always a highlight of any Stampin' Up! event, and at past Conventions I took dozens of pictures of the amazing samples. But I've realized that I rarely go back and look at those pictures, so this year I decided to focus on observing and absorbing. I did snap a photo of this Stampin' Up! product display because I love that little banner made with the Mosaic punch.

One cool feature of the display boards was that the samples were arranged to spell different words.


The 25th anniversary party included delicious treats. These fancy cupcakes tasted as good as they looked (I tested a few different kinds to make sure).

The entertainment included an aerial artist, an '80s cover band called The Spazmatics and carnival-style games. It was a lot of fun, but definitely a bit of sensory overload.

After the closing general session on Saturday we wanted to go to The Cheesecake Factory for dinner, but we were told that the wait for a table of eight was three to four hours. (That's what happens when almost 6,000 demonstrators are unleashed on the city.) So we went to the more-like-fast-food Johnny Rockets instead, and even then the two demonstrators who had joined our group decided to leave before we were seated. Despite all the waiting, we ended up having a great time.

That's another Stampin' Up! Convention in the books. I hope to see these beautiful faces next year. Thanks for stopping by!

Sunday, July 21, 2013

Convention roommate gifts

Whew! I'm back home from a fabulous, fun and exhausting time at Stampin' Up!'s 25th anniversary Convention in Salt Lake City. It was wonderful to spend time with friends, see stamping demonstrations, learn about new products and, of course, get free goodies! Now that Convention is over, I'm going to work on getting back to my regular blog posts, so I wanted to start by sharing the gifts I made for my three awesome roommates and another good friend I look forward to seeing at Convention.

Supplies (all Stampin' Up! except "Other supplies"):
Ink: Whisper White craft ink
Paper: Polka Dot Parade Designer Series Paper (DSP); Whisper White, Gumball Green, Rich Razzleberry, Real Red, Daffodil Delight, Pumpkin Pie cardstock
Accessories: On Board chipboard (Blossoms and Basics, Trimmings and Loads of Letters), 7/8" scallop circle punch, 1-1/4" scallop circle punch, Crop-a-dile, Floral Frames Framelits dies, Perfect Polka Dots embossing folder, Simply Scored tool, stitched Gumball Green ribbon, white baker's twine, Rich Razzleberry taffeta ribbon, Pumpkin Pie taffeta ribbon, Real Red 1/8" taffeta ribbon, pewter jumbo eyelets, Brights Designer Buttons (retired), Winter White embossing powder, Sticky Strip, Mono Multi liquid glue, Dimensionals
Other supplies: 4" round cork mats, thumbtacks, magnetic discs, metal rings, thin cardboard

Each set included three coordinating items: a monogram tag for the recipient's Convention bag, a mini
corkboard and a magnetic bookmark. I don't have step-by-step instructions, so if you have specific questions, post a comment below and I will respond as soon as I can. I do, though, have a few tips and tricks:
  • For the corkboards, I used the largest Floral Frames Framelits die to cut a flower out of DSP and out of thin cardboard (I used a cereal box from the recycling bin). Use Mono Multi liquid glue to adhere the DSP to the cardboard so the plain side of the cardboard is showing on the back.
  • The buttons are attached to the thumbtacks with Dimensionals.
  • I posted instructions for making the magnetic bookmarks in a previous post (April 29, 2012). For these bookmarks I used magnetic discs instead of strips.
  • The letters on the tags are covered with two or three layers of Whisper White craft ink and then embossed with Winter White embossing powder.

To package the gifts I put the items in a cellophane bag and added a coordinating ribbon. (And I made sure to pack them in my checked baggage because I wasn't sure they were acceptable in a carry-on.) I think everyone liked their gifts, and I had fun making them. Can't wait to make roommate gifts for the next Convention! Thanks for stopping by!


Sunday, July 14, 2013

Cards for a cause

I'm in the final countdown before the Stampin' Up! convention, and today I made a few cards to bring with me to donate to Ronald McDonald House Charities (RMHC). Each year Stampin' Up! designs a special stamp set to benefit RMHC, so I decided to use two of the previous sets to make my cards. (I apologize for the less-than-stellar photos; the sun was already down and I didn't have a lot of time to perfect the lighting.)

Supplies (all Stampin' Up!):
Stamps: Moving Forward
Cardstock: Very Vanilla, Bermuda Bay
Ink: Bermuda Bay, Real Red, Crushed Curry, Chocolate Chip
Accessories: Cloudy Day embossing folder, Circles Collection Framelits dies, Crushed Curry polka dot ribbon, Dimensionals

I applied ink with markers directly on the stamp to create the multicolored focal image. After die-cutting the image, I used the Chocolate Chip marker to add faux stitches around the edge. For the background I used the Cloudy Day embossing folder, wrapped the layer with Crushed Curry polka dot ribbon and added two ribbon tails. I used Dimensionals to adhere the focal image over the ribbon.

Supplies (all Stampin' Up!):
Stamps: Moving Forward
Cardstock: Very Vanilla, Old Olive, Strawberry Slush
Ink: Strawberry Slush, Basic Gray, Old Olive, Crushed Curry
Accessories: Perfect Polka Dots embossing folder, Delicate Designs embossing folders, Large Scallop Edgelits die, 2-1/2" circle punch, Basic Gray stitched grosgrain ribbon, Dimensionals

For the background I started with an Old Olive card base embossed with polka dots. I trimmed some cardstock off the bottom edge of the card front and adhered to it a die-cut and embossed piece of Strawberry Slush cardstock. I hid the seam between the pieces with Basic Gray stitched grosgrain ribbon and used Dimensionals to add the focal image.


Supplies (all Stampin' Up!):
Stamps: Turtle & Co., Flower Shop
Cardstock: Very Vanilla, Primrose Petals, Wild Wasabi
Ink: Jet Black StazOn, Wild Wasabi, Primrose Petals
Accessories: Modern Label punch, corner rounder, Candy Dots - Subtles, Dimensionals

I created a simple background for this card by repeatedly stamping one of the images from the Flower Shop set. I matted the focal image with Primrose Petals cardstock and then adhered the punched-out greeting so it overlapped the right edge of the focal piece.

Thanks for stopping by!

Wednesday, July 10, 2013

Keep calm

I have a lot of frustrations going on with work right now, so although I wanted to stamp cards today, I just wasn't feeling up to it. What I really wanted to do was pound something. A lot. Like a giant mound of clay. Or throw paint at a massive white wall. Sadly, those options weren't available. Instead I put to use some craft supplies I do have on hand and made this magnet:

Supplies (all Stampin' Up!® except "Other"):
Stamps: Carry On
Cardstock: Whisper White, River Rock, textured Cherry Cobbler
Ink: Midnight Muse, River Rock
Accessories: Labels Collection Framelits dies, Festive Paper-Piercing Pack, paper-piercing tool and mat, Photo Corners punch, rhinestones, Cherry Cobbler seam binding ribbon, Stamp-a-ma-jig, Mono Multi liquid glue
Other: 3-1/2" square magnetic acrylic photo frame, 1/2" magnetic buttons

I know a lot of people are over this phrase or never really cared for it in the first place, but it seemed appropriate for me today. I started with a 3-1/2" square of River Rock cardstock and glued a punched photo corner (textured Cherry Cobbler cardstock) in each corner. I adhered a piece of Cherry Cobbler seam binding ribbon across and behind the square, leaving the ends loose at the right side.

For the focal image, I used the Stamp-a-ma-jig tool to stamp the greeting in Midnight Muse on Whisper White card stock. I stamped the crown in River Rock and then cut out the images with a Labels Collection Framelits die. I pierced a border around the edge and adhered it in the middle of the square over the ribbon.

I slid the layered piece into the frame and then tied the ribbon in a bow. I also placed a rhinestone directly on the frame over the crown. And that's it! I did have to glue a couple of circle magnets to the back of the frame; the frame came with a magnet, but it didn't seem to be strong enough for the layered cardstock

Now I need to find a good spot to place my magnet where it will catch my eye. Thanks for stopping by!

Sunday, July 7, 2013

Floral Christmas card

Today I was supposed to be having a craft day, visiting with one of my good friends and working on my Convention swaps. That was before I managed to tweak my back yesterday morning. Sigh. It doesn't seem like anything serious, but I decided that sitting all day wouldn't be the smartest or most comfortable thing to do. I did, though, want to make one card to share on my blog today, so here is a quick floral Christmas card:

Supplies (all Stampin' Up!):
Stamps: Bright Blossoms, Sweet Essentials
Paper: Cherry Cobbler, Very Vanilla cardstock; Festival of Prints Designer Series Paper (DSP) stack
Ink: Cherry Cobbler, Lucky Limeade
Accessories: Cherry Cobbler seam binding ribbon, slot punch, rhinestones, Essentials Paper-Piercing Pack, paper-piercing tool and mat

I love the little flowers in the Bright Blossoms stamp set, and I wanted to see if I could use some of them to make a Christmas card. Using my markers and the image of the branch with buds, I colored the circles Cherry Cobbler and the branches and leaves Lucky Limeade. Now they look like winter berries -- with a few rhinestones to add a snow-like sparkle. I used two different patterns from the Festival of Prints DSP stack to mat the focal layer, and added Cherry Cobbler seam binding ribbon for a final embellishment.

Here's hoping I have more creations to share with you soon. Thanks for stopping by!

Thursday, July 4, 2013

Happy 4th of July

"This, then, is the state of the union: free and restless, growing and full of hope. So it was in the beginning. So it shall always be, while God is willing, and we are strong enough to keep the faith."
~Lyndon B. Johnson

Supplies (all Stampin' Up!® unless otherwise noted):
Stamps: Strokes of Wisdom (Raisin Boat)
Paper: Bordering Blue cardstock, silver glimmer paper
Ink: Real Red, Whisper White craft, Night of Navy
Accessories: Large star punch, Merry Minis punch pack, Simply Scored tool, Dimensionals

In honor of our country's birthday, take a few moments to watch this moving video for one of my favorite patriotic songs, "America the Beautiful," performed by The Blenders.


Thanks for stopping by!

Wednesday, July 3, 2013

Card designs for Convention swaps

Since my last post I have had a few productive crafty days. Yippee! On Sunday I finished making the gifts I will be giving to my roommates at the Stampin' Up!® Convention in a few weeks. (I can't share them yet, though, because I want them to be a surprise for my roomies.) On Monday I made a few cards to celebrate the Fourth of July. And today I finally finished designing the cards I'm going to make to swap with other demonstrators at Convention.

Supplies (all Stampin' Up!):
Stamps: Flower Shop, Petite Pairs
Cardstock: Island Indigo, Very Vanilla
Ink: Melon Mambo, Island Indigo, Daffodil Delight
Accessories: GIngham Garden Designer washi tape, rhinestones, Dimensionals

This card was inspired by the second card in the blog post titled "Flower Shop cards." I just made a few tweaks, such as changing the orientation of the card, adding a layer to the card base, and using three different flower images instead of the same image three times.

Supplies (all Stampin' Up!):
Stamps: For the Birds
Paper: Whisper White, Basic Gray cardstock; silver glimmer paper; Polka Dot Parade Designer Series Paper (DSP)
Ink: Jet Black StazOn; Real Red, Old Olive, Marina Mist, Crushed Curry, Basic Gray markers
Accessories: Occasions Paper-Piercing Pack, paper-piercing mat and tool, rhinestones, Dimensionals

The strips of DSP and silver glimmer paper are each 1" wide and 3-3/4" long. It wasn't intentional, but I like how the the pattern on the DSP -- the circles made of tiny dots -- is repeated with the paper-piercing around the focal image.

Supplies (all Stampin' Up!):
Stamps: Storybook Friends, Sweet Essentials, Lovely Little Labels
Paper: Sahara Sand, Whisper White cardstock; Polka Dot Parade DSP
Ink: Jet Black StazOn; Sahara Sand, Baked Brown Sugar, Blushing Bride, Daffodil Delight markers
Accessories: 1" square punch, Postage Stamp punch, Sweet Buttons Embosslits die, Glue Dots, Dimensionals

This card and the next one were inspired by my "Miss you zoo" card, but I made a few changes for efficiency. To make the faux postage stamps for these cards, I stamped the image on Whisper White cardstock, punched it out with the 1" square punch and then adhered it to a Whisper White Postage Stamp piece. I prefer the look of the faux stamps with the embossed border, but this method is easier and faster to mass produce. I also adhered each faux stamp directly the card instead of first attaching them together on another piece of cardstock.

Supplies (all Stampin' Up!):
Stamps: Zoo Review, Lovely Little Labels
Cardstock: Crumb Cake, Basic Black, Naturals Ivory
Ink: Jet Black StazOn; Basic Gray, Crushed Curry, Soft Suede, Pumpkin Pie markers
Accessories: 1" square punch, Postage Stamp punch, 2-1/2" circle punch, 7/16" natural trim, Dimensionals

I really liked the spattered background on the first version of this card, but I was having trouble reproducing it. So after much deliberation I decided to use punched circles for the background instead. I think this background works well, too -- it reminds me of an animal print.

Now that I have the designs done, I actually have to make the cards I will be swapping. I'll probably make ten to fifteen cards of each design, so I'd better get stamping! Thanks for stopping by!