Saturday, December 31, 2022

2023 desk calendars

Happy new year! The last day of the year seems like the perfect time to share my designs for the 2023 desk calendars I made as gifts this year. I made eight calendars total, four each of two different designs: one design using primarily the Simple Seasons stamps and dies (Concord & 9th) and one using a variety of die-cut shapes. 

For the first calendar style, I watercolored the images using Karin markers. To make the backgrounds, I either stamped an image a few times or did ink blending with a stencil. I also splattered the backgrounds with metallic paints (Prima Marketing) -- there are twelve paints in the set, and I used a different color for each month.


For the second calendar design I actually have two versions; I used gel prints for the backgrounds of one calendar and textured card stock panels for the other three. (I'll post the card stock version and then the gel print version for each grouping.) I also splattered these background panels with metallic paints, and I added a few clear sequins to each panel.


Let me know if you have questions about any of the specific dies or other products I used for these calendars. Since there were so many pictures I didn't want to make this post even longer with a bunch of text. :)

The last few years have been challenging to many people for many reasons, me included. So I'm wishing for a new year that brings more hope, peace, kindness, and caring to everyone the world over. Happy new year!


Saturday, December 24, 2022

2022 Christmas card recap

Merry Christmas Eve! I didn't have a chance to post this little recap earlier, but I hope it will inspire you for next year's cards. (If you're like me, you'll be starting those in January!)

Click on the name of the month to see the full post for each card design.

January: Believe

February: Merry gel prints

March: Woodsy peace

April: Ornament trio

May: Ombre peace

June: Winter shaker

July: Pine cones and berries

August: Simple winter scene

September: Fun with patterned paper

If you celebrate Christmas, I hope you have a wonderful holiday filled with peace and hope.


Wednesday, December 21, 2022

Snailed It for neutral, all-occasion cards

I decided to mix in some non-holiday cards today for a little variety. This batch of cards was one I made a couple of months ago for a color challenge on the Ellen Hutson blog. I ended up being too late to enter the challenge, but I was really pleased with the way the cards turned out.

I used the Snailed It stamp and die sets (Essentials by Ellen) to create these cards. I started by choosing five colors that fit the color challenge. (Unfortunately I didn't write down which colors I used, and it's been so long now that I don't remember the specifics.) Then I stamped a variety of images using those colors and cut them out with the coordinating dies. Finally I mixed and matched the pieces to create five different card layouts.

I love that these colors and images work for masculine or feminine cards as well as a variety of occasions. I made a birthday card, thinking of you, thanks, and two hello cards. I also really like that they are bold, solid stamps -- I don't always feel like coloring stamped images.


For some of the cards I used clusters of a few die-cut pieces, and for others I arranged the pieces to fill up most or all of the card front. I added simple, neutral embellishments to the cards as well as a bit of texture with scored or doodled borders, die-cut frames, or embossing folders.

For this card I glued the pieces all over the card front. Then I embossed the card using an embossing folder with a small, all-over pattern. I haven't used this technique in quite a while, but it's a neat effect as it presses the die cuts into the card stock. Just be sure that all the edges of the die cuts are glued down; if not, the little ends might stick up a bit after the card is embossed.

Thanks for stopping by!


Sunday, December 18, 2022

Happy Hanukkah!


A Hanukkah wish for you and yours:

May the warmth and glow
Of each candle you light,
Make your heart happy
And your Hanukkah bright!

Wishing a bright and beautiful holiday to everyone who celebrates Hanukkah!


Saturday, December 17, 2022

Easy handmade gift items

So I've temporarily solved my computer problems -- I'm borrowing my sister's computer. :) I'm going to try to get a few posts done and scheduled for the rest of December. Then I think I'll have to break down and buy a new computer next year.

Anyway, I don't have any more Christmas cards to post -- the September batch was the last for this year. But I have been busy the last few weekends making some little gifts for the holidays, so I thought I'd share some of those. None of the the gifts are holiday themed, so they would be great for a variety of occasions, such as birthdays, thank-you gifts, even party favors.

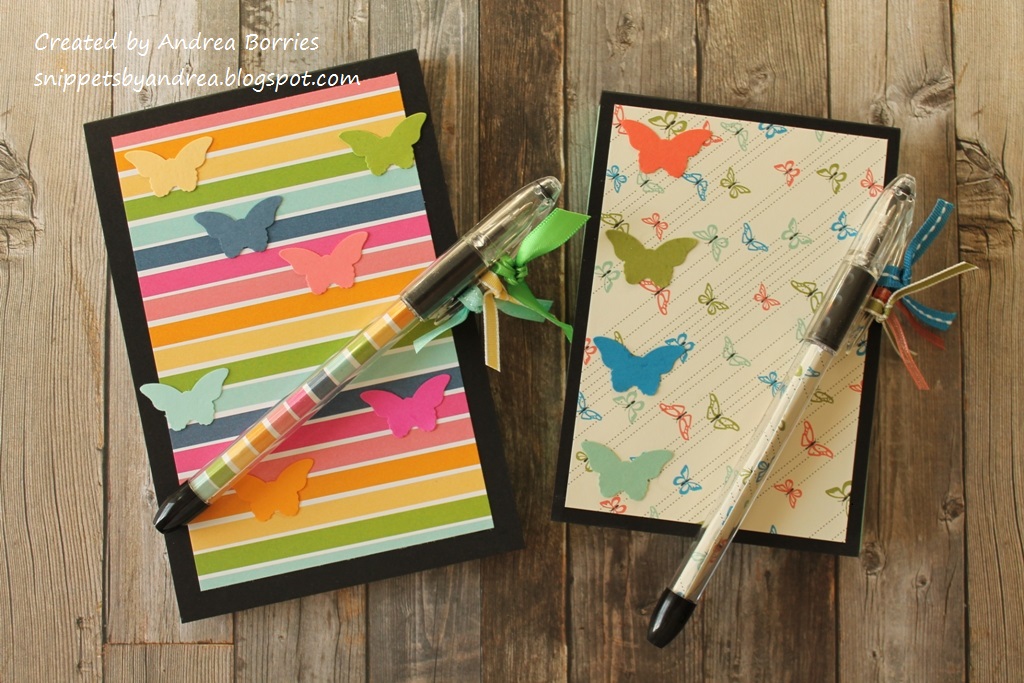
These coordinating notepads and pens were fun and easy to make. They are 4" x 6" unlined notepads and Pentel RSVP pens. I bought these supplies many years ago and made a few of them at the time, but I decided I would use up the rest this holiday season. I think they'll make cute gifts for the office staff at my school -- and I get rid of some of my stash!

I used card stock to make the covers for the notepads. I cut a piece of card stock a tiny bit wider than the pad and a few inches longer. I scored the card stock once at the length of the pad and then a second time the same thickness as the pad (e.g., score at 6" and 6-3/4"). So the cover folds around the gummed end of the pad and goes a couple of inches along the back. (You could make the cover long enough to cover the whole back of the pad, but I'm fine with it this way.) I applied strong double-sided adhesive to the card stock on the back of the pad and firmly pressed it to the chipboard backing.

For this batch of notepads, I cut the rainbow die out of five different card stock colors and then mixed and matched the pieces to make five rainbows. I added each rainbow to a covered notepad over a layer of rainbow-themed paper. (I made two each of the designs on the left and the right.) For the pens, I took a small scrap of each of the same patterned papers, rolled them up, and inserted one inside the barrel of each pen. I tied a few bits of coordinating ribbon onto the pen cap for a finishing touch.


Here are a couple of more notepads. The one on the right is a smaller, lined notepad, but I used the same basic process to measure and make the card stock cover. I also made a few notepads with ocean-themed papers and die-cut seahorses, but I didn't take pictures of those.


These magnets are a fun way to hang note on your fridge or in an office. I measured and cut strips of patterned paper just a bit smaller than the length and width of the clothespins. Using a set of small alphabet stamps I spelled out a few phrases with black ink. I adhered the strips to the clothespins and then coated them with a little bit of clear varnish. (I think something like Mod Podge or Multi Matte Medium would be good options, too.)


I cut strips of magnetic tape or magnetic sheets and glued them to the back of the magnets. Be sure you check the strength of the magnets first; I had some magnet sheets that were not strong enough to hold up the clip. I wish I'd had some really strong magnets, but the ones I used should be enough to hold a photo/piece of paper without the clip sliding down the fridge.


For my last project, I decorated these little boxes. (They are the mini pizza boxes from Stampin' Up!, although I'm not sure if they are currently available.) I know there are lots of ways to make all kinds of little boxes from scratch, but I wanted something faster. All I had to do for these was pick a pack of patterned paper and then cut and glue pieces on the top, bottom, and sides of the box. I chose Christmas papers, but anything would work here. Inside I added individually wrapped tea bags and a lip balm.


There you have it -- a few ideas for easy handmade gifts that would be great for party favors, teacher gifts, neighbor thank-you gifts, and many other occasions.

Thanks for stopping by!


Sunday, December 11, 2022

I’m trying!

Well, hello! I can't believe I haven't posted anything on my blog in over two months. I had no intention of being “gone” that long, but my job, although I'm adjusting to it, still exhausts me. And October is crazy busy with family birthdays, and then there’s Thanksgiving, winter weather, and you know, life.

I finally sat down last week to share some little gift items I made for the holidays … and then I started having technology issues. My computer is very old and temperamental and apparently has already started its holiday vacation. Sigh. I’ll see if I can figure something out this week because I do have a few things I’d like to share. But just in case I don’t have any luck, I hope you have a wonderful holiday season or end of the year, however you celebrate (or not)!

Thanks for stopping by!


Saturday, October 1, 2022

September Christmas cards: Fun with patterned paper

I know I'm a day late posting my September Christmas cards. Last month was a total blur. I ended up getting a job in an elementary school at the beginning of the month, worked two days, and got COVID. Sigh. I was out for a week, went back and felt like I was starting all over. And there were issues with the school district's payroll and HR departments getting me (and other new employees) set up so I can actually get paid. With all that and other life stuff, September felt like one big struggle. I didn't get a single blog post done -- and I had been on such a roll in August! Oh, well.

Back to the important part of this post: Christmas cards. I didn't have a lot of physical or creative energy in September, so for this batch of Christmas cards I decided to finish up a pack of 6" x 6" patterned paper that I've had for quite awhile: Christmas on Market Street from My Mind's Eye.

I had about half of the paper pad left, so I started by cutting most of the sheets into card front-sized panels and accent strips. I mixed and matched patterns and then glued the papers to card bases in a variety of coordinating colors. I used several different holiday-themed word dies for the sentiments and decorated the cards with various trims and sequins.

These types of cards are always ones that I expect to finish quickly -- and yet that's never how it works out. I hem and haw about the layout, colors, embellishments, etc. So even though these look like quick and easy cards, I spent a lot of time on them.

For this last group of cards, I used the leftover paper pieces to cut strips, squares, and trees for some different layouts. The top two cards are 6" x 6" instead of A2 size, so they will need extra postage (or hand delivery). I think my favorite cards from this whole group are the cards with the group of three trees.

Thanks so much for stopping by. It happens to be World Card Making Day today (Oct. 1), so I hope you have some time to get crafty!


Wednesday, August 31, 2022

You're a fungi

I've got one last challenge card to post for August. Whew! It's been years since I've done so many blog posts in one month! This card is my second one for the August challenge at Stay Crafty with a Blog Named Hero. The theme is "It's Hip to Be Square," and each project needs to include a square(s) in some way. For this card, I went with a clean and simple masculine design.

Supplies:
Stamps: You're a Fungi (Hero Arts)
Paper: Stone woodgrain card stock (Hero Arts); Mossy Meadow, Soft Suede card stock (Stampin' Up!)
Ink: Versamark (Tsukineko)
Accessories: White embossing powder (Hero Arts), Neutrals Candy Dots (Stampin' Up!), 1-1/4" square punch (Stampin' Up!), foam tape (3M)

I wanted to use a neutral color palette, so for the card base I chose a piece of gray woodgrain card stock from an old My Monthly Hero kit. I could have cut the piece in half to make two card fronts, but I decided to score and fold it and use the whole piece for the card base. (Since this is a simple card, I like the extra detail of the woodgrain texture, and it's nice to feel it on the back of the card, too. Makes it seem a little more special.)

I love all the images and punny sentiments in the You're a Fungi stamp set, so I started by figuring out which of the mushrooms would fit in a 1-1/4" square and stamping them on a deep green card stock with Versamark ink. For some of the bitty mushrooms I was able to just fit two of them in one square. I embossed the images with white embossing powder and punched them out. (My embossing is not great. I know all the tips and tricks, but I often still struggle with it, which is one of the reasons I don't do it often. Luckily the rustic feel of this card means the imperfect embossing isn't too big a deal.)

I wanted to include the "you're a fungi!" sentiment, but it was too long to fit in one of the squares. I fixed that by stamping the sentiment in two steps. First I inked up just the "you're a" with Versamark and then stamped it on brown card stock. I cleaned off the stamp and then inked and stamped "fungi!" just below the first part of the sentiment. Then I embossed it and punched it out. Problem solved! And I love how it stands out on the different color of card stock.

I arranged the six squares in the center of the card base and attached them with foam tape. (The gap between the squares is about 1/4".) To finish the card I added three gray enamel dots in the upper left corner. I really like how they add just a little more interest, but since they're the same color as the background, they don't distract from the stamped images.

I'd forgotten how fun it is to do challenges -- maybe I'll try to keep it up and enter again next month. Thanks for stopping by!


Autumn bouquet

The last two cards I have to share this month are both for the August challenge at Stay Crafty with a Blog Named Hero, but I'm going to post them separately. The theme for the challenge is "It's Hip to Be Square," and projects need to include a square or squares in some way. I've been into fall-themed crafting the past couple of weeks, so for this first challenge card I created a bouquet with an autumn feel.

Supplies:
Stamps: You're So Lovely (Hero Arts)
Paper: Plum card stock (Hero Arts), Basic White card stock (Stampin' Up!)
Ink: Lime Green, Moss, Lemon Drop, Raspberry Jam, Grape Juice, Tangerine, Cup O' Joe (Hero Arts); gold Glimmer Metallic ink (Hero Arts)
Accessories: You're So Lovely dies (Hero Arts), Nested Squares Cross-Stitch dies (Rubbernecker Stamps), gold confetti (Pretty Pink Posh), hemp twine (May Arts Ribbon), foam tape (3M)

I started out by stamping and die cutting all of the flowers and leaves (I cut several of each piece so I could make a few cards at the same time) and the white square with the stitched border. I stamped the sentiment on the square and arranged the flowers and leaves around it, letting some of the pieces go past the edges of the square. I used foam tape to pop up the two flowers and add a little dimension.

For the background panel, I used a 4-1/4" x 5-1/2" piece of Plum card stock and splattered it with gold Glimmer Metallic ink. When using the metallic ink, I put a little bit on a clear block (most any nonporous surface would work; clear blocks are just handy while stamping) and add a drop or two of water. I mix it up with a small paintbrush and then use the brush to make the splatter. I may have overdone the splatter a little bit on this card, but I love the sparkle! I also wanted to tie in the metallic ink to the flowery focal panel, so I painted just a little bit onto the brown berries, the purple sprig, and the orange leaf.

Once the gold ink was dry, I used foam tape to attach the focal panel to the card base, leaving a border of about 5/8" on either side and 3/4" on the top. I added some gold confetti pieces around the focal panel and in the center of each flower. I adhered the whole card front to a white card base and finished off the card by wrapping a piece of help twine twice around the front of the card and tying it in a knot.

I love how this card turned out, and since I added a birthday sentiment inside, I've got another birthday card for my stash! Stay tuned for my second "square" card in my next post.

Thanks for stopping by!