Tuesday, December 30, 2014

From the Garden trio

Before Christmas I ordered a few items from the upcoming Occasions catalog from Stampin' Up! The first things I've had a chance to try out are the From the Garden stamp set and Handpicked Framelits dies. Here are my first three creations:

Valentine card with a scene of five heart-shaped flowers and a plant stake stamped with the greeting "Grown with love."
Supplies (all Stampin' Up!):
Stamps: From the Garden
Paper: Soft Sky, Baked Brown Sugar, Real Red, Strawberry Slush, Whisper White, Old Olive, Daffodil Delight card stock
Ink: Old Olive, Memento Tuxedo Black
Accessories: Handpicked Framelits dies, Cupcake Builder punch, 1-3/8" circle punch, Itty Bitty Accents punch pack, Glue Dots, Dimensionals

I think this is a cute, simple, nontraditional Valentine's Day card. It would also be perfect for anytime you want to say love you, thinking of you or miss you. It's a pretty straightforward card, so there isn't much to explain. The only detail that isn't evident is that the leaves on the stem/vine image are actually just outlines. After I stamped the stems with Old Olive ink, I used an Old Olive marker to fill in the leaves to make them a little more bold.

Blue card with floral background. The focal point is a white tag stamped with flowers and the sentiment "Sweet as can be."
Supplies (all Stampin' Up!):
Stamps: From the Garden
Paper: Marina Mist, Whisper White card stock
Ink: Memento Tuxedo Black, Marina Mist, Wild Wasabi, Basic Black marker
Accessories: Scalloped Tag Topper punch, pearls, burlap ribbon, Glue Dots, Dimensionals

I wanted to make this card using just the stamp set, without the coordinating Framelits dies. The images in the stamp set are all fairly small, so I stamped the flowers and leaves together in groups to make them a better scale for the card. I cut out the flower on the bottom left corner by hand, adhered it to the tag with a Dimensional and added a pearl in the center. For the tassel on the tag, I cut a piece of burlap ribbon a few inches long, trimmed off one of the sewn edges and then pulled out a few of the individual fibers. I threaded some of the fibers through the hole on the tag and used one of the fibers to tie them together. I made a dotted border around the tag with a marker and added a horizontal line of pearls to balance out the vertical tag.

Black card with a white layer stamped with "swooshes" of orange, yellow, green and blue. Die-cut crayon shapes of the same colors are stamped with different sentiments. The main sentiment is "happy birthday to you."
Supplies (all Stampin' Up!):
Stamps: From the Garden, Work of Art, Endless Birthday Wishes
Paper: Whisper White, Basic Black, Pear Pizzazz, Old Olive, Daffodil Delight, Crushed Curry, Coastal Cabana, Bermuda Bay, Pumpkin Pie, Tangelo Twist card stock; silver glimmer paper
Ink: Pear Pizzazz, Daffodil Delight, Pumpkin Pie, Coastal Cabana, Memento Tuxedo Black, Project Life Journaling Pen (05)
Accessories: Handpicked Framelits dies, Itty Bitty Accents punch pack, Glue Dots, Mono Multi liquid glue, Dimensionals

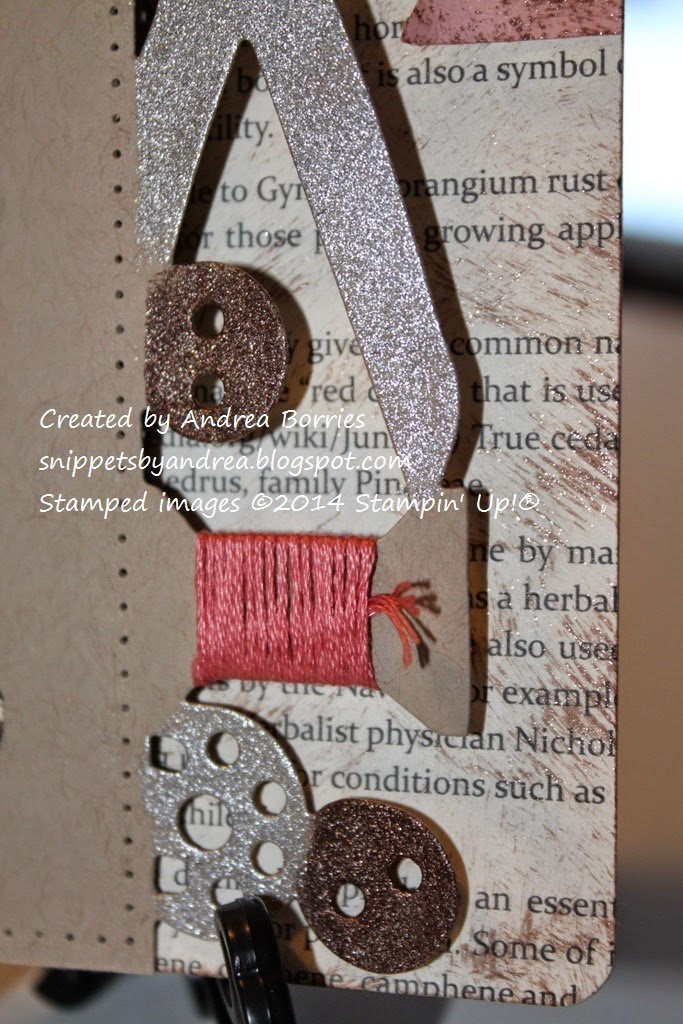
This is my favorite card of the three, and probably the most unexpected, since there is nothing garden-ish about it. As soon as I saw the shape of the die that's meant to be a long plant stake, pointed at one end, I thought of a crayon.

I chose four colors and then selected a light and dark shade of each color; the lighter shade is the crayon, and the darker shade is the wrapper. I die cut the crayon shape from each of those eight colors of card stock and then trimmed off the ends of the four darker pieces. I stamped the "loopy" image from the From the Garden at each end of the wrapper piece and used a journaling pen to draw a solid line next to it. Then on the center of each crayon I stamped a different sentiment. All of the sentiments are from From the Garden, although "for you" is shortened from "Fresh picked for you"; the photopolymer makes it really easy to stamp just part of an image exactly where you want it. After I glued the wrappers on the crayons, I trimmed the bottom end of each crayon so they weren't quite so rounded.

With the crayons made, I needed a background. The swooshes and dots in the Work of Art set seemed like perfect crayon scribbles, so I stamped them randomly on Whisper White card stock using the same colors as the crayons. I stamped a birthday sentiment, mounted the panel on a Basic Black card base, adhered the crayons and added a few silver stars.

There you have it: three very different cards made with the same basic products. I'm excited to see what else I'll create with this stamp set and dies. Thanks for stopping by!

Monday, December 29, 2014

Lego winter village 2014

You may remember Snowburg, my Lego winter village, from last Christmas. The village was resurrected again this year with a few changes: it has been relocated to higher ground (i.e., our built-in buffet) to avoid further attacks from the abominable snow cat, and it has expanded to include a Parisian cafe (the town council wants to bring in more tourist dollars), a bakery, a Christmas tree lot, Santa's workshop, and a busy, busy town square filled with people ice skating, having snowball fights, mailing letters to Santa and generally enjoying the holiday spirit. Snowburg is definitely a bustling place this time of year!

Winter village made from Lego building sets and minifigures.

Winter village made from Lego building sets and minifigures.
I also had a lot of fun this season with the Lego City Advent calendar, which I got from my parents at the beginning of December. Each morning I opened the little door for that day, assembled the figure or accessory inside, and added it to my winter village.

You'll notice in these photos that Santa is with his sleigh by his workshop and also on top the Parisian cafe. No worries. The Santa by the workshop is, in fact, the real Santa. The one on the cafe is Santa's little-known younger brother, Klaus Claus, who acts as Santa's stunt double (sliding down chimneys is dangerous work!) and runner up to the position of Jolly St. Nick. If, for any reason, Santa is unable to perform his Christmas duties, then Klaus steps in. He has to be ready to go at a moment's notice, hence the second sleigh.

There are a few of "Santa's helpers" wandering around the village, too. Everyone wants to spread Christmas joy!
Winter village made from Lego building sets and minifigures.

Winter village made from Lego building sets and minifigures.

Winter village made from Lego building sets and minifigures.

Winter village made from Lego building sets and minifigures.

I hope you're having a splendid holiday season. Thanks for stopping by!

Thursday, December 25, 2014

Merry Christmas

"There are many things from which I might have derived good, by which I have not profited, I dare say," returned the nephew. "Christmas among the rest. But I am sure I have always thought of Christmas time, when it has come round -- apart from the veneration due to its sacred name and origin, if anything belonging to it can be apart from that -- as a good time; a kind, forgiving, charitable, pleasant time; the only time I know of, in the long calendar of the year, when men and women seem by one consent to open their shut-up hearts freely, and to think of people below them as if they really were fellow-passengers to the grave, and not another race of creatures bound on other journeys. And therefore, uncle, though it has never put a scrap of gold or silver in my pocket, I believe that it has done me good, and will do me good; and I say, God bless it!"
--Charles Dickens, A Christmas Carol

Wishing you a Christmas and new year filled with love, laughter and peace.

Wednesday, December 24, 2014

Last-minute Christmas ornaments

So in my last post I mentioned that I was done with all my Christmas preparations. And that was true; I was done. Promise. At least it was true until I found out that I needed to make last-minute changes to a couple of presents (technically one was a birthday present, but the celebration is on Christmas, so it's close enough). I took care of that yesterday morning -- while avoiding anything resembling a mall or department store -- and then after finishing another project in the afternoon I decided that what I really needed to do was make last-minute Christmas ornaments. Did I have time for that? Not really. But did I have fun making them anyway? Yep. And here they are:

Two star-shaped Christmas ornaments made with layers of silver paper, burlap and stamped kraft paper.
Supplies (all Stampin' Up! unless otherwise noted):
Stamps: Bright and Beautiful
Paper: Silver paper (retired); kraft, Naturals White card stock
Ink: Silver pigment (ColorBox)
Accessories: Burlap Fabricpage (Canvas Corp), Stars Framelits dies, Frosted Finishes embellishments, Vintage Faceted Buttons, large pearls, silver detail embossing powder, silver elastic cord, Eclectic Paper-Piercing Pack, paper-piercing tool, 3-in-1 Advanced Craft Glue (Beacon), Scor-Tape (Scor-Pal), Dimensionals

I made ten ornaments total; one to keep and nine for family members. That's a lot of die-cut stars to crank out through the Big Shot machine.

Star-shaped Christmas ornament made with layers of silver paper, burlap and stamped kraft paper.
I used the three largest star-shaped Framelits dies: the largest for the silver paper, the next size for the burlap and the backing (see below), and the third-largest for the stamped image. I was worried at first that I would run out of the burlap. I had one 12" x 12" page, but when I cut out the first star, I discovered that it was actually two sheets of burlap sewn together, so I just separated each pair of stars after cutting them out.

I also made a discovery about the kraft card stock: It has a "right" side and a "wrong" side. If you look really closely at the card stock, you'll notice very faint lines on the back. It's barely noticeable, and wouldn't made a difference if you were using the card stock for a mat or a die-cut or punched accent. It may even be okay for basic stamping. But when I started to emboss the stars, the images that I had stamped on the back of the card stock did not look right. I think the detail embossing powder might have settled into those faint lines. At any rate, they just looked a little strange, so I stamped and embossed those stars over again.

A star-shaped Christmas ornament made with layers of silver paper, burlap and stamped kraft paper.
I only had seven of the Frosted Finishes embellishments left from last year, so for the last three stars, I used a large Vintage Faceted Button. I added a large pearl to the center of the button to give it a more finished look, but I really wish I had some large rhinestones to add to the shine. I did glue the pearls into the buttons to make them a little more secure.

The three layers are attached together with Dimensionals. I wasn't sure how well the Dimensionals would adhere to the burlap, so I tested a little scrap first. They seem pretty secure for now; I guess we'll find out next year how well they stand the test of time.

I also pierced a border along the edge of the largest star shape of each ornament. Without the paper piercing, the silver paper looked too flat and boring compared to the texture of the burlap and embossed layers.

Back of the star ornament, stamped "Created by Andrea, 2014."
I wanted to attach a string to the ornaments without punching a hole in one of the points. My solution was to cut a piece of silver elastic cord and use Scor-Tape to adhere the ends (untied) to the back of the largest star at one of the points. Then I cut a piece of Naturals White card stock with the second-largest star die -- I used the smaller size for the backing star so it wouldn't cover up the pierced holes -- stamped and signed it, and adhered it to the large star, securing the ends of the cord. (This is actually easier to do before you add the layers on the front.) The backing star also makes the ornament a little sturdier, since the silver paper isn't as heavy as card stock.

I already have my ornament on my Christmas tree and the other nine packaged up and ready to deliver. So I think now I'd really done with all the Christmas preparations. Just in the nick of time. Thanks for stopping by!

Saturday, December 20, 2014

Clean and simple all-occasion card

I can't believe Christmas is only a few days away. All my cards are mailed, my shopping is finished, and the presents are wrapped. But if you're still busy with preparations, here's a quick all-occasion card to give you a break from the holiday hoopla:

Crumb Cake card base with a panel of newsprint-style printed paper on the left side. On the printed paper is a die-cut and embossed flower colored with Perfect Plum and Old Olive.
Supplies (all Stampin' Up! unless otherwise noted):
Stamps: Gorgeous Grunge, Happiest Birthday Wishes
Paper: Crumb Cake, Perfect Plum card stock; First Edition Specialty Designer Series Paper (DSP)
Ink: Perfect Plum, Old Olive, Crub Cake
Accessories: Botanical Branch Embosslits die (Sizzix), Regals Candy Dots, Dimensionals

I started with a Crumb Cake card base and stamped one of the splatter images from Gorgeous Grunge. I used Crumb Cake card stock to make the embossed die-cut flower and then colored the embossed parts with Perfect Plum and Old Olive markers. I added a Perfect Plum Candy Dot to the center of two of the flowers, although I think I should have used Very Vanilla, or maybe even Crumb Cake for more contrast. What do you think?

To create a simple background for the flower I cut a strip of First Edition Specialty DSP and stamped it with the splatter image in Crumb Cake ink (I stamped on scratch paper first to lighten the ink color). I matted the DSP with Perfect Plum card stock and adhered the panel to the left side of a Crumb Cake card base. Using Dimensionals, I attached the flower to the DSP. I added a "happy birthday" sentiment, but this card could easily be used for just about any occasion.

Thanks for stopping by!

Thursday, December 18, 2014

Two 'sew' cute cards

Did you ever find a crafting product that you knew you needed to have even though you weren't exactly sure how you'd use it? Well, that's how I felt about the Sewing Edge die when I saw it at a scrapbooking expo back in October. I bought it then, but I didn't have a chance to use it until a couple of weeks ago. I sat down to play with it and ended up making two cards that I loved.

Shabby chic-style card. Sewing accessories die cut from right side of card, dress form die cut and stamped on the left side.
Supplies (all Stampin' Up! unless otherwise noted):
Stamps: Watercolor Minis, Very Versatile
Paper: Crumb Cake, Blushing Bride card stock; First Edition Specialty Designer Series Paper (DSP)
Ink: Soft Suede, Blushing Bride, Regal Rose
Accessories: Sewing Edge die (Tim Holtz Alterations), Dress Up Framelits dies, Banner punch, corner rounder, Bitty Buttons, rhinestones, Mocha adhesive gems (Close to My Heart), Walnut Brown Metallic and Silver 3D Stamp Paint (Viva Decor), sponge daubers, rose embroidery floss (DMC), Essentials Paper-Piercing Pack , paper-piercing tool, Crystal Effects

I don't often make shabby chic-style cards, so this one took awhile to produce. I kept stopping to think about what embellishment I should add or where I should place something. But it was a fun process, so I didn't really mind. I'll just make sure the recipient of this card is someone who really appreciates the time and effort, right?

Photo showing details of the die-cut right edge, with spool shape wrapped with ebroidery floss and other shapes painted with metallic 3D stamp paint.
Now for some details. I started with a standard A2 card base (4-1/4" x 5-1/2") in Crumb Cake and ran it through the Big Shot with the Sewing Edge die, which cut out the shapes from the right edge of the card. Then I used sponge daubers to apply metallic 3D Stamp Paint to the scissors, bobbin and buttons shapes. The paint dries very quickly (within a couple of minutes), and has such a beautiful sparkle. I added embroidery floss to the spool by taping one end to the back, wrapping it around until the spool was full and then using a needle to pull the other end behind the wrapped strands. It's not pictured here, but I also added a rhinestone on the scissors where the screw would be.

Close-up photo showing dress form die cut from newsprint-style paper and stamped with flowers.
I knew I wanted to pair this die with my Dress Up Framelits dies, so I cut the dress form shape out of First Edition Specialty DSP. I used a small two step-flower stamp to add some color. I stamped the first part of the flower with Blushing Bride ink. For the second part of the flower, I inked the stamp with Regal Rose, rolled the edges of the stamp in Soft Suede ink and then stamped the image. I love the vintage look that creates. To enhance that look, I lightly sponged some of the metallic Walnut Brown 3D Stamp Paint on the dress form and around the edges. For a little embellishment, I added a "necklace" of small brown pearls and a tiny clear button tied with embroidery floss. (The button is adhered with Crystal Effects.)

I adhered the dress form to the left side of the card front, pierced a border around the panel and stamped "happy birthday" below it. Confession: I was so worried I was going to stamp the sentiment crooked and ruin the card after all that work. I know I should have pulled out my Stamp-a-ma-jig tool, but I decided to eyeball it. Thankfully I stamped it straight. Whew!

Photo showing the inside of the card with the stamped birthday sentiment and the right side lined with newsprint-style paper.
Inside of the card, I adhered a piece of First Edition DSP to the right side of the card so the die-cut shapes on the front would really stand out. Again I lightly sponged on some 3D Stamp Paint to distress the paper and to give it just a little glimmer. I punched a banner from Blushing Bride card stock, applied Stamp Paint and adhered it to the right edge where there is space between the scissors blade and handle. Finally I rounded the two corners on the right side and stamped my sentiment on the Crumb Cake card stock.

That was actually the second card I made with the Sewing Edge die. I had a little practice with the first card (below), which was simpler but still cute:

Card with die-cut right edge (using the Sewing Edge die) and a dress form on the left side. On the dress form is a dress cut from coordinating patterned paper: red patterned bodice and floral skirt.
Supplies (all Stampin' Up! unless otherwise noted):
Stamps: Create a Cupcake
Paper: Very Vanilla, Early Espresso, Poppy Parade card stock; Everyday Enchantment DSP
Ink: Early Espresso
Accessories: Sewing Edge die (Tim Holtz Alterations), Dress Up Framelits dies, corner rounder, 1/8" Early Espresso taffeta ribbon, pearls, rhinestones, red embroidery floss (DMC), Mono Multi liquid glue, Dimensionals

To accent the die cuts on this card, I also cut the shapes out of a piece of Poppy Parade card stock. I cut out the two button shapes and adhered them over the shapes on the card base. I again wound embroidery floss around the spool shape and added a rhinestone to the scissors.

For the left side of the card front, I cut the dress form out of Very Vanilla card stock and adhered it to the card. I cut the dress shape out of two coordinating prints from Everyday Enchantment DSP and then adhered the top part of one of the dresses to the bottom of the other one. I used a piece of narrow ribbon to look like a belt (and to hide the paper edges) and three tiny pearls to look like buttons on the bodice. I adhered the dress over the dress form with Dimensionals.

Photo of the inside of the second card with red patterned paper on the right side and vanilla card stock stamped with a sentiment on the left side.
Inside the card I added a piece of DSP to the right side and rounded the two right corners of the card. I also added a panel of Very Vanilla card stock inside the card so I would have a light-colored base for my sentiment stamp.

If you wanted more room to write or stamp a message inside the card, I think you could start with a longer piece for the card base (for example, 11" x 5-1/2"). Then you could score and fold the right side in at 2-1/2" and the left side at 4-1/4". That would give you an extra flap inside the card; the "outside" of the flap would be the background for the die-cut shapes, and when you opened the flap, there would be plenty of space to write.

So which version do you prefer: the vintage card with the shabby chic dress form card or the cleaner card with the multi-patterned dress? Thanks for stopping by!

Saturday, December 13, 2014

S'more fun

Now that I've mailed out all my Christmas cards (though I do have two left to hand deliver), I've officially moved on to cards for other occasions. I've been having fun playing with some new supplies that I've bought over the past few months but haven't had a chance to use yet. Today I'm going to share a fun kids birthday card that uses a stamp set from Lawn Fawn called Love You S'more and the coordinating dies.

Tan birthday card with a vertical blue piece. On the blue is a green hill with a campfire. Two sticks with marshmallows are over the fire, and stars are stamped at the top of the blue piece.
Supplies (all Stampin' Up! unless otherwise noted):
Stamps: Love You S'more (Lawn Fawn), Birthday Wish
Paper: Baked Brown Sugar, Marina Mist, Mossy Meadow, Early Espresso, Pumpkin Pie, Tangerine Tango, Real Red, Whisper White card stock
Ink: Baked Brown Sugar, Marina Mist, Mossy Meadow, Early Espresso, Pumpkin Pie, Tangerine Tango, Real Red, Chocolate Chip
Accessories: Love You S'more Lawn Cuts dies (Lawn Fawn), Glue Dots, Mono Multi liquid glue

When this stamp set was released earlier this year I immediately fell in love with it. So when I found it at a scrapbooking expo this fall I snatched it up, along with the coordinating dies. This is the first card I've made with the stamps and dies, and I really like how it turned out.

I chose Baked Brown Sugar card stock for the card base and stamped a row of trees along the bottom. I used a wide strip of Marina Mist card stock for the focal area and stamped some tiny stars near the top of the strip. Then I stamped, die cut and layered on all the pieces for the hill, campfire and marshmallow sticks. I wanted to make this a birthday card, so I stamped that sentiment in the upper right corner, but you could easily use a different sentiment or omit it altogether. I also think that, trimmed down a little, this would make an adorable accent on a scrapbook page about camping or cookouts.

Inside of card with the sentiment "Everything is s'more fun with you" and a stamped s'more image.Inside the card I added a layer of Whisper White card stock and combined a few stamps to create the sentiment "Everything is s'more fun with you." And of course I had to add a little winking s'more because it's just one of the cutest things ever.

I'll definitely be making more cards with this set, and I'm already thinking about how I could use this sentiment on a few valentines -- it would be perfect for my friends.

Thanks for stopping by!

Tuesday, December 9, 2014

Small fabric bags

As part of my quest to make more Christmas gifts this year, I decided that I wanted to try making fabric bags. Not huge tote bags or anything, just something that would use up some of the fat quarters of fabric that I've collected here and there. Of course, I don't have a sewing machine, so this project required a little help. I recruited my mom, and she brought her fancy sewing machine over to my house for a couple of days. I cut and pressed fabric and did a little hand stitching here and there, while my mom kept her sewing machine humming along doing most of the assembly.

Reversible small bags made from Christmas-print fabrics and ribbon handles.
For each bag I chose two coordinating fabrics (some were from Stampin' Up!) and a wide coordinating ribbon for the handles. I ironed fusible fleece onto the outer fabric for each bag to provide some stability. I wanted to add a little embellishment, so I made a fabric yoyo with a button center for most of the bags. I sewed each yoyo onto a piece of ribbon and then tied the ribbon onto one of the bag's handles. That way it can be removed without leaving pin holes, and the ribbon adds extra color.


Reversible small bags made from coordinating fabrics and ribbon handles.
I'd spent some time searching the Internet and found a few patterns I liked, but nothing exactly right. But I have a small bag I received as a gift a few years ago that was almost perfect, so we took the measurements from that bag and used some tips and tricks from a few online patterns. Our first bag (the one on the top in this picture) wasn't the greatest. We placed the two pieces of fabric together, with fusible fleece between them, and then sewed the bag shape. That method left unfinished edges inside and along the top of the bag. We covered the edges on top, but I wasn't crazy about the look of it -- or having to do that extra step -- so we modified our "pattern."

Reversible small bags made from Christmas-print fabrics and ribbon handles.
For the rest of the bags my mom sewed the inside fabric and outside fabrics into the bag shape separately and then sewed them together along the top seam with the handles in between, leaving a few inches to turn the bags. I had the job of turning the bags inside out, tucking the lining fabric into the bag, and then whip stitching the opening closed. This method is much more finished looking, and the bags are actually reversible because all the seams are hidden between the layers of fabric.

Photo showing the inside of one of the finished bags.
For most of the bags I cut the pieces of fabric to 20" x 14". Some of my fabric pieces weren't big enough, though, so used smaller pieces: 20" x 11", 20" x 12" and 19" x 13". For those smaller sizes, we just made the bottom of the bag narrower.

I'm using these bags as gift bags and tucking a few little treats inside them. The recipients can keep them to use themselves or re-use them to give a gift to someone else.

Photo showing a close-up view of one of the fabric yoyos made with green fabric, a red button in the center and brown ribbon.
Here is a list of the supplies I used:
Fabric: Candy Cane Christmas, Candlelight Christmas, Spice Cake, Essentials (Stampin' Up!); Christmas in Killarney (Keepsake Quilting); other miscellaneous patterns
Ribbon (all Stampin' Up!): Burlap; Chocolate Chip taffeta; Baja Breeze striped grosgrain; Old Olive, Night of Navy 1-1/4" striped grosgrain; 3/4", 1-1/2" twill tape; Very Vanilla, Cherry Cobbler, Crumb Cake seam binding ribbon
Other: Crochet thread, Candy Cane and Sweet Stitches Big Designer Buttons (Stampin' Up!), Very Vintage Designer Buttons (Stampin' Up!), 3-in-1 Advanced Craft Glue (Beacon)

Thanks for stopping by!

Wednesday, December 3, 2014

Two simple trees

After my 12 Days of Christmas Cards blog series, I thought I was finished making and sharing my Christmas cards. But I forgot that I wanted to create a card for the Christmas and holiday challenge on the Raisin Boat blog. So earlier this week I pulled out my newest Raisin Boat stamp set, Treemendous, and got to work.

Christmas card with stick tree and red, green and blue ornaments. There is a red ribbon bow on the tree trunk, as well as light blue stamped snowflakes and the greeting "Happy Holidays."
Supplies (all Stampin' Up! unless otherwise noted):
Stamps: Treemendous (Raisin Boat)
Paper: Naturals Ivory, Early Espresso card stock
Ink: Early Espresso, Real Red, Old Olive, Lost Lagoon, Soft Sky card stock
Accessories: 1/8" Real Red taffeta ribbon, sponge, Glue Dots

This was an easy card to make, and I really like the way it turned out. After I stamped the tree, I used the separate branch stamp to add two extra branches near the bottom of the tree; that created more of a Christmas tree shape, and it gave me more space for ornaments. I used the image of three little dots like snowflakes in the background and sponged around the main layer to create a vintage look. I wanted a simple embellishment, so I tied a piece of narrow red ribbon in a knot and used a Glue Dot to adhere it to the tree trunk. All that was left was to stamp the greeting and adhere the panel to an Early Espresso card base.

Birthday card with a stick-style tree with green leaves and yellow blossoms. Stamped grass and three flowers along the bottom of the card. The flowers and tree branches are embellished with small pearls.
Supplies (all Stampin' Up! unless otherwise noted):
Stamps: Treemendous (Raisin Boat)
Paper: Naturals Ivory, Old Olive card stock
Ink: Early Espresso, Old Olive, Daffodil Delight
Accessories: Pearls, corner rounder

Since I had this versatile stamp set out, I decided to make another, non-holiday, card. By keeping the same basic layout but changing a couple of colors and images, I created a cheerful card for any occasion. (I added a "happy birthday" stamp because I'm really low on birthday cards, but you could easily use a different sentiment or omit the greeting altogether.) I used the image of three small dots again on this card, but by stamping them in yellow I turned them into blossoms on the tree. When I was done stamping, I rounded the corners of the panel, embellished the flowers and tree branches with a few pearls, and used an Early Espresso marker to doodle a border along the top and sides of the panel. Finally I adhered the stamped card stock onto an Old Olive card base.

Thanks for stopping by!