Monday, October 28, 2013

A finished project

I spent the weekend at my friend Lisa's house for a couple days of quality crafting time. We had a lot of fun, and I even finished a project: my Summer 2013 This and That journal. I'm a little late getting it done, since I had wanted to add mementos and write about events as they happened during the summer. I had all of the pictures and info together and ready to go, but as usual, there was never enough time. The craft weekend, though, was the perfect opportunity to focus on finishing my journal. Here are a few of the completed pages:

Samples of completed pages in my Summer 2013 This and That journal.

Samples of completed pages in my Summer 2013 This and That journal.

Samples of completed pages in my Summer 2013 This and That journal.

Samples of completed pages in my Summer 2013 This and That journal.
There's nothing like the satisfaction of completing a project. And it was fun to create a journal that was casual and imperfect, unlike my "regular" scrapbooks. For instance, I included a lot of receipts that I know will fade and become illegible, but that's OK. I'm not worried about my journal lasting for generations to come or becoming some sort of historical document. It will just be fun to look back at it in the coming years and remember a little about my life in 2013.

Thanks for stopping by!

Tuesday, October 22, 2013

A pair of thank yous

I've had a busy month, so it's been a little tricky finding the time A) to stamp and B) to share my creations here on my blog. Fingers crossed that I'll be able to get back to a more "normal" schedule in November. I did, however, manage to sit down after work today and make two one-layer cards with my new stamp set Another Thank You.

Supplies (all Stampin' Up!):
Stamps: Another Thank You
Cardstock: Pistachio Pudding, Baked Brown Sugar
Ink: Pistachio Pudding, Baked Brown Sugar
Accessories: Itty Bitty Shapes punch pack, corner rounder, pearls, Mono Multi liquid glue

Several years ago I made a card similar to this one, but back then I had to look through all my stamp sets to find the different "thank you" sentiments. It was much faster this time with all the stamps in the same set. And with the clear photopolymer stamps it was easier to determine which stamp would work best to fill the spaces.

For this card I stamped the largest image first, using Baked Brown Sugar ink so it really stood out as the focal point. Then I filled in the space around it with the other images, stamping them in Pistachio Pudding to create a background. I added a little embellishment to the card by adhering a few punched flowers with pearl centers to the empty spaces inside the loops created by the letters of the main image.

Supplies (all Stampin' Up! unless otherwise noted):
Stamps: Another Thank You
Cardstock: Naturals Ivory, Midnight Muse, textured Chocolate Chip
Ink: Chocolate Chip
Accessories: 5/16" neutral brads, washi tape (unknown)

My thank-you cards often have a feminine feel to them -- a lot of flowers and such -- so I've been trying to make an effort to create more masculine thank yous. For this card I stamped one of the larger "thank you" sentiments on the bottom right quadrant of the card base. I added a piece of washi tape and a strip of textured Chocolate Chip cardstock below the sentiment. To pull out the blue in the washi tape, I adhered a piece of Midnight Muse cardstock to the left of the sentiment. I wanted to include some embellishment, so I added three simple Chocolate Chip brads.


Thanks for stopping by!

Saturday, October 19, 2013

Birthday monsters

In July Stampin' Up! had a contest to design a monster-themed stamp set. The winning stamp set, Monstermaniacs, was created by a Stampin' Up! demonstrator. It's a cute stamp set, and I thought it would be fun to use for a variety of occasions. I made my first card with it this week: a birthday card for one of my cousins' sons, who will be turning nine next week.

Gray card with red, yellow, blue and green circles on the background and an image of three friendly monsters.
Supplies (all Stampin' Up! unless otherwise noted):
Stamps: Monstermaniacs, Yippee-Skippee!
Cardstock: Basic Gray, Whisper White, Real Red, Daffodil Delight, Wild Wasabi, Island Indigo
Ink: Jet Black StazOn, Real Red, Daffodil Delight, Wild Wasabi, Island Indigo
Accessories: Circles Collection Framelits dies, 3/4" circle punch, Square Lattice embossing folder, googly eyes (Inkadinkadoo), Mono Multi liquid glue, Dimensionals

I stamped and colored the image and then cut it out with one of the Circles Collection Framelits dies. For the background I wanted to play off the circle shape of the focal piece -- there are also several circles in the image itself -- so I used the Framelits dies again to make several circle frames in different sizes and colors. (This was really easy to do with the new magnetic platform for the Big Shot. Love it!) I adhered the circles to a 4" x 5-1/4" piece of Basic Gray cardstock then added some texture by embossing the whole piece with the Square Lattice embossing folder. I attached the layer to a Basic Gray card base and adhered the focal piece to the right side of the card.

To create the sentiment I used markers to ink the letters with different colors. I stamped the sentiment on a strip of Whisper White cardstock and used the 3/4" punch to round the ends of the strip. Then I used Dimensionals to adhere the sentiment so it overlapped the focal layer. I wanted to add a little embellishment to the card -- but nothing too frilly -- so I gave one of the monsters googly eyes. Googly eyes make everything more fun!

I stamped a birthday sentiment inside the card, and since I always like to include a hand-written message, I added a little note wishing the birthday boy a "monstrously" good birthday. (Another possibility I considered was "I hope your birthday is out of this world.") Thanks for stopping by!

Thursday, October 17, 2013

Sending love

When I saw Stampin' Up!'s photopolymer stamp set Greetings From, I immediately loved the images. It's designed to coordinate with the set Map It Out and would make adorable scrapbook layouts for travel and adventure themes. But I don't do a lot of scrapbooking, and when I do, I find that I rarely use stamps in my scrapbooks. So I have other ideas for this stamp set, and here is the first one:

Supplies (all Stampin' Up!):
Stamps: Greetings From, Gorgeous Grunge, Lovely Little Labels
Cardstock: Whisper White, Basic Black, Crumb Cake
Ink: Jet Black StazOn, Old Olive, Marina Mist, Real Red
Accessories: 1-1/4" square punch, 7/8" scallop circle punch, Dimensionals

This card didn't turn out exactly as I imagined. I had wanted to use the 1" square punch to punch out the stamped images and then mat them with postage stamp punches, creating a little play on the word "sending." But it turned out the car image was too long, so I had to change it up a little.

To create the backgrounds for the images, I used one of the splatter-type images from the Gorgeous Grunge set. I inked the rubber, stamped it on scratch paper and then stamped it on the Whisper White cardstock. This makes the background light enough that you can still easily see the focal images. I used another stamp from the Gorgeous Grunge set to add a little visual interest on the Crumb Cake card base. The streaky lines remind me of tire tracks, which seemed appropriate for this card.

This card is going in my box of cards to be sent to Operation Write Home (OWH). I actually had OWH in mind as I made the card -- if I were so far away from my friends and family, I know I would want to send them all the love I could. Thanks for stopping by!

Tuesday, October 15, 2013

My birthday weekend

My birthday was on Sunday, and I opted to skip any big festivities this year. Instead I spent the weekend visiting a good friend in rural Minnesota. The weather wasn't the greatest -- Sunday was gorgeous, but Saturday was chilly, rainy and blustery -- but I didn't mind at all. We had a wonderful time chatting, making cards, exploring a few landmarks in the area and generally being entertained by my friend's seven-year-old daughter. Here are a few photos from my birthday weekend:


Stained glass windows at St. John's Abbey church.


Saturday evening the skies cleared up just enough to catch the sunset.

Card-making is serious business ...

... so you have to find some way to have a little fun!

Sunday dawned a clear, calm and relatively mild October day.


Reese's Peanut Butter cupcakes for my birthday. Yum! We couldn't fit thirty-eight candles on the cupcakes -- and I don't think I could have blown them all out if we had -- so I had eleven instead (3 + 8 = 11).

I came home late Sunday afternoon and had a quiet family dinner Sunday night. My sister made us teriyaki stir fry and a chocolate Bundt cake for dessert. Chocolate cake twice in one day -- that's a great birthday!


Thanks for stopping by!

Saturday, October 12, 2013

Hello to a sweet friend

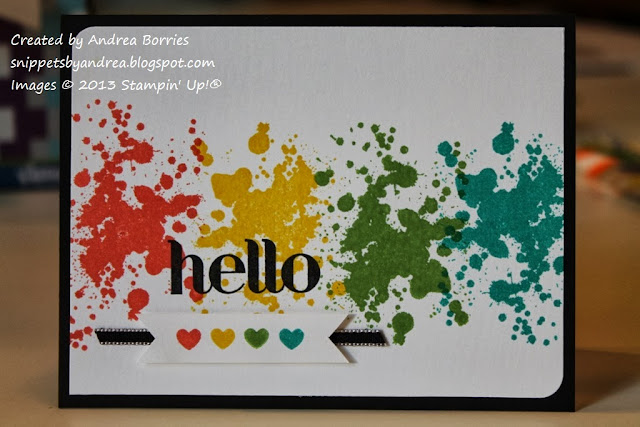
Today I'm sharing my last October Creative Crew project, a card in honor of Sweetest Day on Oct. 19. For this challenge, we were to create a card for our "Sweetest" using products from the Etcetera Suite found in the 2013 - 2014 Stampin' Up! catalog (Pages 96 - 109 in the U.S./Canadian catalog). I chose to make a card for one of my sweetest friends, but I'm not going to say who, so she'll be surprised when she finds it in the mail.

Supplies (all Stampin' Up!):
Stamps: Gorgeous Grunge, Lovely Little Labels, Four You
Cardstock: Whisper White, Basic Black
Ink: Jet Black StazOn, Calypso Coral, Daffodil Delight, Gumball Green, Bermuda Bay
Accessories: Basic Black 1/8" taffeta ribbon, corner rounder, Stamp-a-ma-jig, Dimensionals

I love the tropical rainbow of splatters across the front of the card. It's colorful, but because each color is concentrated in one spot, it doesn't seem too busy. And the black accents -- the "hello" sentiment, the strip of ribbon, and the frame created by the card base -- really stand out against the white cardstock and bright ink colors.

Since this card is for Sweetest Day, I wanted to add a few hearts to the design. Using my Stamp-a-ma-jig tool, I stamped a row of four hearts, one in each of the bright colors, on a strip of Whisper White cardstock. I trimmed both ends of the strip into a V and used Dimensionals to adhere it to the card over the piece of Basic Black ribbon.

This was a fun card to make, and I hope it will be just as fun to receive. Thanks for stopping by!

Friday, October 11, 2013

Matchbook-style gift card holder

Did you know October 17 is Wear Something Gaudy Day? I didn't either. At least not until this month's Creative Crew challenges. One of our October challenges was to use our gaudiest colors to make a gift card holder. Gaudiness is in the eyes of the beholder, so I thought about colors I probably wouldn't wear together and chose my palette from there: Coastal Cabana, Pumpkin Pie, Melon Mambo and Gumball Green.

Supplies (all Stampin' Up!):
Stamps: Tag It, Gorgeous Grunge, Bring on the Cake (inside card)
Cardstock: Coastal Cabana, Pumpkin Pie, Melon Mambo, Whisper White
Ink: Basic Gray, Coastal Cabana, Pumpkin Pie, Melon Mambo, Gumball Green
Accessories: Chalk Talk Framelits dies, Coastal Cabana ruffle stretch trim, Gumball Green stitched satin ribbon, white baker's twine, Chevron embossing folder, Brights Glimmer Brads, Brights Candy Dots, Stamp-a-ma-jig, Dimensionals

I decided to make a matchbook-style card for my gift card holder. I started with a 4-1/4" x 11" piece of cardstock scored and folded at approximately 1-1/4" and 6-1/4". The measurements can be adjusted; you just need to make sure that the two end pieces overlap enough to keep the card closed.

After stamping the bottom flap, I placed a brad on each side to keep the flap closed and allow the top flap be tucked in -- be sure that the brads are placed low enough that they aren't in the way of the top flap. The gift card will be placed between the brads inside the card, so be sure they aren't too close together, either.

For the focal image on the card, I used markers to color one of the stamps from the Tag It set. Then I die cut it with one of the Chalk Talk Framelits dies and added ribbon at the top. I also cut out Pumpkin Pie and Melon Mambo tags, which I embossed with the Chevron embossing folder. I layered the tags on the card front and added three Melon Mambo Candy Dots.

Inside the card I stamped a sentiment on a layer of Whisper White cardstock. (Note: You can add this layer before you place the two brads, or you can make it short enough that the bottom of the layer is just above the brads.) I placed the image high enough that it is above the gift card, and I will use the rest of the layer to add a personalized message. The gift card will fit in the holder either horizontally or vertically. It can be pulled out easily, though, so if you are worried about the gift card falling out, you could adhere it to the card with a small piece of double-stick tape or a Glue Dot.

I have to say that even though this color combo may be gaudy, I really do like how the colors work together on this card. What would your gaudiest colors be?


Thanks for stopping by!


Wednesday, October 9, 2013

'Hoppy' Halloween

This weekend I'm going to visit one of my dear friends. She doesn't live very far away, but it's just far enough that we only manage to get together once or twice a year. Well, earlier this week my friend sent me an e-mail to ask if I could bring along supplies for her daughter to make a Halloween card. Apparently her daughter is quite a fan of my cards and was very excited about the possibility of making her own. Well, shucks. How could I say no to that? So here is the card I designed:

Halloween card with a "vampire" bunny and the greeting "hoppy halloween."
Supplies (all Stampin' Up! unless otherwise noted):
Stamps: Hoppy Halloween (Lawn Fawn)
Paper: Midnight Muse, Summer Sun, Whisper White cardstock; Designer Series Paper (DSP) Patterns Stack - Brights (retired); silver glimmer paper
Ink: Jet Black StazOn, Only Orange, Old Olive, Sahara Sand, Midnight Muse, Summer Sun
Accessories: Dazzling Diamonds glitter glue, deckle scissors (Fiskars), Merry Minis punch pack (star), 1-3/8" circle punch, scalloped oval punch, Mono Multi liquid glue, Dimensionals

I hope she likes it! I've already done a lot of the prep work -- all the stamping; punching out the stars, moon and cloud; and cutting layers -- both to simplify the card-making process and to limit the supplies I need to bring with me. I managed to get all the supplies except the scissors packed into one of the clam-shell style plastic cases in which Stampin' Up! used to package their stamp sets. That even includes the card bases and envelopes. Sweet!

I'm bringing enough supplies so my friend and I can each make a card, too. We'll be trimming the top edge of the DSP grass, coloring the images and cutting them out (with assistance if needed), painting the glitter glue on the moon and then adhering everything together.

I was already looking forward to my mini vacation, but throw in a little card-making, and it will be even better! Thanks for stopping by!

Sunday, October 6, 2013

Late on two counts

Happy (belated) World Card Making Day! I had good intentions of spending some time in my craft room yesterday to make cards, but with the whirlwind of October underway my crafting time was not meant to be. I did manage to find some card-making time this afternoon, though, and it seems fitting that the card I needed to make was a belated 85th birthday card for my great uncle.

Supplies (all Stampin' Up!):
Stamps: Background Sampler, Distressed Dots, Basic Label
Paper: Crumb Cake, Real Red, Bermuda Bay, Old Olive cardstock; silver glimmer paper
Ink: Crumb Cake, Real Red, Bermuda Bay, Old Olive
Accessories: Petite Pennants Builder punch; Apothecary Accents Framelits dies; Itty Bitty Shapes punch pack; corner rounder; Real Red, Bermuda Bay, Old Olive 1/8" taffeta ribbon; Candy Dots - Brights; Mono Multi liquid glue; Dimensionals

I have been using the Petite Pennants Builder punch a lot lately (see "Simple, serene note cards" and "Card variations"), but this time I used it to make party hats. I stamped three different background patterns on Real Red, Bermuda Bay and Old Olive cardstock and then punched a triangle pennant from each one. To make them look like hats, I added a piece of coordinating 1/8" taffeta ribbon along the bottom (the shortest side) and a silver scalloped circle with a Candy Dot center at the top point. Although the Candy Dots are self-adhesive, I did use a little bit of Mono Multi liquid glue to adhere them to the glimmer paper; the paper has a bit of texture, and I wanted to be sure the embellishments didn't fall off.

I used Dimensionals to adhere the hats to a Crumb Cake label shape, and I added two more Candy Dots and a little bit of ribbon to the label. I used Dimensionals to adhere the label to a layer of silver glimmer paper and then attached the whole piece to a Crumb Cake card base stamped with a polka dot background.

I hope you found some time this weekend to do whatever it is you really enjoy. Thanks for stopping by!

Wednesday, October 2, 2013

Halloween with the Creative Crew

Is it just me, or did September fly by? It's hard to believe that October is already here. I love October: colorful leaves, crisp air ... and more Creative Crew projects to share with you! Our first challenge was to make a project using Witches' Brew Designer Series Paper (DSP) or the color combo Basic Black, Basic Gray, Pumpkin Pie, Summer Starfruit and Very Vanilla.

Halloween treat bag made with Tag a Bag gift bags.
Supplies (all Stampin' Up!):
Stamps: Tags 4 You
Cardstock: Pumpkin Pie, Basic Gray, Summer Starfruit, Very Vanilla
Ink: Jet Black StazOn
Accessories: Tag a Bag gift bags, Witches' Brew washi tape, 1-3/4" circle punch, Chalk Talk Framelits dies, Finishing Touches Edgelits dies, Itty Bitty Shapes punch pack, Summer Starfruit stitched satin ribbon, Basic Gray grosgrain ribbon, Basic Black 1/8" taffeta ribbon, Glue Dots, Mono Multi liquid glue, Dimensionals

The idea for this treat bag was floating around in my head for probably a week or two before I actually made it. (I even planned ahead enough to go to our local candy store and pick up the candy sticks in Halloween colors.) I knew I wanted to use the Tag a Bag gift bags, but they were too wide and too tall for the candy sticks. So I improvised.
How to cut the Tag a Bag gift bag in half to make a Halloween treat bag.
I used my paper cutter to cut one of the gift bags in half. Then I folded the open side over about 1/4" and adhered it to the back of the bag with Mono Multi liquid glue. (Because there is no seam or fold on that side, you'll need to glue down both layers of the bag.) Then to make the bag shorter I used the pinking, or zigzag, die from the Finishing Touches Edgelits set to cut off about 1-1/2" from the top of the bag. You could also use a paper cutter to trim the bag, but using the Edgelits die created a fun decorative edge along the top of the bag.

To decorate the treat bag I wrapped three pieces of washi tape around the bottom of the bag. It's cute and a little extra security that the side of the bag will stay closed. I used the circle punch from the Itty Bitty Shapes punch pack to make small circles of Summer Starfruit cardstock and adhered them randomly to the front of the bag with Glue Dots.

For the focal piece, I used one of the Chalk Talk Framelits dies to cut a tag out of Pumpkin Pie cardstock. I adhered a 1-3/4" circle of Basic Gray cardstock to the tag and used Dimensionals to adhere the "Trick or Treat" image over the circle. (I don't have the punch that coordinates with the Tags 4 You stamp set, so I had to cut out the image by hand. It wasn't very hard -- and I do like to fussy cut -- but the punch would have been faster.) I finished the tag by threading pieces of Summer Starfruit and Basic Gray ribbon through the slot and tying them off with a piece of 1/8" Basic Black taffeta ribbon.

Originally this was going to be the only project I made for this challenge. But then one of the others I was working on -- a scrapbook page in My Digital Studio (MDS) -- wasn't cooperarting. I really wanted to finish it, but it was taking me too much time. So I set that aside (for now) and made a Halloween card instead.


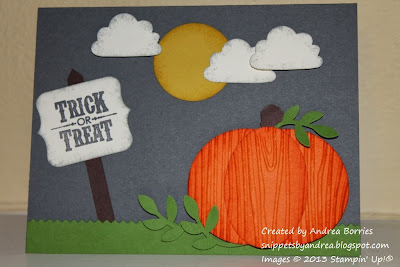
Punch art Halloween card with pumpkin, moon, clouds and "trick or treat" sign.
Supplies (all Stampin' Up!):
Stamps: Tags 4 You
Cardstock: Basic Gray, Pumpkin Pie, Summer Starfruit, Very Vanilla, Chocolate Chip, Gumball Green
Ink: Basic Gray, Pumpkin Pie, Summer Starfruit, Smoky Slate
Accessories: Circles Collection and Chalk Talk Framelits dies; Finishing Touches Edgelits dies; Woodgrain embossing folder; Little Labels punch pack; Extra-Large Oval, Cupckae Builder, Bird Builder and 1-3/8" Circle punches; sponges; Sticky Strip; Dimensionals; Mono Multi liquid glue

I didn't completely stick with the color combo in the challenge; I didn't use any Basic Black on this card, and I added some Gumball Green and Chocolate Chip. To make the pumpkin, I cut two circles with the fourth-smallest die from the Circles Collection Framelits set and punched one extra-large oval from Pumpkin Pie cardstock. I embossed the pieces with the Woodgrain embossing folder and sponged the edges with Pumpkin Pie ink. I adhered the pieces together and added a stem, made with one of the punches from the Little Labels punch pack, and a few branches from the Bird Builder punch.

To make the sign, I stamped just the words from the Tags 4 You stamp -- the same image used on the treat bag above -- and cut it out with the long, narrow die from the Chalk Talk Framelits set. I positioned the image at one end of the die, cut it out, then repositioned the die and cut again to make the cardstock shorter. I sponged the edges of the sign and attached it to a strip of Chocolate Chip cardstock. I finished the card with die-cut grass and punched and sponged moon and clouds.

Stay tuned for my other two October Creative Crew projects. Thanks for stopping by!