Is it just me, or did September fly by? It's hard to believe that October is already here. I love October: colorful leaves, crisp air ... and more Creative Crew projects to share with you! Our first challenge was to make a project using Witches' Brew Designer Series Paper (DSP) or the color combo Basic Black,
Basic Gray, Pumpkin Pie, Summer Starfruit and Very Vanilla.
Supplies (all Stampin' Up!):
Stamps: Tags 4 You
Cardstock: Pumpkin Pie, Basic Gray, Summer Starfruit, Very Vanilla
Ink: Jet Black StazOn
Accessories: Tag a Bag gift bags, Witches' Brew washi tape,
1-3/4" circle punch, Chalk Talk Framelits dies, Finishing Touches Edgelits dies,
Itty Bitty Shapes punch pack, Summer Starfruit stitched satin ribbon, Basic Gray
grosgrain ribbon, Basic Black 1/8" taffeta ribbon, Glue Dots, Mono Multi liquid glue, Dimensionals
The idea for this treat bag was floating around in my head for probably a week or two before I actually made it. (I even planned ahead enough to go to our local candy store and pick up the candy sticks in Halloween colors.) I knew I wanted to use the Tag a Bag gift bags, but they were too wide and too tall for the candy sticks. So I improvised.
I used my paper cutter to cut one of the gift bags in half. Then I folded the open side over about 1/4" and adhered it to the back of the bag with Mono Multi liquid glue. (Because there is no seam or fold on that side, you'll need to glue down both layers of the bag.) Then to make the bag shorter I used the pinking, or zigzag, die from the Finishing Touches Edgelits set to cut off about 1-1/2" from the top of the bag. You could also use a paper cutter to trim the bag, but using the Edgelits die created a fun decorative edge along the top of the bag.
To decorate the treat bag I wrapped three pieces of washi tape around the bottom of the bag. It's cute and a little extra security that the side of the bag will stay closed. I used the circle punch from the Itty Bitty Shapes punch pack to make small circles of Summer Starfruit cardstock and adhered them randomly to the front of the bag with Glue Dots.
For the focal piece, I used one of the Chalk Talk Framelits dies to cut a tag out of Pumpkin Pie cardstock. I adhered a 1-3/4" circle of Basic Gray cardstock to the tag and used Dimensionals to adhere the "Trick or Treat" image over the circle. (I don't have the punch that coordinates with the Tags 4 You stamp set, so I had to cut out the image by hand. It wasn't very hard -- and I do like to fussy cut -- but the punch would have been faster.) I finished the tag by threading pieces of Summer Starfruit and Basic Gray ribbon through the slot and tying them off with a piece of 1/8" Basic Black taffeta ribbon.
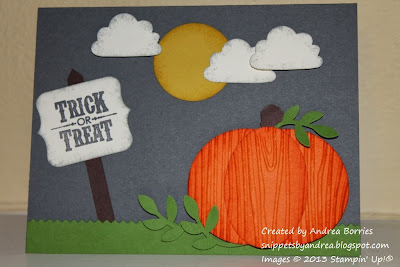
Originally this was going to be the only project I made for this challenge. But then one of the others I was working on -- a scrapbook page in My Digital Studio (MDS) -- wasn't cooperarting. I really wanted to finish it, but it was taking me too much time. So I set that aside (for now) and made a Halloween card instead.
Supplies (all Stampin' Up!):
Stamps: Tags 4 You
Cardstock: Basic Gray, Pumpkin Pie, Summer Starfruit, Very Vanilla, Chocolate Chip, Gumball Green
Ink: Basic Gray, Pumpkin Pie, Summer Starfruit, Smoky Slate
Accessories: Circles Collection and Chalk Talk Framelits dies;
Finishing Touches Edgelits dies; Woodgrain embossing folder; Little Labels
punch pack; Extra-Large Oval, Cupckae Builder, Bird Builder and 1-3/8"
Circle punches; sponges; Sticky Strip; Dimensionals; Mono Multi liquid glue
I didn't completely stick with the color combo in the challenge; I didn't use any Basic Black on this card, and I added some
Gumball Green and Chocolate Chip. To make the pumpkin, I cut two circles with the fourth-smallest die from the Circles Collection Framelits set and punched one
extra-large oval from Pumpkin Pie cardstock. I embossed the pieces with the Woodgrain embossing folder and sponged the edges with Pumpkin Pie ink. I adhered the pieces together and added a stem, made with one of the punches from the Little Labels punch pack, and a few branches from the Bird Builder punch.
To make the sign, I stamped just the words from
the Tags 4 You stamp -- the same image used on the treat bag above -- and cut it out with the long, narrow die from the Chalk Talk
Framelits set. I positioned the image at one end of the die, cut it out, then repositioned the die and cut again to make the cardstock
shorter. I sponged the edges of the sign and attached it to a strip of Chocolate Chip cardstock. I finished the card with die-cut grass and punched and sponged moon and clouds.
Stay tuned for my other two October Creative Crew projects. Thanks for stopping by!


No comments:
Post a Comment