Saturday, March 30, 2013

Display stamper submission

Earlier this month, Stampin' Up!® demonstrators were invited to apply to be a display stamper -- one of the people who make sample projects that are displayed at different events for the company. Applicants had to create six items: three cards, two 3D items and one scrapbook page. Here are the projects I created for my submission.

Card made with Betsy's Blossoms and Sweet Essentials stamp sets.
Supplies (all Stampin' Up!):
Stamps: Betsy's Blossoms, Sweet Essentials
Card stock: Whisper White, Pool Party, Lucky Limeade, Daffodil Delight
Ink: Pool Party, Daffodil Delight
Accessories: Cloudy Day embossing folder, Vine Street embossing folder, 1-1/4" Scallop Circle punch, 3/16" corner rounder, Brights Designer buttons, Lucky Limeade baker's twine, Sticky Strip, Dimensionals

To make the flowers on this card, I stamped the large flower image from the Betsy's Blossoms set three times with Daffodil Delight ink on Whisper White card stock. I punched out the middle of the flowers with the 1-1/4" scallop circle punch. Between each of the scallops, I snipped about 1/4" toward the center of the circle to make "petals." I adhered an Old Olive button tied with Lucky Limeade baker's twine to the center of each flower and gently curved the petals up around the button. For the greeting I carefully inked and stamped just part of the "hello, baby" sentiment from the Sweet Essentials set.

Card made with Secret Garden stamp set.
Supplies (all Stampin' Up!):
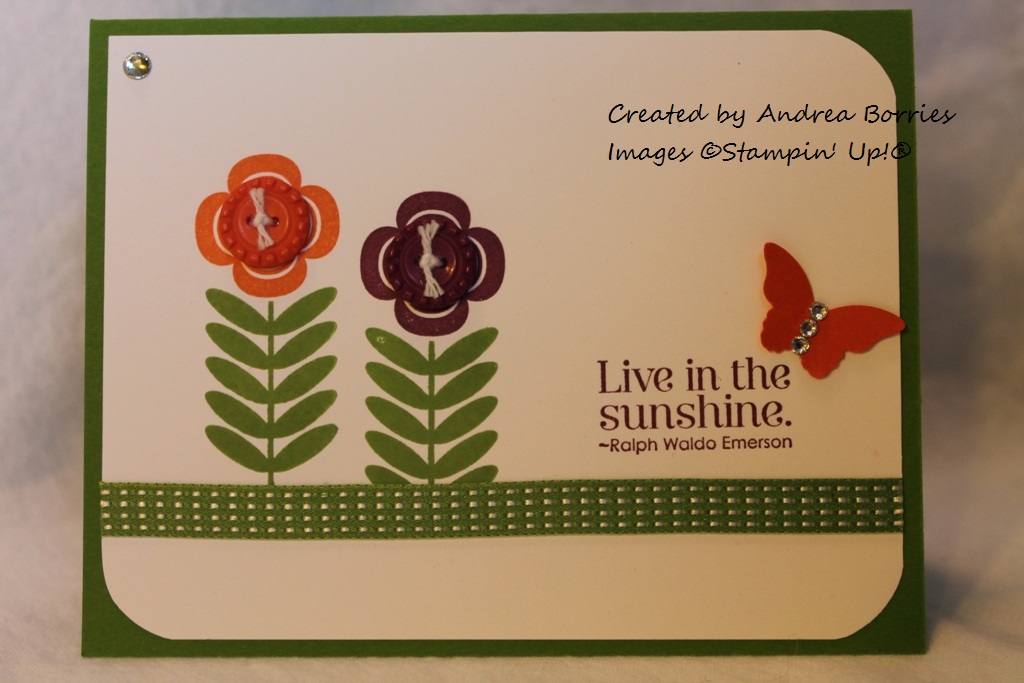
Stamps: Secret Garden
Paper: Crumb Cake, Very Vanilla card stock; Print Poetry Designer Series Paper (DSP) Stack
Ink: Crumb Cake
Accessories: Secret Garden Framelits dies, Honeycomb embossing folder, 5/8" Victoria crochet trim, Crumb Cake seam binding ribbon, Pearl Basic Jewels, Dimensionals

A monochromatic card definitely doesn't have to be boring. I used a piece of patterned paper from the Print Poetry DSP Stack (which is perfect for card-making) and different textures from the Honeycomb embossing folder, crochet trim and seam binding ribbon to create a lot of visual interest on this card. The focal point is a single flower from the Secret Garden stamp set. I used the coordinating Framelits dies to cut out the stamped flower; I cut out the stem by hand and adhered it to the back of the flower. I used Dimensionals to attach the flower to the embossed card stock and also to adhere the whole panel to the card front.

Card made with Tea Shoppe stamp set.
Supplies (all Stampin' Up!):
Stamps: Tea Shoppe
Card stock: Very Vanilla, Primrose Petals, Soft Suede
Ink: Primrose Petals, Soft Suede, Pink Pirouette
Accessories: Scallop Trim Border punch, 1" Circle punch, 1-1/4" Scallop Circle Punch, 5/8" Victoria crochet trim, Soft Suede 3/8" taffeta ribbon, Vintage Trinkets, Pearl Basic Jewels, paper-piercing tool, Stampin' Pierce Mat, Stamp-a-ma-jig tool, Sticky Strip, Dimensionals

The sentiment I used for this card ("A cup of thanks") is actually one line of text on the stamp. I wanted it to fit in a circle punch, so I inked and stamped just the first three words and then used the Stamp-a-ma-jig tool to stamp the last word underneath. That allowed the greeting to fit perfectly in a 1" circle. I added three pearls and a scallop circle mat, pierced a hole in the top with the paper-piercing tool, and attached the tag to the focal image with a mini safety pin from the Vintage Trinkets embellishments. I also tied a little piece of Soft Suede taffeta ribbon on the safety pin.

Summer Starfruit and Pool Party ribbon-covered barrettes.
Supplies (all Stampin' Up! except "Other supplies"):
Stamps: Betsy's Blossoms, Just for You (from the Pop-Up Posies Designer Kit)
Card stock: Very Vanilla
Ink: Pool Party, Summer Starfruit, Basic Gray (marker)
Accessories: Summer Starfruit 3/8" stitched satin ribbon, Pool Party 3/8" ruffled ribbon, 5/8" flower trim, 3/8" Basics glimmer brads, Sycamore Street ribbon and button pack, Itty Bitty Shapes punch pack, 3/16" corner rounder,
Other supplies: Single-pronged curl clips, hot glue gun

I love these cute little barrettes, and as long as my cousins keep having baby girls, I'll just keep making them. (For a tutorial, see my Aug. 23, 2011, post titled Ribbon barrettes.) To embellish the Summer Starfruit barrettes, I used two individual flowers from the new 5/8" flower trim, carefully cutting off the extra tulle around each flower. For the Pool Party barrettes, I clipped the prongs off of two silver brads and hot glued the brad tops to Pool Party buttons from the Sycamore Street ribbon and button pack. To attach the barrettes to the tag, I used the circle punch from the Itty Bitty Shapes punch pack to punch four holes in the card stock. Then I opened each barrette, placed the back of the clip through one of the holes and let the barrette close.

Luminary for electric tealight candles. Made with Window Frames Collection Framelits and Natural Composition DSP.
Supplies (all Stampin' Up!):
Paper: Natural Composition Specialty DSP, vellum card stock, Crumb Cake card stock
Accessories: Window Frames Collection Framelits dies, Festive Paper-Piercing Pack, paper-piercing tool, Stampin' Pierce Mat, Simply Scored scoring tool, Sticky Strip

To make this tealight holder, I used the largest die and the second-smallest die from the set of Window Frames Collection Framelits dies to die cut four shapes with windows from the Natural Composition Specialty DSP. For each of the die-cut shapes, I paper-pierced around the window and adhered a 3" square piece of vellum card stock to the back. I used the Simply Scored scoring tool to make score lines along three of the "flaps" on each die-cut shape and adhered the die-cuts together by placing Sticky Strip on the flaps (be sure the non-scored flap is on the top). I folded the bottom flaps to the inside of the candleholder and adhered a 3-1/2" square piece of Crumb Cake card stock over them to create a flat bottom for a battery-operated tealight candle. Although you can't see it in the photo, the candlelight does look very pretty shining softly through the vellum. You could make these candle holders with different colors of card stock -- plain, stamped and/or embossed -- to match holiday decor or to make table centerpieces for a party.

Scrapbook page of me in the Pacific Ocean. Scalloped trim background  made to look like waves.
Supplies (all Stampin' Up!):
Stamps: Pursuit of Happiness
Card stock: Marina Mist, Bashful Blue, Sahara Sand, Pacific Point, Always Artichoke, Whisper White
Ink: Marina Mist, Sahara Sand, Pacific Point, Always Artichoke markers
Accessories: Tasteful Trim Bigz XL die, Apothecary Accents Framelits dies, Natural 7/16" trim ribbon, Itty Bitty Shapes punch pack, 3/16" corner rounder, color spritzer tool, Sticky Strip, Glue Dots, Multipurpose Liquid Glue, Dimensionals

To create the background for this 8" x 8" scrapbook page, I used the Tasteful Trim die to cut strips of "bubble" trim in several colors that coordinated with the water in my photo. (My favorite part of this page is how the Pacific Point and Always Artichoke strips at the top of the page blend in perfectly with the waves on the left side of the picture.) For the sentiment, I used the color spritzer to make splatters of Marina Mist and Sahara Sand on a piece of Whisper White card stock and then stamped the greeting in Pacific Point and Always Artichoke. I cut out the sentiment using a label shape from the Apothecary Accents Framelits dies and adhered a piece of natural trim to the back.

Thanks for stopping by -- and wish me luck!

Tuesday, March 26, 2013

A dress-up rainbow

I'm not really much of a girly girl; I rarely wear make-up, I prefer jeans to dresses, and I despise high heels. (Seriously, the last time I wore heels was for a friend's wedding several years ago -- I was her personal attendant -- and my toes were numb for days afterward.) But the new Dress Up Framelits dies in the Stampin' Up!® spring catalog are too adorable for words. The set comes with dies for two different dresses and a dress form. I bought them on my last order, and yesterday I made this adorable set of cards:

Supplies (all Stampin' Up!):
Paper: Summer Smooches Designer Series Paper (DSP); Basic Gray, Whisper White, Tangerine Tango, Daffodil Delight, Real Red card stock
Accessories: Dress Up Framelits dies, Oval Accent Bigz Clear die, Beautiful Wings Embosslits die, Perfect Polka Dots embossing folder, corner rounder, Itty Bitty Shapes punch pack, Bitty Buttons, Brights Designer Buttons, Everyday Enchantment Lucky Limeade 1/8" organdy ribbon, Daffodil Delight and Real Red 1/8" taffeta ribbon, Sycamore Street Tangerine Tango and Island Indigo 1/4" ribbon, Rich Razzleberry 3/8" taffeta ribbon, white baker's twine, pearls, rhinestones, Glue Dots, Tombow Mono Multi liquid glue

Aren't they cute? They were easy to make, too. I used Basic Gray card stock to die cut the six dress forms. For the dresses, I chose six monochromatic patterns from the Summer Smooches DSP and cut a dress from each pattern.

The hardest part definitely was deciding how to embellish the dresses! I've seen many cute and creative variations of these die-cuts: dresses with ribbon skirts or ruffles along the bottom, dresses with patterned tops and solid skirts (or vice versa), and adorable little cardigan sweaters over dresses. But I decided to keep it simple: I just added a ribbon belt and one other embellishment to each dress. I did make a little alteration to the Real Red dress by trimming off one of the straps. Then I added a flower (made with three flower shapes from the Itty Bitty Shapes punch pack crumpled and layered together with a pearl in the center) to the other strap.

To frame the dresses, I used the Oval Accent die to cut decorative oval shapes from Whisper White card stock. I embossed the ovals with the Perfect Polka Dots embossing folder and adhered them to Basic Gray card bases. (I rounded the corners of the card bases before attaching the ovals.) I adhered the dresses onto the dress forms and then glued the forms to the middle of the white ovals. Inside the cards I simply adhered a blank 4" x 5-1/4" piece of Whisper White card stock with rounded corners.

I have a few friends with birthdays coming up this spring, and I've been trying to decide who will receive this set of cards. Hmm ... I might just have to make some more dress-up cards. Thanks for stopping by!

Saturday, March 23, 2013

By the Tide for him and her

About a month ago I ordered the By the Tide stamp set from Stampin' Up!®. I loved the set as soon as I saw it in the spring catalog, and when it arrived I mounted the stamps on the wood blocks and then ... did nothing. I was stumped. (Everyone I know thinks I just sit down and magically start producing cards, but it's really not that easy.) The images are gorgeous and make me think of all things beachy (oh, what I wouldn't give to be on a beach right now!), but I just couldn't figure out how to put them together on a card. So  I decided the only way to get going was to just start playing with the stamps. The end product was two cards: one feminine and one masculine.

Supplies (all Stampin' Up!):
Stamps: By the Tide
Card stock: Pool Party, River Rock
Ink: Pool Party, River Rock, Basic Gray
Accessories: Pearls, Dimensionals

Not very many supplies, right? I wanted a clean and simple layout for the feminine card, so I stamped the coral image in Pool Party ink on a Pool Party card base. To create the look of sand along the bottom of the card, I tore the edge off a strip of River Rock card stock and then crumpled and creased the card stock. After I smoothed out the strip, I gently rubbed my River Rock ink pad over it so the edges and creases were lightly inked and then adhered it to the bottom of the card. I also used River Rock ink and card stock for the shell, which I cut out and adhered to the card with Dimensionals. I stamped the poem over part of the coral image with Basic Gray ink and added a few pearls beneath it. To fill the emptiness in the top right corner of the card, I cut two small banners from Pool Party card stock and adhered them above the poem; I like how the tone-on-tone detail adds a subtle visual interest but doesn't detract from the stamped images.

Supplies (all Stampin' Up! unless otherwise noted):
Stamps: By the Tide, Teeny Tiny Wishes
Card stock: Naturals Ivory, Not Quite Navy
Ink: Not Quite Navy, River Rock, Always Artichoke, Soft Suede
Accessories: Woodgrain embossing folder, Natural Trim ribbon, hemp twine, medium metallic brad (Making Memories), Dimensionals

For the masculine card, I used collage-style stamping. I randomly stamped images over a piece of Naturals Ivory card stock using Not Quite Navy (seahorse), Always Artichoke (shell), River Rock (coral) and Soft Suede (fish). I embossed the card stock with the Woodgrain embossing folder to add some texture (I think the wavy lines are reminiscent of water) and mounted the piece on a Not Quite Navy card base. I distressed a piece of Natural Trim ribbon by fraying the ends and then adhered it along the bottom of the card, leaving it bunched and curved in some places. I wrapped a piece of hemp twine around the right side of the card twice, making an X shape. For the focal point, I cut out a stamped fish image, used Dimensionals to adhere it over the knot in the twine and added a thin strip of card stock stamped with "Happy Father's Day." The brad in the corner was a bit of an afterthought, but I'm glad I added it.

So which card do you like better? I think I'm leaning toward the more feminine card, but I have to admit that the masculine one is growing on me. Now that I've got a start with this stamp set, I'm excited to see what else I can create. Thanks for stopping by!

Wednesday, March 20, 2013

Polka-dot daisy card set

As promised in my last post, today I'm going to share the second card set I made last weekend. For this set I was inspired by a bright floral card I made a couple of weeks ago (the first card in the "Flower power" post).

Supplies (all Stampin' Up!®):
Stamps: Pick a Petal
Card stock: Whisper White, Basic Gray, Daffodil Delight, Primrose Petals, Pink Pirouette, Pool Party
Ink: Basic Gray marker; Daffodil Delight, Primrose Petals, Pink Pirouette, Pool Party pads
Accessories: Sweet Buttons Embosslits die, 1-1/4" scalloped circle punch, Perfect Polka Dots embossing folder, stitched Basic Gray grosgrain ribbon, Dimensionals

The complete set includes eight cards, two of each of the colors pictured. I really like this fun combination of colors and the playful polka-dot flowers. To make the focal layer for each card I started with a piece of Whisper White card stock. I stamped one of the circular images from the Pick a Petal stamp set where I wanted the center of the flower -- it doesn't have to be perfect since it will be covered, but it helps to have a guide for stamping the petals. I stamped two of the petals directly across from each other and then two more in between those (so the four petals make an X). Then I went back and stamped one more petal between each pair of petals, making eight petals total.

For the flower center I embossed a piece of Basic Gray card stock with the Perfect Polka Dot embossing folder and then punched out a 1-1/4" scallop circle. I adhered the scallop circle over the center of the circle and added a die-cut and embossed button. I doodled a border around the white card stock, added another die-cut button and layered the piece on Basic Gray card stock. To finish I adhered a piece of Basic Gray ribbon near the bottom of the card front and used Dimensionals to attach the stamped panel to the card base.

Thanks for stopping by!

Monday, March 18, 2013

Hydrangea card set

Last weekend I needed a couple of card sets to give as birthday gifts. (One was belated and one was early, so it all evens out, right?) The stash of card sets I used to have all made and ready to give has been depleted, so I started from scratch. I'll share the first card set today and the second one later this week.

Supplies (all Stampin' Up!®):
Stamps: Because I Care
Card stock: Very Vanilla, Almost Amethyst, Perfect Plum, Bashful Blue, Marina Mist
Ink: Almost Amethyst, Perfect Plum, Bashful Blue, Marina Mist, Old Olive markers
Accessories: Pop 'N Cuts card base die, Labels Collection Framelits dies, Festive Paper-Piercing Pack, paper-piercing tool and mat, Frost White Shimmer Paint, Very Vanilla seam binding ribbon, Color Spritzer tool, sponge daubers, Dimensionals

I love this hydrangea image, and since I always associate blue with hydrangeas, I chose a color palette of two shades of blue (Bashful Blue and Marina Mist) and added two purples (Almost Amethyst and Perfect Plum) for a little variety. To create the focal image, I colored directly on the rubber stamp with markers (one of the four main colors for the hydrangea blossom and Old Olive for the stem and leaves). Then I used a sponge dauber to apply Frost White Shimmer Paint to the blossom part of the rubber stamp (on top of the ink). I didn't worry about even coverage; I just dabbed on the shimmer paint here and there. Then I stamped the image on Very Vanilla card stock. It's a subtle shimmer, but it looks so pretty when it catches the light.

After stamping all of the hydrangeas (two of each color for the eight-card set), I cut them out using the Labels Collection Framelits dies. The focal pieces needed a little something, but when I give card sets as gifts, I try to keep the cards fairly flat so someone else doesn't have to worry about extra postage. So instead of adding pearls, rhinestones or buttons, I decided to paper pierce around the edge of the die cut. I think it turned out to be the perfect detail for these cards.

To make the card bases, I used the new Pop 'N Cuts card base die from Stampin' Up!. I love the little tabs on the corners to keep the card closed, and the rounded bottom edge looks great with the Labels Collection die-cuts.

Before adding the focal images on the cards, I used the Color Spritzer tool to "splatter" ink from the coordinating marker on each of the card bases. I wrapped a piece of Very Vanilla seam binding ribbon around the middle of the card front and used Dimensionals to adhere the focal image.

I am really pleased with how this card set turned out, and I think I may need to make another one if I ever have a chance to work on replenishing my stash. Check back later this week to see the second card set I made last weekend. Thanks for stopping by!

Sunday, March 17, 2013

Happy St. Paddy's Day!

Growing up I often wished I were Irish, and sometimes people even assume I am (I think because of the auburn hair). Alas, I am neither Irish nor a big drinker, so St. Patrick's Day is a very low-key holiday for me. Today my nods to the Irish culture included listening to Celtic music, drinking Irish breakfast tea and eating some wonderfully delicious Irish soda bread (which sadly is only available during March at our local Breadsmith bakery). And of course wearing the requisite green shirt.

Since I'm not a St. Patrick's Day card-maker, I don't have anything particularly festive to share. But I do have a floral card that includes some green. It's a stretch, I know, but it's a fun card that I think you'll enjoy.

Supplies (all Stampin' Up!®):
Stamps: Madison Avenue, Pursuit of Happiness
Card stock: Gumball Green, Whisper White
Ink: Gumball Green, Tangerine Tango, Rich Razzleberry
Accessories: 1-1/4" circle punch, Sycamore Street ribbon and button pack, white baker's twine, Gumball Green stitched satin ribbon, rhinestones, Glue Dots

Isn't it bright and cheerful? I'm wishing I could live a bit more in the sunshine myself, especially with yet another snowstorm predicted for tonight.

I think this card is mostly self-explanatory, so I won't go into too much detail. I do want to explain, though, how I rounded the corners of the layer of Whisper White card stock: instead of using a traditional corner-rounding punch,  I used a 1-1/4" circle punch. Holding the circle punch upside-down, insert the corner of the paper into the circular hole in the bottom and slide the point between the layers of metal. Then close the punch and just the corner is cut off. When I was done with the punch I used my scissors to smooth out the places where the now-rounded corners meet the straight edges. You can use different size circle punches, too; a larger circle will cut off more of the corner. It's easier to explain with pictures, but I neglected to take any photos of this step. If you're confused, post a comment below and I will try to clarify and/or create a separate post that shows how to round corners with a circle punch.

Thanks for stopping by and Erin Go Bragh!

Tuesday, March 12, 2013

Looks like summer

Sadly, the post title does not refer to the weather here. It is supposed to warm up a bit toward the end of the week, but seeing as how we're getting some light snow flurries this afternoon, it will be quite awhile before it looks like summer outside my window. The summery goodness I do have to share with you, though, is this card:

Supplies (all Stampin' Up!® ):
Stamps: Bright Blossoms, Petite Pairs
Paper: Summer Smooches Designer Series Paper (DSP); Whisper White, Island Indigo, Lucky Limeade card stock
Ink: Island Indigo, Lucky Limeade, Rich Razzleberry, Tangerine Tango, Daffodil Delight
Accessories: 1-1/4" circle punch, Postage Stamp punch, Island Indigo baker's twine, Dimensionals

This was a quick card to make and could be suitable for many occasions simply by changing the sentiment. You could even omit the sentiment, add a fourth flower image instead and make a set of blank cards to give as a gift.

The strip of DSP along the bottom of the card is probably my favorite pattern from the Summer Smooches pack. Using a small piece such as this on a card adds some fun color and detail to your design -- and helps the sheet of DSP go a long way!

Looking at this card does make it a little easier to believe that summer is on its way. Thanks for stopping by!


Friday, March 8, 2013

Simple and subdued

Although I seem to be drawn to bold, bright colors in my card-making lately (trying to shake off winter!), I am equally fond of more relaxing, subdued color palettes. I found the combination of Wild Wasabi, Chocolate Chip and Pool Party in my Color Coach from Stampin' Up!®. I hadn't tried it before, but I think it works very well with this simple any-occasion card layout.

Supplies (all Stampin' Up!®):
Stamps: Quint-Essential Flower
Card stock: Crumb Cake, Whisper White, Chocolate Chip
Ink: Chocolate Chip, Wild Wasabi, Pool Party
Accessories: 2-3/8" and 1-1/4" scallop circle punches, 1" circle punch, corner rounder, In Color Designer Printed brads, Essentials Paper-Piercing Pack, paper piercer and mat, Dimensionals


I stamped the Quint-Essential Flower three times on Whisper White card stock -- once in each color -- punched out the images with different punches, added a brad to the smallest piece and layered them together with Dimensionals. I adhered a strip of Chocolate Chip card stock behind the layered flower and then adhered the whole piece to the Crumb Cake card base, which I had already pierced using the Essentials Paper-Piercing Pack. I rounded the two bottom corners of the card for an extra little detail.

Thanks for stopping by!

Thursday, March 7, 2013

A crafty St. Kate's shout out

I graduated from the College of St. Catherine (now St. Catherine University) in 1998 with a B.A. degree in English and Philosophy. And yes, for those of you doing the math, that means this year is my fifteen-year college reunion. (Excuse me, but how did that happen?) Today is Shout Out St. Kate's Day, and in honor of the celebration, I put my crafty skills to use and made two cards that display my Katie pride.

Supplies (all Stampin' Up!®):
Stamps: Everyday Flexible Phrases, Polka-Dot Posies, Kind and Caring Thoughts
Card stock: Shimmery White, Elegant Eggplant, Yoyo Yellow
Ink: Jet Black StazOn
Accessories: 1" and 1-3/4" circle punches, Itty Bitty Shapes punch pack, Bitty Buttons, Chevron embossing folder, Daffodil Delight stitched grosgrain ribbon, white baker's twine, Dimensionals, Glue Dots

The starting point for both of my purple and yellow cards was a set of shout-out stickers included in the alumnae magazine. (Today I'm wearing the "Proud to be a Katie!" sticker. The toddlers in my class will be terribly impressed that I have a giant purple sticker on my shirt.) For this card I aimed to answer the question "What's a Katie?" It's a little hard to read the words on the purple card stock circles, so here are all of them (left to right, top to bottom): caring, genuine, mother, sister, friend, just, wise, daughter, kind. I know every Katie out there can lay claim to at least one of these words.

Supplies (all Stampin' Up! unless otherwise noted):
Stamps: DefineYour Life, Everyday Flexible Phrases, Expressive Flexible Phrases, Think Big, Strokes of Wisdom (Raisin Boat)
Card stock: Elegant Eggplant, Yoyo Yellow, Silver Glimmer paper
Ink: Elegant Eggplant
Accessories: 2-1/2" circle punch, silver cord, rhinestones, Dimensionals

Making the background for this card was a fun but challenging experience (ooh - just like my four years at St. Kate's!). I searched through many, many stamp sets trying to find the best words and phrases to capture the Katie spirit and the myriad ways, both big and small, that we make a difference in our lives and in the world. I hope I succeeded! And since Shout Out day is something of a celebration, I thought a little sparkle was only appropriate.

So, want to know a little more about St. Catherine University? Here are just a few fun facts:
  • The University offers degrees at the associate, baccalaureate, master’s and doctorate levels, making it the most comprehensive private college or university in Minnesota.
  • St. Kate’s was the first Catholic college or university in the country to receive a chapter of Phi Beta Kappa in 1937.
  • We rank in the top 10 percent of all U.S. News and World Report colleges and universities in our category.
  • The Sisters of St. Joseph of Carondelet founded the College of St. Catherine in 1905 and remain active in campus life today.
  • Our College for Women, which grants four-year degrees in both traditional and hybrid formats, is the largest women’s college in the country.
  • Men can be Katies, too. Our graduate, associate and certificate programs are open to women and men.
  • St. Catherine’s main campus in the Highland Park neighborhood of St. Paul is often touted as the prettiest urban campus in Minnesota.
  • Both ethnically and economically, our student body is the most diverse of all Minnesota private colleges or universities.
If you are heading to college for the first time or are thinking about returning to school, consider St. Catherine University. I'm definitely proud to be a Katie!

    Tuesday, March 5, 2013

    Buttons, buttons

    I've always liked the look of buttons on cards. With so many different shapes, styles and colors, they're an easy, relatively inexpensive and fun embellishment. But I've often shied away from using them because the bulkiness can make it difficult to mail a card. Well, apparently I decided to throw caution to the wind because lately I've found myself adding buttons to cards more and more often. So, with buttons on the brain, what set would be more appropriate for card making than Button Buddies?

    Supplies (all Stampin' Up!®):
    Stamps: Button Buddies
    Paper: Naturals Ivory, Soft Suede card stock; Natural Composition Specialty, Polka Dot Parade Designer Series Paper (DSP)
    Ink: Old Olive, Soft Suede markers
    Accessories: 2-3/8" scallop circle punch, 2-1/2" circle punch, Brights buttons, white baker's twine, Sticky Strip, Dimensionals

    First of all, I love that this stamp set is designed so you can use it with or without buttons; the images are complete in and of themselves. And this cherry image is definitely one of my favorites in the set.

    On this card I used four 1-5/8" x 2-1/4" pieces of patterned paper for the background: two from the Natural Composition Speciatly DSP (natural kraft color with raised glossy designs) and two from the Polka Dot Parade DSP (Real Red and Old Olive). I centered the pieces on the card front and then adhered the focal image over the middle. I also used my Soft Suede marker to doodle a border around the edge of the card.

    Supplies (all Stampin' Up!):
    Stamps: Button Buddies, Sweet Essentials Card stock: Whisper White, Old Olive Ink: Real Red, Old Olive markers Accessories: Bitty Butterfly punch, Scallop Edge Border punch, 2-1/2" circle punch, Brights buttons, white baker's twine, rhinestones, 1/8" Old Olive taffeta ribbon, Sticky Strip, Dimensionals, Glue Dots

    On this card I love the different layers of Old Olive -- the base, the scalloped strip, the ribbon, the butterflies and even the stamped sentiment -- with just touches of Real Red and Pumpkin Pie in the vase and the flower buttons. And I added a little extra bling with three rhinestones on each butterfly and one in the upper left corner.

    I've accumulated (read: hoarded) a lot of buttons over the years, so maybe now I'll start putting more of them to good use! I'll just need to invest in a few padded envelopes.

    Thanks for stopping by!

    Monday, March 4, 2013

    Flower power

    With every fiber in my being I am ready for winter to be done. I am tired of shoveling snow, trudging through slush, slipping on ice and climbing over snowbank after snowbank. But alas, it's only March -- often one of the snowiest months for us -- and, you guessed it, it's snowing. So, since I have no influence over Mother Nature, I decided to inject a little spring into my crafting by focusing on the power of flowers.

    Supplies (all Stampin' Up!® unless otherwise noted):
    Stamps: Central Park (Raisin Boat), Petite Pairs
    Card stock: Whisper White, Basic Black, Melon Mambo
    Ink: Jet Black StazOn, Daffodil Delight, Melon Mambo, Basic Black marker
    Accessories: Brights Buttons, Daffodil Delight stitched grosgrain ribbon, white crochet thread (DMC), Sticky Strip, Dimensionals

    I don't know what could cure the winter doldrums better than a giant bright pink daisy, do you? The oval image I used to make the daisy petals is actually a treetop, but I think it works great here; I love how the scalloped lines within the ovals align to create circles radiating from the center of the flower.

    I didn't use many embellishments on this card because I really wanted the flower to have the spotlight. A Daffodil Delight button adds some dimension to the center of the daisy, and a piece of Daffodil Delight ribbon helps break up the Melon Mambo card base. I also hand-drew a border around the focal panel for a little visual interest.

    Supplies (all Stampin' Up! unless otherwise noted):
    Stamps: Central Park (Raisin Boat)
    Card stock: Whisper White, Going Gray
    Ink: Going Gray, Lucky Limeade, Wisteria Wonder, Summer Starfruit, Pool Party
    Accessories: Lucky Limeade 1/8" taffeta ribbon, corner rounder

    I chose a softer color palette for this garden-inspired card. The layout is almost as simple as it can get: a stamped piece of white card stock layered on a card base. Easy peasy. I added just a bit of ribbon and a simple bow along the bottom of the stamped panel for a subtle embellishment.

    I'm always happy that no matter what the weather outside, I can always have flowers in my craft room. Thanks for stopping by!

    Sunday, March 3, 2013

    Giant jigsaw puzzle

    Goodness, it's been more than a week since I posted on my blog. I had every intention of making cards to share last week, but I had to do some tasks for work, and the days just got away from me. I created a few cards yesterday, though, so I will have things to share this week. In the meantime, I've been intending to post this picture for awhile:

    Several weeks ago my sister and I put together this massive jigsaw puzzle. She had given it to me for Christmas 2011, but we hadn't assembled it yet because we didn't have a surface that was large enough and free from clutter. It's hard to appreciate the size of the puzzle in a picture, but it was roughly five feet long and three feet high; as you can see, it took up the entire dining room table.

    According to the box it was a 3,000-piece puzzle, but when we were finished I multiplied the number of rows by the number of columns and came up with something closer to 3,200 pieces. Egads. I was sure by the time we were done there were going to be pieces missing -- lost in the vacuum, fallen into the Christmas decorations we were packing, stuck to something we set down on the table, or confiscated by one of the cats -- so I was relieved to find that all the pieces were present and accounted for.

    We left the completed puzzle on the table for a week or two to admire it and then packed it up and started another one. This one is "normal" size -- 1,000 pieces and about 19" by 27" -- but we became so used to the giant puzzle that the new puzzle looks ridiculously tiny! I guess it's all relative.

    Thanks for stopping by!