Sunday, July 29, 2018

July garden update

Apparently I was so tickled with the unicorn card I posted last week that I completely forgot to do another post for the week. Oops! I'll try to remember to do three this week to make up for it. Today I have a quick garden update and a few pictures.


As usual, the cucumbers are growing like crazy, which never ceases to amaze me. See all the little yellow buds on the plants? This guy was our first harvest of the season and a delicious addition to a salad with last night's dinner.

Clearly, though, the second cucumber plant doesn't want to be outdone. It's got four cucumbers coming in that are all about the same size (sorry they're a little hard to see in this photo). Looks like I'll be making a cucumber salad soon.

On a somewhat-related-but-still-kind-of-random note, do you ever wonder about the people who first ate fruits or vegetables? I mean, I know it was so long ago it's hard to comprehend, but who was the brave soul who saw something hanging from a plant, thought, "Oh, that looks tasty. I could really go for a snack right about now," then picked it and ate it? There had to have been some unfortunate choices along the way, right?

And back to the garden! We have little tomatoes growing on one of the tomato plants ...

... and flowers just starting on the other one. I think this plant is the Pink Berkeley Tie Dye variety, so the fruit should be pretty. I love tomatoes that aren't plain solid red. Those are good tomatoes, too, don't get me wrong. But there are just so many other varieties that most people never see.

Another aside: I was walking home from the bus stop after work today and went past a garden with tomatoes that had to have been the size of a small melon. They were huge! We've harvested some big tomatoes, but nothing quite like that.


The zucchini (above) is doing quite nicely, as is the yellow squash (below).


And just for fun, here is the elephant ear plant we put in the planter box along with my little gnome family. Something -- squirrels or chipmunks or some such critter -- likes to dig in this planter, and I often come out to discover gnomes and their accessories strewn about and/or covered with dirt. The gnomes are good sports about it, though, and never complain.

Thanks for stopping by!

Tuesday, July 24, 2018

Need a smile?

If you need a little smile today, I've got the perfect card for you. Every time I look at it, it just cracks me up.

Supplies (all Stampin' Up! unless otherwise noted):
Stamps: Little Dreamer - Cardmaking (Close to My Heart), Pure Magic (Essentials by Ellen), Love You S'More (Lawn Fawn)
Paper: White card stock (Cougar)
Ink: Almost Amethyst, Pool Party, River Rock, Stardust Gelly Roll pen (Sakura)
Accessories: Wonky Stitched Circles dies (My Favorite Things), Viola sequin assortment (Craft Medley), Glue Dots, Dimensionals

Ha ha ha ha ha ha! This has to make you smile, right? Even if it's not your style, or you think it's just silly, I'm pretty sure it has to amuse you just a little.

When I saw the Pure Magic stamp set from Essentials by Ellen, I had to order it the day it was released. There are a lot of great sentiments that work with rainbow, unicorn and other magical images. But I confess that I wanted this set mostly because of this sentiment. I had an idea for a layout like this, and I'm so glad it worked out.

I stamped my unicorn's body with Almost Amethyst ink and used Pool Party for the mane and tale and River Rock for the snout and horn. The big question, though, was how to illustrate the unicorn's farts. Pink puffs? Swirly rainbows? I decided to go with sparkly stars.

I used River Rock to stamp three tiny stars below the unicorn's tail and draw a few curly lines. Then I went over them with a Stardust Gelly Roll pen to add the sparkle. I love how that made the ink look almost gold, so I added sparkle to the unicorn's horn and snout, too. I cut out the completed unicorn with a large wonky stitched circle die. (Note: I positioned the die so it was closer to the right side of the unicorn image because I knew I would be trimming off the left part of the circle.)

On a separate piece of white card stock I stamped the sentiment with Pool Party ink and cut it out with a smaller wonky stitched circle die. I wanted to emphasize a few of the words, so I stamped the sentiment again using River Rock ink, carefully trimmed out the words "glitter" and "unicorn farts," and used Dimensionals to attach them over the original sentiment. I also went over those words with the Stardust Gelly Roll pen.

I used Dimensionals to adhere the two circles to a white card base and added a few sequins for embellishment. And that's it! Not a complicated card, but definitely an amusing one.

Thanks so much for stopping by. And remember, make today a glitter-filled bag of rainbows and unicorn farts!

Thursday, July 19, 2018

July's Christmas card

After making the birthday blue bird card I shared last week, I decided to use the tree rings die and embossing folder for one of my Christmas card designs. I played with the nature theme and created this card:

Supplies (all Stampin' Up! unless otherwise noted):
Stamps: Petite Pairs
Paper: Thick Very Vanilla, Baked Brown Sugar, Poppy Parade, Old Olive, Garden Green, Very Vanilla card stock; Candlelight Christmas Specialty Designer Series Paper (DSP)
Ink: Early Espresso
Accessories: Tree Rings Texture Fades (Sizzix - Tim Holtz), Leafy Branch 5 die (Elizabeth Craft Designs), pearls, red enamel dots (Eyelet Outlet), Poppy thick twine (Close to My Heart), clear Wink of Stella glitter brush pen, Corner Chomper (We R Memory Keepers), Dotted Scallop Ribbon Border punch, sponge, Glue Dots

I have to say that the die I used to make the mistletoe has been very versatile. I've also used it to make seaweed for a fish shaker card and as an accent on one of my 2018 easel calendar pages. But I really love how it looks on this card.

I die cut two branches -- one each from Old Olive and Garden Green card stock -- then carefully intertwined them and tied the stems together with red twine. I used strategically placed Glue Dots to adhere the branches to the embossed tree rings die cut (sponged with Early Espresso ink), and a few little pearls are the perfect berries.

To create the card for my focal image, I used a thick Very Vanilla card base. I trimmed a piece of DSP that had some color but wasn't too busy (I like how the circle pattern works with the tree rings die cut), then rounded the corners, sponged the edges and layered it on the card front. I also added clear Wink of Stella glitter to the middle of the circles on the DSP to create a subtle sparkle.

To add the greeting on the front of the card, I stamped a sentiment on a Very Vanilla banner and added it in the lower right corner. Three red enamel dots add another little pop of red.

I even decorated the inside of the card just a bit. I punched a piece of Poppy Parade card stock with the Dotted Scallop Ribbon Border punch and adhered it behind a strip of DSP so that the scallops are just peeking out. I attached that along the bottom of the card and then stamped the sentiment.

After I finished the prototype for this card design, I decided to make five more (since I could get six pieces of DSP from one 12" x 12" sheet). For the other five cards, I actually made the inside of the cards before creating the card fronts. That way I didn't have to worry about spending a lot of time making the front perfect only to mess up the stamp on the inside.

Do you make any Christmas or holiday cards? Have you started yet? If not, there's still some time to celebrate Christmas in July (smile)! Thanks for stopping by!

Sunday, July 15, 2018

A 'whale'-y fun shadow box card

If you've read much of my blog, you probably know I lean toward clean and simple cards. That's just what comes naturally to me. But now and then it's fun to shake it up and make something a little different. And it's even better when that something different is also really cute and three dimensional.

Supplies (all Stampin' Up! unless otherwise noted):
Stamps: Essential Messages (Hero Arts)
Paper: Crumb Cake, Whisper White, Pool Party, Bermuda Bay, Basic Gray, Blueberry Bushel, Daffodil Delight, Mango Melody, Granny Apple Green, Call Me Clover card stock
Ink: Blueberry Bushel
Accessories: Shadow Box Card dies and Shadow Box Card Ocean Add-On dies (Lawn Fawn), Sun and Clouds dies (Taylored Expressions), Dimensionals, Glue Dots

Isn't that fun? The Shadow Box Card dies and add-on dies from Lawn Fawn are awesome. They cut and score the box (with the opening) as well as the support pieces that go across the inside of the box. You just have to design your card, add adhesive and assemble.

Since this was my first shadow box card, I didn't get too elaborate. I wanted an ocean scene, so I used Crumb Cake for the box, to give the look of sand. I decorated the back of the box to look like the sky and added waves for the middle supports. I attached a die-cut whale to the middle wave and added a few bits of die-cut seaweed and a seashell to the front of the box. (I wish I had gotten a photo that was focused on the back of the box instead of just the front so you could really see how cute it is!)


For the last detail I die cut a white banner, stamped it with "Happy birthday" and adhered it above the opening on the front of the box. I added my "Handmade by" stamp on the side of the box and wrote a message on the back.

One of the best parts of this box card is that it folds flat to fit in a standard A2-sized envelope. The recipient just pulls it out of the envelope, unfolds it, and - voila! - a cute three-dimensional scene.

Thanks for stopping by!


Saturday, July 14, 2018

Card sets featuring DSP

Sometimes patterned paper is too pretty to cover up and needs to be in the spotlight. That's just where I put the Share What You Love Specialty Designer Series Paper (DSP) in two card sets I made last week.


Supplies (all Stampin' Up! unless otherwise noted):
Paper: Share What You Love Specialty DSP; Tranquil Tide, Mint Macaron, Petal Pink, Old Olive, So Saffron, Rich Razzleberry card stock; copper foil sheets
Accessories: Copper cord (unknown), copper liquid pearls (unknown)

First off, I apologize for the lighting in these photos. I took them outside, which usually works well, but not so much this time. The cards are much prettier in person!

Back to this first set of cards. I chose six of the patterns from the pack of DSP and cut a 3-3/4" x 5-1/2" piece of each. I chose six coordinating colors of card stock for the card bases -- there are so many colors that match this pack of DSP! -- and adhered a piece of DSP to each base.

Of course I wanted to embellish the cards, but I didn't want to detract from the DSP. So I decided to add metallic accents. I went with copper because I really liked it with the yellow, pink and peach tones in the paper. I wasn't crazy about how it looked with the blues and greens, but I went with it anyway. (And honestly, it's grown on me on those cards, too.) I added a strip of copper foil paper along the left edge of the DSP, tied copper trim around the card front, and added copper liquid pearls on the DSP. It's a simple card set, but still pretty -- and suitable for so many occasions.

Supplies (all Stampin' Up! unless otherwise noted):
Paper: Share What You Love Specialty DSP; Tranquil Tide, Mint Macaron, Petal Pink, Old Olive, So Saffron, Rich Razzleberry card stock; copper foil sheets
Accessories: Burlap ribbon trim, linen thread, Very Vintage buttons, Brights buttons, Dimensionals

For the second set of cards, I used the same colors for the card bases and the same main DSP patterns. But I wanted to mix patterns for this card set, so I adhered the main DSP to about the top two-thirds of each card base and then added a complimentary pattern to the bottom third of the card. (Note: The patterns that are together on each card are not the front and back of the same piece of DSP.) The trickiest pattern to match was the small yellow flowers on the top middle card. I couldn't find a coordinating pattern that I liked, so I decided to switch it up for that card and use a completely different color. I always love purple and yellow together anyway.

Instead of metallic accents on these cards, I went more natural with a piece of burlap trim across the card front (to cover the seam in the papers) and a linen thread bow tied on a button. I used Dimensionals to adhere a button to each card just above the burlap trim. Another pretty set of simple, all-occasion cards.

Thanks for stopping by!

Tuesday, July 10, 2018

A birthday blue bird

When I was shopping at the Stamp and Scrapbook Expo last month I found a cool tree ring die/embossing folder combination. I was really intrigued by it, and even though I wasn't exactly sure how I would use it, I decided to buy it. I pulled it out a couple of weeks ago to use with the Spoken Bird set from Hero Arts, and here is the card I created:

Supplies (all Stampin' Up! unless otherwise noted):
Stamps: Spoken Bird (Hero Arts)
Paper: Thick Very Vanilla, Very Vanilla, Midnight Muse, Baked Brown Sugar card stock
Ink: Baked Brown Sugar, Chocolate Chip, Midnight Muse
Accessories: Spoken Bird dies and Paper Layering Feather die (Hero Arts), Tree Rings Texture Fades (Sizzix), burlap ribbon trim, clear droplets (Pretty Pink Posh), sponge, Dimensionals

I think the two products work really well together! I used a color palette of Baked Brown Sugar, Chocolate Chip and Midnight Muse to stamp branches and flowers on the card base for a background. I die cut the tree ring out of Baked Brown Sugar card stock and then embossed it. I sponged Chocolate Chip ink around the edge to create the look of bark and then adhered the tree ring to the middle of the card base. On top of the tree ring I added a Midnight Muse feather and stamped, die-cut bird.

You could use this card for a variety of occasions, but I decided to stamp "Happy birthday" in the lower left corner. (Looking at this photo, though, I can see I didn't get that stamp inked very well. Goodness.) I also tucked a bit of burlap ribbon behind the tree ring, added a few clear droplets and inked around the whole card base with Baked Brown Sugar.

Thanks for stopping by!

Saturday, July 7, 2018

Card contest entries

I mentioned a few weeks ago that I had made a couple of cards that I was entering in a card contest at a rubber stamp show. Well, the show was today, and ... I didn't win. Sigh. I was a little disappointed, but on the plus side, my friend Lisa and I had a great time. We learned some new tips and tricks, did some make-and-take projects and, of course, bought lots of new goodies.

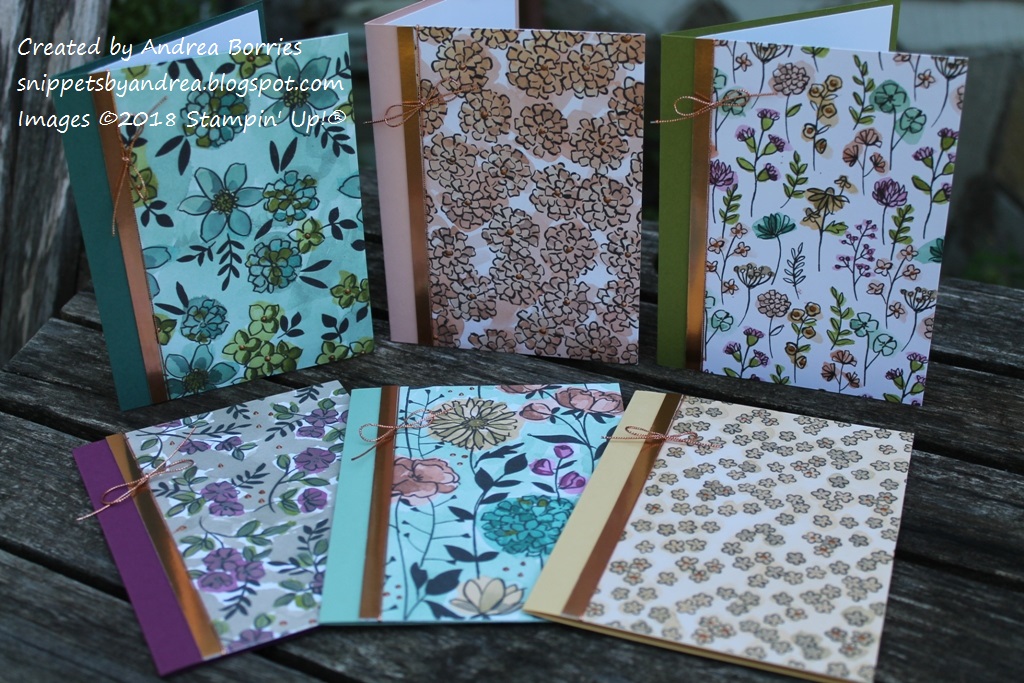
The theme for today's card contest was "easy chair." Here are my entries:


I actually purchased this stamp set at the Stamp and Scrapbook Expo in June. I had been looking for a stamp set that fit the theme for this contest and when I spotted this set I liked it right away. Even better is that I really like the cards I made with the set!

Supplies (all Stampin' Up! unless otherwise noted):
Stamps: Make Yourself at Home (My Favorite Things), Floral backgroound
Paper: Brocade Blue, Whisper White card stock; Wood Textures Designer Series Paper (DSP) Stack
Ink: Memento Tuxedo Black, VersaMark; Warm Gray No. 3 marker (Copic); Bendabilities/
Blends: Old Olive, Night of Navy, Bronze

Accessories: Wonky Stitched Circles dies (My Favorite Things), Simply Scored tool, earth tones glitter buttons (American Crafts), linen thread, Dimensionals

For my first card I wanted to make a homey little scene, so I stamped and colored a few of the elements from the set and then cut them out. (Coordinating dies are available for this set, but I didn't get them. These pieces are easy enough for me to hand cut.)

I scored a piece of white card stock every 1/8" to look like wainscotting, and I used a piece of wood-patterned DSP as the floor. I attached the piece together and then die cut them with a wonky stitched circle die. I adhered the scene elements to the circle, using Dimensionals to pop up the chair and lamp.

I stamped a floral background image on a blue card base using VersaMark ink to create a subtle background. After adding the focal piece, I stamped a sentiment in the lower right corner and added three buttons tied with linen thread.

Supplies (all Stampin' Up! unless otherwise noted):
Stamps: Make Yourself at Home (My Favorite Things)
Paper: Thick Very Vanilla card stock, The Thrift Shop patterned paper (October Afternoon)
Ink: Memento Tuxedo Black, Basic Black marker, Chocolate Chip marker
Accessories: Metallic enamel shapes, Large Stitched Rectangles Stackables dies (Lawn Fawn), Mono Multi, Glue Dots, Stamp-a-Ma-Jig

I thought the chair would be a great image for paper piecing, and I had the perfect paper: a pack of patterned paper with vintage-looking small patterns.

I played around with the layout for awhile and finally settled on a grid of nine chairs with space for a sentiment between the bottom two rows. Using a Stamp-a-Ma-Jig to help with placement, I stamped the chairs on a large vanilla stitched rectangle. Then I stamped the chair image on nine different patterned papers. I cut out the top part of each chair (the upholstered part, without the legs) and glued them all to the chairs stamped on the vanilla card stock. Tip: Before I glued down the patterned chairs, I rubbed the side of a black marker all along the cut edge. This covers up any little edges past the stamped lines and gives the images a more finished look. I also added pillows to a few of the chairs.

To finish the card, I colored the chair legs, stamped a sentiment and added two silver hearts. Then I adhered the entire panel to a Very Vanilla card base.

I'm sure I'll enter the contest again next year. They've already announced the themes, so maybe I should get started now! Thanks for stopping by!


Tuesday, July 3, 2018

Wildlife note card set

Last week I wanted to make a set of note cards for the parents of one of my friends. They have a lake home surrounded by trees and truly enjoy nature and wildlife, and I think this set is perfect for them:

Supplies (all Stampin' Up! unless otherwise noted):
Stamps: Wildlife Friends (Inkadinkado), Artisan Textures
Paper: Crumb Cake note cards and envelopes, Very Vanilla card stock
Ink: Crumb Cake, Early Espresso
Accessories: Stitched Shapes Framelits dies, Early Espresso seam binding ribbon, twine, Dazzling Metallics sequins (Craft Medley), Glue Dots, Dimensionals

I had bought the Wildlife Friends stamp set (from Inkadinkado) months ago, and I knew right away that I wanted to make a card set like this. I have to say that I love how it turned out.

To compliment the images, I used a neutral color pallet of Crumb Cake, Early Espresso and Very Vanilla. For the background, I stamped the "scratchy" image from the Artisan Textures set twice using Crumb Cake ink on the Crumb Cake note card. It adds just a little bit of texture and depth without being distracting. I adhered a piece of Early Espresso seam binding ribbon across the stamped background and then a bit of looped twine over the ribbon. (If you look closely at all the cards in the photo above, you'll notice that I had to use two different kinds of twine. I started with one and then realized I didn't have enough. That seems to be happening to me a lot lately ...)

For the focal point, I stamped an animal on Very Vanilla card stock using Early Espresso ink and then die cut it with a stitched circle die. I used Dimensionals to adhere the circle over the ribbon and twine. A few brown sequins add a simple embellishment.

I purposely didn't add any sentiments to these cards, because I know the recipients like blank cards that they can use for any occasion. I did, though, stamp the animal images on the envelopes so each card has a matching envelope. Cute!

Thanks for stopping by!