Monday, April 29, 2019

April Christmas card: Penguin shaker

When I made my Easter shadow box cards, I realized that the shadow box opening made with the Shadow Box Card Park Add-On dies from Lawn Fawn looked a lot like a snow globe. And a snow globe would be perfect for a Christmas shaker card.

Supplies (all Stampin' Up! unless otherwise noted):
Stamps: Winter Penguin (Lawn Fawn), Christmas Sampler (Paper Smooches)
Paper: Lost Lagoon, Whisper White, silver card stock; All Is Calm Specialty Designer Series Paper (DSP)
Ink: Memento Tuxedo Black; Lost Lagoon; Alcohol markers - Pumpkin Pie, Smoky Slate, Old Olive (Stampin' Up!); BT4 (Spectrum Noir); C1 (Copic)
Accessories: Shadow Box Card Park Add-On and Ocean Add-On dies (Lawn Fawn), Frosted Sequins, bead mix (unknown), window sheets, adhesive foam strips, Mono Multi liquid glue, Glue Dots

I think this little ice skating penguin is so cute! I just love him. And he works perfectly as the focal image in this shaker card.

I die cut the shaker opening from a piece of DSP and positioned it on a Lost Lagoon card base. With a pencil I lightly traced along the bottom edge of the opening onto the card front and then removed the DSP. I adhered a piece of silver card stock over the pencil line for the ice, and stamped a few snowflakes in the background. I stamped, colored and cut out the penguin, glued him on the card base and then placed a little pile of beads and sequins in the middle of the scene.

For the next step, I adhered a piece of window sheet behind the DSP. (Note: Because the top of my shaker card was patterned paper instead of card stock, I added extra stability by using a piece of window sheet that was almost the same size as the DSP rather than just covering the opening. If you wanted to be more frugal with your window sheet or acetate, you could glue the patterned paper to a piece of card stock to make it sturdier. In that case, though, you would have to cut the shaker opening from the card stock as well.) I applied foam strips to the back of the DSP and then carefully placed the top piece on the card front, making sure to firmly press down and adhere all the foam.


I thought about making my shaker card actually look like a snow globe, but in the end I decided to just add a banner stamped with a sentiment. The patterned paper seemed like it needed a little something, so to finish off the card I added a few of the same silver sequins that are in the shaker.

Thanks for stopping by!

Friday, April 26, 2019

Sprinkled with stardust

I have a cousin who loves purple, so for her ninth birthday, I made her this card:

Supplies (all Stampin' Up! unless otherwise noted):
Stamps: Sprinkles and Smiles (Penny Black), Birthday Basics Turnabout (Concord & 9th)
Paper: Elegant Eggplant, Very Vanilla card stock; gold foil sheets; watercolor paper (Strathmore)
Ink: Gansai Tambe watercolors - 37, 38, 91, 139 (Kuretake); Elegant Eggplant
Accessories: Mini Treat Bag dies, Stars dies, "sparkle" die (Taylored Expressions), Dimensionals

I used three shades of purple to make a watercolor wash background. I love making these backgrounds -- I need to do them more often! My top two purples aren't blended as well as they could be, but that's okay.

Once I was done with the purples, I decided to turn the panel into a night sky. I got gold watercolor on my brush and then tapped it on my finger to add gold splatters to the background. I die cut several stars and the word "sparkle" from gold foil sheets and glued them to the dry watercolor background. Finally I mounted the panel on an Elegant Eggplant card base.

For the inside of the card I cut a layer of Very Vanilla card stock slightly smaller than the card base. In my stamp stash I found the perfect birthday sentiment ("Birthdays are days sprinkled with stardust") and stamped that, as well as "happy birthday," in Elegant Eggplant ink. I carried over the stars from the front of the card by gluing two small gold stars and one large purple star around the sentiment. Then I just had to adhere the layer inside the card base.

And that's it! Definitely not a complicated card, but one that was fun to make and perfect for the recipient.

I think it would be fun to make a whole set of cards with a monochromatic watercolor wash like this on the front. Each card could feature a different color and have a different die-cut word, with or without the stars. Or maybe different shapes to coordinate with the different sentiments (hearts for "love," etc.). I'll have to add that to my ever-increasing list of crafty things I want to try!


Thanks so much for stopping by today!

Saturday, April 20, 2019

Happy Easter, everybunny

It's hard to believe that Easter is tomorrow. I know it's cliche, but where does the time go? It feels like Christmas was just a few weeks ago.

As I promised yesterday, here is the second batch of Easter cards I made this year:

Supplies (all Stampin' Up! unless otherwise noted):
Stamps: Everybunny
Paper: Crumb Cake, thick Whisper White card stock; Happy Day paper pad (My Mind's Eye)
Ink: Memento Tuxedo Black; Blends markers: Real Red, Pumpkin Pie, Pineapple Punch, Pool Party, Crumb Cake; R81, R83, R85, W1 alcohol markers and colorless blender (Copic)
Accessories: Stitched Shapes dies, enamel dots (Eyelet Outlet), various trims (Making Memories, Stampin' Up!, unknown), Dimensionals

I chose a couple of adorable bunny images from the Everybunny stamp set, stamped each one three times on white card stock, and cut them out with a stitched circle die. I selected a pack of printed paper and then die cut smaller stitched circles from a few different coordinating patterns (a great way to use up scraps!). Using the colors in the patterned paper as a guide, I colored the bunnies using alcohol markers.

To assemble the cards, I adhered the patterned circles directly on Crumb Cake card bases and used Dimensionals to attach the stamped images. I stamped the sentiment below the focal image and then added a piece of trim along the bottom of each card and three coordinating enamel dots.

Thanks for stopping by today. Happy Easter!

Friday, April 19, 2019

Easter shadow box cards

Today was a beautiful spring day -- the blizzard of last week seems a distant memory -- and the perfect day to share the shadow box cards I made for Easter.

Supplies (all Stampin' Up! unless otherwise noted):
Paper: Whisper White, Marina Mist, Baja Breeze, Certainly Celery, Wild Wasabi, Pink Pirouette, So Saffron, Crumb Cake, Smoky Slate, Tip Top Taupe, Gray Granite card stock; cocoa Crinkles card stock (Wausau Paper); Certainly Celery Prints Designer Series Paper (DSP); window sheets
Accessories: Shadow Box Card, Shadow Box Card Park Add-On, Grassy Border, Mushroom House, Hello Sunshine dies (Lawn Fawn); rabbit dies - DIE043-G (Impression Obsession); mini white pom poms (Fibre Craft); 1/8" and 1/4" Scor-Tape (Scor-Pal); Art Glitter Glue (Art Institute Glitter); Dimensionals

Aren't they cute? I didn't make any Easter cards last year, so I really wanted to make at least a few this year. And when I saw the Shadow Box park Add-On die from Lawn Fawn, I knew exactly what I wanted to make. The Shadow Box dies make it so easy to make these fun cards. (And they fold flat to fit in a standard A2-sized envelope!) The hardest part is deciding how to decorate them!

I used dies from a few different Lawn Fawn sets to set the scene for these little bunnies. I added a grassy border along the back and sides of the shadow boxes, clouds in the sky, and a few little butterflies and flowers (tulips, my favorite). For some of the cards I glued a butterfly to a tiny strip of window sheet, so it looks as if they're flying.

The bunny shapes are made with a die from Impression Obsession. I cut them out a few different colors of neutral card stock and chose two different bunnies for each card. I couldn't resist adding tiny white pom poms for their little cottontails.

I also love the texture on the tree trunks that frame the scene. Originally I wanted to use a wood grain-textured card stock, but while I was looking through my various bins of paper, I stumbled across the Crinkles card stock. The little bit of texture looks just like tree bark. Perfect!

I used these shadow boxes for about half of my Easter cards. The rest of them were a traditional, clean-and-simple A2-size card (but still with cute bunnies!). Check back tomorrow to see those cards. Thanks for stopping by!

Sunday, April 14, 2019

Peek-through fox birthday card

Not surprisingly, spring in Minnesota is a bit of a roller coaster this year. We are seeing the sun shine again today after three days of snowy, sleety, rainy, windy weather last week. It wasn't nice, and I wasn't happy about shoveling again. But the temperature is creeping back up and the snow is melting, and I'm pretty happy about that. And I think the fox in this card seems to be enjoying some lovely weather, too:

Supplies (all Stampin' Up! unless otherwise noted):
Stamps: Foxy Friends, Banners for You, Birthday Messages (Simon Says Stamp)
Paper: Thick Whisper White, Whisper White card stock
Ink: Tangelo Twist, Old Olive, Pool Party, Early Espresso
Accessories: Layering Circles dies, Bunch of Banners dies, Fox Builder punch, mini jewels (Doodlebug Design), ink blender (Tim Holtz), Wink of Stella clear glitter brush pen, Dimensionals

See? It looks like he's got a clear blue sky and green things growing. I'd take that!

At any rate, I haven't used the Foxy Friends stamp set nearly as much as I should have, so I pulled it out for a cute birthday card. And for something a little different, I decided to make a peek-through card.

To start, I made the blue circle, which is sponged on the inside of the card. Here is a quick how-to for this step:
1. Position a circle die on the front of a plain white card base and die cut the circle from only the front of the card. (Or use whatever shape die you prefer.)
2. Die cut the same size circle from a scratch piece of copy/printer paper. Close the card and slip the scratch paper inside the card, placing it so the cut-out circle matches up with the circle on the front of the card.
3. Hold the scratch paper in place and open the card. You may want to secure the scratch paper with a small piece of low-tack tape, such as painter's tape or washi tape.
4. Apply the desired color of ink(s) with a sponge or ink-blending tool.
5. Remove the scratch paper. (If you used tape, peel it off carefully.) You should have a colored circle that matches up with the opening in the front of the card.

With that part out of the way, I stamped a vine image in Pool Party ink on either side of the opening on the front of the card. Then I stamped, cut, punched, or die cut all the pieces to to make the focal point of the card and started assembling. I placed the fox sitting on the stump on the inside of the card, along with one mushroom and one branch (see photo). I used Dimensionals to pop up the fox's body and head.

On the front of the card, I placed a banner stamped with a birthday greeting as well as a mushroom and a branch. (Tip: If you are adhering pieces across the die-cut opening, be sure to place your adhesive where it will only stick to the front of the card. You don't want to glue your card closed!) I also added three clear rhinestones.

Inside the card I added a stamped sentiment below the fox. It's hard to tell in the pictures, but I used a glitter brush pen to add just a touch of sparkle to some of the white parts of the images, such as the tip of the fox's tail and the mushroom caps.

I had a lot of fun making this card, and I definitely want to make more peek-through cards. It's like decorating the front and the inside of the card in one fell swoop. And it's cute to boot!

Thanks for stopping by!


Thursday, April 11, 2019

'I'll be there for you'

I don't know about you, but I am a big fan of TV. I love all kinds of shows -- paranormal/ghost hunting, forensics and crime, old reruns, cartoons, British dramas, etc. -- but some of my all-time favorites are sitcoms. One of those sitcoms is Friends.

Friends originally aired when I was in college, and I remember that on Thursday nights everyone used to gather in the campus lounges to watch "Must See TV" on NBC. (Remember the days before everyone had cell phones, tablets, and laptops where they could stream any show under the sun?) Since then I've seen every episode of Friends multiple times, but they still make me laugh, and my sister and I often quote Friends lines to each other. So when I found a Friends-themed stamp set, I had to get it. And it was the perfect set to use for a birthday card for one of my friends who is also a fan.

Supplies (all Stampin' Up! unless otherwise noted):
Stamps: The One with All the Stamps (The Ink Road), Stylized Birthday, Birthday Greetings (Studio Katia)
Paper: Basic Black, Crumb Cake, Whisper White card stock; gold foil sheets; Neutrals Designer Series Paper (DSP) Stack
Ink: Memento Tuxedo Black, Crumb Cake, VersaMark, light Crumb Cake Blends marker
Accessories: Gold embossing powder, gold sequins (Craft Medley), Corner Chomper (We R Memory Keepers), Dimensionals, foam tape (3M), Art Glitter Glue (Art Institute Glitter)

Oh my goodness, this card just makes me smile. Especially that quote in the upper left about a "moo point." Joey had some of the best lines.

I will admit, though, that I struggled with the card layout at first. Since none of the stamps in the set are specifically birthday related, I decided to go with a "sampler" approach. I picked out a few key quotes and icons and arranged the stamps together on a large clear block so I could stamp them all at the same time. I stamped them on a piece of Crumb Cake card stock using black ink. I also stamped a few of the images again on Crumb Cake with VersaMark so I could emboss them in gold. I cut out those images and used Dimensionals to attach them over the original images.

For the rest of the card,  I wanted to keep a neutral palette, so I used a black card base and added a layer of black-and-white polka dot DSP to the bottom part of the card. The white dots on the DSP seemed too stark, so I colored them with my light Crumb Cake Blends marker. It was the perfect way to soften the white (and an easy method for customizing patterned paper for just about any project).

I added a strip of gold paper along the top of the DSP and then attached the focal layer to the card base with foam tape. A few gold sequins finish the front of the card.

Inside the card I focused on the birthday part of this birthday card. First I stamped a large script "Happy birthday" in Crumb Cake ink on a panel of white card stock. Then, to tie in the Friends theme, I stamped the sentiment "Wishing you a year of joy and friendship" just below that in black ink. I added a few more gold sequins just for good measure.

What do you think? Do you have a favorite TV show? I also bought a stamp set with quotes from The Big Bang Theory (which just happens to be on right now), and I'm looking forward to creating some fun cards with that set, too. Thanks for stopping by!

Thursday, April 4, 2019

More Party Pop-Up cards

As promised in yesterday's post, I'm back to share the birthday card I made with some of the leftover pieces from my two-tone pop-up card. And I have a bonus card, too!

Supplies (all Stampin' Up! unless otherwise noted):
Stamps: Party with Cake
Paper: Coastal Cabana, Whisper White card stock; silver foil sheets; Oh My Stars Collection kit (Bella Blvd)
Ink: Coastal Cabana
Accessories: Party Pop-Up Thinlits dies, Glitter Enamel Dots, Scribble Happy Birthday dies (Poppy Stamps), Action Wobble Spring (Raisin Boat), Art Glitter Glue (Art Institute Glitter)

I started with a Coastal Cabana card base (which looks a lot like Bermuda Bay in this picture) and stamped clusters of confetti and sprinkle images to create a tone-on-tone background. I added a few Glitter Enamel Dots, also Coastal Cabana, for a touch of sparkle.

For the focal image, I used the die-cut speech bubble I cut out of the insert for yesterday's card. You can see the score line down the middle of the die cut, but the patterned paper helps camouflage it a bit. I cut a piece of silver foil sheet and adhered it behind the die cut so you can see the silver through the letters and streamers. You can't tell in this picture, but I used an Action Wobble Spring to attach the speech bubble to the middle of the card base, so it wiggles and bounces around. Fun!

Inside the card I used more leftover pieces from the die cuts. (Quick tip: Keep a small dish or plastic container at your workspace so you can collect all the little pieces that come out of die-cut shapes.) I saved the letters from both the yellow and white speech bubbles, so I had plenty of letters to work with, although not a great variety. I realized that I could spell "happy" with the letters from each speech bubble, so I glued "happy happy happy" in a column down the middle of the card stock. (The third "happy" was actually from the card below.)

I needed a "birthday" after all that happy, so I die cut a script-style "birthday" out of silver foil to repeat the color combo from the front of the card. I love the combination of block and script letters. I added three little streamers to finish off the inside of the card.

Supplies (all Stampin' Up! unless otherwise noted):
Stamps: Party with Cake
Paper: Basic Black, Whisper White card stock
Ink: Memento Tuxedo Black
Accessories: Party Pop-Up Thinlits dies, Birthday Wishes washi tape (Pebbles), Brights Enamel Shapes, foam tape (3M), Scor-Tape (Scor-Pal)

I was having a lot of fun with this stamp and die set, so I decided to make one more card. This time I started with a black card base and added a layer of white card stock on the front. I pulled out these coordinating rainbow washi tapes and added alternating strips to make a colorful background. (I bought these washi tapes a while ago, but this is the first time I had used them. I have to say that I love them! The colors are so bright and bold.)

I stamped the sentiment on white card stock, matted it with black and attached it to the card front with Dimensionals. A few turquoise enamel dots were the perfect embellishment.


I kept the inside of the card pretty clean. I cut the insert from white card stock, leaving a 1/4" border of black card stock visible on each side. (I love how the black shows through the cut-out letters, so it mimics the look of the stamped sentiment on the front of the card.) I added a piece of the rainbow striped washi tape on the left and right sides of the insert and stamped a sentiment below the speech bubble. I love how this card turned out, and I think it's my favorite one of all three!

Thanks for stopping by!


Wednesday, April 3, 2019

Two-tone Party Pop-Up tutorial

Today I'm going to share a little tutorial for a birthday card made with the Party Pop-Up Thinlits dies from Stampin' Up!. Quick disclaimer: Stampin' Up! no longer sells these particular dies, although you may be able to purchase them through sites such as Ebay, Etsy, etc. Or, even better, you could try this technique with pop-up dies you already have or make your own pop-up with a large speech bubble die. Regardless, I hope this card sparks your creativity!

Supplies (all Stampin' Up! unless otherwise noted):
Stamps: Party with Cake
Paper: Midnight Muse, Whisper White card stock; Oh My Stars Collection Kit (Bella Blvd)
Ink: Midnight Muse, Night of Navy marker
Accessories: Party Pop-Up Thinlits dies, Baby Boy mini pearls (Doodlebug Design), foam tape (3M), Scor-Tape (Scor-Pal)

Before we get to the pop-up, here is the front of the card. I love the bright colors and bold designs in the Oh My Stars Collection Kit -- they are perfect for birthday cards! For this card I chose a pattern with a dark blue background and colorful circles and layered it on a Midnight Muse card base.

Near the middle of the card I adhered another layer of Midnight Muse card stock, sized to go behind my focal layer with about a 1/4" border on all sides. I added a strip of yellow starred paper across the mat and then added my focal layer using foam tape. Since the paper is busy, I kept the embellishment simple and just added two blue pearls.

And now for the inside:

I wanted to mimic the idea of a white focal layer surrounded by color from the front of the card, so I made a two-tone pop-up insert (see tutorial below). For a simple embellishment, I took a scrap piece of the blue patterned paper and cut out several of the circles. I glued them around the speech bubble, making sure that some were "hanging off" the edge and leaving an open space at the bottom to write my message.

Here's a step-by-step breakdown of how I made the two-tone insert:

1. Cut the paper/card stock for the inside of your card to the desired size. (I left a 1/4" border on all sides of the inner layer.) Score the insert down the middle and die cut the speech bubble.

2. Trim the speech bubble from the rest of the paper by cutting along the score lines on the left and right sides of the bubble. (Save the speech bubble and all the cut-out letters to use on another card. I'll share the one I made in my next post.)

3. Choose a contrasting paper/card stock. Cut a piece slightly larger than the die, score the paper down the middle, and die cut the speech bubble.

4. Trim off the extra card stock at the top and bottom of the speech bubble by snipping from the side just to the score line on each side (for a total of four cuts). This will leave a long tab on each side of the speech bubble.


5. Fold the speech bubble on the score lines so the middle of the bubble pops up (mountain fold) and the tabs are pointed up (valley folds).

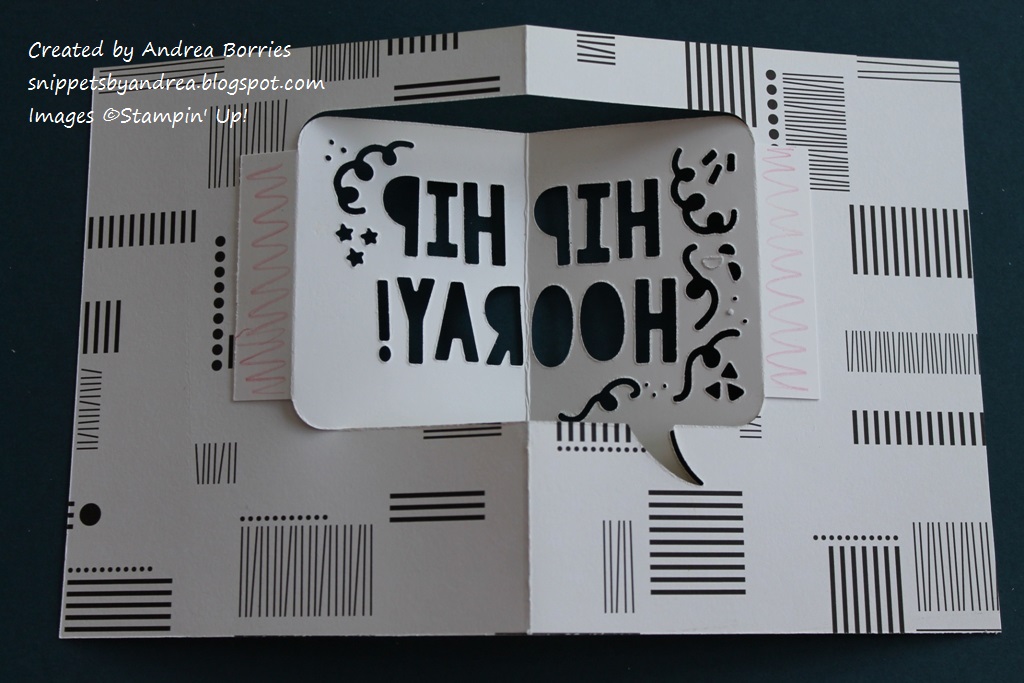
6. Place adhesive along the tabs and attach the speech bubble to the paper that will be inside the card. In this photo, the speech bubble and yellow starred paper are upside down so you can see the tabs, which are marked with red pencil.

Here is the finished insert. Now it just needs to be adhered inside the card and, if desired, embellished.

I find that the easiest way to attach the insert is to place strong, double-sided adhesive with a liner, such as Scor-Tape, along all the edges and score lines. (Don't glue down the pop-up!) Without removing any of the liners, I fold the insert and place it inside the folded card base to get the desired placement. (Be sure the fold of the insert is fit snugly to the fold of the card base.) Once that's set, I remove the liner from one piece of tape along one of the sides of the card and adhere that edge to the card base. Then I open the card, remove the rest of the tape liners from only that side of the insert and carefully secure that side to the card base. With the card base still open, I fold just the insert closed and remove the rest of the tape liners. Keeping the insert folded, I close the card base on top of the insert and firmly rub to make sure all the tape is attached. That's it!

I hope my little tutorial was helpful. If you have any questions, please leave me a comment below. And remember to come back to see the card I made with the leftover die-cut pieces from this card. Thanks so much for stopping by today!

Monday, April 1, 2019

Teacher note cards

Three of my cousins are teachers, and all three have birthdays in February or March. My usual gift is a set of handmade cards, and this year I decided to add a personalized twist: I gave each of them a set of eight teacher-themed note cards stamped with her name.

Supplies (all Stampin' Up! unless otherwise noted):
Stamps: To Thine Own Shelf (Simon Says Stamp), Pick a Pennant
Paper: Whisper White note cards and envelopes, Whisper White card stock
Ink: Gray Granite, Cherry Cobbler, Crushed Curry, Pear Pizzazz, Brocade Blue, Stardust Gelly Roll pen (Sakura)
Accessories: Large Stitched Rectangle Stackables dies (Lawn Fawn), Neutrals Candy Dots, foam tape (3M)

I wanted to include an apple image in each design, so for this set I added a small apple on a shelf along with a few books, a plant, a clock and a storage box. I used a Gelly Roll pen to add a bit of sparkle on some of the images and stamped the name below the shelf. I cut out the little scene with a stitched rectangle die, attached the panel to the center of a note card with foam tape, and added two Candy Dots for a simple embellishment.

Supplies (all Stampin' Up! unless otherwise noted):
Stamps: Labeler Alphabet, apple incentive stamp, Pockets & Pages Journaling - Notepaper (Taylored Expressions)
Paper: Very Vanilla note cards and envelopes, Very Vanilla card stock, Typeset Specialty Designer Series Paper (DSP)
Ink: Pool Party, Memento Tuxedo Black; markers: Poppy Parade, Close to Cocoa, Gumball Green
Accessories: Note Tag punch, 7/8" scalloped circle punch, Poppy thick twine (Close to My Heart), Tiny Attacher (Tim Holtz), Dimensionals

For this set, I used a piece of DSP with bold numbers for the background of the cards. To make the focal image, I stamped a notepaper image with Pool Party ink and then punched it out to make a tag. I stamped the name on one of the lines and used a Dimensional to attach a little apple, which I punched out with a scalloped circle punch. I stapled a bit of red twine to the top of the tag and then added then tag to the middle of the card front with Dimensionals.

Supplies (all Stampin' Up! unless otherwise noted):
Stamps: Apple of My Eye, Labeler Alphabet
Paper: Whisper White note cards and envelopes, Whisper White card stock
Ink: Real Red, Old Olive, Soft Suede
Accessories: Linen thread, micro adhesive dots (Glue Dots), Mini Dimensionals, Corner Chomper (We R Memory Keepers)

With this design, the apple is the main attraction. I stamped the name on a scrap of white cardstock, cut out the pieces (the whole name together, not the individual letters) and attached them to the card front with Mini Dimensionals. I wasn't sure how to embellish this design, but I finally settled on a simple linen thread bow on the stem of the apple. I also rounded the two bottom corners of the card to echo the shape of the apple.

Supplies (all Stampin' Up! unless otherwise noted):
Stamps: Jar of Love
Ink: Memento Tuxedo Black, Poppy Parade
Accessories: Paper gift bag (Target), mini clothespin (unknown), Poppy twine (Close to My Heart)

I packaged each note card set in one of these cute paper bags. I bought the bags ages ago at Target, and they were perfect. Well, almost perfect. They are actually flat bags that I altered to make gusseted bags so the cards would fit inside.

It's actually not hard to alter the bags -- you just need to make a few score lines, trim a bit off the bottom of the bag, and then adhere together the newly created flaps on the bottom -- but I didn't take any pictures this time. If you need help with that part, leave me a comment below, and I'll put together a little photo tutorial.

I thought these note cards would be great for end-of-the-year thank yous for students or for quick notes to parents. They were fun to make, and I think my cousins all liked their personalized gift.

Thanks for stopping by!