Tuesday, November 27, 2012

Festival of hearts

The holiday season is in full swing, and I need to put up the Christmas decorations and finish making (and addressing!) my Christmas cards. But sometimes I need to take a break from all the holiday hoopla, so today I will be sharing three love-themed cards using the Festival of Prints Designer Series Paper (DSP) stack from Stampin' Up!®. These cards would be great for Valentine's Day or any day you need to send a special "I love you."

This is my last post in the "Festival of Prints parade," but if you missed the previous two posts, check out Festival of ornaments (Nov. 25, 2012) and More Christmas cards with Festival of Prints (Nov. 26, 2012).

Supplies (all Stampin' Up!):
Stamps: Lots of Thoughts
Paper: Crumb Cake, Island Indigo, Cherry Cobbler, Very Vanilla card stock; Festival of Prints DSP
Ink: Cherry Cobbler
Accessories: Heart punch, small star punch, paper piercer and mat, Essentials Paper-Piercing Pack, Dimensionals

This card (along with the other two in this post) will be headed to Operation Write Home, so I think the patriotic feel of this color combination is appropriate. If you look closely at the print on this sheet of DSP, you'll notice that the blue outlines around the red starburst images are actually a series of small dots. I continued that theme by paper piercing a border inside the heart and around the matted DSP. I added a blue star to pull out the blue in the DSP and a small banner with the sentiment. I really like the simple but eye-catching layout of this card.

Supplies (all Stampin' Up!):
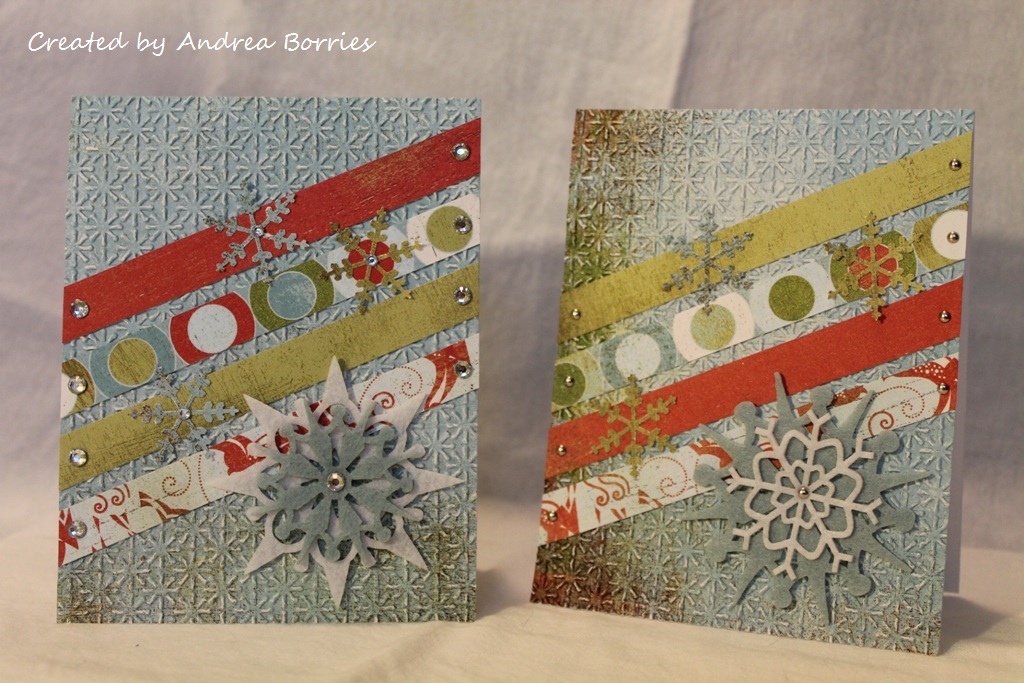
Stamps: More Sayings and Such
Paper: Crumb Cake, Cherry Cobbler, Very Vanilla card stock; Festival of Prints DSP
Ink: Cherry Cobbler
Accessories: Fashionable Hearts Embosslits die, heart punch, Dotted Scallop Ribbon Border punch, Modern Label punch, paper piercer and mat, Essentials Paper-Piercing Pack, Cherry Cobbler baker's twine, Dimensionals, Mini Glue Dots

These cards are identical except for one difference. Can you spot it? On the card on the right I used Cherry Cobbler baker's twine to make three cross stitches in the punched strip of Cherry Cobbler card stock. I like the way the stitches turned out, but it was a bit of a pain to repeatedly fit the baker's twine through the little holes (the end kept fraying), and I didn't have the right size needle handy to simplify the process, so I decided to skip that detail for the second card. The chevron-pattern on the punched hearts is actually the print on the reverse side of the light blue pattern. I punched two hearts out of one of the short ends of the sheet of DSP, trimmed off the punched portion and then cut the rest of the sheet evenly in half, using each half on the bottom of a card.

Supplies (all Stampin' Up!, unless otherwise noted):
Stamps: Easy Events
Paper: Chocolate Chip, Very Vanilla, textured Cherry Cobbler card stock; Festival of Prints DSP
Ink: Chocolate Chip, Old Olive, Cherry Cobbler
Accessories: 2-3/8" scallop circle punch, Owl builder punch, brown ribbon (unknown), Dimensionals, Tombow Mono Multi liquid glue

This is a pretty straightforward card -- stamp, color, punch, layer -- so I won't say too much about it. The one detail I want to point out is that I used the Owl Builder punch to make the red heart on the tree and the vanilla hearts along the bottom of the DSP. I like that the heart shape is a little narrower than hearts sometimes are, and here they fit perfectly between the polka dots on the DSP.

I hope you enjoyed the "Festival of Prints parade" and found some ideas for using this fun DSP stack. Thanks for stopping by!

Monday, November 26, 2012

More Christmas cards with Festival of Prints

Are you back for Day Two of the "Festival of Prints parade"? If you missed Day One, check out the fun Christmas cards in the Festival of ornaments post. Today I'm going to share three more Christmas card designs using the Festival of Prints Designer Series Paper (DSP) stack from Stampin' Up!®.

Supplies (all Stampin' Up!):
Stamps: Word Play
Paper: Lucky Limeade, Cherry Cobbler, Very Vanilla card stock; Festival of Prints DSP
Ink: Chocolate Chip
Accessories: Window Frames Collection Framelits dies, Houndstooth embossing folder, 1/2" circle punch, Scallop Edge Border punch, paper piercer and mat, Festive Paper-Piercing Pack, Lucky Limeade ruffled ribbon, pearls, Tombow Mono Multi liquid glue, Dimensionals

I love how the Window Frames dies are the same shape as the Lucky Limeade parts of the pattern in this DSP. And those Lucky Limeade shapes were the prefect size to punch out and adhere inside the ornament in the stamped focal image. (It's hard to see in the photo, but there is also a tiny pearl inside the ornament.) To add texture to the card, I embossed the Cherry Cobbler mat with the Houndstooth embossing folder and adhered a piece of ribbon between the focal image and the mat.

Supplies (all Stampin' Up!):
Stamps: Perfect Presentation
Paper: Crumb Cake, Very Vanilla, Cherry Cobbler card stock; Festival of Prints DSP; silver glimmer paper
Ink: Cherry Cobbler, Crumb Cake, Lucky Limeade
Accessories: Rhinestones, 1/8" Lucky Limeade organdy ribbon, Merry Minis punch pack, Dimensionals, Tombow Mono Multi liquid glue

The pattern on this paper seemed very busy to me, so I had a hard time deciding which stamps to use with it. I finally settled on this tree stamp because it was a bold image, but the text adds some visual interest. I stamped and cut out three trees and punched out a silver glimmer star for each. I added a little extra embellishment to the Crumb Cake tree -- rhinestones and organdy ribbon -- and adhered it to the card with Dimensionals.

Supplies (all Stampin' Up!):
Stamps: Pines
Paper: Handsome Hunter, Very Vanilla, Crumb Cake card stock; Festival of Prints DSP
Ink: Handsome Hunter, Early Espresso
Accessories: Merry Minis punch pack, linen thread, Dimensionals, Mono Multi liquid glue

Every time I look at this paper in the Festival of Prints DSP stack I see a flannel shirt. I can't help it. I briefly thought about making a card that looked like a shirt, but I decided to go with a woodsy, flannel-inspired scene instead, and this moose and pine trees fit the bill perfectly. It was a little time-consuming to cut out the stamped images, but I like "fussy cutting," so it wasn't too bad. And it was fun making a more masculine Christmas/holiday card.

Come back tomorrow to see three non-Christmas cards in my last post in the "Festival of Prints parade." Thanks for stopping by!

Sunday, November 25, 2012

Festival of ornaments

Before I get to the crafty goodness I want to say that I hope you had a wonderful, safe Thanksgiving and holiday weekend. We went from about 61° F on Wednesday to cold winds and snow Thursday evening to a low of 12° F on Saturday. Definitely made me want to hide in my craft room and make cards all weekend, which I did as much as I could. Now, on with the show.

In the past few months, I've posted several card ideas using the Festival of Prints Designer Series Paper (DSP) stack from Stampin' Up!®. (You can type "Festival of Prints" into the search box at the top of the right sidebar to see my previous posts.) I pulled that DSP out again this weekend and was busy creating Christmas and all-occasion cards. I made too many cards to share in one post, so I'll have a little "Festival of Prints parade" for the next couple of days. Leading the parade today is a series of cards made with the Holiday Ornaments Framelits dies.

Note: There are quite a few pictures in this post, so I kept them small. You can click on any of the pictures to see larger versions.

Supplies (all Stampin' Up!):
Stamps: Petite Pairs
Paper: Cherry Cobbler, Lucky Limeade, Island Indigo, Very Vanilla card stock; Festival of Prints DSP; sliver glimmer paper
Ink: Cherry Cobbler, Island Indigo
Accessories: Holiday Ornaments Framelits dies, Top Note die, Tasteful Trim die, 3/4" circle punch, Merry Minis punch pack, silver cord, rhinestones, Tombow Mono Multi liquid glue, Dimensionals, Mini Glue Dots

Aren't they fun? I started out by selecting four full sheets (and one partial sheet leftover from another project) from the Festival of Prints DSP stack. I wanted to do combinations of Lucky Limeade/Cherry Cobbler and Island Indigo/Early Espresso, so I chose the sheets with patterns on the front and back that would work with those combinations.

You can see how I arranged the Framelits dies to cut as
many shapes as possible at one time.
I started with one of the DSP pieces and placed as many of the Holiday Ornaments Framelits dies on it as I could, making several die cuts with one pass through the Big Shot. I repeated that process with each piece of DSP until I had a whole slew of ornaments. I sorted the die-cuts into groups of three or four, mixing and matching until I was pleased with the variety of ornament shapes, sizes and colors in each group.

I decided to use the same basic layout I used for my Ornament Keepsakes cards, so I die cut fourteen Top Note shapes from Very Vanilla card stock (seven for the card fronts and seven for inside the cards). Then it was time to embellish the ornaments. To make the silver glimmer paper ornament tops, I traced the tops of the die-cuts on the back of the glimmer paper, cut them out by hand and glued them to the ornaments. I also added punched circles or strips of glimmer paper to a few of the ornaments. (Tip: If you remove the thin plastic-like backing from the glimmer paper, then it is easier to punch shapes.)

To "hang" the ornaments, I adhered a small piece of silver cord to the back of each ornament and then adhered the ornaments to a Top Note die-cut. (I used Dimensionals to adhere one or two ornaments on each card.) I pulled the cord snugly over the top of the Top Note die-cut and adhered it to the back. Then I attached the Top-Note die-cut to the front of the card and stamped the sentiment. As a last-minute embellishment, I added a few rhinestones for just a little more sparkle.

I discovered with my first card not to place an ornament directly below the point in the top of the die-cut because the cord will have a tendency to slide to either side of the point. If you don't have silver cord, you could use baker's twine, embroidery floss, or crochet thread instead. You also could use a marker and simply draw the ornament hangers, or you could just skip the hangers, which is what I did with my previous Ornament Keepsakes cards.

There were still some good-sized scraps left after die cutting the ornaments, so I went to work with the ornament punch from the Merry Minis punch pack. I adhered five of the mini ornaments to each of the remaining Top Note shapes, stamped a sentiment, and adhered them inside the cards.

I enjoyed making these cards, but they took me much longer than I thought they would, mainly because I decided to add the glimmer paper ornament tops and cord to the ornaments. Although they still would have been cute cards without those details, I'm glad I took the time to add them.

Come back tomorrow for a few more Christmas card designs made with the Festival of Prints DSP stack. Thanks for stopping by!

Thursday, November 22, 2012

Gratitude

"As we express our gratitude, we must never forget that the highest appreciation is not to utter words, but to live by them."
- John F. Kennedy

Gratitude - A Louie Schwartzberg Original Short Film


On this Thanksgiving day, and every day, may our hearts and souls be filled with gratitude for all that we truly have, and may our lives reflect that gratitude.

Happy Thanksgiving!

Monday, November 19, 2012

Snowflakes and snowfolks

I've been trying to get a few more Christmas cards made and posted for the past couple of days and haven't had much luck. I wasn't feeling inspired and did a lot of staring at my stamps and paper and then getting frustrated. But I finally managed to pull together a few wintery-themed Christmas cards, and if you change or omit a couple of the sentiments, they would be great all-occasion winter cards.

Supplies (all Stampin' Up!®):
Stamps: Stylin' Snowfolk, Teeny Tiny Wishes
Card stock: Crumb Cake, Riding Hood Red, Whisper White
Ink: Basic Gray, Gumball Green, Pumpkin Pie, Riding Hood Red, Early Espresso, Jet Black StazOn, Craft Whisper White
Accessories: Apothecary Accents Framelits dies, white baker's twine, paper piercer, Tombow Mono Multi liquid glue, Dimensionals

Since I had previously used the Stylin' Snowfolk stamp set to make cards with a snow-family and a snow-woman, I decided I'd use a snow-kid and a snowman as focal points on cards. For this little guy, I stamped the snowman outline, added the arms, button and facial features, and then cut him out. I stamped the hat and mittens separately, cut them out and glued them onto the snow-kid piece.

For the background I stamped several Whisper White Craft ink snowflakes on a Crumb Cake card base and then applied the white ink around the edges of the card front and the edges of the Riding Hood Red die-cut piece. (I skipped a sponge and just lightly rubbed the pad directly on the card stock.) To add the baker's twine, I adhered the die-cut to the card and pierced a hole (through the die-cut and card front) in each side.

Supplies (all Stampin' Up!):
Stamps: Stylin' Snowfolk, Hugs & Wishes
Card stock: Sahara Sand, Whisper White, Soft Suede
Ink: Jet Black Staz On, Real Red, Pumpkin Pie, Soft Suede
Accessories: Houndstooth embossing folder, black grosgrain ribbon, Brights glimmer brads, snowflake punch, 1" circle punch, 1-3/8" circle punch, 1-3/4" circle punch, Tombow Mono Multi liquid glue, Dimensionals

This very dapper snowman amuses me; he seems just like the kind of snowman you'd find in front of a stately old mansion. I used three circle punches to create the snowman's body, and the snowflake punch for his arms; I just cut one "spoke" off the snowflake for each arm and then trimmed off the extra pieces at the end. The pipe, bow-tie and hat were stamped separately, cut out and adhered to the snowman's body.

I wanted to keep the rest of the card dignified enough for this snowman, so I embossed a piece of Sahara Sand card stock with the Houndstooth embossing folder and adhered it to the bottom of the card. I tied a piece of black grosgrain ribbon over the seam and added a Real Red glimmer brad for just a touch of sparkle.

Supplies (all Stampin' Up!):
Stamps: Tiny Tags
Card stock: Soft Suede, Real Red, Whisper White
Ink: Soft Suede
Accessories: Snowflake punch, Jewelry Tag punch, Argyle embossing folder, Soft Suede taffeta ribbon, Vintage Trinkets, paper piercer, Tombow Mono Multi liquid glue

I think this card is my favorite of the group; I love the repeated bold snowflakes, the contrast of the red and white, and the texture. To create the background I punched out several Whisper White snowflakes and arranged them on a 3-3/4" x 5" piece of Real Red card stock. Once I was happy with the pattern, I used liquid glue to adhere the snowflakes. (It was a little time-consuming, but I made sure to apply glue to all the little snowflake ends so nothing came loose later.) Then I ran the whole piece through the Argyle embossing folder. The texture reminds me off a cozy winter sweater or pair of mittens.

I originally made this piece as the background for the snowman in the previous card, but it was much too busy. Instead I used it as the focal point on its own card by mounting in on a Soft Suede card base and wrapping Soft Suede ribbon around the card. I punched out three small tags, stamped "merry" on the white one and attached them to the the knot in the ribbon with a small safety pin.

All this wintery-ness seems a little out of place since our weather has been downright balmy, and the forecast for Wednesday calls for a high in the 60°s F. But I think it's a little more fun to make winter cards when you're not surrounded by it outside. Thanks for stopping by!

Friday, November 16, 2012

Stocking trio, penguin in snow

Christmas is coming quickly -- I can't believe that Thanksgiving is already less than a week away! -- and I need to get moving with my Christmas cards. So today I'm going to share two Christmas cards I made this week with the Stampin' Up!® set Jolly Bingo Bits: a trio of stockings and a little penguin in the snow.

Supplies (all Stampin' Up!):
Stamps: Jolly Bingo Bits
Card stock: Soft Suede, Whisper White, Lucky Limeade, Pool Party, Real Red, silver glimmer paper
Ink: Soft Suede, Lucky Limeade, Pool Party, Real Red
Accessories: Argyle embossing folder, Stocking Builder punch, corner rounder, Tombow Mono Multi liquid glue, Dimensionals

I think this may be one of my all-time favorite Christmas cards. This photo doesn't quite capture the colors or the shine of the glimmer paper, but in person it's fabulous (in my own humble opinion). I embossed pieces of Lucky Limeade, Pool Party and Real Red card stock with the Argyle embossing folder and then punched out the stocking shapes. I was going to use white card stock for the cuffs, toes and heel pieces, but it looked a little blah, so I switched to the glimmer paper. Since I don't have any other embellishments on the card, I think that sparkle is a nice touch. To fill the stockings, I stamped and cut out two presents, two gingerbread men and two candy canes and glued them to the back of the stockings. I had planned to add something to the background -- layers, stamping or embossing -- but when I laid out the stockings on the plain card, I loved it just like that. I haven't made any multiples of my Christmas cards yet, but I may just have to make a few more of this card.

Supplies (all Stampin' Up!):
Stamps: Jolly Bingo Bits, Petite Pairs
Card stock: Pool Party, Whisper White
Ink: Basic Gray, Pumpkin Pie, Old Olive, Chocolate Chip, Daffodil Delight, Pool Party
Accessories: Frost White Shimmer Paint, sponge dauber, Dimensionals, Mini Glue Dots

I don't really think of Jolly Bingo Bits as a stamp set for creating scenes, but that was what I set out to do with this card. I started with a Pool Party card base. For the background I tore three pieces of Whisper White card stock to look like hills and then used a sponge dauber to apply Frost White Shimmer Paint to the torn edges before layering the pieces on the bottom half of the card base. Then I applied shimmer paint with a dauber to the snowflake stamp and added snowflakes on the top part of the card. The shimmer paint is actually a little more subtle in person than it looks in this picture; it catches the light as you tilt it.

For the rest of the scene I stamped and cut out a penguin, four trees and a star. I did perform a little amputation with the star (cut off the dotted border) and the trees (cut off the small stars on the tops) so they fit a little better. Then it was just a matter of adding the pieces to the card and adding a sentiment.

I realized that I don't have any embellishments on either of these cards. It would be easy to add some ribbon or a few rhinestones, but I think I'll leave them as is. Sometimes simple is better. Thanks for stopping by!

Tuesday, November 13, 2012

Summer Silhouettes

Yes, I know that it's November, and it's cold and snowy. Summer is a quickly fading memory for many of us. But that's not going to stop me from sharing two cards I made last weekend with the Stampin' Up!® set Summer Silhouettes. Or maybe that's the very reason I should share them. At any rate, a floral card is never really out of season as far as I'm concerned.

Supplies (all Stampin' Up!):
Stamps: Summer Silhouettes
Card stock: Whisper White, Summer Starfruit, textured Rich Razzleberry
Ink: Summer Starfruit, Rich Razzleberry, Old Olive
Accessories: Elegant Butterfly punch, rhinestones, Mini Glue Dots

Using Old Olive ink, I stamped several of the leaves, four short stems and two long stems on a 3-1/4" x 4-1/2" piece of Whisper White card stock. The flowers on the long stems are stamped in Rich Razzleberry directly on the Whisper White card stock. I stamped the other, smaller, flowers in Rich Razzleberry and Summer Starfruit on a separate sheet of white card stock and cut them out. That was the most time-consuming part of making this card, and even that wasn't too bad. (Plus I actually like "fussy cutting.") I attached the flowers to the Whisper White panel with Mini Glue Dots and then adhered the panel to the middle of a Summer Starfruit card base.

I added a 1/4" strip of textured Rich Razzleberry card stock along the bottom edge of the panel and a butterfly in the upper left corner. To add a little sparkle I placed rhinestones in the center of the Summer Starfruit flowers and along the middle of the butterfly.

I even "fancied up" the inside of the card just a bit by stamping a few leaves and flowers along the bottom of a layer of Whisper White card stock. I always like the finished look when I stamp the inside of a card to coordinate with the outside. But I don't do it very often because I'd rather spend time making the front of the card, which is what most people are going to see. Basically the same reason I rarely stamp matching envelopes.

Supplies (all Stampin' Up!):
Stamps: Summer Silhouettes, All-Year Cheer II
Card stock: Lucky Limeade, Peach Parfait, Poppy Parade, Calypso Coral, Whisper White
Ink: Lucky Limeade, Peach Parfait, Poppy Parade, Calypso Coral
Accessories: 1/8" Lucky Limeade organdy ribbon, corner rounder, Jewelry Tag punch, Simply Scored tool, Dimensionals, Mini Glue Dots

I think this image is my favorite one from the Summer Silhouettes set. It's so different from any other flower images I have (and I have a lot, so that's saying something!). I stamped the stem image in Lucky Limeade on three 1-1/2" x 3-1/4" pieces of Whisper White card stock and then stamped the flowers in three different colors: Peach Parfait, Poppy Parade and Calypso Coral. I trimmed the pieces with the peach and coral flowers down to about 1-1/4" x 3" and rounded the corners of all three pieces. I matted each piece with the coordinating color of card stock, leaving a wider border around the piece with the red flowers.

I wanted to add a little bit of texture to the card, so I scored five horizontal lines along the bottom of the card front. I added some ribbon and a stamped tag to the Poppy Parade flowers (the tag is attached with a Mini Glue Dot under the knot of the ribbon), attached that panel to the center of the card with Dimensionals and adhered the other two panels on either side.

Inside the card I rounded the corners of the Whisper White layer (to match the panels on the front) and stamped one flower in the corner. I think this card will go in my stash for Operation Write Home, so I wanted to leave as much blank space as possible for a hero to write his or her message to a loved one back home.

Thanks for stopping by!

Monday, November 12, 2012

Anatomy of my stamping grid paper


Other than stamps, ink, card stock and adhesive, what is the one thing you use most when you're stamping? For me it's not ribbon, brads or buttons. It's not my Big Shot or punches. It's not even my paper cutter or Dimensionals -- although those are both very, very close to the top of the list. It's my Stampin' Up!® grid paper.

I know that probably sounds strange, but I've found that I must have it on the table when I'm stamping. (The whole pad, too, not just one sheet; although one sheet of grid paper is preferable to anything else.) It's where my analytical, logical left brain (numbers, order, identical squares) meets my creative right brain (scribbles, colors, doodles). There have been a few times when I've packed up supplies to stamp at a friend's house and have forgotten my grid paper. I manage with whatever scratch paper is on hand, but it's just not the same. Sigh.

I don't worry about keeping my grid paper neat. I use the top sheet until A) it gets sticky from glue, B) I spill something on it that could transfer to another project, and/or C) the bottom corners get so curled up that they are constantly getting caught on my arm. (This sheet is probably nearing its last days.) And while it's exciting to tear off that top sheet and start with a clean slate, it's also fun to really look at my grid paper and get a glimpse of the cards and projects I've made in the last weeks or months.

Here's a closer look at part of my current piece of stamping grid paper:

It's not visible here, but one of my favorite features of the grid paper are the rulers on the bottom and left sides of the paper. I often measure card stock on the grid paper and notch it with my thumbnail where I want to cut it instead of measuring it on my paper cutter. (Don't ask why; I work in mysterious ways.) I've even been known to jot down non-stamping-related notes on my grid paper. Once while I was making cards my aunt called to ask for help with a game of Words with Friends, and my grid paper became an impromptu crossword puzzle.

So there you have it, one of my most important stamping tools. I just hope Stampin' Up! continues to sell it as long as I continue to stamp. Thanks for stopping by!

Sunday, November 11, 2012

Christmas cards from a sketch

This afternoon I was looking at some past sketch challenges on the Operation Write Home Web site, and I found one from October that really intrigued me because it was very different from card layouts I usually use (Sketch Challenge 143). Here is the sketch:

Sketch Challenge #143 with Tonic Studios!

I still have a few dozen Christmas cards left to make this year, so I decided to use this sketch to inspire a few holiday cards, using some patterned paper for the diagonal strips.

Supplies (all Stampin' Up!® unless otherwise noted):
Card stock: Blitzen Collection pack from Basic Grey (Polar Blue, Pear, Cranberry, Dasher, Jingle Bells)
Accessories: Snow Burst embossing folder, mini silver brads, rhinestones, Little Felt Flurries, small and medium snowflake punches (EK Success), paper piercer, Mini Glue Dots, Tombow Mono Multi liquid glue

I embossed each card front with the Snow Burst embossing folder and then adhered the four strips of paper, each 1/2" wide, across the card. I glued a punched a snowflake on each of the top three strips and then added layered felt snowflakes in the lower right corner. I wanted a little bit of sparkle and shine, so on the left card I added rhinestones to the ends of the paper strips and in the middle of the punched and felt snowflakes. The card on the right has mini silver brads at the ends of the strips and in the center of the felt snowflakes.

I like the distressed look of this paper collection, but it's often hard for me to work with because it's not my usual style. This sketch was a really easy way to put together several of the prints and make a couple of quick holiday cards.

Supplies (all Stampin' Up!):
Card stock: Silver glimmer paper, Winter Bright Simply Scrappin' Kit: textured Pretty in Pink, Wild Wasabi and Real Red card stock, Designer Series Paper (DSP), stickers
Accessories: Stocking Builder punch, Merry Minis punch pack, Tombow Mono Multi liquid glue, Dimensionals 

I decided to make two more cards with the sketch, this time using the Winter Bright Simply Scrappin' Kit. I used Pretty in Pink and Wild Wasabi textured card stock from the kit for the card bases. For the strips I used the stickers from the kit; I like the different widths and patterns. (I also added a thin strip of silver glimmer paper to the card on the left.) I punched stockings from the DSP in the Winter Bright kit, added cuffs, toes and heels from coordinating card stock and then adhered the stockings to the cards with Dimensionals.

Thanks for stopping by!

Saturday, November 10, 2012

Simple color combinations

I was making more cards for Operation Write Home yesterday, and after I finished the first two designs, I realized there was sort of a pattern in my color choices. For each design I'd used one main color, a neutral for accents and either white or vanilla. It seems terribly obvious and simplistic, and I've used color combos like that many times before, but for some reason this time it struck me what a great "formula" that is for choosing colors. I know it isn't always possible to select colors that way; sometimes you want or need to have a variety of colors on a card. But even in those situations it could be a great starting point.  

Here are the three cards I made with this color formula.

Supplies (all Stampin' Up!®):
Stamps: You're My Type
Paper: Midnight Muse, Sahara Sand, Very Vanilla card stock; Patterns Pack III Designer Series Paper (DSP)
Ink: Midnight Muse, Sahara Sand
Accessories: Dimensionals

I decided to stamp the typewriter image in a color other than black, but I felt as if I still needed a strong, dark hue. Midnight Muse fit the bill nicely, and I paired it with Sahara Sand for a great masculine color combo. I used a piece of Sahara Sand DSP for the background, and I added three Midnight Muse banners behind the layered focal image.

Supplies (all Stampin' Up!):
Stamps: Tagger's Dozen, Sending Happy Thoughts
Card stock: Raspberry Ripple, Crumb Cake, Whisper White
Ink: Raspberry Ripple
Accessories: 1" square punch, Postage Stamp punch, taupe grosgrain ribbon, Blossom Builders kit (for rhinestones), Dimensionals

For this card I started by stamping the "miss you" image in Raspberry Ripple and then looked for a flower stamp that looked similar to the tiny flowers. I settled on one from Sending Happy Thoughts and started stamping the flower in the lower right corner, working up and to the left. I used Dimensionals to adhere the layered focal image in the upper left corner and added small rhinestones (from the Blossom Builders kit) to the flower centers. I tied a piece of ribbon around the bottom of the card to bring in the neutral color again.

Supplies (all Stampin' Up!):
Stamps: Tea Shoppe, All-Year Cheer II
Card stock: Very Vanilla, Marina Mist, Soft Suede
Ink: Marina Mist, Soft Suede
Accessories: 1-1/4" and 1-3/8" square punches, Dotted Scallop Ribbon Border punch, Owl Builder punch

I switched my color formula a little bit for this card by using Very Vanilla as the card base. I stamped the teacups in Marina Mist and Soft Suede, punched them out and matted them with the same color card stock. I added three hearts (made with the Owl Builder punch)above the Soft Suede teacup and a punched strip of Marina Mist card stock along the bottom of the card.

Do you have a favorite simple color combination? Thanks for stopping by!

Someone needs attention

Everyone who has a cat knows that they always want to be the center of attention. (Unless they don't. But either way it's really their call.) I've had cats most of my life, and it never fails that as soon as I sit down to do something -- sorting coupons on the coffee table, putting together a jigsaw puzzle, playing a board game on the floor -- a cat appears out of nowhere to sprawl out and knock things everywhere. (Whoever invented the raised grids for Scrabble games has my undying admiration and gratitude. I'm sure he or she had a cat.) The moment your attention is focused in a specific area, their radar senses it, and they must, without question, be in that area. It does not matter if you just spent hours painstakingly assembling the border of a 1,000-piece jigsaw puzzle of red and white candy canes. Nope.

Clearly, stamping is no exception to this rule, as Mielle reminded me yesterday afternoon. (Just before I took this picture she had been lying across my paper.) Sleeping on the pillow on the radiator right next to my stamping table was not close enough. She needed a little more of my undivided attention. She didn't make a mess this time -- my ink pads were closed, and she didn't walk across the stamp cleaning pad and leave little wet footprints everywhere -- but you might receive a card with a stray cat hair or two stuck between the layers. Think of it as Mielle sending her love.

Thanks for stopping by!


Wednesday, November 7, 2012

Miss-you cards for OWH

I am hoping to send another shipment of cards to Operation Write Home (OWH) sometime during the holiday season. (They won't, of course, be holiday cards as that deadline passed several weeks ago. But I have enough of my own holiday cards to keep me busy on that front.) Typically I send a good number of birthday cards along with some general/blank cards, thinking-of-you cards, a few thank-you cards and maybe a few love-you or miss-you cards. This time I decided to spend more time focusing specifically on miss-you cards, which I know our overseas heroes can always use.

Supplies (all Stampin' Up!® unless otherwise noted):
Stamps: Feathered Friends
Card stock: Naturals Ivory, Crumb Cake, Marina Mist, Perfect Plum, Summer Starfruit
Ink: Jet Black StazOn; markers: Going Gray, Basic Gray, Soft Suede, Marian Mist, Poppy Parade, Old Olive, Gumball Green, Perfect Plum, Summer Starfruit, Cherry Cobbler
Accessories: Small and large classic scalloped oval Nestabilities dies (Spellbinders), Framed Tulips embossing folder, 1/16" hole punch, Summer Starfruit stitched satin ribbon, Dimensionals

I've had this stamp set for ages -- I think it was one of my first hostess sets years ago -- and it goes back and forth between my "keep" and "donate" stamp stashes. I love the adorable bird-themed images; I just don't use it very often. At any rate, it's one of the keepers right now, and I don't think I've ever used this particular image in the set, so I put it to good use. I kept the layout of these cards simple; I die cut and matted the focal images and used Dimensionals to adhere them to card bases that I had embossed with a frame. I also added a bit of ribbon to the purple and yellow card. Which color combo do you like better? I think I like the red and blue flowers because it has a little patriotic feel.

Supplies (all Stampin' Up!):
Stamps: Up, Up & Away
Card stock: Soft Sky, Wild Wasabi, Whisper White
Ink: Soft Sky, SOft Suede, Wild Wasabi, Cherry Cobbler, Daffodil Delight
Accessories: Hounstooth embossing folder, Wild Wasabi stitched ribbon, Dimensionals

I made two copies of this card, and it wasn't much more work than making one. I just stamped and cut out six balloons instead of three, and I embossed one piece of Wild Wasabi card stock that I cut in half to make wavy hills for each card. Then it was just a matter of doing a little stamping, assembling and adding the ribbon to each card.

Supplies (all Stampin' Up!):
Stamps: Teeny Tiny Wishes
Paper: Poppy Parade, Naturals Ivory, Pool Party card stock; Everyday Enchantment Designer Series Paper (DSP)
Ink: Poppy Parade
Accessories: Fun Flowers die, Framed Tulips embossing folder, Everyday Enchantment brads, 1-1/4" square punch, Dimensionals

OK, you caught me: This card doesn't say "miss you." I figured "thinking of you" was a pretty close alternative, though. This card base was originally for the card on the left in the first picture above. But Poppy Parade is such an orange-y red that it just didn't look right with the Marina Mist mat of the focal image. So I put it aside to use for a different card. Here we have a simple layered die-cut flower (I snipped the petals on the smallest flower) with a brad in the center. To the right of the flower I added a banner stamped with the greeting and matted with a slightly larger Pool Party banner.

If you like to make more cards than you can possibly use, consider donating some to OWH. You'll get to have some quality time with your stamps, our heroes will be able to keep in touch with their friends and families, and their loved ones will receive beautiful cards they can treasure while they wait for their husband, wife, son, daughter, mom or dad to come home. It's a win-win-win.

Thanks for stopping by!

Tuesday, November 6, 2012

Get out and vote!

I know there are times, especially this time of year, when politics and politicians can be frustrating and disheartening. But each of us can have a say in who represents us in government and how our cities, counties, states and nation are run. That's a privilege many people in the world only dream about. And I think it's our responsibility as U.S. citizens.

So today, regardless of who you are voting for, exercise your right to vote. Cast your ballot and be counted. Be heard.

Sunday, November 4, 2012

Snow flurries

We had a very brief flurry of snowflakes a couple of weeks ago, but it's only a matter of time before the serious stuff is here. (Shudder.) For today, though, the snow is just on the cards I made this morning.

Supplies (all Stampin' Up!® unless otherwise noted):
Stamps: The Snowflake Spot
Card stock: Whisper White, Basic Gray, Going Gray, Bashful Blue
Ink: Basic Gray, Going Gray, Bashful Blue, Jet Black StazOn, Illuminate
Accessories: Snow Flurry die, striped ribbon (Michaels), rhinestones, Dimensionals

The striped ribbon on these cards always makes me think of winter, so I used those colors as my inspiration. With the Snow Flurry die, I cut snowflakes out of Whisper White, Bashful Blue, Going Gray and Basic Gray card stock (the die cuts all three snowflake sizes at once) and then I grouped the  snowflakes into different color combinations.

I randomly stamped snowflakes in the two grays and blue over a 6-1/4" x 8-1/2" piece of Whisper White card stock. I also stamped some little snowflakes with the Illuminate ink pad, which adds a hint of shimmer. (I tried to capture the shimmer in this photo, but it's subtle.) I cut the white card stock into four equal pieces of 3-1/8" x 4-1/2" and then assembled the cards.

I used basically the same supplies for all of the cards, but just like snowflakes, they are all different (which is a little more interesting than making multiples of exactly the same card). Here is a little detail about each card:
Basic Gray card - I stamped one of the snowflake images with the Illuminate ink pad on the card base, although you can't really see it in the photo above.
Whisper White card - I matted the stamped panel with a piece of Going Gray card stock so it would stand out. (I think this is my favorite card of the group.)
Bashful Blue - I stamped the word “Joy” with Jet Black StazOn ink.
Going Gray - This card is actually 4-1/4” square. With the smaller size, I didn’t want the ribbon to take over, so I added just a little tab at the top.

I stamped "Season's Greetings" from the Curly Cute set inside each of the cards so they're ready to be sent for the holidays. I did have fun making these cards, but I really hope these are the only flurries I see for quite awhile. Thanks for stopping by!