Thursday, November 28, 2013

Happy Thanksgiving

12" x 12" MDS project featuring a quote on gratitude from Albert Schweitzer.

Wishing you and your loved ones a happy, safe and peaceful Thanksgiving and lives filled with gratitude.

Thanks for stopping by!

Wednesday, November 27, 2013

'Beary' favorite Christmas stamps

Do you have an all-time favorite Christmas stamp set? I think mine is Polar Bears, which I've had for ages. I just love those bears. I can't say that I use it to make Christmas cards every year, but I do pull it out pretty regularly, and I don't think I'll ever part with it. Last weekend I created two polar bear cards:

Supplies (all Stampin' Up!):
Stamps: Polar Bears
Cardstock: Crumb Cake, Bermuda Bay, Whisper White
Ink: Jet Black StazOn, Bermuda Bay, Coastal Cabana, Crushed Curry, Crisp Cantaloupe
Accessories: 2-1/2" circle punch, Coastal Cabana ruffle stretch trim, burlap ribbon, rhinestones, Dimensionals

Supplies (all Stampin' Up!):
Stamps: Polar Bears
Cardstock: Gumball Green, Pool Party, Whisper White, silver glimmer paper
Ink: Gumball Green, Pool Party, Smoky Slate, Baked Brown Sugar, Crisp Cantaloupe
Accessories: Ovals Collection Framelits, Perfect Polka Dots embossing folder, Merry Minis punch pack, Envelope Punch Board (to round the corners), Dimensionals

For both cards I stamped the bear image on Whisper White cardstock, colored it with markers, cut it out and adhered it with Dimensionals to a focal layer. I kept the rest of the cards simple so the polar bears stand out. I'm planning to use these as Christmas cards, but they would both make cute winter cards to say hello or thinking of you.

So what's your favorite Christmas stamp set? Thanks for stopping by!

Sunday, November 24, 2013

Let it snow, man!

Supplies (all Stampin' Up! unless otherwise noted):
Stamps: Cold Play
Paper: Crumb Cake, Soft Sky, Pumpkin Pie, Whisper White cardstock; Designer Series Paper (DSP) Prints - Soft Sky
Ink: Crumb Cake, Soft Sky
Accessories: Burlap ribbon; punches: 1-1/4" circle, 1-3/4" circle, 1-1/4" scalloped circle, snowflake, corner rounder; Black Diamond Stickles glitter glue (Ranger); sponge; Mono Multi liquid glue; Dimensionals

No, I don't really want it to snow right now. We've had a few flurries that have melted, and that's fine by me. But this little guy sure looks like he's ready. (And did you catch the pun in my title? Snow, man? Hee.) I've been having fun experimenting with -- and finding online -- different ways to make punch-art snowmen. This one is made with two circle punches -- 1-1/4" and 1-3/4" -- sponged around the edges with Soft Sky ink. To make his nose, I punched a 1-1/4" scalloped circle out of Pumpkin Pie cardstock and then trimmed from the sides of one of the scallops to the center of the circle. His arms are two trimmed segments of a punched snowflake, and I used small dots of black Stickles glitter glue for his eyes, mouth and buttons.

Have you seen any snow yet this season? Thanks for stopping by!

Friday, November 22, 2013

Mini Thanksgiving boxes

This has been a rough crafting week for me. Not a lot of time to stamp, and when I did have some time, nothing seemed to come out right. Frustrating. Yesterday I finally decided I needed to work on something simple and straightforward: mini treat boxes for Thanksgiving.

Supplies (all Stampin' Up! unless otherwise noted):
Stamps: Tags 4 You
Card stock: Really Rust, Naturals Ivory
Ink: Really Rust
Accessories: Gift box punch board (We R Memory Keepers), hemp twine, leaf brads (Creative Impressions), 1/8" hole punch

I used the gift box punch board to make the boxes; each one used a 6" x 6" piece of Really Rust card stock. To create the tags I stamped the "Happy Thanksgiving" image from the Tags 4 You set on Naturals Ivory card stock with Really Rust ink and cut them out. (Stampin' Up! makes a coordinating punch, but I don't have it yet. These images are actually pretty easy to cut out by hand.) I added two leaf brads to each tag and used hemp twine to attach them to the boxes.

Inside each box is five foil-wrapped chocolate leaves. I thought these would be cute little holiday treats for a few of the bus drivers I have when I go to work -- one of the drivers I see in the morning drops me off right in front of school so I don't have to walk from the corner, which is really nice on cold, snowy, dark mornings. It's always nice to thank the people who probably don't hear that enough.

I'm pretty happy with how these boxes turned out. And now that I have one project successfully finished, maybe I'll have a more productive weekend. Thanks for stopping by!

Sunday, November 17, 2013

MDS lesson plan calendar

One of the things on my to-do list this weekend was to finish my December lesson plan for work. (Yes, we do have lesson plans for toddlers. They're filled with things like books to read, songs to sing and various art activities. Fun stuff.) I usually start with a blank calendar on white paper, fill in the activities and then decorate it with stickers, stamps or computer clip art. Well, yesterday morning I sat down at the computer to check my e-mail and was struck with the idea that maybe I could use My Digital Studio (MDS), Stampin' Up!'s digital scrapbooking software, to make my lesson plan calendar. Here is what I created:

December 2013 one-page calendar featuring blue snowflakes made with MDS.

Actually, this picture isn't completely accurate; everything to the left of Monday, to the right of Friday and below the bottom row is not printed on my hard copy. Those parts of the project are in the page bleed area, so while they are technically part of the file, they don't show up in the printed version.

Now, I haven't created much in MDS, so this is pretty basic. I started with a blank 8-1/2" x 11" page. I'm doing a winter theme in December, so I searched MDS for snowflake stamps and found a few images I liked. I inserted each image several times, moving, resizing and rotating them as needed until I was happy with the result. Then I changed the colors of the snowflakes to various shades of blue, grouped them together and changed the opacity to 50% so the images were light enough to write over.

I was debating how I wanted to add the calendar -- Draw each line of the grid in MDS? Run the page through the printer twice to print the background and grid separately? -- when I noticed that there was a way to add either a month or year calendar in MDS. Woohoo! I added a calendar for December 2013 and re-sized it to fit the whole page. Since I didn't need Saturday or Sunday on the calendar, I stretched the sides so those days were outside the printable area. Then I used the last three squares in the bottom row, which would have been empty, for the name of our theme.

Now I just need to go through and write our activities on each day, and I'll be able to check this task off my list. Thanks for stopping by!

Saturday, November 16, 2013

Endless Wishes

I've been busy planning project ideas for a "Quick and Cute Christmas" class I'm holding in a couple of weeks, but today I had a chance to make some of my own Christmas cards with Stampin' Up!'s new Endless Wishes photopolymer stamp set.

Supplies (all Stampin' Up!):
Stamps: Endless Wishes
Cardstock: Whisper White, Smoky Slate, Pool Party, silver glimmer paper
Ink: Smoky Slate, Pool Party
Accessories: Striped embossing folder, 3/4" circle punch, corner rounder, rhinestones

I love the sentiment options in this stamp set. There are several words in the larger "handwritten" font and various phrases in the smaller type, so they can be combined to make numerous different greetings. For this "very merry Christmas" card, I stamped the three snowflakes and the greeting on Whisper White cardstock. I layered it on a piece of Smoky Slate cardstock and added three silver glimmer paper circles behind the panel on the left side. (Note: Since only part of each circle is visible, you can be frugal with your glimmer paper and punch out about three-quarters of each circle. Just make sure you have enough space to apply the adhesive.) I adhered the panel to the embossed card front and added rhinestones to the centers of the snowflakes.

Supplies (all Stampin' Up!):
Stamps: Endless Wishes
Cardstock: Whisper White
Ink: Pool Party, Basic Gray
Accessories: Pool Party baker's twine, 1-3/4" circle punch, 1-1/4" circle punch, 3/4" circle punch, rhinestones, sponge

To make this single-layer card, I created a mask by punching three circles in a scratch piece of cardstock. For each circle, I set the mat on the Whisper White card front in the desired place and then sponged Pool Party ink inside the circle. I removed the mask and stamped the snowflake with Basic Gray ink over the sponged circle. I used rhinestones for the snowflake centers and as the dot above the j in joy. I also added some baker's twine for texture, but I think this card would look lovely without it as well.

I think we will be using this stamp set for one of my "Quick and Cute Christmas" projects. I'll be sure to share those projects after the class. Thanks for stopping by!


Sunset

I know the sun is setting early these days, but last night was a beautiful one. I'm glad I caught a glimpse of it before it faded away.


Thanks for stopping by!

Tuesday, November 12, 2013

Mitten cards

It's always fun to open an envelope and find a handmade card. And it's an extra little surprise when the card is shaped. So when I bought a pack of die-cut mitten shapes, I knew exactly what I was going to make with them: Christmas cards.

Supplies (all Stampin' Up! unless otherwise noted):
Stamps: Petite Pairs (inside cards)
Ink: Cherry Cobbler, white gel pen
Cardstock: Blue and red die-cut mittens (Paper Source), Whisper White, Cherry Cobbler, Gumball Green
Accessories: Stocking Accents die, snowflake punch, heart punch, blue washi tape (unknown), Season of Style washi tape, rhinestones, various ribbons and baker's twines, Simply Scored tool, Essentials Paper-Piercing pack, paper-piercing mat and tool, Ovals Collection Framelits dies (inside card)

Aren't they cute? I especially like the faux stitching with the white gel pen. The die-cut mittens came in single-color packs of twenty. I was shopping with a friend at the time, and she wanted to get a pack, too, so we each bought one color and then traded half the pack. (I think they also came in a kraft color and white, but I exhibited tremendous self-control and just bought one pack.)

I used two mittens to make each card. For the mitten on the front of the card I used my Simply Scored tool to
make a vertical score line every 1/8" along the cuff and a horizontal score line along the bottom of the cuff. After decorating the mitten I adhered the back of the cuff to the second mitten. Then for most of the cards I wrapped baker's twine around the mittens and tied it in a bow. To open the card, you simply lift the top mitten, and the greeting is stamped inside. With the blue mittens, I stamped the greeting directly on the card. For the red ones, I added an oval of Whisper White cardstock and stamped on that layer.

Thanks for stopping by!

Sunday, November 10, 2013

A change of colors

As addicted as I am to all things papercrafting, I rarely buy individual rubber stamps anymore. They're typically more expensive (per stamp) than a set, and sometimes it's hard to find other stamps that coordinate. But once in a while I fall in love with a stamp, and I can't pass it by. That's what happened a couple of weeks ago when I was shopping with a friend and noticed a stamp of a cardinal sitting in winter trees, surrounded by snowflakes. It was such a peaceful image, and it was different from anything I already had. So I bought it, and today I used it to make two Christmas cards.

Supplies (all Stampin' Up! unless otherwise noted):
Stamp: Cardinal in Trees (Paper Source)
Cardstock: Whisper White, Chocolate Chip, Smoky Slate
Ink: Chocolate Chip, Soft Sky, Real Red, Smoky Slate
Accessories: Snowflakes embossing folder (Sizzix), Real Red 1/8" taffeta ribbon, rhinestones, Dimensionals

I used the same layout for both cards and just changed the colors of the image and card base. I love how just that one difference changes the feel of the card. For the card on the left, I used markers to color directly on the rubber of the stamp; it was a bit tricky with all the little tree branches and snowflakes, but it was worth the effort. For the card on the right, I used an ink pad to cover the whole rubber stamp with Smoky Slate ink. I used a small piece of cardstock to rub the ink off the cardinal portion of the stamp and then colored it with a Real Red marker.

But wait, that's not all. I decided to make one more version of this card:

Supplies (all Stampin' Up! unless otherwise noted):
Stamp: Cardinal in Trees (Paper Source)
Cardstock: Very Vanilla, Chocolate Chip, Crushed Curry
Ink: Chocolate Chip, Always Artichoke, Real Red, Crushed Curry
Accessories: Woodgrain embossing folder, Real Red 1/8" taffeta ribbon, Dimensionals

Again I used the same basic layout, but with a few different colors, I changed not just the feel of the card, but also the season! I colored the "snowflakes" with Crushed Curry to turn them into falling autumn leaves and used Always Artichoke for the ground. I did use Crushed Curry cardstock for the mat instead of Very Vanilla because I wanted to pull out the color of the leaves. The texture from the Woodgrain embossing folder makes the perfect finishing touch.

Now maybe I'll make a card with the ground green and the "snowflakes" blue ... would they look like raindrops? Thanks for stopping by!

Saturday, November 9, 2013

Everyday Occasions Cardmaking Kit

In September, Stampin' Up! introduced the Everyday Occasions Cardmaking Kit. The kit is designed to introduce stamping and cardmaking to new crafters and includes almost everything you need to make twenty all-occasion cards (you supply the scissors and adhesive). You can make all the cards and have them ready to go, which is what I did, or you can keep the kit stored in its decorative box and pull it out to make a card here or there when needed. And I think even the most experienced cardmakers have times when they need quick, cute, last-minute cards.

One nice feature of the kit is that it comes with a color brochure that includes photos of card designs. So if you're not feeling very creative, you can simply copy one of the samples. I started out looking at the brochure until I had a "feel" for the kit components. I don't think I copied any of the samples exactly, but there were a few that I made very similar with a little tweak or two. I also used a few extra supplies when making my cards: rhinestones, white baker's twine (the kit comes with Basic Gray/white baker's twine, but I wanted to hoard a little of that, so I substituted plain white for some cards), the Essentials Paper-Piercing Pack, and a paper-piercing tool and mat.

Below are pictures of the cards I made with the Everyday Occasions Cardmaking Kit, grouped by the type of card (thank you, birthday, etc.). I think they're all self-explanatory, so I'm not including any other details. But if you have any questions, post a comment below and I will respond as soon as I can.


Thanks for stopping by!


Wednesday, November 6, 2013

Thankful Tablescape kit card tutorial

Yesterday I shared a tutorial for a gift bag made with Stampin' Up!'s Thankful Tablescape Simply Created kit. As promised, today I'm going to share the coordinating Thanksgiving card, which was my last November project for the Creative Crew challenges.

Supplies (all Stampin' Up!):
Stamps: Teeny Tiny Wishes, Thoroughly Thankful
Cardstock: Chocolate Chip, Very Vanilla
Ink: Chocolate Chip
Accessories: Thankful Tablescape Simply Created kit, Autumn Accents die, corner rounder, Scallop Edge Border punch, Dimensionals, Mono Multi liquid glue

I made this card with the following kit components: one napkin holder, one belly band, one table tent card, a 6" piece of Chocolate Chip paper ribbon and half of one piece of linen thread. I added the Autumn Accents die, Chocolate Chip and Very Vanilla cardstock, Chocolate Chip ink, stamps, adhesive and a couple of punches. Here is a step-by-step tutorial with photos (click on any of the photos to view a larger image):

Step 1: Cut a 4" x 5-1/4" piece of Very Vanilla cardstock and a 3-1/2" x 4-1/4" piece of Chocolate Chip cardstock. Round all corners of both pieces. Set cardstock aside.
Step 2: Cut the two side flaps off the napkin holder. Save pieces for making diecuts or layers. Cut the remaining long piece to 4-1/4" high.

Step 3: On the long side of the napkin holder (the left side in this photo), create a score line 5-1/2" from the pre-made score line and cut 1/4" off the end. (Note: The 1/4" cut is not shown in the photo.)
Step 4: Punch both short sides with the Scallop Edge Border punch. Close the card with the shorter flap inside and the longer flap on the outside.
Step 5: Use the Autumn Accents die to create diecuts with one of the table tent cards, a 6" piece of Chocolate Chip paper ribbon, a piece of one of the belly bands and one of the flaps cut off the napkin holder in Step 2.

Step 6: Sponge the edges of all the leaves and the scalloped edges of the card base with Chocolate Chip ink. (I used an ink spot, but you could also use a full-size ink pad and a sponge.)

Step 7: Cut a 1/2" high strip from one of the pieces cut off the napkin holder in Step 2. Stamp "Happy Thanksgiving" in Chocolate Chip ink on the back (non-patterned side) and trim the right end of the strip into a "V." Stamp a greeting on the Very Vanilla cardstock.
Step 8: Cut a narrow strip of paper from the belly band. (You can use the same belly band from Step 5 or the strip leftover from Step 9 of the gift bag tutorial.) Adhere a piece of the strip near the top of the Chocolate Chip cardstock and bottom of the Very Vanilla cardstock.
Step 9: Adhere the Very Vanilla cardstock and two or three diecuts to the middle panel inside the card.
Step 10: Adhere two diecuts to the short flap (the right side in the photo). If desired, check the placement before adhering the leaves to be sure they aren't visible when the card is closed. (Note: I had one leaf leftover when I finished the card, so I added it to the inside of the left flap.)
Step 11: Adhere the Chocolate Chip cardstock to the card front. Add the tag on the lower right side.

Step 12: Cut in half one of the pieces of linen thread included with the kit (or use the piece left from Step 14 of the gift bag tutorial). Cut one of the pieces in half again. Holding the two short pieces together, tie a bow around the leaf stems. It may be helpful to adhere the stems together first with a few drops of Mono Multi liquid glue. Adhere the pair of leaves to the upper left corner of the Chocolate Chip cardstock.

Step 13: Use Dimensionals to adhere the last two diecuts to the card front.

Your card is done! The finished size is 4-1/4" x 5-1/2" so it will fit in a standard A2-size envelope.

I hope you enjoyed these tutorials. If you have any questions, leave me a comment and I will respond as soon as I can. And remember to check out the November Creative Crew gallery on SCS for more fun projects using Stampin' Up! kits. Thanks for stopping by!

Tuesday, November 5, 2013

Thankful Tablescape kit gift bag tutorial

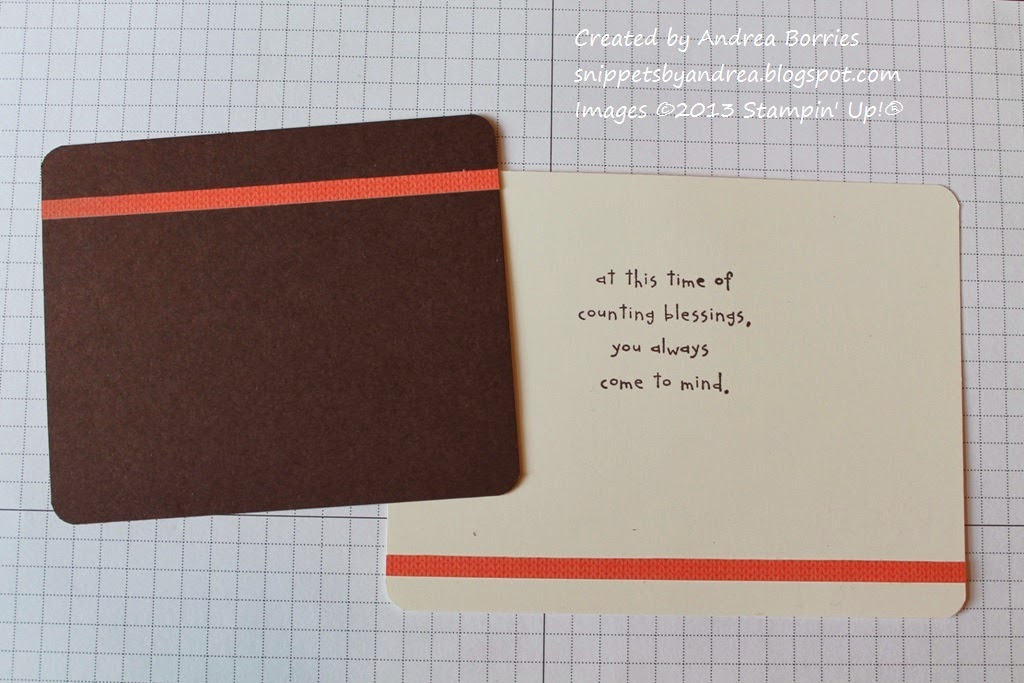
One of the November Creative Crew challenges was to create a project using the Pretty Packages line in the 2013-2014 Stampin' Up! Catalog or any of the kits or packages in the Holiday Catalog. I chose to use the Thankful Tablescape Simply Created kit in the Holiday Catalog, which includes materials to decorate a table for ten guests. Now, I love this kit, but my family is very informal at Thanksgiving. We rarely use place cards, nevermind table tents, napkin holders and centerpieces. I knew I had to come up with other ideas for this kit, so I created a gift bag and coordinating Thanksgiving card. I'm going to share a tutorial for the gift bag today, and the card tutorial is in the following post.

Supplies (all Stampin' Up!):
Ink: Chocolate Chip
Accessories: Thankful Tablescape Simply Created kit, Antique Brads, Scallop Edge Border punch, 1-1/4" circle punch, Simply Scored Tool, paper piercer, Dimensionals, Sticky Strip

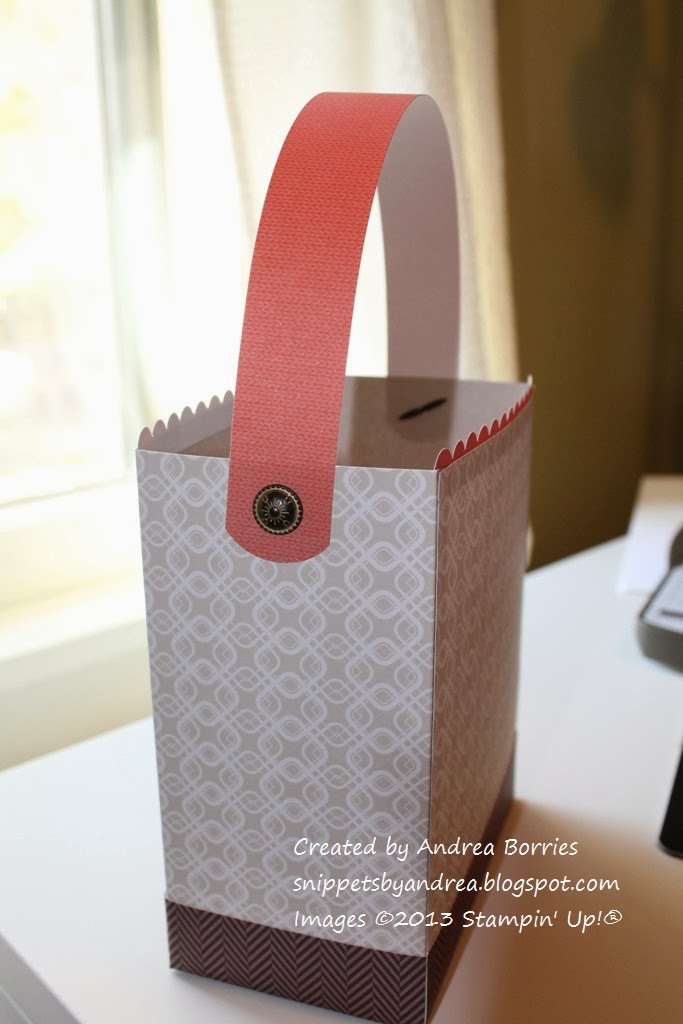
I made this gift bag with the following kit components: one napkin holder, one belly band, two die-cut leaves, 16" of Chocolate Chip paper ribbon and half of one piece of linen thread. I added two Antique Brads, Chocolate Chip ink, adhesive and a few tools. Here is a step-by-step tutorial with photos (click on any of the photos to view a larger image):

Step 1: On the open napkin holder:
- Score 1/4" in from the outside edge of each of the side flaps.
- Cut 1/4" off the end of the long flap.
- Score the long flap 3" from the pre-made score line.
Step 2: Fold and crease the paper on the three score lines you made in Step 1 as well as on the three pre-made score lines. Note: Each side flap has two score lines; be sure to crease the ones that are straight up and down, not the angled score lines.
Step 3: Apply Sticky Strip on the patterned side of the 1/4" section on each side flap. Fold up the long flap and adhere it to the side flaps, lining up the folded edges on the side flaps with the outside edges of the long flap. You now have the basic bag shape.
Step 4: Cut a 16" piece of Chocolate Chip paper ribbon. Score the paper along the middle lengthwise. (The paper is 2" wide, so score at 1".) If you are using the Simply Scored tool, you will need to score the first 12" and then turn the paper around to score the last 4". Then score along the short side at 5", 8" and 13". Cut along the three short score lines up to the middle score line. You will end up with four sections on one side of the paper strip.
Step 5: Angle the sides of each of the sections created in Step 4 by trimming a narrow triangle from each edge. Do not cut past the middle score line.
Step 6: Apply Sticky Strip to the back of the Chocolate Chip paper ribbon along the side that isn't cut. Adhere the paper around the bottom of the bag, lining up the score lines in the paper ribbon with the corners of the bag. Note: I like to apply Sticky Strip in several small pieces so I can remove the backing as I go and reduce the chance that I will accidentally adhere something in the wrong place.
Step 7: Apply Sticky Strip to the four trimmed sections of paper ribbon. Adhere them to the bottom of the bag by folding down the two long sides and then the two short sides. If desired, you could cut another piece of paper ribbon to cover the rest of the bottom.
Step 8: Cut the Tangerine Tango belly band into a 1" wide strip and a 3/4" wide strip.
Step 9: Punch the 3/4" wide strip with the Scallop Edge Border punch. (When you are done punching you will have a very narrow strip left over. If desired you can save this strip for the coordinating card.) Cut the scalloped piece into two 5" pieces (about 13 scallops).

Step 10: Apply Sticky Strip on the patterned side of the scalloped pieces. Adhere them inside the bag along two long sides.
Step 11: Insert one end of the 1" wide Tangerine Tango strip into the bottom of the 1-1/4" circle punch. Close the punch, rounding the end of the strip. Repeat with the other end of the strip.
Step 12: With a paper piercer, make a hole in each end of the Tangerine Tango strip and in each short side of the bag. Attach the strip to the bag with two Antique Brads.
Step 13: Sponge the edges of the die-cut leaves with Chocolate Chip ink. (I used an ink spot, but you could also use a full-size ink pad and a sponge.) Curl leaves up slightly.
Step 14: Layer the leaves together with Dimensionals. Cut in half one of the pieces of linen thread included with the kit. Save one half for the coordinating card, and cut the other piece in half again. Holding the two short pieces together, tie a bow around the leaf stems.
Step 15: Adhere the leaves to the front of the bag with Dimensionals.

Your gift bag is done! I'm going to fill my gift bag with hot apple cider herbal tea (from The Republic of Tea), maple candy and foil-wrapped chocolate leaves for a fun fall-themed Thanksgiving present.


Check out the tutorial for the coordinating card in the next post. You can find more fun projects using Stampin' Up! kits in the November Creative Crew gallery on SCS. Thanks for stopping by!