I have a couple of young cousins who are celebrating their birthdays this month, but I discovered yesterday that I didn't have any kid-themed birthday cards on hand. So yesterday after work I sat down with two of my 8" x 8" printed card stock stacks and spent a few hours making some quick and easy kid birthday cards.
Supplies (all Stampin' Up!® unless otherwise noted):
Stamps: Perfect Party
Card stock: The Glitter Stack (DCWV), Whisper White
Ink: Pacific Point
Accessories: Merry Minis punch pack, 1/8" hole punch, Island Indigo baker's twine, Dimensionals
To make this 3" x 6" card I trimmed one sheet of the printed card stock to 6" x 6" and folded it in half. I used a coordinating pattern from the pack to add a layer along the left side of the card, and I punched a 1/8" hole along the fold so I could wrap baker's twine around the card front. I discovered that the star punch from the Merry Minis punch pack from Stampin' Up! was exactly the same shape as the stars in this paper -- just a little larger -- so I punched out a few stars (I used the strips I trimmed from the card base) to add as embellishment. It's hard to see in the photo, but this patterned card stock has glitter accents on it, so this card has a fun sparkle to it.
Supplies (all Stampin' Up! unless otherwise noted):
Stamps: Birthday Greetings
Card stock: The Glitter Stack (DCWV), Whisper White
Ink: Lavender Lace
Accessories: Spring green grosgrain ribbon, 2-3/8" scallop circle punch, Itty Bitty Shapes punch pack, Mini Glue Dots, Dimensionals
This is another 3" x 6" card using two coordinating patterns of printed glitter card stock, but this card has a girly feel. Again, I love that one of Stampin' Up!'s mini punches worked perfectly with the printed images (the flower shapes aren't exactly the same, but you can't tell unless you really look closely). I used three pieces of ribbon to make the embellishment: one long piece adhered across the card front, one smaller piece with one end adhered over the other to form a circle, and one very small piece wrapped around the circle, creating two loops.
Supplies (all Stampin' Up! unless otherwise noted):
Stamps: Party Hearty
Card stock: The Glitter Stack (DCWV), Whisper White, Chocolate Chip
Ink: Chocolate Chip
Accessories: 1-3/4" circle punch, 1" circle punch, 2-3/8" circle punch, Melon Mambo pom pom trim, Dimensionals
These two cards, which are 3-1/2" square, aren't really limited to being kid cards; they would be great for sisters, girlfriends, moms, etc. Did you notice that for the center of each focal point I added a circle of the printed card stock used for the other card? These are cards that will probably be hand-delivered (or tucked into a gift), because I don't have the right size envelopes on hand, and the pom pom trim is just a little bulky.
Supplies (all Stampin' Up! unless otherwise noted):
Stamps: On Your Birthday
Card stock: Safari Kids stack (DCWV), River Rock, Night of Navy
Ink: Night of Navy
Accessories: Postage stamp punch, hemp twine, Dimensionals
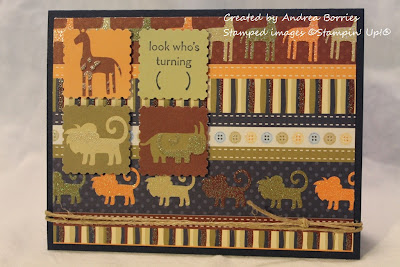
For this card I cut a 4" x 5-1/4" piece of patterned card stock and adhered it to the front of an A2-size Night of Navy card base (4-1/4" x 5-1/2"). I used the postage stamp punch to punch out three animals from a coordinating print and one square of River Rock card stock. I stamped the card stock with a sentiment (I'll write in the age with a marker before I send the card) and then adhered the squares to the card with Dimensionals. I added hemp twine around the bottom of the card for a little safari-appropriate embellishment.
Supplies (all Stampin' Up! unless otherwise noted):
Stamps: Happiest Birthday Wishes
Card stock: Safari Kids stack (DCWV), Gumball Green, Whisper White
Ink: Chocolate Chip
Accessories: 1-3/4" circle punch, 2-3/8" scallop circle punch, mini pearls - baby boy assortment (Doodlebug Design, Inc.), Dimensionals
This card uses three different coordinating papers: the background strip, the main panel and the scalloped circle. It's the only card of the bunch that didn't have glitter accents in the paper, so I added a green mini pearl in three of the corners of the brown layer. In addition to using the scallop circle punch to make the focal point, I also used it to cut off the top right corner of the card. Those hungry alligators must have been in my card-making supplies again!
Thanks for stopping by!


No comments:
Post a Comment