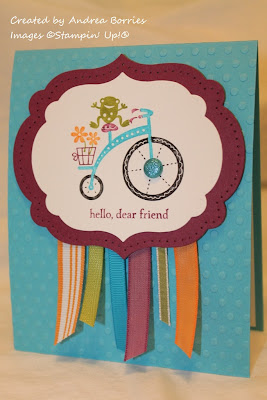
This weekend I took a little break from Christmas cards to make some bright, cheery cards with the new Stampin' Up!® set Moving Forward. This stamp set, which is only available in the 2012 - 2013 catalog, is not only adorable, but it also helps support Ronald McDonald House Charities (RMHC). For every Moving Forward stamp set purchased, Stampin' Up! will donate $3 to RMHC. What a fun and easy way to make a difference!
Supplies (all Stampin' Up! unless otherwise noted):
Stamps: Moving Forward
Card stock: Whisper White, Tempting Turquoise, Rich Razzleberry
Ink: Tempting Turquoise, Rich Razzleberry, Old Olive, Pumpkin Pie, Basic Black
Accessories: Labels Collection Framelits dies, Festive Paper-Piercing Pack, paper-piercing tool and mat, Brights Collection glimmer brads, Pumpkin Pie and Rich Razzleberry 3/8" taffeta ribbon, Old Olive 1/8" taffeta ribbon, Tempting Turquoise grosgrain ribbon, Old Olive polytwill ribbon, Pumpkin Pie striped grosgrain ribbon, Polka Dots embossing folder (Cuttlebug), Dimensionals
This image is actually three separate stamps: the bicycle, the flowers and the frog. I colored directly on the rubber stamps with markers to make the multicolored images, and cut out the image with a die from the Labels Collection Framelits. I matted it with another die-cut and pierced a border around the mat. I added a glimmer brad to the larger bicycle wheel for a little bling and then adhered a few pieces of ribbon to the bottom for some extra color and texture. (This is a great way to use up those ribbon odds and ends.)
Supplies (all Stampin' Up!):
Stamps: Moving Forward
Card stock: Whisper White, Old Olive, Daffodil Delight, Pumpkin Pie, Rich Razzleberry
Ink: Old Olive, Daffodil Delight, Pumpkin Pie, Rich Razzleberry
Accessories: Labels Collection Framelits dies, Chevron embossing folder, 1-1/4" square punch, Dazzling Details, Daffodil Delight stitched grosgrain ribbon, Dimensionals, Tombow multipurpose liquid glue
To create the different colors on this focal point, I stamped the blimp image separately in Old Olive, Rich Razzleberry and Pumpkin Pie (and the bird in Daffodil Delight and Pumpkin Pie). I cut out a few different parts of the Rich Razzleberry and Pumpkin Pie images and adhered them to the Old Olive image. I again used the Labels Collection Framelits dies to cut out the image, and I added a little sparkle with Dazzling Details around the edge of the die-cut and on the banner on the blimp (it's hard to see that on the picture). For the banners in the background, I used the 1-1/4" square punch to create the points.
Supplies (all Stampin' Up!):
Stamps: Moving Forward, Perfect Party
Card stock: Pacific Point, Tempting Turquoise, Whisper White
Ink: Pacific Point, Tempting Turquoise, Real Red, Chocolate Chip
Accessories: Adorning Accents Edgelits dies, Cupcake Builder punch, Pacific Point stitched grosgrain ribbon, Real Red 1/8" taffeta ribbon, Paper-Piercing Pack Essentials, paper-piercing tools and mat, Dimensionals
I had fun creating a little scene with this boat image. To make the
waves, I cut three pieces of Pacific Point card stock with the scalloped
die from the Adorning Accents Edgelits. I adhered the first piece
directly to the Tempting Turquoise card front and then used Dimensionals
to adhere the other two layers. I stamped and cut out the boat image
and placed it between two of the waves. I also added a few clouds made
with the Cupcake Builder punch.
To finish the bottom of the card, I added a greeting on a piece of Whisper White card stock and then tied two pieces of ribbon around the card front. Here's a little confession: I first tried to stamp the "celebrate" greeting directly on the Pacific Point card stock after I'd already layered the waves. Not a good idea. I only got about half the image to stamp. Instead of scrapping the whole card, I stamped the greeting again on Whisper White card stock, pierced holes around the edges and adhered the card stock to the card front. And honestly? I think I like this better. It really helps to break up all the dark blue on the bottom of the card. So there really are no mistakes -- just opportunities for embellishment!
Well, there you have it. On these three cards I used all seven images from the Moving Forward stamp set. And, with the exception of a few neutral colors, I used only the colors in the Brights Collection, which I think work perfectly with this set. Thanks for stopping by!


No comments:
Post a Comment