When I sat down at my crafting table today, I decided I was going to create a little set of birthday treats to send to one of my stamping buddies in February. (I hope she doesn't see this, but just in case ... Stop reading, Faith, or you'll spoil your surprise!) Originally my plan was to use colors that were not at all valentine-y (yes, that's the technical term) since I wanted to keep her birthday separate from the holiday. But when all was said and done, I somehow ended up with pink and red anyway:
Supplies (all Stampin' Up!®, unless otherwise noted):
Stamps: Easy Events, Tiny Tags
Paper: Pink Flamingo Designer Series Paper (DSP), Whisper White, Real Red, red glimmer paper
Ink: Jet Black StazOn, Real Red
Accessories: Pearls, Calypso Coral baker's twine, Dazzling Details, 1/4" hole punch, scallop circle punch, Jewelry Tag punch, 1-3/8" circle punch, Lace Ribbon Border punch, Itty Bitty Shapes punch pack, Sticky Strip, Dimensionals, electric tealight candle (various manufacturers), small jar (Making Memories)
I was pretty pleased with how everything turned out. I kept the color scheme simple by using just one of the patterns from the Pink Flamingo DSP, and I love the sparkle from the red glimmer paper. Here are pictures and a few details for each of the separate items:
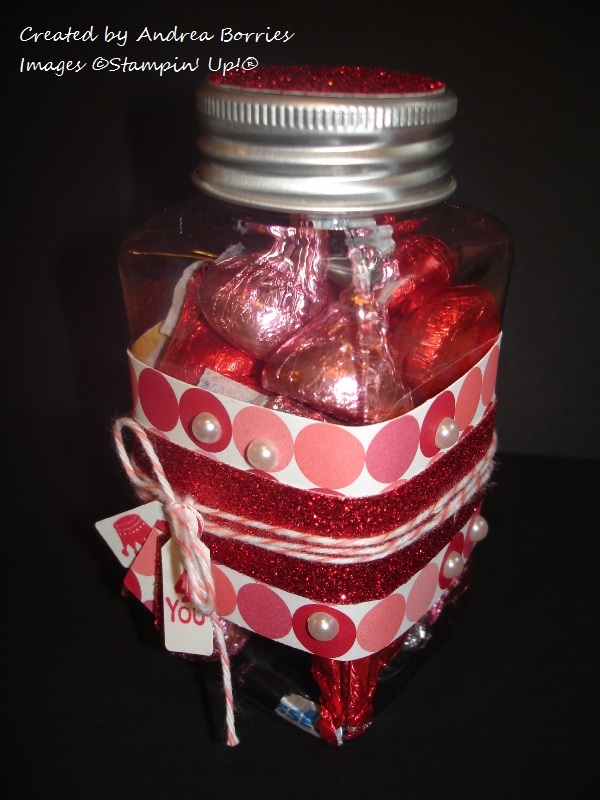
I adhered a strip of red glimmer paper to a wider strip of DSP and wrapped them around the jar. I applied adhesive just on the overlapping end of the strip, so it's not adhered directly to the jar. However, the sides of the jar get a bit wider at the top and bottom, so the paper doesn't slip off.
I wrapped a pice of Calypso Coral baker's twine around the jar three times, then I knotted the twine, added the four tags I punched (one stamped "4 you," one stamped with a crown, one from the DSP and one from the glimmer paper) and tied the bow. I randomly added pearls to some of the circles on the DSP (and I placed them off-center purposely). For the top of the lid, I just glued on a circle of red glimmer paper. I considered adding ribbon around the lid, but I decided I liked the metallic look with the glimmer paper and the shiny wrappers on the Hershey's Kisses.
I've made one of these tealight candle birthday cakes before, and they are really simple and adorable. (I should have turned it on before I took the picture!) There is a great
tutorial for this project on Splitcoaststampers. I made a couple of modifications to the tutorial: The strip I used around the tealight is 7/8" instead of 3/4" to hide the on/off switch on the bottom of the candle, and after Step 5, I tested my scallop circle to be sure it fit over the "flame," and then I punched a 1/4" hole in the center before gluing it down. And here's one more tip: If you put something like pearls on the scallops of the circle, apply them
before you glue it on the candle. (I applied them after the fact, and it was a little tricky.) The shape on top the scallop circle is punched with the Lace Ribbon Border punch; I just punched a piece of glimmer paper once and then cut out one flower shape.
This is a 3" x 3" card, which will fit perfectly in this gift. I used a piece if DSP for the background and wrapped a piece of Calypso Coral baker's twine around the card front three times. For the focal point I stamped the cupcake image on Whisper White and on a piece of DSP. I cut out the part of the image with the cupcake wrapper from the DSP and glued it on the Whisper White. I left the "frosting" white but covered it with Dazzling Diamonds for a little sparkle. A glimmer paper flower and pearl are the perfect "garnish." I left the cupcake stand plain because I wanted the cupcake to really stand out, but I did add little pearls to the fringe. I layered the image with glimmer paper, and adhered it to the card with Dimensionals.
I think this little ensemble (and it sounds really impressive if you say it with a French accent) will show a good friend that I'll be thinking about her on her birthday even if I can't celebrate with her. But here's the sad post-script to this post: After I finished taking these pictures, my camera decided to stop working with no good reason. It was working, and then it wasn't. I had made a couple of other cards today, and my sister let me use her camera to take pictures of those. But now I need to either get my camera fixed or buy a new one. Bummer.
Thanks for stopping by!


No comments:
Post a Comment