I'm back to birthday cards for the next few posts so I can finish sharing the cards I gave my uncle for his birthday last month. Today I have four card designs that are great for kids.
Supplies (all Stampin' Up! unless otherwise noted):
Stamps: Calling All Heroes
Paper: Pacific Point, Crushed Curry, Whisper White card stock
Ink: Pacific Point, Crushed Curry, Real Red, Memento Tuxedo Black
Accessories: Arrows embossing folder, extra-large oval punch, Real Red cotton ribbon, stapler (Making Memories), Dimensionals
This is a fun card for any superhero or comic book fan. I stamped the faces on Whisper White card stock, punched them out, and adhered them to an embossed Pacific Point card base. For embellishment I added three stars and a lightning bolt (stamped and cut out of Crushed Curry card stock) and stapled on a small piece of Real Red ribbon. If I were to make this card again I would switch the placement of the two faces on the bottom so there would be some Real Red on the right side of the card.
Supplies (all Stampin' Up! unless otherwise noted):
Stamps: Sweetie Pie, Sweetie Pie Frames
Paper: 110-lb white (Recollections), Whisper White card stock
Ink: Smoky Slate, Memento Tuxedo Black; Blendabilities: Skin Tones, Soft Sky, Old Olive assortments
Accessories: 1/8" silver ribbon, Dimensionals, Glue Dots
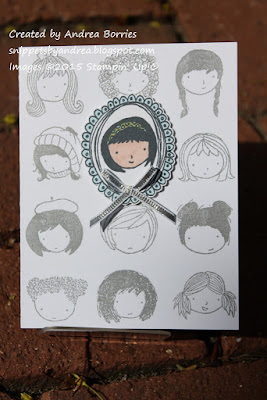
I bought the Sweetie Pie stamp set when it came out because I thought it was really cute (and to be honest, partly because it seemed like everyone else was buying it or wanted it; I didn't want to miss out). But once I got it, I wasn't sure how to use it. So it sat, neglected. When I decided to use it for this birthday card, I remembered seeing a card by demonstrator named Lydia (she is amazingly talented and artistic). She had stamped all the faces to make a background and colored in just one as the focal point. So I decided to take a stab at it.
Originally I was going to stamp each face separately, so I was worried my spacing would be off. But then I realized that -- duh! -- I could put all the images together on my largest clear block and just stamp the background once. So to line up the stamps, I marked off a 4-1/4" x 5-1/2" section on a piece of grid paper. I placed all the stamps in that section, image side down, adjusted them until I was happy with the arrangement and then just pressed my clear block down on the stamps. After I inked the stamps, I stamped them on my grid paper to double-check the placement. (I cut out that section of grid paper and saved it with the stamp set, so next time I can just place the stamps directly over the images to get the same placement.) Then I stamped them on my card base. For the focal image, I stamped just one of the faces on a separate piece of white card stock, stamped a frame around it, and colored the images. I hand-cut the image, adhered it to the card base with Dimensionals and added a silver bow. Inside the card is the sentiment "It's all about you. Happy birthday."
Supplies (all Stampin' Up!):
Stamps: Packed for Birthday
Paper: Tempting Turquoise, Basic Black, Whisper White card stock
Ink: Memento Tuxedo Black; markers: Chocolate Chip, Baked Brown Sugar, So Saffron, Real Red, Tangelo Twist, Daffodil Delight, Old Olive, Tempting Turquoise
Accessories: Large Polka Dot embossing folder, Essentials Paper-Piercing Pack, paper-piercing tool, Dimensionals
The Packed for Birthday stamp is a fun one because you can ink up and stamp (or cut out) just some of the images or use the whole stamp, as I did here. I chose bright, festive shades to color in the images and then matted the piece with Basic Black card stock. I pierced holes around the edges of the black card stock and adhered the panel to a Tempting Turquoise card base embossed with large polka dots.
Supplies (all Stampin' Up!):
Stamps: Remembering Your Birthday
Paper: Crumb Cake card stock, Pawsitively Prints Designer Series Paper (DSP)
Ink: Memento Tuxedo Black
Accessories: Bow Builder punch, Mono Multi liquid glue, Glue Dots, Dimensionals
This design is a great way to use up scraps and small pieces of DSP. For this card I cut three different DSP patterns into squares or rectangles then chose coordinating prints to make strips for "ribbons." I used the Bow Builder punch to make a bow for each present. Then I layered them on the card base and stamped a sentiment. Easy peasy!
Thanks for stopping by!


No comments:
Post a Comment