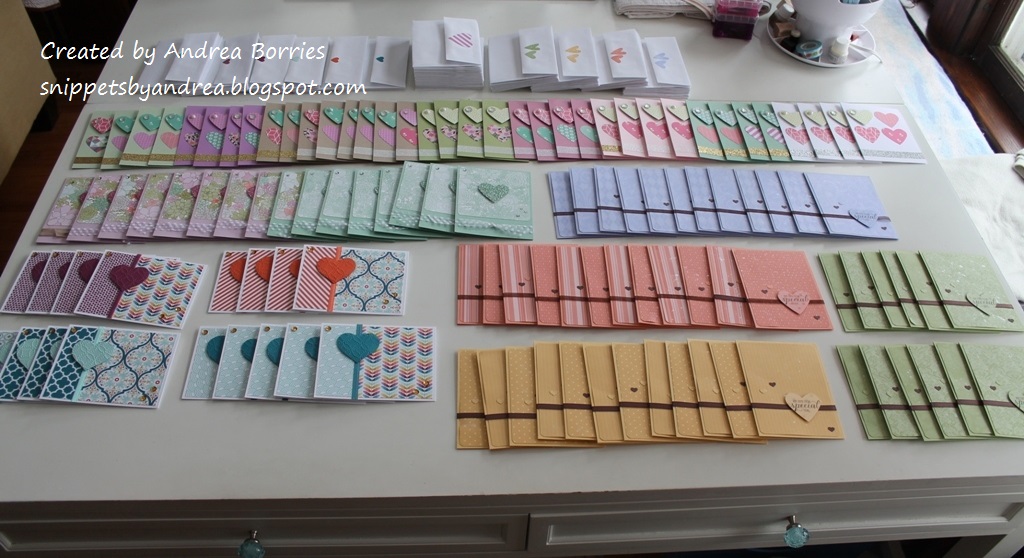
This year I got a late start with my valentines, but I still managed to make 118 cards, which I delivered to the community center yesterday morning:

Stamps: Valentine's Day sentiment (Endless Creations)
Paper: Pale Plum, Mint Macaron card stock; Succulent Garden Designer Series Paper (DSP); Glimmer Paper Assortment Pack
Ink: Memento Tuxedo Black
Accessories: Heart punch, small heart punch, corner rounder, rhinestones, white polka dot tulle ribbon, Dimensionals
Normally I don't like to mass produce cards because I get bored with them. But since I had to make so many cards in a short period of time, I designed four basic layouts and then made multiples of each design, switching up the card stock colors and DSP patterns.

Whenever possible, use "easy" measurements. For instance, with this design, I cut pieces of 12" x 12" DSP into 3" x 3" pieces to use on the front of the cards. That meant I used the whole sheet and didn't have to make extra cuts to trim each piece. I also made full-size A2 cards, so I just needed to cut pieces of card stock in half to make the bases. And here's a bonus tip: If you're scoring your card bases, which I always do, score the piece of card stock before cutting it. That way you score two cards at once.

Stamps: Garden in Bloom, Wild About Ewe, Honey! (Raising Boat)
Paper: Card stock and DSP Prints in Almost Amethyst, Groovy Guava, Certainly Celery, Pear Pizzazz; Chocolate Chip card stock
Ink: Chocolate Chip
Accessories: Heart punch, corner rounder, heart border punch, heart trio punch, brown ribbon (unknown), Chocolate Chip polytwill ribbon, Sparkle Silk (Fun Stampers Journey), Mono Multi liquid glue, Dimensionals


Stamps: Valentine's Day sentiment (Endless Creations)
Paper: 80-lb white card stock (Cougar); Pool Party, Rich Razzleberry, Island Indigo, Tangerine Tango card stock; Sycamore Street DSP
Ink: Rich Razzleberry, Island Indigo
Accessories: Hearts die (Sizzix), Quilt Top embossing folder, Sycamore Street ribbon pack, Rich Razzleberry velvet ribbon, gold sequins (Craft Medley), small heart punch, Dimensionals, Glue Dots, Mono Multi liquid glue


Stamps: "Happy Valentine's Day" (Paper Source) (not pictured)
Paper: Sweet Sugarplum, Orchid Opulence, Mint Macaron, Pear Pizzazz, Crumb Cake, Pistachio Pudding, Pink Pirouette card stock; 80-lb white card stock (Cougar); Llama Love paper stack (Craft Smith)
Ink: Memento Tuxedo Black
Accessories: Glitter washi tape, heart punch, large pearls, clear faceted gems, Dimensionals

Well, there you have it. All of my Meals on Wheels valentines and a few simple tips for mass-producing cards. All-in-all I'm pleased with how these cards turned out, and I hope they bring a smile to the recipients' faces. But I did miss using my cute and punny Valentine's Day stamps. I'll need to get an earlier start next year so I can make some stamped cards, too.
Thanks for stopping by!

2 comments:
Wow - that's a lot of cards! They look great - and I'm sure they will be appreciated. What a kind thing for you to do. The ideas for making quantities of cards are appreciated as well. I'd never thought of scoring, then cutting to do two at once.
Judy
Wow!! That's an amazing lot of (gorjuss) cards you have made, Andrea!! Yes, I do remember you doing this other years. I would love to do something like this myself. I will have to look into it and find an organization I can donate to. Maybe a local Hospice Unit or something. The most cards I have ever done (in one weekend!) was 150 for a bus driver I knew, who wanted Christmas cards to give to all her passengers. I probably stayed awake 24/7 to get them all done! Thanks for the tips on making it easier on getting the cards done. I am inspired! Thank you:-)
Sunshine
ihearttostamp.blogspot.com
Post a Comment