Showing posts sorted by relevance for query meals on wheels. Sort by date Show all posts

Saturday, February 4, 2023

2023 Meals on Wheels valentines

Earlier this week I dropped off my box of valentines for my local Meals on Wheels organization. I made a total of 102 cards in thirteen designs. Here is the whole batch:


And here are close-up photos of the different designs:


For these cards I used some pretty patterned paper with watercolor-style flowers. I wanted to enhance the paper instead of covering it up, so I decided to embellish the flowers. I punched small flowers and glued them onto the painted blue flowers; I added gold paint in the centers of the purple and large pink flowers; and I used a black marker with sparkle to color the inside of the small pink flowers.


These two designs also use large layers of patterned paper, although this time as more of a background. For the paint card I stamped and colored the focal image and sentiment. And for the heart card, I stamped the sentiment on a strip of white card stock and added, appropriately, several small textured die-cut hearts.


In my book, Valentine's Day always calls for puns, and the cactus card was one of those designs. It's also definitely non-traditional, so I added a tiny white heart to the large cactus to make it seem more valentine-y. The milk bottle card looks a little more traditional, but it also could be used for a variety of love, friendship, or thinking of you occasions.


For these two designs I stamped a background stamp in the same color as the card base. Then I added the focal images on a die-cut or stamped white layer just above the middle of the card. I added some cute little envelope embellishments on the snail mail card, and the lightbulb card was another "punny" design. (The sentiment on that card is from a stamp with multiple phrases all related to lights or lightbulbs. The sentiments get cut apart with a die, so each card I made in that design has a different sentiment.)


For the card on the left I cut four coordinating pieces of 6" x 6" patterned paper into nine 2" x 2" squares. I adhered one square of each pattern to the card base at different angles and added a large heart with a stitched border in the middle of the card. To make the mushroom design, I first determined what size heart I wanted and then cut them out of white card stock. I placed one of the hearts on my work surface and placed my largest clear block on top of it. I arranged all of the mushroom stamps on the block and then I was able to stamp each heart just one time instead of having to stamp each mushroom individually. You also could do this technique with a stamp positioner, but my acrylic block was easier to grab. :)


These two are the most feminine designs of the bunch because of all the pink (although I did try to keep them from being too frilly). On the typewriter card, I paper pieced the heart on the stamped image. And it's hard to tell, but the light pink behind the typewriter is a piece of patterned paper with a text print. On the mod floral card, the pieces that look tan are actually a gold card stock. I struggled with whether I should add embellishments on those cards, but ultimately I liked the clean layout with the deckled edge.


The last card designs are two more puns. To make the records I used four different circle punches: 1/8", 1/4", 3/4" and 2". And the sentiment on the bumblebee card is another one from a sentiment-strip stamp, so each card has a different bee-related sentiment.

I've really enjoyed making valentines for Meals on Wheels over the past several years. (To see previous designs, search "Meals on Wheels" or click on the "Valentine's Day" category.) I hope each card brings a little joy to the recipient.

Thanks for stopping by!


Monday, February 14, 2022

2022 Meals on Wheels valentines

Happy Valentine's Day! Again this year I made valentines for the organization that runs the Meals on Wheels program in my neighborhood. I made 115 cards this year in about a dozen different designs. I try to keep some of the designs more masculine or gender neutral (or at least not too pink and frilly), so there is a good variety of styles. (If you're new here, check out the Meals on Wheels valentines I've made in years past. There are a lot of easy, quick, and cute ideas.)

I didn't take a picture of all the cards together, but here are photos of all the different designs.

These cards were from an old card kit. I changed out the sentiments to make them into valentines and made one additional card to use up the extra felt flowers I had left.


For these cards I used a few coordinating sheets of patterned paper with square and heart punches and added matching sequins. On the heart cards, I splattered metallic watercolor paint on the background.


I used some pretty floral and succulent prints from old calendar pages to make these cards. I kept them pretty simple because I didn't want to cover up too much of the flowers.

These cards use the cutest washi tape. The tape looks like a roll of stamps, perforations and everything, so I cut them apart and added two "stamps" to each of these collage-style cards. I think this was my favorite card design.

Another postage-themed set of cards. I've had these faux stamps punched apart and colored for simply ages (like years, seriously), and I decided to finally put them to use.

I didn't want to spend a lot of time coloring, so the images on these cards were perfect. On the dog card, I only had to color the bird and the scooter, and for the other design, I colored only the scale (the bowl, hearts/cherries, and arrow were all stamped). I didn't do any shading, either, so they were pretty quick.

I love the two-tone heart-shaped boxwood wreath on these cards. I combined them with some punched sprigs and wood-patterned paper for nature-inspired cards.

This is a really easy layout for pretty papers. I cut up a 12" x 12" piece of patterned paper into (I think) 3" x 4" pieces, then layered each one on a coordinating card stock mat and adhered it to a card base. I used a coordinating tone-on-tone printed paper for the sentiment banner and added a few white hearts.

These two designs aren't really related; I just already had a lot of pictures, so I put them together. :) So here is a clean and simple stamped rainbow and one more faux postage-stamp design.

And there you have it! I do enjoy making these valentines every year, and I would definitely recommend looking for an organization in your area if you're interested. If Meals on Wheels isn't available, try a community center or senior care facility/nursing home.

I'll be back soon to share my personal valentines from this year. Teaser: I used gel prints to make some collage-style "artsy" cards, and I loved it!

I hope you had a special day, and thanks for stopping by!

Friday, February 8, 2019

Meals on Wheels valentines

For the past several years, I've donated hand-made valentines to a local community service organization that delivers them to Meals on Wheels clients. (If you type "Meals on Wheels" in my blog search bar, you'll find several posts showing the cards I've made in previous years.) It's a project I really enjoy doing, but the timing is always a little tricky because I have to jump right in after Christmas.

This year I got a late start with my valentines, but I still managed to make 118 cards, which I delivered to the community center yesterday morning:


Supplies (all Stampin' Up! unless otherwise noted):
Stamps: Valentine's Day sentiment (Endless Creations)
Paper: Pale Plum, Mint Macaron card stock; Succulent Garden Designer Series Paper (DSP); Glimmer Paper Assortment Pack
Ink: Memento Tuxedo Black
Accessories: Heart punch, small heart punch, corner rounder, rhinestones, white polka dot tulle ribbon, Dimensionals

Normally I don't like to mass produce cards because I get bored with them. But since I had to make so many cards in a short period of time, I designed four basic layouts and then made multiples of each design, switching up the card stock colors and DSP patterns.

I have a few other time-saving tips that helped me create all these cards on time.

Whenever possible, use "easy" measurements. For instance, with this design, I cut pieces of 12" x 12" DSP into 3" x 3" pieces to use on the front of the cards. That meant I used the whole sheet and didn't have to make extra cuts to trim each piece. I also made full-size A2 cards, so I just needed to cut pieces of card stock in half to make the bases. And here's a bonus tip: If you're scoring your card bases, which I always do, score the piece of card stock before cutting it. That way you score two cards at once.

Supplies (all Stampin' Up! unless otherwise noted):
Stamps: Garden in Bloom, Wild About Ewe, Honey! (Raising Boat)
Paper: Card stock and DSP Prints in Almost Amethyst, Groovy Guava, Certainly Celery, Pear Pizzazz; Chocolate Chip card stock
Ink: Chocolate Chip
Accessories: Heart punch, corner rounder, heart border punch, heart trio punch, brown ribbon (unknown), Chocolate Chip polytwill ribbon, Sparkle Silk (Fun Stampers Journey), Mono Multi liquid glue, Dimensionals

Minimize stamping. For all of my card designs, I relied on punches or dies (punches were my first choice since they are faster than die cutting) and patterned paper. I only used stamps for the sentiments. I didn't have to worry about coloring stamped images or pulling out multiple ink colors. Minimal stamping also meant there were fewer chances to smear an image or stamp it crooked, both of which could have taken more time and/or paper to fix.

Supplies (all Stampin' Up! unless otherwise noted):
Stamps: Valentine's Day sentiment (Endless Creations)
Paper: 80-lb white card stock (Cougar); Pool Party, Rich Razzleberry, Island Indigo, Tangerine Tango card stock; Sycamore Street DSP
Ink: Rich Razzleberry, Island Indigo
Accessories: Hearts die (Sizzix), Quilt Top embossing folder, Sycamore Street ribbon pack, Rich Razzleberry velvet ribbon, gold sequins (Craft Medley), small heart punch, Dimensionals, Glue Dots, Mono Multi liquid glue

Use light-colored card bases. For all of my card designs, I used white or light-colored card bases (with dark ink), which was a huge time-saver. With dark card bases, I would have had to cut layers of white card stock to adhere inside the cards so I could stamp a sentiment.

Supplies (all Stampin' Up! unless otherwise noted):
Stamps: "Happy Valentine's Day" (Paper Source) (not pictured)
Paper: Sweet Sugarplum, Orchid Opulence, Mint Macaron, Pear Pizzazz, Crumb Cake, Pistachio Pudding, Pink Pirouette card stock; 80-lb white card stock (Cougar); Llama Love paper stack (Craft Smith)
Ink: Memento Tuxedo Black
Accessories: Glitter washi tape, heart punch, large pearls, clear faceted gems, Dimensionals

Work assembly-line style. When making multiples, it's faster to do one step for all of the cards before moving on to the next step, rather than making one card at a time from start to finish. For instance, with this batch of cards, I cut and scored all the card bases first. Then I punched out all of the hearts and "dealt" them into piles, ensuring that the hearts in each pile had four different patterns. Then I assembled the cards and stamped the sentiment inside as I finished each color group.

Well, there you have it. All of my Meals on Wheels valentines and a few simple tips for mass-producing cards. All-in-all I'm pleased with how these cards turned out, and I hope they bring a smile to the recipients' faces. But I did miss using my cute and punny Valentine's Day stamps. I'll need to get an earlier start next year so I can make some stamped cards, too.


Thanks for stopping by!


Monday, February 10, 2020

Meals on Wheels valentine roundup

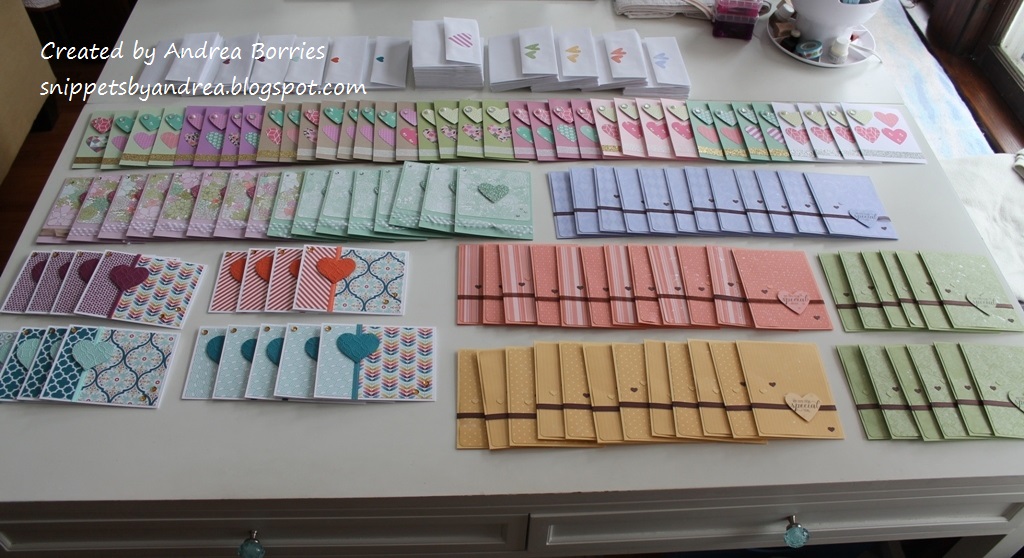
Before I get to the photos of my last Meals on Wheels valentines, I thought I'd share a picture of the whole group of fifty cards. Drum roll please ...


Ta da! It's fun to see all of them together. I think it's a good group of cards; nothing fancy, but a nice variety.

So far I've shared details for all the cards except the two groups on the left side of the middle row and the middle cards in the top row. (To find the previous posts, click on the Valentine's Day label on the right.) Info about the cards in the middle row are below. However, I didn't do a separate post for the cards in the top row because they are made with the For the Love of Felt project kit from Stampin' Up!, and I basically made the cards as they were designed.

Now on to the last two groups of cards:

Supplies:
Paper: Thick Whisper White, vellum card stock (Stampin' Up!); patterned papers (unknown)
Ink: Signo white gel pen (uni-ball)
Accessories: Heart punches (Stampin' Up!), Hearts die (Sizzix), Cherry Cobbler baker's twine (Stampin' Up!), Diamond Dust sequins (The Makery), Quilt Top embossing folder (Stampin' Up!), foam tape (3M), Art Glitter Glue (Art Institute)

While I was looking through one of my boxes of patterned paper, I found some scraps of red and white papers from previous Valentine's Day projects. I wanted to use them up, so I cut some into card backgrounds and then added a variety of mats, layers, punched or die-cut hearts, and sequins. Simple layouts, but definitely festive.

Supplies:
Paper: 80 lb Natural card stock (Cougar), Typeset Specialty Designer Series Paper (DSP), Life's Journey Stamp Collage Embossed Paper (K & Company), red patterned paper (unknown), Real Red card stock (Stampin' Up!)
Ink: Crumb Cake (Stampin' Up!), Art Philosophy Metallic Acccents paint (Prima)
Accessories: Diamond Dust sequins (The Makery), Cherry Cobbler baker's twine (Stampin' Up!), Sunshine Wishes dies (Stampin' Up!), stamp-edge scissors (Fiskars), foam tape (3M), Art Glitter Glue (Art Institute)

Finally I combined a few of the red paper scraps from the previous cards with some faux postage stamps and newsprint-style DSP to make a set of valentines with a vintage feel.


I sponged Crumb Cake ink around the edges of the DSP to make it look aged. And to add a little sparkle, I splattered a bit of metallic red paint across the paper. I added baker's twine bows to a few of the cards and then finished them up with (of course!) a few sequins.

Whew! That's finally it for my Meals on Wheels valentines. Now I have to move on to the valentines I sent out personally! I don't think I'll be able to post all of those before Valentine's Day. But the good news is that most of the cards are not very valentine-themed, so they're great designs for year-round card-making (and sending!). Stay tuned!

Thanks for stopping by!

Saturday, February 11, 2017

Animal valentines and a Meals on Wheels recap

Whew! We made it to the last blog post featuring the Valentine's Day cards I made for our local Meals on Wheels organization. Today's cards are for the birds -- or, more accurately, the cats, bears and fish.

Supplies (all Stampin' Up! unless otherwise noted):
Stamps: Critters in the 'Burbs (Lawn Fawn)
Paper: 110-lb Solar White card stock (Neenah Paper), Into the Woods Designer Series Paper (DSP), DSP Patterns Stack - Brights, Neutrals DSP Stack, Real Red card stock
Ink: Memento Tuxedo Black, Old Olive, Project Life journaling pen
Accessories: Critters in the 'Burbs Lawn Cuts dies (Lawn Fawn), hearts border punch, Mono Multi liquid glue, Dimensionals

I didn't want to spend a lot of time coloring images while I was mass-producing cards, so rather than stamp these images on white card stock, I stamped them on different pieces of DSP, cut them out with coordinating dies and adhered them to the card base. I added three tiny punched hearts to the tree to make it a bit more Valentine-y. I stamped the grass images as a last-minute edition after everything else was finished, and I think I should have tried to add some between the tree and the cat; it looks a little bit empty there.

Inside the card I wished the recipient a "purr-fect" Valentine's Day.

Supplies (all Stampin' Up! unless otherwise noted):
Stamps: Thankful Forest Friends, Trees Company (Raisin Boat)
Paper: Kraft, Whisper White card stock; red glimmer paper
Ink: Early Espresso
Accessories: Small heart punch, 2-1/2" circle punch, Essentials Paper-Piercing Pack, paper-piercing mat and tool, Dimensionals, Glue Dots

This was actually the last card design I created, and I was seriously running out of steam at the time. I wasn't sure what I wanted to do, so I was thrilled when I realized the bear from Thankful Forest Friends looked like he could "hold" a punched heart. And I even had the perfect sentiment to coordinate: "Bear hugs!"

The size of this card is 3" x 4" so I could maximize the 12" x 12" sheets of Kraft card stock.

Naturally I wanted to continue my trend of adding a pun inside the card, so I wished the recipient a "beary" great Valentine's Day.

Supplies (all Stampin' Up! unless otherwise noted):
Stamps: Fish Frolics, Fintastic Friends (Lawn Fawn)
Paper: Whisper White, Real Red card stock
Ink: Real Red, Bermuda Bay, Crushed Curry, Stardust Gelly Roll pen (Sakura)
Accessories: Hearts border punch, Dimensionals, Mono Multi liquid glue, Glue Dots

This card is probably my least favorite of all the designs. I think the layout is okay, but I'm not sure I like the colors. I wanted bright colors, so I went with a classic red-yellow-blue combo. It's not bad; I'm just not crazy about it.

I colored the white parts of the fish with a glitter pen to add a little sparkle and used three small red hearts as bubbles. Inside the card? I stamped "Happy Valentine's Day and wrote a note that said, "Sending fishes for a special day."

So that's it. I've shared all the designs for the one hundred cards I made and donated to a local Meals on Wheels organization. It took a fair amount of time, but it was worth it to see how excited the community center employees were when I dropped off the cards. And I hope they bring a little happiness to each of the recipients. If you missed any of the previous card designs and want to check them out, here is a list of the posts with links:
From a calendar to valentines (Jan. 26, 2017)
Stuck on You (Feb. 2, 2017)
Pizza My Heart (Feb. 8, 2017)
Masculine valentines (Feb. 11, 2017)

Thanks for stopping by!

Thursday, January 29, 2015

One hundred valentines

Last year our local Meals on Wheels organization collected valentines that they delivered to clients with their meals. I made a small batch of valentines last year, and I wanted to participate in the project again this year. When I e-mailed the organization's volunteer coordinator I found out that the deadline to submit cards was Feb. 2, which only gave me about a week to work. I decided to make that my weekend project, and I set a lofty, but achievable, goal of making one hundred valentines.

I started working on Friday, and everything was going pretty smoothly. I thought I was on track to finish the cards on Sunday night or Monday afternoon. Then a wrench was thrown into my plans. On early Sunday afternoon I went out to salt the icy sidewalk, and on my second step out the door I slipped and fell on the stairs. Hard. I didn't have any outward bumps or bruises, but my back was extremely unhappy. I ended up hobbling around and spending a lot of time lying on the couch with a heating pad.

Needless to say, my card-making was hampered since I couldn't sit for very long and needed to take frequent breaks. But I kept plugging away, and I finished all one hundred cards by late Tuesday afternoon. I made mostly 4" x 4" cards because I was able to get four card bases from one piece of 12" x 12" card stock, and I used the leftover 4" x 4" square from each piece for punching out shapes or making layers.

Here are all the finished cards:

One hundred assorted Valentine's Day cards to be donated to Metro Meals on Wheels.

As you can see, some of the cards were stamped, and some of them were made with just punches and paper. I kept them all fairly simple without too much embellishment. Below are close-up pictures of most of the cards (I few of the designs I've already shared), but I didn't keep track of the supplies I used for each card. If you have questions about a particular design, leave a comment below and I'll respond as soon as I can.

Two valentines: one gray and yellow color scheme with tulips and the sentiment "The essence of love is kindness" and the other with red and black colors, a typewriter and the sentiment "you're just my type."
I stamped "Happy Valentines Day" inside both of these card designs. I also wrote a brief note and signed all one hundred of the cards.

Two pink and gray valentines: one with teacups and the saying "You suit me to a tea" and the other with a cat wearing a crown and the sentiment (inside card) "You're the cat's meow."
Inside the teacups card I stamped "Happy Valentine's Day."  The inside of the cat card says "You're the cats meow."

Two valentines: one with a tree and a bird in a nest and the other with three hot air balloons.
I stamped "You're treemendous" inside the tree card and "Up in the air over you" inside the card with hot air balloons.

Two valentines: one with an elephant and the saying "Wild about you" and the other with a jar filled with stamped hearts.
Inside these cards I stamped "Happy heart day."

Two valentines: one with a hedgeho giving a flower to a mouse and the other with a whale floating on the ocean.
Inside the hedgehog card I stamped "Happy Valentine's Day" and wrote a note about sending "hedgehugs." In the whale card I stamped "Happy heart day" and wrote "Whale you be my valentine?"

Two valentines with a background of polka-dot paper and a punched heart as the focal point.
The rest of the cards are made with patterned paper, punches and a few embellishments. Inside the cards I stamped either "Happy Valentine's Day" or "Happy heart day."

Two valentines featuring paper with a cupcake print and a button embellishment.
You can't really tell in this photo, but the cupcakes on this paper are covered with a glittery gloss, and they sparkle in the light. I've been saving this piece of paper for years because it's so pretty, but I decided this was the perfect way to use it.

Valentine with polka dot embossed base, polka dot printed paper and a cupcake image punched out with a circle punch for the focal point.
Inside these cupcake cards I wrote a note wishing the recipient a sweet day.

Two simple valentines each made with four punched hearts arranged in a square on a solid card stock base.
These are some of the simplest card designs, but I actually really like them. I think they're perfect for Valentine's Day. And they remind me of the old Sesame Street song, "One of these things is not like the others ..."

Three valentines: two with layers of heart-patterned paper and one with four hearts punched from coordinating papers and arranged in a flower shape.
I used four punched hearts again for the card in the front of this photo. But instead of arranging them in a square, I glued them down with the point of each heart in the center of the card base, so they make a flower or clover shape.

A variety of valentines made with strips of patterned paper and punched hearts.
This was the last bunch of valentines I made, and I was starting to lose a little steam. So I used strips of coordinating patterned paper, ribbon and punched hearts to make these sixteen cards.

I love being able to share my cards, and I hope they bring a little sunshine to the recipients.


Thanks for stopping by!