Thursday, March 16, 2023

Seahorse birthday wishes

It's been some mix of raining and snowing most of the day today, and now the wind has kicked up. Winter doesn't want to let go, but I am definitely ready for spring. I'd also settle for a nice beach vacation, but that's not in the cards for me. So I'll just share a sea-themed birthday card while I dream of warmer weather.


This card started with the Calypso Coral seahorse, which is splattered with silver watercolor paint. I had made it for a different project and then decided it didn't work, so it was just sitting in the dish of odds and ends on my table waiting for the right card. And I think it's perfect here!

To create an under-the-sea look, I embossed a Coastal Cabana card base with a wave embossing folder. Then I tore the edge of a piece of Crumb Cake card stock and glued it along the bottom of the card front for the sand. I adhered the seahorse to the left side of the card and glued a die-cut "birthday wishes" on the right side, overlapping the seahorse just a bit.

To embellish the card I added a few clusters of clear droplets for bubbles. And I used a mini stapler to add a bit of burlap ribbon in the upper right corner. I love the texture and color of the ribbon, and it has a beachy, tropical feel to me.

Thanks for stopping by!

Monday, March 13, 2023

Party pets

The past year or so I've been trying to be more thoughtful in my craft purchases, partly because of my budget and partly because I still have a good number of stamp sets that haven't ever seen ink. The stamp set I used for today's cards, from the June 2021 My Monthly Hero kit from Hero Arts, was one of those sets. But not any more! I made four cards featuring some cute cats and dogs that are definitely ready for a party.


To start these cards, I stamped and die-cut a whole bunch of cats, dogs, presents, and balloons that I colored with Prismacolor pencils and blended with Gamsol. I am not an expert color-er, so I stuck to basically one color for each of the animals, with the exception of some stripes on the yellow kitties. For the accessories, I used the same pallet of five colors so I could mix and match all the pieces when deciding on my layouts.

These first two cards have similar layouts, and I love how the scalloped rectangle adds to the playful feeling. For the card on the left I placed a small piece of foam tape behind each balloon and then used a tiny drop of glue at the end of each string. For the card on the right I used a few smaller stamps from the set to create a tone-on-tone background.


For the next card, I used cloud stencils (Taylored Expressions) and blending brushes to make a sky full of fluffy clouds on a white card base. I attached the dog and balloon bunch with foam tape and glued the individual balloons directly to the card base. For the last card I used two cat images so I could include the sentiment "sending birthday whiskers," which makes me smile. I used a confetti embossing folder (Taylored Expressions) to add texture to the background, although I had to use the embossing folder upside down because I had a top-folding card base. This way it just looks like the confetti is  piling up on the ground!


I did want to share the inside of the balloon card. I had planned to stamp the sentiment directly inside the card, but I smeared the ink. Instead of covering it with another plain panel, I decided to ink blend some clouds above and below the stamped sentiment. I love how it turned out, and I think it makes the inside a little more fun. 

If you have stamp sets you haven't used, I challenge you to pull one out the next time you make a card. Thanks for stopping by!

Friday, March 10, 2023

Birthday Basics Turnabout cards

I'm back today with a couple more festive birthday cards, this time made with the Birthday Basics Turnabout set from Concord & 9th.

For the first card (on the left), I actually didn't use the turnabout portion of the stamp set. Instead I used the large "hooray" stamp from the set to make my own background panel. I started by stamping the word along the middle of the bottom edge in Bermuda Bay. Then I stamped the partial words on either side in Coastal Cabana and Calypso Coral. From there I moved up the card stock, shifting the position of the stamp and changing the ink color as needed. I added some coordinating die-cut mini banners (Taylored Expressions) to the background and layered it on Bermuda Bay card stock and then a Calypso Coral card base. For the focal image I die cut a balloon and bow using the Birthday Basics dies and stamped "best day ever" on the balloon. I attached the balloon using foam tape and finished the card with some clear droplets.

For the second card I did use the turnabout stamp from the set, and I will admit that, due to a few user errors and then some ink smudges, it took me several tries to get a finished panel I liked. This one still isn't perfect, but I think it's busy enough that it's not too noticeable. And I love the overall effect with the bright, bold colors. Once the background was done, I added four strips of coordinating card stock in different widths across the top half of the panel. Using foam tape I adhered a die-cut "happy birthday" (Gina K Designs) over the strips. I attached the panel to a dark blue card base and added a few silver sequins.

Inside these cards I used a couple more sentiments from the Anything-but-Basic Birthday Wishes stamp set (My Favorite Things) that I mentioned in my last post. I think they both work perfectly with their corresponding card front, and to connect them even more I decorated both inside panels. For the first card I added some falling confetti in the same colors as the card front, and on the second card, I included two party blowers die cut from coordinating card stock.

Thanks for stopping by!


Tuesday, March 7, 2023

Bring on the cake

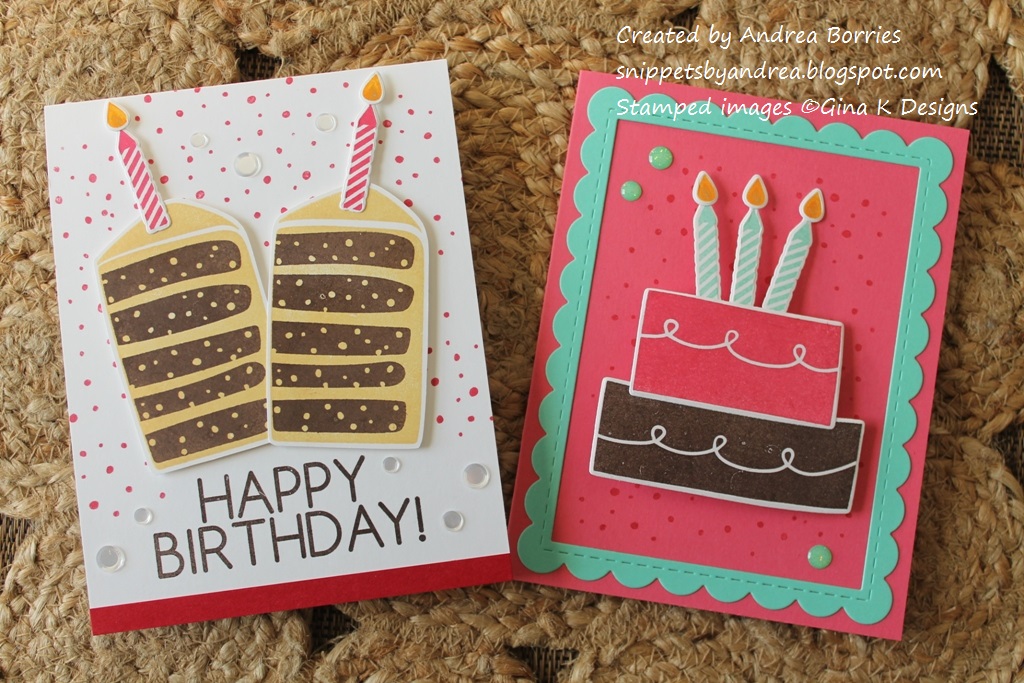
When I take out a stamp set to make a card, I usually try to make at least one other card with the set. And if I can, I mix up the color pallet and/or the style of the card to add some variety to my card stash. Since I've been in desperate need of birthday cards, last weekend I puled out the Birthday Bash stamp set from Gina K Designs and made two cake-themed cards.

For the card on the left, I wanted a neutral card. I used a white card base and stamped red dots/sprinkles/confetti on the background. I stamped "happy birthday" near the bottom of the card and added a narrow strip of red card stock along the bottom edge. For the focal image I stamped and cut out two of the cake slice images. One of my favorite cakes has always been yellow cake with chocolate frosting, so I used the opposite of that for this card. I added a red candle on each slice, and adhered the pieces to the card base with foam tape.

For the second card, I started by making a pink and brown layer cake. I wanted to add a third color, so I chose Coastal Cabana for the candles. I used pink card stock for the card base, stamped some pink confetti in the background, and then added a die-cut Coastal Cabana scalloped frame. To attach the cake focal image, I used an Action Wobble spring (that's why it looks a little lopsided in the photo). It's fun to watch the cake bounce around. For a finishing detail I added three Coastal Cabana glitter enamel dots.

This is the inside of the white card, and this sentiment is why I included two slices of cake on the front of the card. The sentiment is from the Anything-but-Basic Birthday Wishes stamp set from My Favorite Things. I love the fonts and humor of the sentiments, and I used it several times recently, so you'll be seeing more samples. I also stamped more red confetti inside to connect the inside to the front of the card.

Thanks for stopping by!


Saturday, March 4, 2023

Birthday butterfly

When I found the backgrounds that I used for the plaid birthday cards I shared recently, I also found a collage-style background made with the retired Stampin' Up! set Nature Walk. (There were lots of other backgrounds, too, so maybe I'll get around to using them as well at some point.) I decided to use some of the background piece to create a birthday card, and here is the result:


I think the colors in this background are Soft Suede, River Rock, Soft Sky, and Island Indigo. It's also spritzed with a shimmer mist. I used a stitched rectangle die to cut a panel from the background, and then I stamped "Happy Birthday" in an open space near the bottom. I adhered the panel to an Island Indigo card base and added a die-cut butterfly I found in my stash. (Just the body of the butterfly is glued down, so there is a little dimension in the wings.) I finished the card with a few cream-colored sequins and a twine bow on the butterfly.


One of the things I really like about this background is that there are bumblebees stamped on it using shimmer paint. They're hard to see straight on, but when you tilt the card it's a really pretty shimmery effect.

Thanks for stopping by!