I've gotten a little behind on my blog posts the past couple of weeks because I've been working on several different projects. One of those projects was to make thirty birthday cards for my uncle. (To clarify, they are cards for him to use, not thirty separate cards wishing him a happy birthday.) The cards were part of his birthday gift, and I managed to finish them about five hours before the party yesterday. Whew! I'll be posting the cards over the next couple of weeks -- I have masculine, feminine, kids and general designs -- and I hope you enjoy them.
Since it's Mother's Day, I'm going to start by sharing three cards that include images of flowers. Although these are birthday cards, these designs would also make beautiful Mother's Day cards by just changing the sentiment.
Supplies (all Stampin' Up! unless otherwise noted):
Stamps: Flower Patch
Paper: Rich Razzleberry, Pool Party, Hello Honey, Whisper White card stock
Ink: Rich Razzleberry, Blackberry Bliss, Pool Party, Hello Honey
Accessories: Extra-large oval punch, Itty Bitty Accents punch pack, rhinestones, gold and clear Wink of Stella glitter brush pens (ZIG), Rich Razzleberry taffeta ribbon, Dimensionals
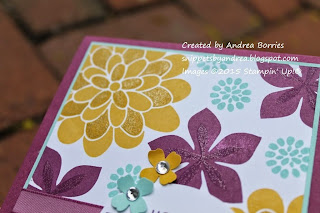
I love the bold flowers in this stamp set and the countless ways you can combine and layer them. (Add in the coordinating Framelits dies and the possibilities seem endless.) For this card I used plain old basic stamping on a panel of Whisper White card stock. I stamped a few of the largest flower in Hello Honey, added a few five-petal Rich Razzleberry flowers (with Blackberry Bliss centers), and then filled in with small Pool Party images. I layered the stamped piece on a mat of Pool Party card stock, added the ribbon and mounted the whole panel on a Rich Razzleberry card base. I added a sentiment in a punched oval and three punched flowers with rhinestone centers.
You may be wondering why some of the petals on the large flowers are a darker yellow. After I had the background all stamped, it looked a little flat to me. So I pulled out my new Wink of Stella glitter brush pens and added some clear glitter over the center of the purple flowers. I decided to try the gold glitter on the yellow flowers, and I really love how it turned out. The darker petals add some dimension to the images, and everything is better with a little sparkle, right?
Supplies (all Stampin' Up! unless otherwise noted):
Stamps: Bright Blossoms, Petite Pairs
Paper: Gumball Green, Basic Black, Whisper White card stock
Ink: Basic Black, Gumball Green, Strawberry Slush, Daffodil Delight markers
Accessories: Black ribbon (unknown), corner rounder, Dimensionals
To do the stamping on this card I used my markers instead of ink pads. I wanted to use the polka dot vase image from Bright Blossoms but with different flowers. So with my Basic Black marker I colored just the vase part of the rubber stamp and then stamped the image on Whisper White card stock. I repeated that twice to get a row of three vases. (Here's a tip: If you want to stamp three evenly spaced images in a row but don't want to bother with measuring, stamp the middle image first. Then eyeball the placement of the left and right images. It may not be perfect, but it will certainly be close enough.) Then I used Gumball Green, Strawberry Slush and Daffodil Delight markers to color the flower images and stamp them above the vases. I matted the panel on Basic Black card stock, adhered it to a Gumball Green card base and added a simple black ribbon and bow for embellishment.
Supplies (all Stampin' Up! unless otherwise noted):
Stamps: Oriental Paintings, Create a Cupcake
Paper: Coastal Cabana, Shimmery White card stock
Ink: Jet Black StazOn, Coastal Cabana, Blushing Bride, Pear Pizzazz
Accessories: Wood sheets, 1/8" gold ribbon, Tea Party embossing folder (Lifestyle Crafts), Aqua Painter, Dimensionals
I've had the Oriental Paintings stamp set for years. I kept it because the images are beautiful, but I rarely use it because I have a hard time figuring out how to use the images on cards. But I was pleased with how this one turned out. I stamped the image with Jet Black StazOn ink on Shimmery White card stock and then colored it using an Aqua Painter and Blushing Bride, Pear Pizzazz and Coastal Cabana ink. (It's hard to see in the picture, but I very lightly painted Coastal Cabana all around the flowers and leaves to add a touch of color to the sky.) Then I adhered the image to a wood sheet to create the look of a frame. For the background I embossed a piece of Coastal Cabana card stock, wrapped a piece of gold ribbon around it and adhered the panel to a Coastal Cabana card base. Using Dimensionals I added the focal point to the card.
I had so much fun watercoloring the image on the front of the card that I also wanted to add the flowers on Shimmery White card stock inside the card. I didn't want the border around the flowers, though, so I carefully applied ink to just the flower part of the image. I did get ink on the bottom part of the border, but when I stamped the image I just made sure to place it so that part of the image was off the card stock. Then I added a sentiment, painted the flowers and adhered the panel to the inside of the card.
Happy Mother's Day to all the moms and mother figures out there! I hope you know how much you are loved and appreciated. Thanks for stopping by!


No comments:
Post a Comment