There's definitely a winter chill in the air today. Time to pull out the scarves, earmuffs and mittens (which I'll be honest I've already worn a few times). While I'm not quite ready for snow -- the older I get the more I dread the hassle -- I do appreciate that we were able to enjoy a nice long fall with a number of gorgeous sunny days. So as we say goodbye to another fall season, it seems fitting to share my last few autumn/Thanksgiving card designs.
Supplies (all Stampin' Up! unless otherwise noted):
Stamps: Grateful Greetings
Paper: Lost Lagoon, Cajun Craze card stock
Ink: Cajun Craze
Accessories: Grass embossing folder (Darice), Walnut Brown and Copper 3D stamp paint (Viva Decor), linen thread, wooden leaf (Paper Source), Mono multi liquid glue, Spouncer brush (Plaid)
This is a simple layout, with a layer of embossed Lost Lagoon card stock as the focal point. To add impact to the embossing I lightly applied a blend of two colors of 3D stamp paint -- Walnut Brown and Copper -- with a foam stipple-style brush. I mounted the embossed card stock on a Cajun Craze card base, stamped a sentiment, tied linen thread around the card front and added an orange wooden leaf. It's nothing fancy, but I love the dynamic color combination and this embossed design.
Supplies (all Stampin' Up! unless otherwise noted):
Stamps: Lighthearted Leaves
Paper: Rich Razzleberry, Old Olive, Very Vanilla card stock
Ink: Rich Razzleberry
Accessories: Fall Leaves Swirl embossing folder (Darice), Autumn Accents die, Copper 3D stamp paint (Viva Decor), copper cord (unknown), crochet trim, Artisan Embellishment Kit, wooden leaf (Paper Source), corner rounder, Mono Multi liquid glue, Spouncer brush (Plaid)
This card has the same basic principle as the previous card: embossed background highlighted with 3D stamp paint and then embellished. This version has a more feminine feel, though, with a green/purple/copper color combination, velvet ribbon and crochet trim. I also added a die-cut leaf as a layer for the stamped sentiment.
Supplies (all Stampin' Up! unless otherwise noted):
Stamps: Lighthearted Leaves
Paper: Whisper White, card stock, gold paper (retired), confetti red card stock (unknown)
Ink: Memento Tuxedo Black, E19 alcohol marker (Copic Sketch), Blendabilities assortments: Daffodil Delight, Cherry Cobbler, Old Olive
Accessories: Metallic foil doilies, Wink of Stella gold glitter brush pen (ZIG), red twill ribbon (unknown), Dimensionals
I made four cards with the design by stamping leaves on a large piece of white card stock, coloring them with alcohol markers, and then cutting the card stock into four pieces. I layered each piece on gold paper, added ribbon and half of a gold doily, and used Dimensionals to adhere the panel to a red card base. To emphasize the gold I also used a gold glitter brush pen to color over the yellow leaves.
Thanks for stopping by!
Thursday, November 19, 2015
Saturday, November 14, 2015
Home tweet home
My little series of autumn cards continues today with a cute birdhouse-shaped card design.
Supplies (all Stampin' Up! unless otherwise noted):
Stamps: Hardwood
Paper: House cards - Fossil (The Paper Cut); Lost Lagoon, Early Espresso, Cajun Craze card stock
Ink: Lost Lagoon, Soft Suede, Crumb Cake, Early Espresso marker
Accessories: Bird Builder punch, Autumn Accents die, Woodgrain embossing folder, 1 3/4" circle punch, sponge, Mono Multi liquid glue, Glue Dots, 3-in-1 Craft Glue (Beacon)
Really, this card design could be used for any season by simply omitting the leaves -- or changing them to a shade of green -- or using flower, butterfly or snowflake shapes instead. (A set of four birdhouse cards, one for each season, would make a fun gift.) To add some texture to the cards I embossed the leaves with the Woodgrain embossing folder and found some small twigs in my front yard to use for the perches. Because of the twigs I think I'll have to either hand deliver these cards or send them in padded mailers, but I think it's worth it.
Supplies (all Stampin' Up! unless otherwise noted):
Paper: House cards - Fossil (The Paper Cut); Whisper White, Soft Sky, Garden Green, Early Espresso, Mossy Meadow card stock; Into the Woods Designer Series Paper
Ink: Crumb Cake
Accessories: Autumn Mix Flower Soft (Katy Sue Designs), window dies (Our Daily Bread), Bird Builder punch, Brick Wall embossing folder, sponge, Mono Multi liquid glue, Dimensionals
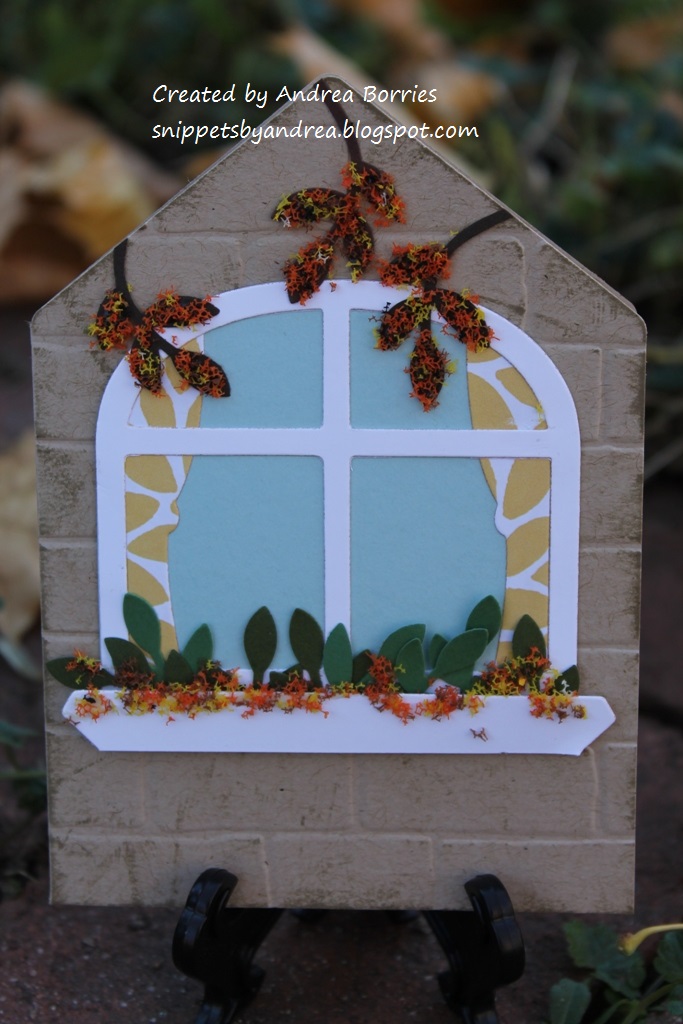
I also tried a different approach to the house-shaped card bases by making one into an actual house, or more specifically, part of a house. The window die I have was too big for the card, so I cut off the sill and the bottom two panes from the white window. I glued die-cut curtains and blue card stock behind the rest of the window frame and green leaves to the back of the window sill. Then I adhered those pieces to the house card base, which I had embossed with the brick embossing folder. I glued a few punched branches at the top of the card and added autumn-colored Flower Soft to the branches and window sill. To be honest, I'm not crazy about how the Flower Soft looks here, but it was worth a try. I do like the rest of the card, though, so maybe I'll try it again another time.
I think I have one more autumn card design to post, and then I'll be on to other projects. Thanks for stopping by!
Supplies (all Stampin' Up! unless otherwise noted):
Stamps: Hardwood
Paper: House cards - Fossil (The Paper Cut); Lost Lagoon, Early Espresso, Cajun Craze card stock
Ink: Lost Lagoon, Soft Suede, Crumb Cake, Early Espresso marker
Accessories: Bird Builder punch, Autumn Accents die, Woodgrain embossing folder, 1 3/4" circle punch, sponge, Mono Multi liquid glue, Glue Dots, 3-in-1 Craft Glue (Beacon)
Really, this card design could be used for any season by simply omitting the leaves -- or changing them to a shade of green -- or using flower, butterfly or snowflake shapes instead. (A set of four birdhouse cards, one for each season, would make a fun gift.) To add some texture to the cards I embossed the leaves with the Woodgrain embossing folder and found some small twigs in my front yard to use for the perches. Because of the twigs I think I'll have to either hand deliver these cards or send them in padded mailers, but I think it's worth it.
Supplies (all Stampin' Up! unless otherwise noted):
Paper: House cards - Fossil (The Paper Cut); Whisper White, Soft Sky, Garden Green, Early Espresso, Mossy Meadow card stock; Into the Woods Designer Series Paper
Ink: Crumb Cake
Accessories: Autumn Mix Flower Soft (Katy Sue Designs), window dies (Our Daily Bread), Bird Builder punch, Brick Wall embossing folder, sponge, Mono Multi liquid glue, Dimensionals
I also tried a different approach to the house-shaped card bases by making one into an actual house, or more specifically, part of a house. The window die I have was too big for the card, so I cut off the sill and the bottom two panes from the white window. I glued die-cut curtains and blue card stock behind the rest of the window frame and green leaves to the back of the window sill. Then I adhered those pieces to the house card base, which I had embossed with the brick embossing folder. I glued a few punched branches at the top of the card and added autumn-colored Flower Soft to the branches and window sill. To be honest, I'm not crazy about how the Flower Soft looks here, but it was worth a try. I do like the rest of the card, though, so maybe I'll try it again another time.
I think I have one more autumn card design to post, and then I'll be on to other projects. Thanks for stopping by!
Wednesday, November 11, 2015
Thankful for forest friends
When I saw the Thankful Forest Friends stamp set in the Stampin' Up! 2015 Holiday catalog, I immediately fell in love with the adorable critters. I combined them with the coordinating Into the Woods Designer Series Paper (DSP) and Crumb Cake note cards and envelopes to make a few cute fall cards.
Supplies (all Stampin' Up!):
Stamps: Thankful Forest Friends, Grateful Greetings
Paper: Crumb Cake note cards and envelopes, Whisper White card stock, Into the Woods DSP
Ink: Early Espresso, Soft Suede, Cajun Craze
Accessories: 2-1/2" circle punch, 1/8" gold ribbon, gold sequin trim, Envelope Liner Framelits dies, Dimensionals, Glue Dots
For this card I stamped all three animals on Whisper White card stock and cut them out by hand. (I actually like "fussy cutting," but these animals really aren't too hard to cut out.) I used two different prints from the Into the Woods DSP to make a background and adhered the animals in a group, using Dimensionals for the fox and the bunny to add some depth.
Supplies (all Stampin' Up!):
Stamps: Thankful Forest Friends
Paper: Crumb Cake note cards and envelopes, Whisper White card stock, Into the Woods DSP
Ink: Early Espresso, Soft Suede, Tangelo Twist, Daffodil Delight, Old Olive, Rich Razzleberry
Accessories: Into the Woods ribbon, Into the Woods Elements, Envelope Liner Framelits dies, Dimensionals
I used markers to color one of the sentiment stamps from Thankful Forest Friends and stamped it on a panel of Whisper White card stock. I adhered that panel to the right side of a note card and added a strip of DSP to the top and bottom of the panel. I stamped and cut out the bear and adhered it below the sentiment. A strip of Rich Razzleberry ribbon and wooden accent finish off the card.
Supplies (all Stampin' Up!):
Stamps: Thankful Forest Friends
Paper: Crumb Cake note cards and envelopes, Whisper White and Rich Razzleberry card stock, Into the Woods DSP
Ink: Mossy Meadow, Early Espresso, Soft Suede, Tangelo Twist, Rich Razzleberry
Accessories: Into the Woods ribbon, gold sequin trim, 2-1/2" circle punch, Emvelope Liner Framelits dies, Glue Dots, Dimensionals
This card doesn't have any of the animal images, but I still think it's cute. I layered a piece of DSP onto Rich Razzleberry card stock for the background. For the focal image, I colored and stamped a sentiment, punched it out with a circle punch and added tails of Rich Razzleberry ribbon and gold sequin trim. It's simple, but I love the colors and the pattern on the DSP.
I want to try using the animal images on non-autumn cards (I've seen some great samples), but that will probably have to wait a bit. I finished making my fall/Thanksgiving cards today (I'll share them in the next two or three posts), but now I've got to focus on Christmas -- I want to make a bunch of gifts and ornaments this year in addition to the cards, so that will keep me busy for awhile. Thanks for stopping by!
Supplies (all Stampin' Up!):
Stamps: Thankful Forest Friends, Grateful Greetings
Paper: Crumb Cake note cards and envelopes, Whisper White card stock, Into the Woods DSP
Ink: Early Espresso, Soft Suede, Cajun Craze
Accessories: 2-1/2" circle punch, 1/8" gold ribbon, gold sequin trim, Envelope Liner Framelits dies, Dimensionals, Glue Dots
For this card I stamped all three animals on Whisper White card stock and cut them out by hand. (I actually like "fussy cutting," but these animals really aren't too hard to cut out.) I used two different prints from the Into the Woods DSP to make a background and adhered the animals in a group, using Dimensionals for the fox and the bunny to add some depth.
Supplies (all Stampin' Up!):
Stamps: Thankful Forest Friends
Paper: Crumb Cake note cards and envelopes, Whisper White card stock, Into the Woods DSP
Ink: Early Espresso, Soft Suede, Tangelo Twist, Daffodil Delight, Old Olive, Rich Razzleberry
Accessories: Into the Woods ribbon, Into the Woods Elements, Envelope Liner Framelits dies, Dimensionals
I used markers to color one of the sentiment stamps from Thankful Forest Friends and stamped it on a panel of Whisper White card stock. I adhered that panel to the right side of a note card and added a strip of DSP to the top and bottom of the panel. I stamped and cut out the bear and adhered it below the sentiment. A strip of Rich Razzleberry ribbon and wooden accent finish off the card.
Supplies (all Stampin' Up!):
Stamps: Thankful Forest Friends
Paper: Crumb Cake note cards and envelopes, Whisper White and Rich Razzleberry card stock, Into the Woods DSP
Ink: Mossy Meadow, Early Espresso, Soft Suede, Tangelo Twist, Rich Razzleberry
Accessories: Into the Woods ribbon, gold sequin trim, 2-1/2" circle punch, Emvelope Liner Framelits dies, Glue Dots, Dimensionals
This card doesn't have any of the animal images, but I still think it's cute. I layered a piece of DSP onto Rich Razzleberry card stock for the background. For the focal image, I colored and stamped a sentiment, punched it out with a circle punch and added tails of Rich Razzleberry ribbon and gold sequin trim. It's simple, but I love the colors and the pattern on the DSP.
I want to try using the animal images on non-autumn cards (I've seen some great samples), but that will probably have to wait a bit. I finished making my fall/Thanksgiving cards today (I'll share them in the next two or three posts), but now I've got to focus on Christmas -- I want to make a bunch of gifts and ornaments this year in addition to the cards, so that will keep me busy for awhile. Thanks for stopping by!
Friday, November 6, 2015
Fall watercolors
At the past few stamp shows I've attended I've been enthralled with the watercolor-style stamping by Art Impressions. I finally gave in and bought several stamp sets and markers and even took a class the company offered at a local stamp store (where I had to buy a couple more sets, naturally). I've practiced a little bit here and there, but a couple of weeks ago I decided to watercolor a few images to use on cards.
I used the same layout for each focal image (it's one we made in the class I took and it's also on the package for the stamp set) and the same basic supplies for all the cards (all Stampin' Up! unless otherwise noted):
Stamps: Clay Pot (4701), Foliage (4051) (both Art Impressions)
Paper: Crumb Cake note cards and envelopes, watercolor paper (Strathmore), Summer Smooches Designer Series Paper (DSP), Sycamore Street DSP
Ink: Markers: 28 - English Red, 45 - Sepia, 6 - Brown, 17 - Steel Blue, 86 - African Violet (Marvy Le Plume II)
Accessories: Wooden leaves (Paper Source), Into the Woods Elements, metallic vintage hemp twine (Hemptique), navy grosgrain ribbon, Envelope Liner Framelits dies, Dimensionals, Mono Multi liquid glue
I didn't add a lot of embellishment to the cards because I wanted the watercolor images to be the focus. But the little wooden elements were perfect accents, and I was really happy with how all three cards turned out. I also used my new Envelope Liner Framelits dies to make the envelopes a little fancier.
I decided to switch up the colors for this version. I like the contrast of the blue and orange, although I wasn't sure at first if it would work. I also cut down the main layer for this card and added a swatch of DSP in the background.
Now that I have this watercolor layout "mastered," I'll have to try some different scenes and images. Thanks for stopping by!
Stamps: Clay Pot (4701), Foliage (4051) (both Art Impressions)
Paper: Crumb Cake note cards and envelopes, watercolor paper (Strathmore), Summer Smooches Designer Series Paper (DSP), Sycamore Street DSP
Ink: Markers: 28 - English Red, 45 - Sepia, 6 - Brown, 17 - Steel Blue, 86 - African Violet (Marvy Le Plume II)
Accessories: Wooden leaves (Paper Source), Into the Woods Elements, metallic vintage hemp twine (Hemptique), navy grosgrain ribbon, Envelope Liner Framelits dies, Dimensionals, Mono Multi liquid glue
I didn't add a lot of embellishment to the cards because I wanted the watercolor images to be the focus. But the little wooden elements were perfect accents, and I was really happy with how all three cards turned out. I also used my new Envelope Liner Framelits dies to make the envelopes a little fancier.
I decided to switch up the colors for this version. I like the contrast of the blue and orange, although I wasn't sure at first if it would work. I also cut down the main layer for this card and added a swatch of DSP in the background.
Now that I have this watercolor layout "mastered," I'll have to try some different scenes and images. Thanks for stopping by!
Sunday, November 1, 2015
Bountiful Border cards
I've paged through the 2015-2016 Stampin' Up! catalog I don't know how many times since I received it last spring. But it wasn't until a few weeks ago that I noticed the Bountiful Border stamp set. I'm not sure how I overlooked it, but once I "found" it, I was intrigued. So I decided to add it to my last order, and this weekend I used it to make three cards.
Supplies (all Stampin' Up! unless otherwise noted):
Stamps: Sprinkles and Smiles (Penny Black), Bountiful Border
Paper: Thick Whisper White card stock
Ink: Hello Honey, Basic Gray pad and marker
Accessories: 2014-2016 In Color washi tape, corner rounder, Wink of Stella gold glitter brush pen (ZIG), Dimensionals
Using washi tape to make candles is one of my favorite quick-and-easy birthday card ideas. You can have just one candle or a whole row of them across a card front, and the jagged edges that are created by ripping the tape off the roll make it look like the candles are melting. So I was excited when I realized that the two individual leaf images in the Bountiful Border set make perfect candle flames. For this card I used three patterns of washi tape for the candles, added the wicks with a marker, stamped the flames with Hello Honey ink and used a gold glitter brush pen to add detail to the flames.
Supplies (all Stampin' Up!):
Stamps: Bountiful Border
Paper: Marina Mist, thick Whisper White card stock
Ink: Old Olive, Marina Mist, So Saffron
Accessories: Petite Petals punch, Subtles Candy Dots, corner rounder, Dimensionals
I used the vine and flower images to make a border along the bottom of this card. I stamped the vine twice with the bottom point of the vines meeting in the middle. After stamping the flowers on the vines and the polka dots in the background I adhered a punched Marina Mist flower over the spot where the vines came together. I wanted to add something else to this card -- maybe a sentiment and/or an embellishment along the top of the card -- but I couldn't decide exactly what. So I'm leaving it like this until I figure out what else it needs.
Supplies (all Stampin' Up!):
Stamps: Bountiful Border, Happiest Birthday Wishes
Paper: Whisper White, Smoky Slate, Calypso Coral card stock
Ink: Calypso Coral, Smoky Slate, Real Red, Old Olive
Accessories: 1/8" silver ribbon, silver sequin trim, corner rounder, sponge, Dimensionals, Glue Dots
To make the focal image for this card I stamped the large flower image four times with Calypso Coral ink on white card stock. Then I cut out each flower around a different layer of petals, sponged the edges with Real Red ink, and layered them together with Dimensionals (see photo).
I stamped the bunch of three leaves twice in the lower left corner of a panel of Whisper White card stock and adhered the layered flower over the leaves. Then I added a few silver sequins and a stamped sentiment and finished the card with a layer of Smoky Slate card stock, a strip of silver ribbon and a Calypso Coral card base.
I used all seven images in the Bountiful Border set (without repetition) to make these three cards, and I really like how each one turned out. I think this stamp set will be a great one to pull out for clean and simple cards. Thanks for stopping by!
Supplies (all Stampin' Up! unless otherwise noted):
Stamps: Sprinkles and Smiles (Penny Black), Bountiful Border
Paper: Thick Whisper White card stock
Ink: Hello Honey, Basic Gray pad and marker
Accessories: 2014-2016 In Color washi tape, corner rounder, Wink of Stella gold glitter brush pen (ZIG), Dimensionals
Using washi tape to make candles is one of my favorite quick-and-easy birthday card ideas. You can have just one candle or a whole row of them across a card front, and the jagged edges that are created by ripping the tape off the roll make it look like the candles are melting. So I was excited when I realized that the two individual leaf images in the Bountiful Border set make perfect candle flames. For this card I used three patterns of washi tape for the candles, added the wicks with a marker, stamped the flames with Hello Honey ink and used a gold glitter brush pen to add detail to the flames.
Supplies (all Stampin' Up!):
Stamps: Bountiful Border
Paper: Marina Mist, thick Whisper White card stock
Ink: Old Olive, Marina Mist, So Saffron
Accessories: Petite Petals punch, Subtles Candy Dots, corner rounder, Dimensionals
I used the vine and flower images to make a border along the bottom of this card. I stamped the vine twice with the bottom point of the vines meeting in the middle. After stamping the flowers on the vines and the polka dots in the background I adhered a punched Marina Mist flower over the spot where the vines came together. I wanted to add something else to this card -- maybe a sentiment and/or an embellishment along the top of the card -- but I couldn't decide exactly what. So I'm leaving it like this until I figure out what else it needs.
Supplies (all Stampin' Up!):
Stamps: Bountiful Border, Happiest Birthday Wishes
Paper: Whisper White, Smoky Slate, Calypso Coral card stock
Ink: Calypso Coral, Smoky Slate, Real Red, Old Olive
Accessories: 1/8" silver ribbon, silver sequin trim, corner rounder, sponge, Dimensionals, Glue Dots
To make the focal image for this card I stamped the large flower image four times with Calypso Coral ink on white card stock. Then I cut out each flower around a different layer of petals, sponged the edges with Real Red ink, and layered them together with Dimensionals (see photo).
I stamped the bunch of three leaves twice in the lower left corner of a panel of Whisper White card stock and adhered the layered flower over the leaves. Then I added a few silver sequins and a stamped sentiment and finished the card with a layer of Smoky Slate card stock, a strip of silver ribbon and a Calypso Coral card base.
I used all seven images in the Bountiful Border set (without repetition) to make these three cards, and I really like how each one turned out. I think this stamp set will be a great one to pull out for clean and simple cards. Thanks for stopping by!
Subscribe to:
Posts (Atom)