Tuesday, June 30, 2020

Three cards for guys

Today I'm sharing a few cards geared toward guys. I used these designs for my Father's Day cards this year, but by changing the sentiment you could use them for any occasion. Each card has a different theme, so there's something for a variety of different personalities or interests.

Supplies:
Stamps: Punny Man 2 (Taylored Expressions), All-Year Cheer II (Stampin' Up!)
Paper: Thick Whisper White, Whisper White, Basic Black, Poppy Parade, Granny Apple Green, Bermuda Bay card stock (Stampin' Up!)
Ink: Memento Tuxedo Black (Tsukineko)
Accessories: 1/8", 1/4" 3/4", 2" circle punches (Stampin' Up!); Nested Banners dies (Simon Says Stamp), jute twine (May Arts Ribbon), foam tape (3M), Art Glitter Glue (Art Institute)

This design would be great for any music lover, not just the guys. I made this card for my great-uncle who, in his 90s, still likes to sing and play the piano. I knew I wanted to use this sentiment, so I set out to create some records with various circle punches. The record is made with 1/8" and 2" circles, and the label is 1/4" and 3/4". Here's a tip: When punching a large circle with a smaller circle in the middle, punch the smaller circle out of the card stock first. It's much easier to center the larger circle around the smaller hole than to try to find the middle of an already punched circle.

Once the records were punched and assembled, I just glued them onto a white card base so they were all touching. The fun thing about a background like this is that when you cut off the pieces that hang past the edge of the card, you can use those pieces to fill in other parts of the background or add them inside the card:


The next card is a little more traditionally masculine:

Supplies:
Stamps: Woven Plaid Background (Concord & 9th), All-Year Cheer II (Stampin' Up!), All the Fixings Stamp and Die Combo (Taylored Expressions)
Paper: Crumb Cake, Night of Navy, Whisper White card stock; galvanized metallic paper (Stampin' Up!)
Ink: Night of Navy, Crumb Cake Blends marker (Stampin' Up!)
Accessories: Foam tape (3M), Art Glitter Glue (Art Institute)

This card was for one of my uncles, who is also my godfather. He likes to wear flannel shirts and used to build a lot of things, so this design was perfect for him. I stamped the background image using Night of Navy ink on white card stock and then used a ruler and a Crumb Cake Blends alcohol marker to add the extra lines in the pattern.

To make the tools, I die cut them out of navy card stock and galvanized metallic paper. Then I trimmed off the tool handles from the navy pieces and glued them to the metallic pieces. The stamp set that coordinates with the tool dies has a few great greetings, but they didn't quite work for this occasion, so I just used a Happy Father's Day stamp on the front of the card and wrote a personalized punny sentiment inside.

And last but not least:

Supplies:
Stamps: Punny Man 2 (Taylored Expressions); Itty Bitty Birthdays, Bubble Over (Stampin' Up!)
Paper: Thick Whisper White, Whisper White card stock; Bubbles & Fizz Designer Series Paper (DSP); gold foil sheets (Stampin' Up!)
Ink: Basic Gray (Stampin' Up!)
Accessories: Bottles & Bubbles dies (Stampin' Up!), Wonky Stitched Circles dies (My Favorite Things), clear droplets (Pretty Pink Posh), glitter enamel dots (Stampin' Up!), foam tape (3M), Art Glitter Glue (Art Institute)

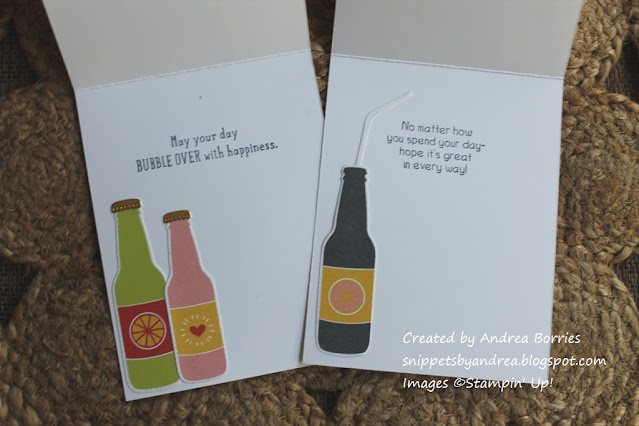
The fun images and bright colors on these cards are great for light-hearted cards for guys -- or anyone, really (I'm thinking especially of tweens/teens). I made the card on the right for my dad, and since I had everything out, I decided to put together a bonus birthday card. The pop bottles are all die cut from a sheet of DSP (I love that the dies coordinate with the paper as well as the stamps), and I used gold foil paper for the bottle caps.

For the background on the Father's Day card, I used various sized scraps of DSP glued onto a white card base to create a block background. I added two bottles (one adhered with foam tape) and used a white die-cut circle to help the sentiment stand out. A few clear droplets add the look of bubbles.

For the birthday card, I used a large piece of DSP as the background and then added a smaller piece in a darker pattern to act as a "table" for the pop bottles. I added the sentiment on a banner at the bottom of the card and used several green glitter enamel dots for embellishment.


I added a few more pop bottles inside the cards along with stamped sentiments. Pretty quick, easy, and fun!

Thanks for stopping by!

Thursday, June 25, 2020

June Christmas card: Merry Chrismoose

After last month's red and white Christmas card, I'm back to white, aqua, and kraft for my June card design. What can I say? I can't seem to help myself.

Supplies (all Taylored Expressions unless otherwise noted):
Stamps: Quick Critters Winter Stamp and Die Combo
Paper: Thick Whisper White, Whisper White, Real Red card stock (Stampin' Up!); Toffee card stock
Ink: Oreo, Cookie Monster; E18 Copper Sketch marker (Copic)
Accessories: Blender brushes, Square Masking Stencils, Build-a-Scene Calendar dies, Snowflake Confetti die, red/white twine (unknown), Art Glitter Glue (Art Institute), Dimensionals (Stampin' Up!)

But isn't this moose such a cutie? I die cut him out of Toffee card stock, stamped his face using Oreo ink and then colored his antlers and muzzle with a copper-colored Copic marker. I glued a tiny bit of red card stock behind the heart cut-out and gave him a festive scarf with a bit of baker's twine, which I unraveled at the ends.

For the rest of the card, I used a base of thick Whisper White card stock. Using the Square Masking Stencils for perfect placement, I blended a background square with Cookie Monster ink onto the card front. I die cut a little snowy hill, glued it along the bottom of the inked square and then stamped the greeting over the right side of the square, again using Cookie Monster ink so it's a little more subtle. I attached the moose to the card with Dimensionals and glued on three bitty snowflakes. I love how the different elements extend past the border of the blue "sky."

Here is the group of seven cards:


I didn't take a picture of the inside of the card, but the sentiment I used says, "May your joys be as many as the snowflakes that fall" (also from Taylored Expressions). And if you'd like to see a different card design with this stamp-and-die combo, check out my March 2018 Christmas card.

Thanks so much for stopping by today!

Wednesday, June 24, 2020

Birthday challenge card

Last month, one of my upline demonstrators through Stampin' Up! sent out a card-making challenge to her team. Each of us received a card base and layer to make a card with a fun fold. We could use any Stampin' Up! products we wanted, and here is the card I created:

Supplies (all Stampin' Up!):
Stamps: P.S. You're the Best, Picture Perfect Birthday
Paper: Melon Mambo, Whisper White card stock; Neutrals and Subtles Designer Series Paper (DSP) Stacks
Ink: Memento Tuxedo Black; Blends markers - Pool Party, Smoky Slate, Pineapple Punch, Granny Apple Green; Melon Mambo Stampin' Write marker
Accessories: Rhinestones, Subtles Enamel Shapes, Basic Black/white baker's twine, Bitty Banner punch, Dimensionals

The pieces I received were the Melon Mambo card base, the Whisper White inner layer, and the Melon Mambo and white layers on the card front. Melon Mambo isn't one of my usual go-to colors, so I decided to give it a little retro feel by adding in Basic Black and Pool Party.

I stamped the typewriter, with the flowers and sentiment, on a scratch piece of white card stock, colored it with Blends markers (I love that blue typewriter!) and then cut it out by hand. Using Dimensionals, I adhered the typewriter to the square of Whisper White card stock. I added a little blue banner and twine bow in the upper right corner and finished the focal layer with a few rhinestones. I added a layer of black-and-white striped DSP on the card front and then adhered the focal layer, matted with the Melon Mambo, near the top of the card (making sure not to glue the card shut!).


For the inside layer,  I stamped a birthday sentiment near the left side of the card. I chose a sentiment that was tall and narrow since the front of the card is shorter than the back. I also stamped a small image in the lower right corner. Not only does that add some interest to the plain white space when the card is closed, but it also provides a visual cue when the card is open -- it creates a "border" on the right side so I know where to stop writing. I added a little blue enamel heart over the corner image, because why not? :)

Thanks for stopping by!

Thursday, June 18, 2020

Live it with zest

It's a dark and stormy evening in my neck of the woods, so I thought I'd pop in for a quick post to share some bright, cheery, summery cards.

Supplies (all Stampin' Up! unless otherwise noted):
Stamps: Lemon Zest, Gingham Background (Concord & 9th)
Paper: Whisper White, thick Whisper White, Pineapple Punch card stock
Ink: Pineapple Punch, Crushed Curry, Lemon Lime Twist, Granny Apple Green, Garden Green; Memento Tuxedo Black (Tsukineko)
Accessories: Lemon Builder punch, 1-3/4" circle punch, Stitched Nested Label dies, Postage Stamp Nested Frame Cuts dies (Hero Arts), Pinewood Planks embossing folder, Glitter Enamel Dots, Go Green sequins (Craft Medley), Art Glitter Glue (Art Institute), Dimensionals


There's not much to explain about these cards; they're mostly stamping, punching and layering. I love the look of the gingham background with the lemons, and I was surprised how much I liked the color Pineapple Punch on these cards (a recently retired In Color from Stampin' Up!). It's such a bright color that I hadn't used it much before -- but after making these cards I decided to buy a whole pack of the card stock!

Thanks for stopping by!


Thursday, June 11, 2020

Cards from a scrapbooking kit

Several months ago I learned about an organization called Bring Smiles to Seniors that delivers cards to seniors who may feel alone and need a little love. They might live in senior care facilities, be home-bound, or participate in nutrition programs, such as Meals on Wheels. Bring Smiles to Seniors collects donations of cards and has volunteers write messages and/or decorate the insides of the cards.

I wanted to send in a box of cards, so this spring I spent some time creating cards from a scrapbook kit I bought ages ago. The kit contained elements from two Cosmo Cricket lines: Early Bird and Garden Variety. The kit contained at least sixteen 12" x 12" patterned papers (some of the patterns were border strips and journaling cards to be cut apart), as well as adhesive chipboard elements, and alphabet stickers. I also have the coordinating stamp set from Unity Stamp Company. I'd used bits and pieces of the kit over the years but had mainly been hoarding it because I thought the papers were so cute. This was the perfect occasion to use them -- and here are the 72 cards I made:


I love the bright, cheery colors and patterns in these papers, and I thought they would be perfect for cards for seniors because there are some retro-style images and punny sentiments. I used a variety of other supplies with the kit, including sentiment stamps, word dies, punches, and a few simple embellishments. I thought I had jotted down some of those supplies, but if I did, I can't find the list. So if you have a question about a particular stamp, die, etc., leave me a comment, and I'll try to figure out which set or company it is from.

Here are more detailed pictures of the cards divided into smaller batches. (There are a lot of photos - sorry!)


The top middle card in the last picture wasn't in the group photo above because it wasn't in the batch I donated; I sent that one to my crafting bestie. But since I used the kit to create it, I wanted to include it in this photo.

I ended up using almost all of the papers; I had some little scraps left over, but I think I recycled all of them because I didn't want to hoard them any more. I did have some chipboard stickers I couldn't use because they were too big (e.g., a 12" long border pieces), and I tucked those away with the rest of my stickers to save for now. It felt good to finally use those supplies!

Thanks for stopping by today!

Friday, June 5, 2020

A little sunshine

I live a few miles from where George Floyd was murdered by a Minneapolis police officer last week. He died too soon and suffered an unimaginable death. I can't imagine how it feels to lose a friend or a brother or a father that way. I can't imagine how it feels to live your whole life -- generations of lives -- afraid of the very people who are supposed to protect you. I can't imagine being a parent and having to teach my children how to act or what to say so they aren't arrested or killed by the police. We need to do better.

My neighborhood has been relatively quiet in terms of the protests and riots that followed Mr. Floyd's murder. The corner grocery store had a window broken, the gas station a few blocks away had extensive fire damage, and several stores and restaurants in nearby business districts were damaged and/or looted. The destruction has been much, much worse in other areas of the Cities -- and at least some of that damage was caused by people who had nothing to do with the protests. It will take time to heal and rebuild, but ultimately those buildings can be repaired or replaced. A life cannot be replaced. Black lives matter.

Despite all the pain and sorrow, there have been glimmers of hope. Minnesotans are taking care of their neighbors. Collection sites have been flooded with donations of food, toiletries, diapers, and other items for residents whose neighborhoods have been destroyed and who don't have access to stores or supermarkets. And people of all colors and faiths, from around the country and around the globe, have been coming together to demand justice for George Floyd and too many others who came before him. I know there are people who condemn the protestors, but I see support and solidarity. Maybe White people are starting to understand, maybe we can finally see some of the systemic racism that Black people have lived with for hundreds of years, maybe change will finally come. I hope so. We need to be better.

I want to be an ally in this movement and help end racial, social, and economic injustice, but I have a lot to learn. I started a notebook filled with lists of websites to visits, Instagram accounts to check out, books to read, and so on. There is a lot of information to process -- and I recognize my privilege in being able to take a step back and figure out what steps to take next. One simple thing I am doing is following more Black crafters to start learning their stories. If you are interested, Kristina Werner has compiled a list of Instagram accounts of Black crafters (as long as the accounts aren't private, you should be able to view them even if you don't have an Instagram account).

Through all of this I have struggled with blogging and card-making. Sitting down to make a card seemed so trivial when so many people are out risking their safety to fight for social justice, when so many people have suffered for so long. And what would I say in a blog post? I didn't want to pretend nothing happened, but I also didn't want to say something wrong. Ultimately, though, if I want to be an ally, I need to say something and be willing to learn.

Of course I will continue to make cards. It's my creative outlet and part of who I am. And I want to share them, too, if for no other reason than to bring a little sunshine into the world. And on that note, here is a little sunshine for today:

Supplies (all Taylored Expressions unless otherwise noted):
Stamps: Over the Rainbow, Rainbow Sentiments
Paper: Whisper White card stock (Stampin' Up!); Salt Water Taffy, Guava, Pineapple, Lime Zest, Plum Punch card stock
Ink: Memento Tuxedo Black (Tsukineko), Salt Water Taffy
Accessories: Over the Rainbow, Rainbow Cloud Duo, Rolling Clouds dies; Here Comes the Sun stencil; blender brushes; sparkling clear sequins (Pretty Pink Posh); Art Glitter Glue (Art Institute); foam tape (3M)


I made these cards with the Somewhere Over the Rainbow kit from Taylored Expressions. The kit is sold out, but I believe the kit components will be for sale individually in the future. I used the rainbow die to cut rainbows from four different card stock colors, and then I distributed the strips so each rainbow has four colors. I added die-cut clouds, stamped or stenciled the backgrounds (for two of the cards), stamped sentiments, and then finished the cards with clear sequins.

Thanks for stopping by today. I wish you and your loved ones peace, sunshine and rainbows.