Saturday, August 30, 2025
'Seas' the day
Monday, January 20, 2025
Tropical vibes
It is a cold in my neck of the woods -- our high temperature was -7°F today -- so it seems like a perfect day to share a couple of cards that have tropical vibes.
I made these cards ages ago, so I don't remember many details, although I think they're pretty self-explanatory. I used the Sending Sunshine stamp set (Stampin' Up!), and while I love the images in the set, it's not particularly versatile. So I tried to create two distinct layouts for these cards. Both cards turned out well, but I really like the retro look of the card on the right with the strips of colored card stock behind the focal image. And I think the style of the "happy birthday" sentiment coordinates well with it, too.
I could do with a hint of this tropical weather. Thank goodness our cold snap is supposed to be ending tomorrow -- we should have temps above zero! Thanks for stopping by!
Monday, August 26, 2024
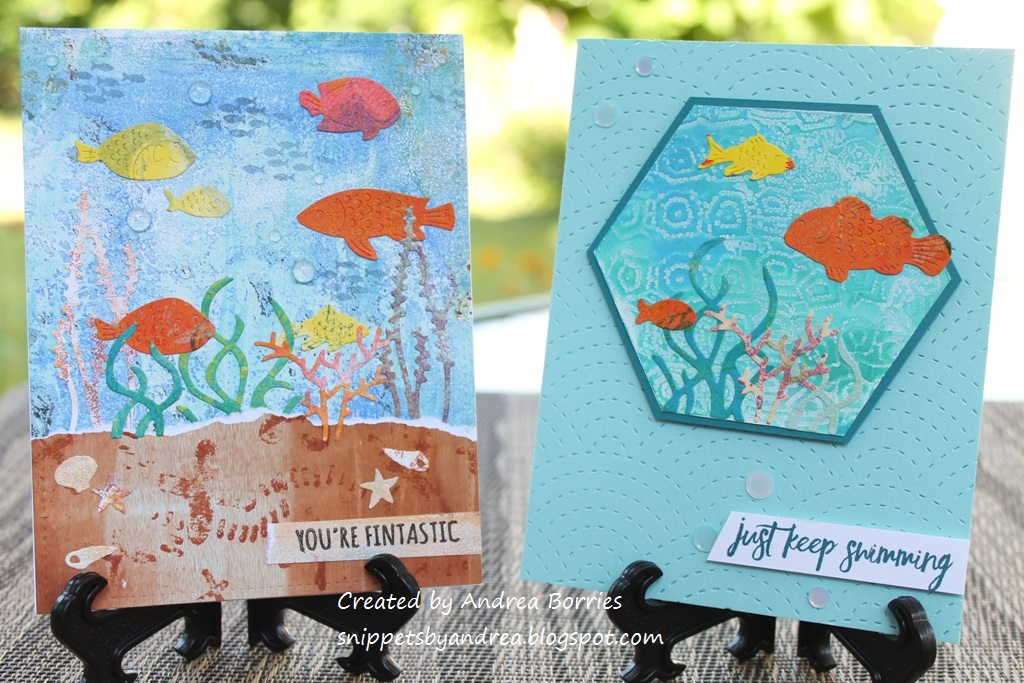
Underwater gel print scenes
The batch of cards I'm sharing today was definitely the most time-consuming of the gel-print cards I made this time around. But I think they were worth the effort.
For these cards, I used various gel prints to make all the parts of the underwater scenes. I chose one main print for the background/water for each card, cut it with a stitched rectangle die, and adhered it to a white card base. To create the sand I tore a brown gel print into wide strips and cut the bottom and sides of each stripe with the stitched rectangle die so it would match the stitching on the background. Then I used bits and pieces left over from a variety of other gel prints to create fish, kelp, coral, and seashells with the School of Fish die (Memory Box) and the Build-a-Scene - Underwater dies (Taylored Expressions). I even used a gel print to make the sentiment strip. I played around until I was happy with the arrangement and then glued everything down. I finished with some sequins to create the look of bubbles.
I don't usually stamp directly on the gel prints because they have a rough texture. But I wanted to stamp some little schools of fish in the background to add more depth. I tried Distress Oxide inks (Faded Jeans and Broken China) and VersaFine (Onyx Black). All of the inks worked, but I did notice that the images stamped with Distress Oxides got sort of blurry as they dried, as if the ink was bleeding. Luckily that was fine for these cards -- it's sort of an underwater effect, which is perfect.
I made one more card like the first two, although I did change the sentiment, and then I tried a different card layout. I have a set of small, shaped gel presses, and one of them is a hexagon. I had a hexagon print that looked like it would make a good underwater scene, so I trimmed off the extra paper, matted it with blue-green card stock, and then trimmed down the mat. I added the die-cut pieces and set the piece aside to work on the card base. I chose light aqua card stock and die cut the card front with the Fanfare Cutting Plate (Taylored Expressions) on the card front. The pattern reminds me of scales or waves, and I think it adds a nice, subtle detail. I used foam tape to attach the focal piece and a sentiment strip, and I finished the card with clear sequins.
Thanks for stopping by!
Monday, June 24, 2024
Seaside Notions card sets
A couple of weeks ago at the end of the school year, one of my coworkers asked to purchase some card sets. I had some card sets on hand, but I wanted to make a few more so she would have additional choices. The two card sets I'm sharing today were made with the Seaside Notions stamp set.
I made both sets with the same general technique: I filled an 8-1/2" x 11" piece of cream card stock with stamped images from the Seaside Notions stamp set, using a different color ink for each image. For this set I also splattered the card stock with metallic blue watercolor paint and then cut it into panels for six cards.
I matted each panel before attaching it to a cream card base. I stamped the sentiments on strips of card stock, trimmed the ends of the strips, and attached them to the cards with foam tape. I finished off the cards in this set with clear droplets.
After stamping the sheet of card stock for the second Seaside Notions card set, I spritzed it with iridescent shimmer spray, which is really hard to see in the photo. Again I matted the stamped panels, but before adhering them to the card bases, I wrapped some hemp twine around the panels. (The ends of the twine are taped to the back of the panel so I didn't have any knots.) I glued a wooden seashell embellishment over the twine and attached the panels to colored card bases. I didn't add sentiments to these cards so they can be used for any occasion.
After I finished the card sets, I had two strips of stamped card stock left over, so I made two birthday cards for my stash. I matted each strip and adhered them to colored card bases embossed with a wave texture. I added a "happy birthday" sentiment and a few clear droplets to finish off these bonus cards.
Thanks for stopping by!
Monday, July 24, 2023
Birthday fishes
Happy Monday! I hope your week is off to a good start. I'm trying to catch up on some blog posts today. I intended to finish this post over the weekend, but then I decided to rearrange and reorganize my craft room. Uff da. It was a big project, but I'd been wanting to do it for awhile. I like the new arrangement so far, but I haven't had a chance to do any crafting yet; that will be the true test.
But back to today's post. Here are some cute birthday fishes:
I'm really pleased with how these cards turned out. To make the fish, I used the School of Fish die (Memory Box) and an old gel print. I wasn't crazy about the gel print itself, but I love how it worked for these die-cut fish. I did have to layer the fish, because the gel print paper was light-weight; I just cut another round of fish out of card stock (I used a light orange to coordinate) and glued the pieces together. If I'd thought about it ahead of time, I probably would have adhered the gel print to card stock first and then die cut the fish.
For the card bases I used blue card stock embossed with the Seabed embossing folder. I love all the fun underwater details. To make the sand, I cut strips of Crumb Cake card stock, tore along the top edge, and repeatedly stamped a speckle- or splatter-style image to add texture. I finished the scenes with a few die-cut pieces of seaweed and coral, a small wooden seashell on each card, and a few clear droplets. I added the punny sentiment "birthday fishes" on a small strip of card stock near the upper right corner of each card.
"Fishing" you a great day! Thanks for stopping by!
Saturday, June 17, 2023
Fruit and fish
I hope you're not tired of seeing card sets, yet! These should be the last sets I have to share for at least a little while. Today's sets have two different themes, which you may have guessed from the title of this post: fruit and sea life. That's a strange combo, I know, but the thing they have in common is punny sentiments.
I think this is my favorite card from the fruit sets. I love the kiwi fruit paper, and the sentiment just makes me smile. I finished off the cards with coordinating sequins.
Thursday, March 16, 2023
Seahorse birthday wishes
It's been some mix of raining and snowing most of the day today, and now the wind has kicked up. Winter doesn't want to let go, but I am definitely ready for spring. I'd also settle for a nice beach vacation, but that's not in the cards for me. So I'll just share a sea-themed birthday card while I dream of warmer weather.
Thursday, August 25, 2022
Too cool for school
After my last post with the less-than-stellar pictures of some of my gel-print cards, I wanted to share a gel-print card with a good picture! :) And bonus - this gel print was one of my favorites, and I love how the card turned out, too.
Isn't that fun? I had been waiting to use this gel print because I wanted the "perfect" card for it. The colors made me think of an under the sea theme, so I decided to use the S'whale stamp set from Ellen Hutson.
I stamped a few schools of fish around the edges of a Coastal Cabana (Stampin' Up!) card base. I die cut the gel print with a stitched rectangle die, matted it with a layer of black card stock, and then adhered it to the card base.
Thursday, July 29, 2021
Happy thoughts at the beach
I'm not a huge fan of the hot, humid weather during summer, so the past couple of weeks has been the worst. I would love a nice relaxing day at the beach (preferably with a light, cool breeze -- is that asking too much?), but for now I'll live vicariously through this card:
Supplies:Stamps: Totally Random Sayings Vol. 3 (Essentials by Ellen), Gorgeous Grunge (Stampin' Up!)
Paper: Whisper White, Crumb Cake, Pool Party, Garden Green card stock (Stampin' Up!)
Ink: Pool Party, Crumb Cake (Stampin' Up!); Memento Tuxedo Black (Tsukineko)
Accessories: Beach Chairs die (Rubbernecker Stamps), Grass #2 die (Rubbernecker Stamps), High Flying Kites die (Poppy Stamps), Whale of a Time sequins (Stampin' Up!), blending brush (Picket Fence Studios), Art GLitter Glue (Art Institute)
Doesn't that look so calm and relaxing?
I started with a Pool Party card base and decided where I wanted to position the horizon. Using a piece of paper (or a sticky note, masking paper, card stock scrap - whatever you have for a straight edge) to cover the top part of the card, I used a blending brush to add a bit of Pool Party ink to create the water.
For the sand, I cut a piece of Crumb Cake card stock as wide as the card base and then tore along the top. I wanted to add more texture, so I used a splatter-style stamp to add a bunch of little dots to the sand. (If you don't have a stamp, you could make your own splatter with a marker or watercolor paint.) Then I adhered that piece to the card base, making sure the top overlapped the bottom edge of the "water."
I die-cut and glued down a white Adirondack chair, several bits of green grass, and a few wispy little clouds. I finished the card with a stamped sentiment and three seashell sequins.
Thanks for stopping by!
Thursday, June 10, 2021
A manatee-rific trio
We are in a heat wave in my neck of the woods (it's like we jumped from spring to the middle of summer), and an ocean vacation would be so amazing right about now. Sadly, there are no beach days in my immediate future, so I'll enjoy making ocean-y cards instead.
Supplies:
Stamps: Whale Done, We'll Walrus Be Friends (Stampin' Up!); Manatee-Rific (Lawn Fawn)
Paper: Under the Sea, Manatees, Otterly Awesome, Sand Dollars & Starfish patterned papers (Dare 2B Artzy); Whisper White, Blueberry Bushel, Calypso Coral, Pool Party, Grapefruit Grove card stock (Stampin' Up!)
Ink: Blueberry Bushel (Stampin' Up!)
Accessories: Stitched Squares and Layering Squares dies (Stampin' Up!), Shadow Box Ocean Add-On dies (Lawn Fawn), Wonky Stitched Circles dies (My Favorite Things), Calypso Coral baker's twine (Stampin' Up!), Whale of a Time sequins (Stampin' Up!), foam tape (3M), Art Glitter Glue (Art Institute)
I made these cards for a friend who requested a card with manatees (one of my favorite animals). I do have a few manatee stamps, but I remembered that I also had these patterned papers, which are all part of the Seas the Day Collection from Dare 2B Artzy. I had purchased a few of the individual papers at a stamp show a couple of years ago but hadn't used them yet. This was the perfect occasion!
I started by hand cutting several of the manatees from one of the sheets of paper (I even used a partial image for the card on the left). I paired them up, arranged them on die-cut shapes, and stamped punny sentiments to make focal points for three cards. I chose coordinating card stock colors for the card bases and used more of the patterned paper for the backgrounds. I attached the focal layers with foam tape and finished off the cards with sequins and little die-cut shapes.
I think these cards all turned out pretty cute -- and I think my friend agreed, because she decided she wanted all three!
Thanks for stopping by!
Tuesday, January 26, 2021
A visit to Atlantis
I've only been to the ocean a couple of times in my life, but I loved it and definitely hope to go back someday. I don't see that trip happening any time soon, though, so for now, I'll have to use my craft supplies to create my own ocean scenes. Here are two cards I made last summer featuring the July 2020 My Monthly Hero kit from Hero Arts and the underwater lost city of Atlantis
Supplies:
Kit: July 2020 My Monthly Hero kit (Hero Arts)
Paper: Thick Whisper White, Whisper White, Basic Black card stock (Stampin' Up!)
Ink: Intensified Black (Hero Arts)
Accessories: Foam tape (3M), Art Glitter Glue (Art Impressions), blender brush (Picket Fence Studios)
I started these cards by ink blending blue backgrounds on two white card bases. I applied the ink heavier toward the bottom of the card and lightened as I went up, leaving the card stock white at the very top of the card. I die cut the sunken city silhouette twice out of black card stock and glued each to a card base. Then I stamped the color-layering reef on white card stock, using a different color combo for each card. (The colored ink cubes were included in the kit, which is why they're not listed separately above.) I die cut those pieces and adhered them to the cards using foam tape. I finished off each card with some stamped and die-cut sea creatures (love the mermaid silhouette), a stream of bubbles, and a sentiment. I didn't add any embellishments (what?!), but a few clear droplets would be cute and would look like more bubbles.
Thanks for stopping by!
Thursday, December 17, 2020
A day at the lake
December is just flying by! I can't believe it's been almost two weeks since my last post -- and only one week until Christmas. I've been frantically trying to finish all my holiday projects and to dos, and I think I'm finally in the home stretch. But this will be a short post tonight, because I do have a few tasks I'd like to check off my list tonight.
I made the cards for today's post months ago (as with so many of the cards I still have to share), so they are a little out of season, at least for those of us in the Northern Hemisphere. But it's always fun to dream about a day at the lake, right?
Supplies:
Kit: July 2019 My Monthly Hero (Hero Arts)
Paper: Balmy Blue, Garden Green, Early Espresso, Whisper White card stock (Stampin' Up!); 110-lb Solar White card stock (Neenah)
Ink: Lime Green, Forest, Dusty Blue, Sand Stone, Cocoa (Hero Arts [in the kit]); Real Red, Sahara Sand, Tip Top Taupe (Stampin' Up!); Momento Tuxedo Black (Tsukineko)
Accessories: High Flying Kites dies (Poppy Stamps), Express-o Yourself mini prills (USArt Quest), clear Wink of Stella glitter brush pen (Kuretake), Art Glitter Glue (Art Institute), foam tape (3M)
I love both of these scenes, but the lake monster casually swimming by on the right-hand card really cracks me up! Both of these cards are made with mostly stamping, die cutting, and layering. I did add some clear Wink of Stella glitter in the "water" to add some detail and a bit of sparkle. You can see it a little in the close-up photo below.
After you spend all day swimming at the lake, it's time for some sunset fishing, right? That was the focus on the next card.
Supplies:
Kit: July 2019 My Monthly Hero (Hero Arts)
Paper: Whisper White card stock (Stampin' Up!)
Ink: Fossilized Amber, Wild Honey, Spiced Marmalade, Abandoned Coral, Seedless Preserves, Salty Ocean, Faded Jeans Distress Oxide inks (Ranger); Momento Tuxedo Black (Tsukineko)
Accessories: Blender brushes (Picket Fence Studios), masking paper (Inkadinkadoo), clear shimmer spray (Avery Elle), foam tape (3M)
I covered the bottom half of the card stock panel with masking paper while I used blender brushes and distress oxide inks to create the sunset on the top part of the card stock. Then I moved the masking paper to the top of the card and blended the water. (I was bummed to see that when I removed the masking paper from the sky, it pulled off tiny spots of ink, so the sunset isn't as smooth as it could be.) I also spritzed some clear shimmer spray over the water to activate the inks and add sparkle.
The background was definitely the challenging part of this card. Once that was done, it was just a matter stamping, die cutting and layering on the images.
Thanks for stopping by today! I'll try to be back soon with more cards to share.
Friday, July 24, 2020
Under the sea
Stamps: Seaside Notions (Stampin' Up!)
Paper: 110-lb Solar White card stock (Neenah); Sea Glass, Key Lime, Tangerine Twist, Sandy Beach card stock (Gina K Designs)
Ink: Memento Tuxedo Black (Tsukineko); Sea Glass, Key Lime, Tangerine Twist, Sandy Beach (Gina K Designs)
Accessories: Circle masking stencils (Taylored Expressions), blender brushes (Taylored Expressions), clear droplets (Pretty Pink Posh), Art Glitter Glue (Art Institute), foam tape (3M)
This is a fun layout, and I think it would work with just about any type of image: flowers or foliage (ooh - four different leaves with rich autumn colors), animals, crafty-themed images, etc.
For this card I started by choosing four images from the stamp set and four colors of coordinating ink and card stock. I stamped each image on one color card stock using the same color ink, trimmed them using a paper snips, and set them aside.
For the background, I used circle masking stencils and blender brushes to create one circle for each ink color on a panel of white card stock. (Note: Be sure to wipe off the stencil after each circle so the colors don't get muddied.) I used a random placement for the circles, letting some of them go off the edge of the card stock and/or overlap with another color.
I stamped a birthday sentiment in the lower right corner and then adhered the panel to a black card base. Using foam tape, I adhered each of the stamped, cut-out images over the corresponding circle. I finished the card with three bubble-y clear droplets.
Stamps: Seaside Notions (Stampin' Up!)
Paper: 110-lb Solar White card stock (Neenah); Coral Reef, Sandy Beach card stock (Gina K Designs)
Ink: Coral Reef, Sandy Beach, Turquoise Sea, Sea Glass (Gina K Designs)
Accessories: Rectangle masking stencils (Taylored Expressions), blender brushes (Taylored Expressions), clear droplets (Pretty Pink Posh), Art Glitter Glue (Art Institute), Dimensionals (Stampin' Up!)
For this card I used the rectangle masking stencil to create a subtle background scene. With the stencil attached to a white card base (use removable tape on the back so the card doesn't shift), I applied Sandy Beach ink near the bottom of the opening and then blended Turquoise Sea and Sea Glass inks to cover the rest of the stencil opening. After I removed the stencil -- look at that perfectly even chunky white border! -- I stamped dot clusters over the sand and one coral image in the water.
For the main images, I used Coral Reef ink and card stock for the seahorse and Sandy Beach ink and card stock for the seashell. I stamped and cut out the images and attached them to the card base using Dimensionals, placing them so they extended past the borders of the ink-blended rectangle. Again, three clear droplets finish the card.