Saturday, November 25, 2023

Crazy quilt scrap papers

I’m popping in with a quick blog post tonight so you don’t think I disappeared. Christmas is coming way too fast, and I’ve been realizing how much stuff I have left to do. And worrying that I won’t get it all done. Sigh. It happens every year.

Lately I’ve been focused on making the desk calendars I will be gifting. I can’t share those until after holidays — but I can share some fun papers I’ve made with the scraps left over from the calendars.


For the three calendars I’m working on now, I used some of my gel prints for the backgrounds. When I trimmed down the gel prints, I had all these colorful strips left. I didn’t want to toss them, but I also didn’t want to tuck them away for later (because later never seems to come). So I pulled out some sheets of double-sided adhesive and started adding the strips. I did two full sheets and four smaller pieces.


These papers remind me of crazy quilts, and it was easy to put them together while I watched TV in the evening. I don’t have any definite plans for them yet, but I think they will be great for background panels on cards or to use for die cutting. If you have any ideas, let me know in the comments. I’ll be sure to share whatever I make.

Thanks for stopping by!


Friday, November 17, 2023

November Christmas cards: Woodland magic

I didn't plan to make any more holiday cards this year, but then a couple of weeks ago I won an Instagram contest from Lavinia Stamps, and my prize was the all the stamps in their latest release. I was so surprised -- and excited! And since I had a whole bunch of new amazing wintery stamps, I had to make a small batch of woodland magic Christmas cards.


I have admired Lavinia Stamps from afar, but I've been intimidated because they're not my usual style. So for my first cards with these stamps, I stuck with clean-and-simple layouts. I used a masking stencil and Distress Oxide inks to create a deckled rectangle in the middle of a white panel and then spritzed on a bit of water.


When the panels were dry I stamped the images in black. I added sparkle by splattering metallic watercolor on the pine tree card and using a glitter Gelli Roll pen to color accents on the card with the fairy (Eve). I adhered the panels to black card bases and finished them with a few confetti sequins.


I used the same basic process/techniques for the next pair of cards, although I switched the color palette. I also added some tone-on-tone stamping with the Forest Leaf image on the background of the card with the smaller tree. To make the sentiment strip with the large tree, I stamped "Noel" on a strip of white card stock and trimmed each end into a V. Using my bone folder, I added a curve to the strip (like it was curling ribbon). I placed a double layer of foam tape behind the middle of the strip and glued the ends directly to the panel.


For the last two cards I decided to shake things up just a little -- starting with kraft card bases. I ink blended a couple shades of brown ink around the edges of the card bases to add some depth. Then to make the Peace card, I used the Fairy Catkins images stamped repeatedly in a circle to create a wreath, although mine is a bit wonky. I stamped a small flourish image in each corner of the card base and finished with metallic paint splatter and a few pearls.


For the fairy card, I layered stamp images on the card base: the Leaf Bouquet stamped in brown, small and large snowflakes in white, and the fairy (Starr) and sentiment in black. There's metallic splatter (of course), and a few rhinestones are the finishing touch.

I had a lot of fun making these cards, and I'm looking forward to adding more Lavinia Stamps to my collection. And if you'd like more inspiration, my friend Sunshine shares beautiful cards made with Lavinia Stamps on her blog!

Thanks for stopping by!

Sunday, November 12, 2023

P.S. You're the Best note card set

As promised in my last blog post, I'm back to share the final set of notecards I made during craft weekend. For this set, instead of making four coordinating card layouts, I settled on one basic design (using the retired Stampin' Up! set P.S. You're the Best) and then changed the color and sentiment for each card.


I stamped the typewriters and sentiments on white card stock and colored them with alcohol markers (I used light colors, but they are a little washed out by the bright sunlight in the photo). I cut out the images by hand and used foam tape to attach them to Crumb Cake card bases, which I had stamped with the splatter and alphabet images.


To embellish the cards I glued a small linen thread bow on each typewriter and finished with three sequins to coordinate with the color of the typewriter.

I was pleased with how these cards turned out -- I would have made more if I hadn't run out of note cards! Thanks for stopping by!

Friday, November 10, 2023

Barnyard friends note card sets

A couple of weeks ago I was lucky enough to spend a few days at a friend's house for the first craft weekend we've had in years. Yay! It was a lot of fun, and pretty productive, too: I made five sets of note cards and one 2024 desk calendar gift. I'm going to share two of the card set designs today, and they both feature some cute barnyard animals.


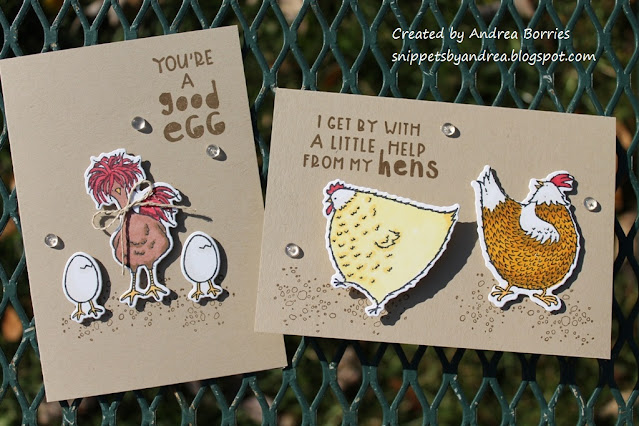
Each card set includes four different card designs, and I think these chicken cards are my favorite. I used two retired sets from Stampin' Up! for the images and a set from Taylored Expressions for the sentiments. The images are colored with alcohol markers, die cut, and attached to the card bases with foam tape -- except for the two large yellow chickens. They're attached with action wobble springs, so they give a little dance. :) I finished off these cards with a few clear droplets.

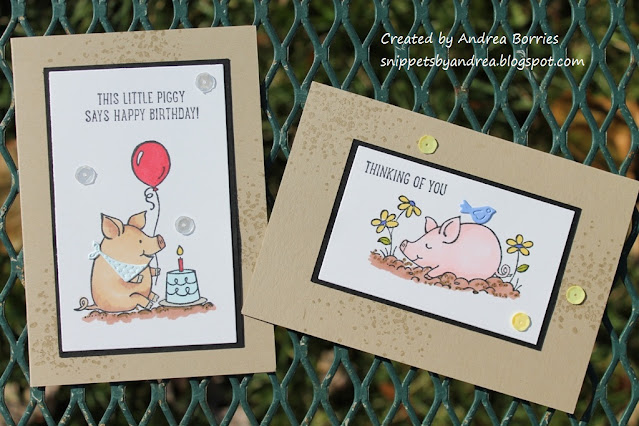
I made two sets of the chicken cards, as well as two sets of these cute little piggy designs:


For these cards, I stamped the images on panels of white card stock, colored them with alcohol markers, and added small die-cut accents. Tip: For the die cuts, I colored scraps of white card stock with the alcohol markers and then cut out the pieces. That way, the color was exactly what I needed (and I didn't have to pack a bunch of colored card stock for craft weekend.) I matted the white panels with black card stock, adhered them to the card bases, and finished the cards with colored sequins.

I'll share the final set of note cards in my next post, but I'm going to save the calendar until after Christmas. Thanks for stopping by!


Monday, November 6, 2023

Patterned paper and greenery

Last week got away from me, and before I realized it the week was over and I hadn't done any blog posts. Oops! I'm going to try to get back on track this week, and for my first post of the week I have a few cards that combine patterned paper and greenery.


The first two cards feature the retired Boho Indigo stamps and dies (Stampin' Up!) and a non-traditional way to use patterned paper. (At lease it's non-traditional for me.) I started by using the dies to cut out vases from two sheets of patterned paper with muted, tone-on-tone marble-style prints. Some of the vase shapes have little cut-outs in them, and the others are solid (they are the ones meant to cut out the stamped images). To add interest to those vases, I embossed them with a few different embossing folders (the results of the Subtle embossing folder are hard to see in the photo). 

I played around with the arrangement of the vases on two layers of white card stock, and when I was happy with them, I first stamped the yellow flowers and cluster of small leaves. Then I glued the vases in the back row directly to the white panels. The other vases are attached with foam tape, and I used die-cut leaves and branches to fill most of them.

I finished the focal layers with a stamped sentiment and a few enamel dots. Then I layered the white panels on black card stock and adhered them to coordinating blue card bases. I love the way these cards turned out!


I don't make a lot of sympathy cards, but I do try to keep a few on hand so I have them ready to go when needed. For this card I chose a soft light green card base that coordinated with one of the colors in the patterned paper. I stamped the card front with a splatter image to add visual interest and then adhered a wide strip of patterned paper vertically near the left side of the card front.

For the focal piece, I used a stitched rectangle die to cut a white panel, stamped "with sympathy" near the bottom of the panel, and adhered a die-cut sprig in the same color as the card base. I glued down the panel so it covered some of the card base and some of the patterned paper and finished the card with a few simple pearls.

Thanks for stopping by!