Showing posts with label gel printing. Show all posts

Monday, July 13, 2026

Summer postcard art

This year my local art supply store, Wet Paint, is doing their 13th annual Summer Postcard Project. All you have to do to participate (from anywhere!) is make a postcard and mail it to the store (postmarked by Aug. 15, 2026). Today I made two postcards for the project.

I absolutely love how this one turned out. I started with a watercolor postcard, glued a gel print to the front, and trimmed the edges. Using bits and pieces from other gel prints, I cut out petals, leaves, and a center for a flower. I played around with the layout for awhile; the flower was too big to add a second one, but too small to be the only thing on the front of the card. I finally settled on adding a quote, and this one — “Where flowers bloom, so does hope” — was the perfect length and the perfect sentiment. Using a Micron pen, I drew a border around the postcard and all the flower pieces. Then I held my breath and started the lettering for the quote. A few places were a little tricky because the paint on the gel print was bumpy, but I did it! I used a ruler to help with spacing and keeping the words straight. I added a few little hearts and covered the postcard with Mod Podge to help protect it in the mail.

For my second postcard (which I actually made first), I created something in the style of neurographic art. I started with a watercolor postcard and used a Sharpie permanent marker to trace different-sized circles. I let the circles overlap and go off the edge. Then I rounded off every place where two lines intersected (so the V shapes look more like U shapes). Then I started filling in the shapes. First I did the doodles, three different styles and four shapes for each style. Then I used ZIG Clean Color brush markers to add the color. Working one shape at a time, I “painted” water on the shape with a water brush, outlined the shape with the color, and then used the water brush to pull the color into the middle of the shape. And since I like to do things evenly, I filled in nine shapes for each color. :)

I’m ready to drop these in the mail tomorrow. The store displays all the postcards they receive in their front windows, so I’m looking forward to stopping by in the coming weeks to admire all the summer postcard art. Thanks for stopping by!


Sunday, August 10, 2025

August Christmas cards: Gel print kit

I didn't think I was going to be able to make any Christmas cards this month. We are doing some work on our house, so my craft room is filled with boxes of random stuff, and I can barely get in the room. But as luck would have it, I entered a drawing on Instagram and won a Christmas card gel printing kit from Gelli Arts. Almost everything I needed was included in the kit -- even a gel plate, brayer, and some paint. I just needed my scissors/trimmer and adhesive. I sat down to create at the coffee table, and here are my finished cards:

The kit was designed to make two cards and ornaments (the white card bases in the top row). I love the idea of including an ornament right on the card! I added a few extra card bases and twine so I could make five cards total. And of course I had to add a few sequins on the tree ornaments. :) I'm still debating if I should add some sparkle to the star ornaments. Maybe I'll take them off the cards and add some spatter. What do you think?

Thanks for stopping by!


Tuesday, July 29, 2025

Gel print strip backgrounds

When I was looking through my collection of gel prints I found four background pieces made with gel prints cut into strips and adhered to double-sided adhesive sheets. (They're similar to the crazy quilt scrap papers I shared in the past.) I decided they would make a good card set, and here are the results:


I think my favorite thing about these cards is that I used navy card stock instead of black for the mats and die cuts. I know it looks black in the photos, but in person the dark blue looks so good with the colors in the gel prints. I need to remember to use navy as a neutral more often. 


The backgrounds were in two arrangements -- horizontal stripes and diagonal stripes -- so I used two different layouts for my cards. For the cards with horizontal stripes, I used a tall branch die cut and short two-word phrases for the sentiments. The strips were useful in making sure I adhered the sentiments straight. I die cut each piece twice and glued them together to give them a little more "oomph." (All the dies I used for these cards are from the retired Well Written die set from Stampin' Up!)  


I struggled with the layout for the cards with diagonal stripes. I played around with the pieces for awhile and finally settled on this arrangement. I placed a curly-style branch in the lower left and upper right corners and added the sentiments at an angle near the middle of the panels. I finished all of the cards with three sequins grouped around the sentiments.

Thanks for stopping by!

Sunday, July 27, 2025

Sending hugs

When I was looking through my gel prints recently, I found the pieces for a card that I'd prepped years ago but never actually put together. I figured it was about time to assemble that card.

First I used Dr. Ph. Martin's Bleed Proof White to add white splatter to the card base. I tore the top and bottom edges of the gel print (the letters were already cut out) and adhered it to the card base. I'd backed the letters with black cardstock for shadows, so I decided to try the eclipse technique, which I've never done before. I glued the letters back into the gel print, fitting the black shadows into the openings. (Looking at it now, I'm wondering if I should have used foam tape for the letters to help them stand out a little more.) I used foam tape to add the flag with "sending" at the top of the gel print and finished the card with gold sequins.

Thanks for stopping by!


Thursday, June 19, 2025

Gel print collage cards

Sometime this summer I want to have another all-day gel printing session. I've been saving various household items to make interesting patterns, and I've got new stencils to try. But before I do that I'm trying to use more of the prints I've already made. So for a start, last weekend I made two gel print collage cards.


For the flower card, I cut circles out of three different gel prints and then went around each circle and snipped out triangles to create the petals. I added smaller circles for the flower centers and leaves behind the flowers. (I also added clear Wink of Stella glitter on the flower centers, but it doesn't show up in this picture.) I used a heavyweight white card base, added a white die-cut frame for a little texture, and glued on the flowers. I wanted to fill a little white space, so I added a couple of flying bugs and drew little dashed lines for their "flight paths." I stamped a birthday sentiment in the lower right corner to finish the card.

For the golf card, I started with a few online searches to get some inspiration. Once I had an idea, I used various gel prints to cut out the background, putting green, hole, pole, flag, and golf ball. The golf ball is supposed to look like it's sailing right into the hole; I thought about drawing a line to show the path, but I decided I liked it better without. I used white pigment ink and white embossing powder to add the sentiment and drew a border around the edges. Inside the card I wrote "Hope your day is a hole-in-one."

Neither one of these cards has any sequins or other embellishments. What?! I considered it, but with the colors and textures of the gel prints, I don't really think they needed anything else. Shocking, I know.

Thanks for stopping by!


Sunday, February 16, 2025

Gel print valentines

Happy Valentine's Day (just a little late)! However you spent the day, I hope it was lovely and filled with kindness. I had hoped to share the valentines I made before the actual day, but here we are. File the ideas away for next year -- or modify them to make a card for a different occasion.

This was the first year in a long time I didn't make cards for our local Meals on Wheels organization. I had planned to, but I never heard back from my contact after reaching out to her three times during January. So instead I focused on my own cards and a festive project for work (and I still ended up rushing at the last minute).

Last year I made some inspirational hearts for my coworkers, and I decided to do that again this year, with a few tweaks. This year I used gel prints for my hearts and added phrases to the hearts instead of just a single word. The rest of the process was basically the same: make heart templates, trace on gel prints, cut out, adhere coordinating card stock on the back, add sentiment, finish with twine.

I chose twelve different sentiments and used each sentiment on five hearts. So there's some variation, but I didn't have to spend time trying to find sixty different phrases.

I put out containers of hearts in our office and break areas. I debated whether it was too similar to last year and thought maybe people wouldn't take them. There were still quite a few left at the end of the day on Friday (I left them out for next week), but I know some people enjoyed them.

After I had cut out all the hearts, I used various heart punches on the left-over parts of the gel prints so I didn't waste them. I used the larger punched hearts to make eight valentines with my all-time favorite layout for Valentine's Day cards.


There's something about those six hearts lined up that just speaks to me. I've used this layout with different textured papers, different colors, different prints, etc. Sometimes I worry that it's too simple, but that hasn't stopped me. I think I could make this card every year. I had planned to make something similar with the smaller hearts I punched out, but I ran out of time. I saved them, though, so maybe next year.

I needed a few more cards after this bunch, so I went looking through some pieces I'd saved to use "sometime" and found a few that worked perfectly for valentines.


The card in the left is the only one that uses gel prints (see Crazy Quilt Scrap Papers for more details). I think the backgrounds for the other two were from a play session when I first got some Distress Oxide inks. But any colorful background -- patterned paper, gel print, ink blending -- would work. I just added die-cut hearts, a sentiment strip, a few black heart embellishments, and a doodled border.

I have a few more valentines to share in my next post, so stay tuned! Thanks for stopping by!


Monday, August 26, 2024

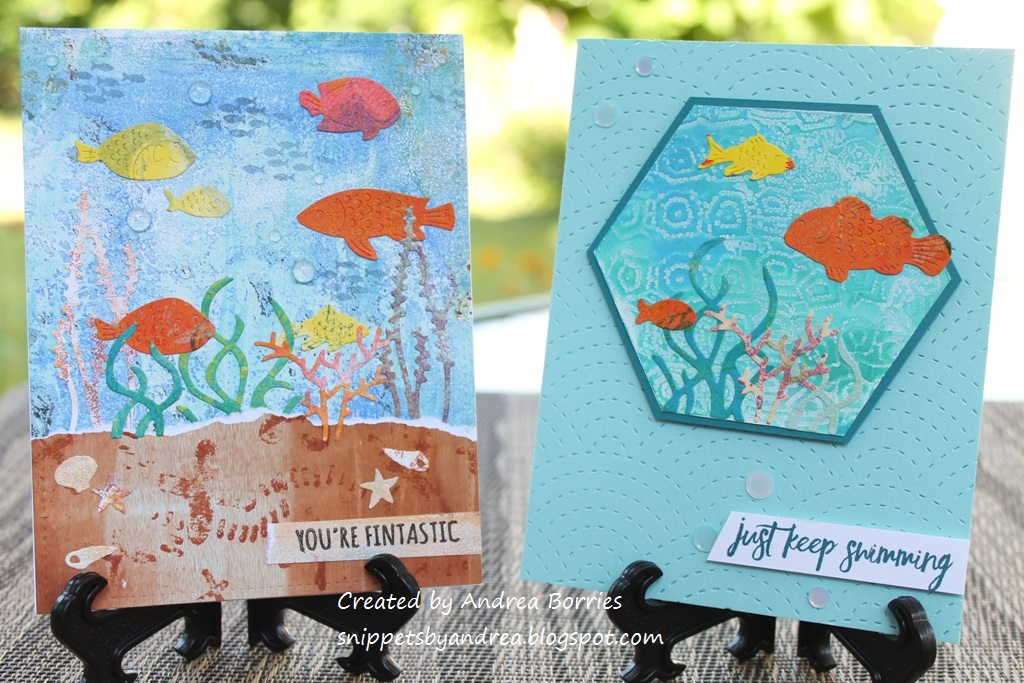
Underwater gel print scenes

The batch of cards I'm sharing today was definitely the most time-consuming of the gel-print cards I made this time around. But I think they were worth the effort.

For these cards, I used various gel prints to make all the parts of the underwater scenes. I chose one main print for the background/water for each card, cut it with a stitched rectangle die, and adhered it to a white card base. To create the sand I tore a brown gel print into wide strips and cut the bottom and sides of each stripe with the stitched rectangle die so it would match the stitching on the background.  Then I used bits and pieces left over from a variety of other gel prints to create fish, kelp, coral, and seashells with the School of Fish die (Memory Box) and the Build-a-Scene - Underwater dies (Taylored Expressions). I even used a gel print to make the sentiment strip. I played around until I was happy with the arrangement and then glued everything down. I finished with some sequins to create the look of bubbles.

I don't usually stamp directly on the gel prints because they have a rough texture. But I wanted to stamp some little schools of fish in the background to add more depth. I tried Distress Oxide inks (Faded Jeans and Broken China) and VersaFine (Onyx Black). All of the inks worked, but I did notice that the images stamped with Distress Oxides got sort of blurry as they dried, as if the ink was bleeding. Luckily that was fine for these cards -- it's sort of an underwater effect, which is perfect.

I made one more card like the first two, although I did change the sentiment, and then I tried a different card layout. I have a set of small, shaped gel presses, and one of them is a hexagon. I had a hexagon print that looked like it would make a good underwater scene, so I trimmed off the extra paper, matted it with blue-green card stock, and then trimmed down the mat. I added the die-cut pieces and set the piece aside to work on the card base. I chose light aqua card stock and die cut the card front with the Fanfare Cutting Plate (Taylored Expressions) on the card front. The pattern reminds me of scales or waves, and I think it adds a nice, subtle detail. I used foam tape to attach the focal piece and a sentiment strip, and I finished the card with clear sequins.

Thanks for stopping by!


Saturday, August 24, 2024

Encouraging cards

Today I'm sharing three more cards made with gel prints. Gel prints make great, easy backgrounds for cards because all you really need to add is a focal image and/or a sentiment. That's what I did for this group of encouraging cards.

Card on the left: The two colored leaf/flower images on this card were ones I made last summer as part of a mini online watercolor class. I wanted to use them together, so I looked for a gel print with coordinating colors. I die cut the gel print with a stitched rectangle die and adhered it to a burgundy card base. I placed the images near the upper left corner of the card. It felt like something was missing, so I looked through my dies and found a few small flower and foliage dies that I cut from copper card stock and added around the painted images. The colors of this card have a very autumn/Thanksgiving vibe to me, so I chose a sentiment about gratitude. I stamped it on vanilla card stock, tore the side of the card stock to add a little texture and adhered it near the bottom right corner. I finished the card with a copper flower by the sentiment and a few cream sequins.

Card on the right: I started by -- you guessed it -- cutting the gel print with a stitched rectangle die and adhering it to a lavender card base. I could trim the gel print with a paper cutter instead of using a die, but many times the pattern on a gel print (if I used a stencil) is slightly crooked and not lined up straight with the edge of the paper. That means I end up trimming the paper at a slight angle and then trying to get an even rectangle. It's easier to place a die where I want it, tape it down so it doesn't move and then die cut the gel print. Anyway, I used a die to cut a heart outline from black card stock and another gel print. I layered the hearts together, slightly offset so the black heart looks like a shadow, and glued them to the middle of the card. I stamped a sentiment on white card stock, cut out the individual words, and glued them down the middle of the card. I finished with several tiny black and white clay hearts.

For the last card I started with two more watercolor leaves I created last summer. I found a coordinating gel print, cut it with a stitched rectangle die, and adhered it to a blue-green card base. I stamped the sentiment on a wide strip of white card stock and then ran my bone folder along the edges of the white piece to distress them just a bit. I glued the strip about an inch above the bottom of the card base and added the leaves to the left side. I finished the card with some cool greenish/bluish/purpley sequins that pull together all the colors in the gel print and leaves.

There are a couple of things I would change about this card if I could make it again. First, I think the white card stock is a little too stark; I think I would try a very light blue or green instead to make it a little softer. Second, I would stamp the sentiment a little more to the right. I didn't realize until I glued down the strip that the words were going to be so close to the leaves. I could have pulled it off and made a new one, but I didn't want to wreck the gel print, so I left it.

I've got one more group of gel print cards to share, so stay tuned for my next post. Thanks for stopping by!


Friday, August 23, 2024

'Feline' fine

I haven't made any gel prints recently, and one of the reasons is because I have a whole pile of prints I need to use. So I pulled out the pile, gathered some dies, and got to work. Today's gel print cards, which are pretty meow-velous, are made with the Feline die from Penny Black.

Both this first card and the next one are the same layout, just different gel prints for the backgrounds. I wanted to make birthday cards, so I chose two prints that were fun, bright colors. For each card, I cut the print using a stitched rectangle die to cover the entire front of an A2 card and glued it onto a white card base. I cut the Feline die out of black card stock and adhered it in the middle of the card. I found a small party hat die in my stash (this one is from the No Drama dies from Taylored Expressions -- it's the perfect size) and cut a hat out of five different card stock colors that coordinated with the gel print. I added a little Wink of Stella to the hats and then glued them on the die-cut cats. I finished each card with a few coordinating sequins.

I thought about adding a "happy birthday" sentiment to the front of these cards, but I couldn't find a style or layout that I really liked. So I decided to leave the sentiment to just the inside of the cards. (I think the one I used said "Live it up on your birthday and all year long.")

I had the negative pieces left from the first two cards, so I layered them together and made one more card. For this card I used a smaller stitched rectangle die to cut the gel print background. Then I glued the die-cut pieces to the remaining part of the same gel print and trimmed it along the edges of the black card stock. I attached the focal piece slightly above the middle of the card and added one tiny white clay heart between two of the cats. Finally, I stamped the sentiment on a scratch piece of white card stock, cut it into a strip, and added it near the lower right corner of the card.

Stayed tuned for more gel print cards. Thanks for stopping by!


Saturday, April 6, 2024

Two gel print cards

I have a quick post tonight to share two cards I made with gel prints from my last gel print session.


This is a 5" x 7" card, rather than a standard A2-sized card. I loved the way this gel print turned out, and I didn't want cut it down. I did trim it to about 4-3/4" x 5-3/4" and matted it with a 5" x 6" piece of black card stock. I adhered the panel to the kraft card base, lining up the top and bottom edges and centering the panel from right to left.

I wanted to add a little detail, so I used a white paint pen to doodle a border around the edge of the gel print and a loopy line on the empty edges of the card base. I used foam tape to add a sentiment strip, and finished off with a handful of clear droplets.


This is the only Easter card I made this year. And I actually made it back in January to include in a set of cards I was giving as a gift. I used a stitched rectangle die to cut the gel print and then layered it on a 4-1/4" x 5-1/2" piece of white woodgrain textured card stock. That panel was attached to a white card base.

I die cut the words "hope" and "love" from silver card stock and glued them to the gel print between the words that were part of the gel print. I cut a silver doily into small pieces and glued a piece to the lower right and upper left corners of the gel print. Two small punched yellow flowers add a pop of color on the cross image, and a scattering of mini pearls finish the card. 

Thanks for stopping by!


Wednesday, February 21, 2024

Mixed media valentines

For most of the valentines I sent out this year, I made mixed-media cards. To make my cards I started with a number of the prints I created in my last gel printing session as well as several foiled panels. 


These two cards are my favorites from the gel print cards. The panels for both cards, as well as those for the rest of today's cards, were made with stencils from The Crafter's Workshop. (I purchased them in a bundle, however, so unfortunately I don't know the names of the individual stencils.) I cut these panels with the Postage Stamps Nested Frame Cuts dies (Hero Arts). I added the bits of text with the Collage Background Hero Transfers (Hero Arts). To add some sparkle, I used my finger to rub Gold Hero Paste on a few places on each card and then splattered a bit of Gold Glimmer Metallic Ink (both from Hero Arts).


These two cards use many of the same products and the same basic process as the previous cards. There was one extra step: I added texture by spreading some of the Gold Hero Paste randomly through the Script Stencil (Hero Arts). It's hard to see in the photo, but it's a fun detail. 


For these two cards, I added accents with the Sketched Hearts dies (Taylored Expressions). I used gold card stock for the hearts on the pink card and black card stock on the orange/yellow card.


I kept the postage theme for these cards but switched to the dies from Master Layouts 11 from Gina K Designs. I die cut two panels of "stamps," used a pen to doodle borders, and added the letters L-O-V-E to the stamps.


The rest of the cards in today's post were foiled using Transfer Gel Duo and Deco Foil from Therm O Web. For these first two cards I accented the foiled card fronts with musical notes transfers, twine, and a few washi tape postage stamps on the left-hand card.


I had a hard time trying to figure out how to use these two foiled card fronts. I didn't want to cover up too much of the image, but I didn't want to leave it "plain," either. For the pink card I decided to use the coordinating ink to sponge around the edges of the panel and in the center of the rose. I finished the card with some ribbon and a few pearls. For the gray card I added a few floral die cuts, a sentiment strip, and enamel dots.


These two cards are probably the least "valentine-y," but they're still cute! For the card I the left, I love the rainbow foil on the black card stock. I kept the rest of the card simple with a few silver hearts and sequins. The silver foil and yellow card stock of the right-hand card reminded me of a bumblebee, so I added a die-cut bee and punny sentiment strip in the middle of the card front over a circle of vellum. 

Thanks for stopping by!


Friday, February 16, 2024

Inspirational hearts

This year for Valentine's Day, I wanted to create a little something to share with the teachers and staff where I work. I didn't want to make more cards, though, and I wanted the gift to have some meaning. I decided on a collection of colorful hearts with inspirational words. Here are a few of my favorites:

To make the hearts I actually used the paper from cleaning off my brayer while gel printing. (Those scratch papers always look so pretty; I love finding a use for them.) I drew a few folk-style hearts on chipboard and cut them out to use as templates. I traced and cut out the colorful hearts, glued them onto coordinating card stock (a great way to use scraps!), and then trimmed off the extra card stock.

I used a variety of pens and paint markers to doodle a border on each heart then punched a hole with my Crop-A-Dile and added a loop of twine. I made a list of inspirational words and used a small alphabet stamp set to spell out the words on strips of white card stock. (Some of the words I stamped two or three times.) I trimmed the white card stock close to the letters and glued a word on each heart.

I made about 55 hearts, divided them into two containers and put one in the main office and one in the staff break room. I was nervous that no one would take one and it would end up being a silly idea, but most of them were gone by the end of the day, and there was only one left by Friday. Yay!

Thanks for stopping by!


Monday, January 29, 2024

Gel print session

Well I started out the month doing pretty well with my blog posts and then I completely lost my momentum. I've been working on some crafty projects, but I don't have too much ready to share yet. So for tonight it's a short post with a couple of pictures from my last gel printing session.


During my winter break I set aside one day to do gel printing. I cleared as much as I could off my work tables (so I had a lot of flat space to set prints for drying), set out my supplies, and got started. Above is a picture early in the day, and below is a shot after I finished all the prints.


For my prints I use packs of gel print paper from Taylored Expressions. There are 50 sheets in a pack, and I usually use a whole pack each session; since everything is set up, I just keep printing. Then I have plenty of prints for card backgrounds, collages, and any other projects.

Thanks for stopping by -- and I hope to be back soon with some cards!

Thursday, January 4, 2024

2024 calendars: gel prints and quotes

Happy new year! I'm on my last few days of before I head back to school, and I've been busy in the craft room. I'm been focused on finishing up a bunch of card kits that have been hanging around (I used one for my January Christmas cards!), and yesterday I spent the day making gel press prints. But before I get too far ahead of myself, I still need to share the 2024 calendars I made as Christmas gifts.

I made eight different desk calendars for 2024, but I had six different designs, so I'm going to split them into multiple posts. Today I'm going to share the calendars I made using gel press prints and various quotes.

The first two calendars feature quotes from authors. I used the same basic layouts and quotes, but I switched the order of some of the quotes so I decided to include both versions in the pictures. Each photo has four calendar pages, two per month (e.g., January A, January B, February A, and February B). The die-cut quotes are attached with foam tape, and each page is embellished with three coordinating sequins.


For the third gel print calendar, I used quotes from the TV show "Friends." My sister and I love "Friends," and we often quote lines from the show to each other. So this seemed like a perfect theme for her calendar. (The downside is that the font is very small, so you might not be able to read all of the quotes in the photos.) I decided to stamp these images/quotes directly on the gel prints and then emboss them. Again, I finished each page with three coordinating sequins.


I know I didn't provide too many details (trying to keep this post from getting even longer), so if you have any questions, just leave a comment below.

Stay tuned for two more calendars in my next post. Thanks for stopping by!