Thursday, December 28, 2023

Christmas ornaments

Happy holidays! I've clearly fallen behind on my blog posting this month. The couple of weeks before Christmas felt crazy, school was in session until Dec. 22, and I couldn't seem to get anything done. Now this week I've been lazy and doing as little as possible: lounging in my pajamas, reading, napping, etc. Maybe next week, with the new year, I'll start to get back into more of a "normal" routine. But for now, here is a quick post to share some Christmas ornaments I made.


The base of the ornaments (thin wooden circles) and the twine are from a craft store. I painted the ornament bases with acrylic paint -- at least two coats for each ornament -- and then splattered them with gold watercolor. (The background of the candle ornaments is more red in person; the photo came out very orange.)


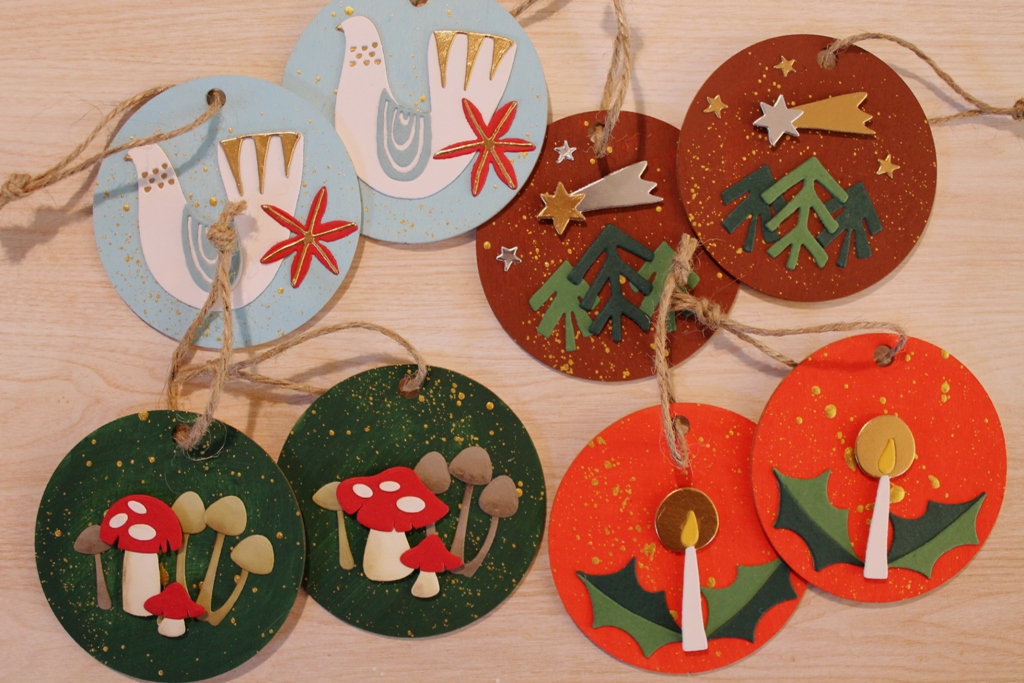
While the bases were drying, I used a couple of die sets and various card stock colors to die cut different focal images. I know the mushrooms aren't very Christmas-y, but they were a special request from a friend. And I actually kept one of those ornaments because I really like how they turned out. :)


I adhered the die-cut pieces to the ornaments with liquid glue and foam tape. I used a permanent marker to write "Happy holidays" or "Merry Christmas" on the back, along with my name and the year. The last step was to add on the twine.

I actually made a second batch of ornaments with different colors and images, but I finished them at the very last minute, so I didn't get to take any photos. But the basic materials and process are the same. These also would be fun to make for other holidays or occasions -- or even to use as gift tags,

The next thing I have to share will probably be the desk calendars I made; I'm just not exactly sure when that will be. So thanks for stopping by, and if I'm not back before the end of the year, I hope you have a magical, marvelous new year!

Sunday, December 10, 2023

Scrap bookmarks

A couple of weeks ago, I shared some crazy quilt scrap papers I made with leftover pieces from gel press prints. I decided to cut up one of the pages to make some bookmarks, and here are the results:


I cut the scrap paper into 2-3/4" x 5-3/4" pieces and was able to get six out of the sheet. Then I looked up quotes about reading and books online and wrote one quote on each bookmark. (I tried to add a little character to my lettering, but it's mainly just printing. I would love to work on my hand lettering -- I just need to find the time and focus!) I rounded the corners of each bookmark and used black pens and a white paint pen to add doodles and details: dots, stitches, swirls, etc.

Once I was happy with each bookmark, I removed the backing paper and adhered them to white card stock. (You could adhere the entire sheet to card stock before cutting it. I wasn't sure if the bookmarks were going to work, so I decided to wait and add the card stock at the end.) 


To finish off the bookmarks, I slipped each one into a little plastic sleeve. I don't know where these sleeves are from or what their intended purpose is; I found them at work on a table of stuff that teachers were getting rid of. I took them thinking that they might work for bookmarks, so I was pleased to see I was right -- and I love that I was able to use something that would otherwise have been thrown away.

Thanks for stopping by!


Friday, December 8, 2023

Happy Hanukkah

I kindled my eight little candles,
   My Hanukkah candles, and lo!
Fair visions and dreams half-forgotten
    Were rising of years long ago.

- Philip M. Raskin, "Hanukkah Lights"

I created this menorah using the Essentials Arches dies from Ellen Hutson. I taped several of the dies together so there was even spacing between them and then ran them through my Big Shot with shimmery white card stock. I ended up with several skinny arch outlines that I trimmed and glued together to make the menorah. Each arch die also cuts out a very narrow frame, which I used for the candles. I used alcohol markers to color the candles two different shades of blue.

In addition to the shimmery white card stock, I added sparkle to the background by splattering metallic watercolor paint over a blue ink-blended rectangle and used a gold gel pen to draw the candle flames. I finished the card with a simple sentiment strip.

Wishing everyone who celebrates a holiday filled with peace, love, and light. Happy Hanukkah!


Saturday, December 2, 2023

2023 Christmas card recap

It's December! How did that happen? I've still got a lot of tasks to check off my to-do list before the holidays, but I'm chipping away at it. I hope that I'll have more projects to share soon, but until then, here is a recap of all the Christmas cards I made this year.

Click on the name of the month to see the full post for each card design.

January: Upcycled tissue paper

February: Festive faux postage

March: Watercolor wishes

April: Quilt blocks

May: Mittens & Mistletoe

June: Nordic notecards

July: Cheery snowman

August: Simple peace

September: Seasonal Snapshot cards (also includes Halloween cards)

November: Woodland magic

If you're still working on your Christmas cards, I hope these designs bring you a little inspiration. I may have finished making my cards, but I haven't started sending them yet -- that's always such a daunting task!

Thanks for stopping by!