Showing posts with label recycled materials. Show all posts

Saturday, August 1, 2026

Cheers to fifteen years

Today marks fifteen years of my blog. Crazy. That simultaneously seems like so long and no time at all. I wasn’t sure how to mark the occasion, so I decided to do what I do best: make a card.

This card is perfect for the occasion for a couple of reasons. First, this shade of blue is one of my favorite colors. And second, the panel with the fireworks is upcycled from an old desk calendar. I love to find ways to reuse things, especially cool or pretty papers.

I don’t think this card needs much explanation, but here are a few details. I used gold foil card stock to die cut the frame, the scalloped circle, and the numbers. I die-cut the word “hooray” twice and layered them together to give the sentiment a little more heft. And the pennants on the award ribbon are also trimmed from the desk calendar, which is great because I knew it would perfectly match the background panel. 

Whether this is your first time here or you’ve been following along for years, thanks for stopping by!


Monday, February 16, 2026

Valentines for seniors

It’s been a couple of years since I made valentines for my local Meals on Wheels chapter. But this year I made a group of cards for a different organization — one that supports senior citizens throughout Minnesota. I wanted to share them before Valentine’s Day, but better late than never.


With everything going on in the world, our country, and particularly in my state, I wanted to make valentines that had a little more meaning. I started with the scratch papers I used to clean off my brayer during previous gel print sessions. I cut free-hand hearts from the papers (a total of 20 hearts) and used a variety of Posca acrylic markers to add a stitched border around each heart.

For the sentiment I started by finding scraps of card stock that coordinated with each heart. Well, coordinate might not be the best word. I tried to find a color in each heart that I could pull out with the sentiment strips. It was satisfying to use up some of the small bits of card stock I always seem to save.

Anyway, once I had chosen the colors, I used a stamp set with a labeler-style alphabet to spell out the phrase “Do small things with great love.” I didn’t worry about lining up each letter perfectly; obviously I was going for an imperfect style with these cards. After all the words were stamped, I cut out each word, leaving a narrow border of colored card stock. 

I decided to use sheet music for the background, so I paged through an old songbook I have (I think it’s from the early 1900s) to find some pages that were visually appealing. I also scanned the lyrics to make sure they weren’t religious or offensive. Then I tore the pages (gasp!) into background panels for the cards.

For the card bases, I chose a card stock color that I thought looked nice with each heart; some “match,” and some don’t. I had planned to make all the cards in a landscape layout, but a few of the hearts were too tall. (These are A2 cards, which are 4-1/4” x 5-1/2”.) For the landscape cards, I tore the sheet music into a rough rectangle, leaving about 1/4” of the card base visible on all sides. For the cards with a portrait layout, I used the same size piece of music but glued it across the middle of the card and trimmed off the extra on the sides.

I glued down each heart in the middle of the card base and then added the words for the sentiment on the heart. Normally I would’ve used foam tape to adhere the words, but the organization requests non-bulky cards so I went with liquid glue. I also wanted to add some little embellishment so I pulled out a sheet of finely detailed gold stickers that I’ve had for ages. They were a fun little accent, and I managed to use the whole sheet. Yippee!

I was pleased with how these cards turned out (though I do sometimes wonder if cards like this don’t look “nice” enough). I also made a few valentines for friends and family, but those will be for my next post.

Thanks for stopping by!


Friday, January 30, 2026

January Christmas cards: Merry snowflakes

It’s been very challenging to feel merry with all of the “immigration enforcement” activities and the resulting chaos that is happening in Minnesota. (I use that phrase loosely as that doesn’t seem to be the government’s goal anymore.) People, regardless of their immigration status, shouldn’t be afraid to leave their homes to go to work, school, or even the grocery store. People shouldn’t be stopped or detained based on the color of their skin. It’s all stressful and overwhelming, so I haven’t done much crafting at all this month. I did, though, manage to make some January Christmas cards a few weeks ago, and I figured I should post them before the month ends. I made two different designs with snowflakes and the phrase “be merry.”


For the first design I used some wrapping paper from a Christmas gift I received. I usually try to remove wrapping paper carefully so I can reuse it. But I loved the colors and style of the snowflakes on this paper, so I decided to use it to make some cards. I used a stitched rectangle die to cut out background panels for six cards and then glued the panels to light gray card bases.


I had a hard time choosing a color for the die-cut sentiment — nothing seemed quite right. Then I remembered I had some holographic card stock, and that seemed perfect. For each card I die cut “be merry” (Lawn Fawn) out of the holographic card stock and out of the same light gray as the card bases. I layered the two pieces together and glued them to the card bases. I know the sentiment is a bit hard to read, but I love how it reflects different colors. I finished each card with a few silver sequins.


For the second group of snowflake cards I used the Snowflake SoirĂ©e products (The Greetery) — stamps, layering stencils, and dies. I started by using the layering stencils to make a bunch of light blue and mint green snowflakes (some of the images are one color, some are two-tone). I cut them all out with the coordinating dies and then spritzed them with shimmer spray.


I divided up the snowflakes for four cards: two light blue and two mint. I stamped the sentiment “be merry and celebrate the season” in the lower-right quadrant of each card base using coordinating ink. I glued four snowflakes onto the front of each card and stamped smaller snowflakes using white ink and the coordinating stamps. I finished the cards by adding a rhinestone to the middle of each die-cut snowflake.

Wishing us all peace in this chaotic world,


Sunday, December 10, 2023

Scrap bookmarks

A couple of weeks ago, I shared some crazy quilt scrap papers I made with leftover pieces from gel press prints. I decided to cut up one of the pages to make some bookmarks, and here are the results:


I cut the scrap paper into 2-3/4" x 5-3/4" pieces and was able to get six out of the sheet. Then I looked up quotes about reading and books online and wrote one quote on each bookmark. (I tried to add a little character to my lettering, but it's mainly just printing. I would love to work on my hand lettering -- I just need to find the time and focus!) I rounded the corners of each bookmark and used black pens and a white paint pen to add doodles and details: dots, stitches, swirls, etc.

Once I was happy with each bookmark, I removed the backing paper and adhered them to white card stock. (You could adhere the entire sheet to card stock before cutting it. I wasn't sure if the bookmarks were going to work, so I decided to wait and add the card stock at the end.) 


To finish off the bookmarks, I slipped each one into a little plastic sleeve. I don't know where these sleeves are from or what their intended purpose is; I found them at work on a table of stuff that teachers were getting rid of. I took them thinking that they might work for bookmarks, so I was pleased to see I was right -- and I love that I was able to use something that would otherwise have been thrown away.

Thanks for stopping by!


Saturday, September 16, 2023

Fall is in the air

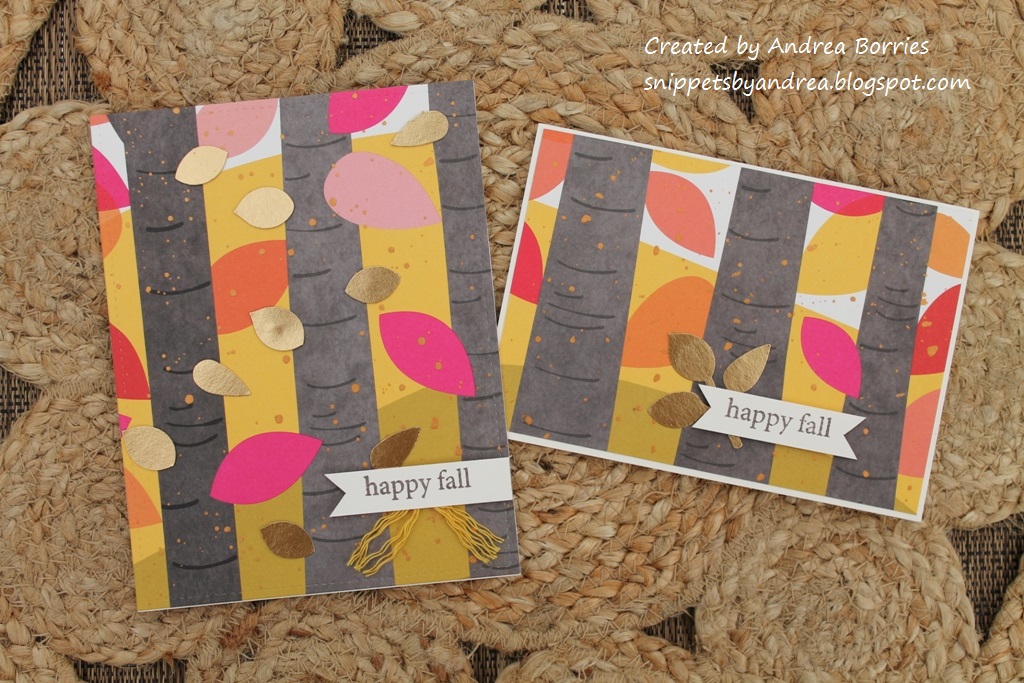
I think (or at least I hope) we're finally past all the hot weather, and I love having a little chill in the air in the morning. Autumn is my favorite season, so I decided it was time to start making some fall-themed cards.


For these two cards I kept it pretty simple. I started with two panels of leaf-patterned card stock (upcycled from an old calendar page) and layered both of them on gold card stock. I adhered each panel to a coordinating card base and then added a sentiment/focal image and a few gold sequins.


The patterned card stock on the next two cards was also an old calendar page. I splattered both panels with some metallic watercolor paint and then added gold leaves. (I used a punch to create the leaves. The card on the right uses the entire sprig of leaves; for the card on the left I trimmed the leaves apart.) As with the previous cards, I added sentiments on strips of card stock with the ends cut into a V. Two more easy cards done!


For the last two cards, I started from scratch. I used kraft card bases and stamped the backgrounds -- one with a background image and one by repeatedly stamping the "happy fall" sentiment. I cut a large scalloped circle in half, embossed the pieces with a wood plank embossing folder, and adhered each piece to the left side of the card front. For the focal images I created a cluster of leaves and added a twine bow. I wanted to add metallic accents, so on one of the cards I splattered some metallic paint on the scalloped half-circle and painted a border around the edges of the card base. I decided I wasn't crazy about how the paint looked, so I skipped it on the second card. The finishing touch on both cards was metallic sequins.

Thanks for stopping by!


Saturday, January 21, 2023

January Christmas cards: Upcycled tissue paper

I know we're three weeks into January, but happy new year! I hope 2023 is treating you well so far. For my first post of the new year I'm going to share my January Christmas cards.


I actually made these cards in December, a few days after last Christmas. I had received a Christmas gift packaged with pretty red and green color block tissue paper, and I knew I wanted to use it for Christmas cards. So I put it to use right away!


I started the cards by making the background panels. I determined what size I wanted to make the panels and then cut eight pieces of vanilla card stock to that size and eight pieces of tissue paper slightly larger. I crumpled each piece of tissue paper into a tight ball and then carefully opened them up. I lightly coated one piece of vanilla card stock with glue, placed a piece of tissue paper over it, and gently pressed it down to adhere it to the card stock. (I was careful not to smooth out the wrinkles so it created a nice texture.) I wrapped the edges around to the back and secured them with double-sided tape and then used the same process to complete the rest of the panels.


For the card bases I used dark red card stock splattered with gold paint. Using foam tape, I adhered the panels to the card bases. I wanted a focal image that didn't cover too much of the tissue paper, so I die cut two sprigs for each card: one gold and one green. I also die cut the word "merry" in gold for each card. I glued those pieces to the panels and added a red twine bow and three enamel dots in either gold or red.

These cards have a more "traditional" feel than the Christmas cards I usually make, but I'm really pleased with how they turned out. I'll definitely keep this technique in mind for any pretty tissue paper I get in the future. :)

Thanks for stopping by!


Wednesday, May 19, 2021

More cards from a calendar

When I made my February Christmas cards this year, instead of using stamps to create my focal images, I cut up pages from a couple of old calendars. Today I'm going to share a card set and a collection of birthday cards made with calendar pages.

Supplies:
Paper: Brilliant White 120lb card stock (Purely Simple Paper), glossy black paper (Concord & 9th), vellum card stock (Stampin' Up!)
Ink: Stardust Clear Gelly Roll pen (Sakura)
Accessories: Smile die (Gina K Designs), Big Hello Sugar Script die (Birch Press Design), Celebrate Sugar Script die (Birch Press Design), Thanks die (Taylored Expressions), Thinking of You die (Honey Bee Stamps), Large Stitched Rectangle Stackables dies (Lawn Fawn), sparkling clear sequins (Pretty Pink Posh), Art Glitter Glue (Art Institute)

I love the bright, bold print on this calendar page, and I didn't want to detract from the colorful images, so I kept these cards really simple. I started by using an A2-sized stitched rectangle die to cut out the five hummingbird images, and then I adhered each one to a plain white card base.

I used a glittery gel pen to add highlights to each hummingbird, and I love the little touch of sparkle. I decided I wanted to add sentiments to the cards, so I chose five word dies and cut them out of glossy black paper. (A couple of them also had shadow dies, which I cut out of vellum card stock.) I adhered one word die cut to each card and finished off with sparkling clear sequins. These cards aren't fancy, but wouldn't it make you smile to pull one of them out of an envelope?

Supplies:
Stamps: Tiny Words Birthday (Simon Says Stamp)
Paper: Gray Granite, Basic black, Basic Gray, Calypso Coral card stock; gold foil sheets; swirls vellum (Stampin' Up!)
Ink: Basic Gray (Stampin' Up!), Stardust Gelly Roll pen (Sakura)
Accessories: Well Written dies (Stampin' Up!), Happy Birthday die (Avery Elle), Happy Birthday die (Stampin' Up!), Celebrate die (My Favorite Things), white rhinestones (Taylored Expressions), Bubble Blower droplets (Trinity Stamps), Iridescent Sequin Assortment (Stampin' Up!), Corner Chomper (We R Memory Keepers), clear shimmer spray (Avery Elle), foam tape (3M), Art Glitter Glue (Art Institute)

These watercolor-style balloons were perfect for a collection of birthday cards for my stash. I cut several panels out of the calendar page and sprayed them with shimmer spray. I also traced the balloon strings with a Stardust Gelly Roll pen to help them stand out. 

I trimmed some of the panels, rounded some corners, and adhered each one to a card base. I used several card stock colors and coordinated the card base with the die-cut sentiment for each card. I finished the cards with a variety of sequins, rhinestones, or droplets.


Thanks for stopping by!


Sunday, February 28, 2021

February Christmas cards: Cards from calendars

It's been a rough few weeks, and I haven't had much energy for card making. But I did want to make my February Christmas cards, and I just managed to squeeze them in. Rather than making cards from scratch, though, I used pages from old calendars. I really like the finished cards, but I'll admit that it does feel a bit like cheating.

The calendars I used for my cards today are from Paper Source, which is a stationery and gifts retailer. They have a good variety of calendars and planners, but some of my favorites are the ones featuring their own colorful artwork. One style is large (about 12" x 20") with the artwork filling the whole page and a small calendar grid in the bottom right corner. This style is specifically designed for you to repurpose the pages, and the backs are even printed with cutting guides for things like file folders, gift boxes, bookmarks, and cards.

I had two of these calendars from several years ago, and I finally decided to start cutting them up. For some of the pages, I did the suggested projects -- I really like the file folders, for instance, and the prints on those pages are often too large for cards. A couple of the pages I made into my own gift bags using a gift bag punch board. But for most of the pages, I simply cut or die cut them into rectangular pieces to use on card fronts. I've got a pretty good pile going, and I used some of the wintery ones for this batch of Christmas cards.

Supplies:
Stamps: Inside Christmas Greetings (Simon Says Stamp)
Paper: Handsome Hunter, Sahara Sand, Poppy Parade, Shaded Spruce card stock (Stampin' Up!)
Ink: Shaded Spruce (Stampin' Up!), white paint pen (Posca)
Accessories: Layering Circles and Stitched Shapes dies (Stampin' Up!), Stitched Rectangle Stackables dies (Lawn Fawn), Merry Sugar Script die (Birch Press Design), rhinestones (Stampin' Up!), white gesso (Art Basics), liquid watercolor shimmer (Taylored Expressions), Art Glitter Glue (Art Institute), foam tape (3M)
Other: Old calendar pages (Paper Source)

I think these birds on the snowy pine branches are so cute. I used rectangle stitched dies to cut pieces for six card fronts. To make the cards with the stitched rectangle panels, I mixed some white gesso with liquid watercolor shimmer and then painted over the snowy areas on the branches. Then I thinned the mixture a little more and splattered it on the pieces to create the look of falling snow. (Some of my splatter drops got a little gloppy -- I guess those are just big, fat snowflakes.) I was hoping the shimmer would show up in the gesso, but it really doesn't. Oh, well. I still like the result.

When the gesso was dry, I mounted the panels on Handsome Hunter card bases. For the "merry" sentiment, I die cut the word three times for each card and glued them together before adhering them to the card so it really stands out. I also added a rhinestone or two to each card for a hint of sparkle.

When those cards were done, I used the extra bits and pieces to make two more cards. For those cards I used Sahara Sand card bases, which was almost a perfect match for the background of the calendar page. I used a circle die to create a focal image for one of the cards. For the second one I hand cut a bird and several branches and berry clusters from the leftover scraps. I layered the pieces together and then used a white paint pen to make dots around the completed image. I added a few rhinestones to those cards, too. 

Supplies:
Stamps: Stitched with Cheer (Stampin' Up!)
Paper: Whisper White, Crumb Cake, Poppy Parade card stock (Stampin' Up!)
Ink: Garden Green (Stampin' Up!), white paint pen (Posca)
Accessories: Bunch of Banners dies (Stampin' Up!), Large Stitched Rectangle Stackables dies (Lawn Fawn), Ovals Collection dies (Stampin' Up!), 1-1/4" and 1-3/8" circle punches (Stampin' Up!), paper piercer (Stampin' Up!), sparkling clear sequins (Pretty Pink Posh), Corner Chomper (We R Memory Keepers), Art Glitter Glue (Art Institute), foam tape (3M)
Other: Old calendar pages (Paper Source)

These bears are adorable, too, but since they're a lot bigger than the birds, I was only able to make three cards from this calendar page. For the top two cards, I used dies to cut out the images; the rectangle piece was cut with a stitched die, and I used a paper piercer to pierce a hole in each scallop of the oval for an extra little detail. For the bottom card I just used my paper cutter to cut out the image and then rounded the corners. I added punched or die cut a stamped sentiment for each card and added a few clear sequins over some of the snowflakes for a little shine and simple embellishment.

Thanks for stopping by!


Tuesday, July 28, 2020

July Christmas cards: Playing with paper

Usually when I make my monthly Christmas cards, I focus on a particular stamp set, or maybe a die or stencil. This month I decided to do something a little different: I played with paper. It started with a pack of eeBoo holiday paper chains that I received as a Christmas gift from a friend a few years ago. I had never put the paper chain together because I thought some of the designs could be used to make Christmas cards. Well, I finally tried out that idea:

Supplies:
Stamps: Christmas Sampler (Paper Smooches)
Paper: Long Notes cards and envelopes (Stampin' Up!), Basic Black card stock (Stampin' Up!), paper chains (eeBoo)
Ink: Memento Tuxedo Black (Tsukineko)
Accessories: Frosted sequins (Stampin' Up!), Box of Chocolate sequins (Craft Medley), All Year Cheer washi tape (Sstampin' Up!)

What do you think? They're not terribly fancy, but I love the colors and images for a different style of Christmas card.

I will admit that I struggled with a layout for these cards. The strips for the paper chains are about 10" long, so obviously too long for a U.S. standard A2 card size. And I like the images, so I didn't want to cut off too much of the pattern. I thought for a loooong time and then finally remembered that I still have some of the Long Notes cards and envelopes that Stampin' Up! sold years ago. (I think these colors are Cool Caribbean and Wild Wasabi.) They are about an inch longer and an inch narrower than an A2 card, which worked perfectly: I could use a longer piece of the paper chain, and there wasn't a lot of card space left to have to fill.

I made two cards of each of these designs by glueing the paper chain strip to the card base, trimming the ends, and adding a border on the top and bottom with either thin strips of black card stock or copper washi tape. That left just enough space to stamp a sentiment on the bottom, and I had to give the cards a little sparkle with a few sequins.

While I had been looking for the Long Notes cards and envelopes, I came across a stack of vintage choral sheet music that I got at a church several years ago. I decided I wanted to use some of the pages from Christmas carols to make some collage-style cards. Here is the first group:

Supplies for all collage cards:
Paper: Naturals Ivory, Crumb Cake card stock (Stampin' Up!), gold foil sheets (Stampin' Up!), Christmas on Market Street paper pad (My Mind's Eye), vintage choral sheet music (unknown)
Ink: Crumb Cake (Stampin' Up!), gold Wink of Stella glitter brush pen (Kuretake)
Accessories: Snowflake punch (Stampin' Up!), green tree glitter tape (Paper Source), Country Houses die (Poppy Stamps), Christmas on Market Street enamel dots (My Mind's Eye), jute twine (May Arts Ribbon), puffy gold star (unknown), sponge (Stampin' Up!), Art Glitter Glue (Art Institute)

I have to say that I have a deep admiration for people who make collages. I have a hard time being "free" enough to do it well, and my left brain prefers more structure. (One of the reasons I've never been able to get into keeping an art journal, even though I really want to.) But when all was said and I done, I love the way these cards turned out; they might be my favorites so far this year. (I think they look prettier in real life than in the photos.)


Not only did I upcycle some old sheet music for these cards, but I also used up a bunch of leftover strips of patterned paper and a sheet of enamel dots. Even the gold snowflakes were already punched out (I must have planned to use them on a previous project and then changed my mind). Gotta love that!

For each card, I started by flicking gold Wink of Stella ink over a Naturals Ivory card base and then sponging the edges of the card base with Crumb Cake ink. Then I layered on the patterned paper (there are two separate strips on each card) and added a torn piece of the sheet music on top. Here's a tip for tearing paper: to help your tears go in a fairly straight line, use a slightly damp paintbrush to trace along the line where you plan to tear. This weakens the fibers a bit so they will tear easier.

Once the sheet music was glued down, I also sponged those edges with Crumb Cake ink. Then I added the embellishments: a strip of green tree glitter tape, a gold snowflake, a twine bow, and a few enamel dots.


These last three cards had little twists in the layout. For the left and right cards, I used different patterns for the papers above and below the sheet music. I also swapped the placement of the trees and the star.

For the card in the middle, I had two strips of sheet music left, and I wanted to use both. So I combined them with a Crumb Cake die cut of country houses and trees and used a puffy gold star instead of a snowflake. I still wanted some color, though, so I used a couple tiny scraps of patterned paper to make little banners and tucked them under the top piece of sheet music and then added a few enamel dots.


I love that the music for this card is from "It Came Upon a Midnight Clear." That little village seems perfect for the lyrics.

That makes fourteen Christmas cards made this month! Whew! I'll have to count up how many cards I have and start making a card list so I know how many more I still need to make. Pretty soon I'll need to start working on other Christmas projects. Thanks for stopping by!

Thursday, July 4, 2019

Kitten card set + recycled card pouch

As I promised in my last post, I'm back to share a fun little note card set featuring the kittens in the Oh My Whiskers stamp set from Honey Bee Stamps.

Supplies (all Stampin' Up! unless otherwise noted):
Stamps: Oh My Whiskers (Honey Bee Stamps)
Paper: Basic Black, Whisper White card stock; Neutrals Designer Series Paper (DSP) Stack
Ink: Memento Tuxedo Black; Blends/Blendabilities markers - Soft Suede, Daffodil Delight, Smoky Slate; W1, W3, R81 markers (Copic Sketch)
Accessories:Large and Small Stitched Rectangle Stackables dies (Lawn Fawn), black enamel dots (Eyelet Outlet)

I needed to make a quick set of note cards for a cat-loving friend, and I knew the Oh My Whiskers stamp set would be perfect. But I didn't have a lot of time to color all of the images. Instead I used a black-and-white color scheme and added pops of color by just coloring the kittens.

I used a stitched rectangle die to cut panels of white card stock and stamped the images using Memento Tuxedo Black ink. With alcohol markers I colored the cats and added a shadow below each image. I also stamped a few butterflies on each panel to fill up some of the white space and add a little more to the scenes.

For the card bases I used black card stock folded so that the crease is at the top of the card. (I make almost all of my cards with this orientation. I don't know why, but I prefer it over a side-folding card.) I adhered a piece of black-and-white striped DSP along the left side of the card front and then added the focal panel, centered on the card. For a simple embellishment I added one black enamel dot to each card.

I used three different images for my cards, and I made two cards of each design for a total of six cards. For the inside of the cards I cut a larger stitched rectangle from white card stock and stamped a single kitten. (The card in the top right of this photo shows the inside of one of the cards.)

With the cards done, I needed some sort of packaging for them. When I received my order from Honey Bee Stamps, it arrived in the cutest brown paper bag (protected inside a padded envelope, of course). Rather than just recycling the bag, I decided to repurpose it into a little holder for the cards.

This is the front of (part of) the bag. It was printed with these adorable images, and I thought that sentiment was perfect! I trimmed off the top of the bag and then used a scissors with a mini pinking blade to add the decorative edge. There was some printing below the sentiment, so I covered it with a strip of washi tape (also from Honey Bee Stamps) that had a black-and-white floral pattern. I used my alcohol markers to add color to some of the flowers.

I honestly can't remember how I made the rest of the pouch. I do remember it didn't work exactly as I imagined, and I had to do some improvising. When all was said and done, the back of the pouch was shorter than the front, so you get a peek at the cards inside. It wasn't what I was intending, but I think it works. I added another strip of the washi tape along the back of the pouch.

To finish it off I wrapped a narrow yellow ribbon around the whole pouch and tied it off in a bow on the front.

Today is Independence Day in the U.S., so if you are celebrating, have a safe and happy holiday. But regardless of what day it is wherever you are, I wish you a wonderful day filled with awesome things!

Thanks for stopping by!

Thursday, January 4, 2018

Clearing out the old

In honor of the new year, I've decided to clear out the old. Photos of "old" cards to be specific. I have several photos that have been sitting in my cyber files for months, including several of the cards I made at my craft retreats last fall. I never got around to sharing them because there was always something I liked better or something more timely or [insert various excuse here]. So for the next week or so I'm going to focus on sharing those cards before I jump into creating new cards and goodies. So here goes.

Supplies (all Stampin' Up! unless otherwise noted):
Stamps: Party with Cake
Paper: Green Galore, Whisper White card stock; recycled paper from a junk mail envelope (Current)
Ink: Memento Tuxedo Black, Project Life journaling pen
Accessories: Yellow paper flowers (Eyelet Outlet), Ice White Pearl Pen (Viva Decor), large glitter brad (American Crafts), clear Wink of Stella glitter brush pen

The starting point for these two cards was the colorful floral paper. It was part of an envelope I received last summer containing a sales flyer or coupon from Current. (Current is a company that sells stationery, holiday, home and gift items. I used to order from them frequently before I started making cards. Picking up those packages in the college mail roomwas the best. I still order occasionally; they have awesome wrapping paper.) I loved the bright colors and didn't want to just toss it, so I cut apart the envelope and made these two cards.

I've loved doing stuff like this since I was a kid: making gift tags out of greeting cards (or vice versa), collecting paint and wallpaper samples at the home improvement stores to make collages, cutting old wrapping paper into tiny pieces to make mosaic pictures. I really enjoy doing it, but I think I never shared these cards because they didn't seem "fancy" enough. They're not really anything special, but I still love that paper, and they're bright and cheery, and I made them. So why not share them?

Supplies (all Stampin' Up! unless otherwise noted):
Stamps: Geo-Graphic (Paper Smooches)
Paper: Green Galore, Berry Burst card stock; recycled paper from a junk mail envelopes (Current)
Ink: Berry Burst
Accessories: Yellow paper flowers (Eyelet Outlet), neutrals brads, Large Polka Dot embossing folder, clear Wink of Stella glitter brush pen, Ice White Pearl Pen (Viva Decor), Dimensionals

I went with a polka dot theme for this card, and I added plenty of Wink of Stella for a solid sparkle factor, although it's hard to see in the photo above. You can see it a bit better in the shot on the right. All the large embossed polka dots, as well as the smaller yellow flower, are coated with Wink of Stella. I don't know what I did before I found that amazing product!

So there are my first two "old" cards. I'll try to get more posted this weekend. Thanks for stopping by!

Saturday, March 11, 2017

Coordinating tags and gift box

Last week I was organizing some of my craft supplies and came across a bag filled with odds and ends of Japanese papers. I hadn't used the papers in awhile, so I decided to have some crafty fun with them, starting with this small gift box:

Supplies (all Stampin' Up! unless otherwise noted):
Paper: Chiyogami papers (The Japanese Paper Place); Poppy Parade, Naturals Ivory, Naturals White card stock
Ink: Gold paint marker (Sharpie)
Accessories: Itty Bitty Accents punch pack, Scalloped and Ornate Tag Topper punches, Note Tag punch, gold Deco Foil (Therm-O-Web), gold baker's twine, In Color Accessory Pack, Baker's Twine Trio Pack, black fiber (On the Surface), metallic enamel shapes, wavy scissors (Provo Craft), Tiny Attacher stapler (Tim Holtz), Mono Multi liquid glue, 1/8" Scor-Tape (Scor-Pal), Glue Dots

While I was organizing, I also found my refill kit for Stampin' Up!'s Undefined stamp-carving kit. I haven't used the refill kit yet, but the small, sturdy black box was the perfect base for an upcycled gift box. The only writing on the box was the label on the lid, so I covered the top of the box with two different prints from the Japanese papers. I placed 1/8" Scor-Tape along the seam and rubbed gold Deco Foil over the tape.

To make a focal point for the box I punched out three small Poppy Parade flowers. I used a gold paint marker to outline the flowers and added detail to the centers, so they coordinate with the paper. I attached them in a loose cluster to the upper left corner of the box lid.

With the box completed, I decided to turn it into a gift for a friend. That meant I needed to find -- or, more accurately, make -- something to fit inside the box. I settled on twelve coordinating tags and twelve mini clothespins.

For the tag bases I used a few different punches with Naturals White and Ivory card stock. I decorated them with pieces of the Japanese papers (I used four different prints and made three tags for each print), added embellishments on some of the tags, and used various twines and fibers for the tassels. I wasn't sure how best to include the clothespins, so I simply clipped them on to a small rectangle of gold paper.


Here are a few of the tags close up. I made each of the twelve tags a little different, and I left room to write "To" and "From" and/or a little message. Or the recipient could write or stamp a message on a tag and use it as a focal point on a card. When the tags are gone, the box can be re-used as a gift box or for decorative storage.


While I had the Japanese papers out, I decided to make a card, too:

Supplies (all Stampin Up! unless otherwise noted):
Paper: Chiyogami papers (The Japanese Paper Place); Naturals Ivory, Concord Crush card stock
Accessories: Petite Petals punch, Stitched Shapes Framelits dies, metallic enamel shapes, metallic gold thread, Glue Dots, Mono Multi liquid glue

I love this deep, rich purple combined with the gold, and since these papers are so pretty I wanted them to be the focus of the card. I die cut three stitched squares from each type of paper and arranged them on a card base. (I trimmed the card base down a bit so the borders around the squares were fairly even.) I felt like the card needed some kind of embellishment, so I punched a small flower from Concord Crush card stock, gently creased the petals and added a gold enamel circle in the center. I looped some gold metallic thread behind the flower and attached it to the square in the bottom right corner of the card. I haven't completely decided if one flower is enough, or if I should also add a flower in the other two light-colored squares. What do you think?

Thanks for stopping by!