Sunday, March 31, 2024

Versatile card sets

This spring the parent association at my school is holding a silent auction fundraiser. Last year I donated a set of handmade cards to the silent auction, and they sold quickly, so I decided to make a set again this year. Well, actually I decided to make two sets: one with a retro swirl design and one a more traditional floral.


I love the way these cards turned out. I used the Retro Swirls A2 die from Erin Lee Creative. There are five “sections” of the swirl so I used five colors of card stock to make a bright rainbow and heavyweight white card stock for the card bases. I ran the die through my die-cutting machine with each piece of colored card stock and separated the pieces for each card. To glue the pieces, I started with the middle, chunkiest section of the swirl and then worked outward.

For the sentiments, I used the On Occasion stamp set and coordinating dies from Taylored Expressions. I like how the style of the font works with swirl, and there are five great sentiments in the set — one for each card. I stamped and die cut each sentiment, and then I cut each sentiment die two more times out of plain white card stock. I glued the pieces for each sentiment together in a stack and adhered them in the lower right corner of the cards. I finished each card with a few sequins.

Since I really liked the way these cards turned out, I decided to make five more in a different color combination:


I chose these beachy colors for a more neutral or masculine option. The only other change from the first version is that I used dark brown ink for the sentiments instead of black.

I debated making each version into a separate card set, but for some reason I like my card sets to have an even number of cards. So I went with one set of ten cards.


For the second set of cards I wanted to do something floral, but not too elaborate. After trying a few things, I settled on this layout. I used the Full of Flowers background stamp from Taylored Expressions to stamp four A2 panels of white card stock using black ink. I cut each panel into thirds to make ten patterned strips (with a little left over). I glued each strip along the bottom of a top-folding heavy white card base. Then I added a 1/4" strip of black card stock along the top of the I patterned piece on each card.

To make the colored flowers, I used the matching Full of Flowers - Singles stamps and dies from Taylored Expressions. I stamped the flowers and leaves several times and used the "filler" stamps (that come with the background stamp) to add the color. I die cut the elements and mixed and matched the pieces into ten groups.

Before adding the flowers I stamped a different sentiment on each card just above the black strip and toward the right side. (The sentiments are from the Sending Love Mail stamp set from Hero Arts.) Then I used glue and foam tape to add the flowers to create a little dimension. for the finishing touch I added three clear droplets around the flowers on each card.

I packaged each card set, with envelopes, in a small gift bag. I had planned to use clear card boxes that I have, but the stacks of cards were too thick. Unfortunately I didn't discover that until the night before I had to bring them to work; if I had realized it earlier, I would have made a cute holder for each set.

Thanks for stopping by!

Saturday, March 30, 2024

March Christmas cards: Christmas mice

Goodness, my blog posts have been few and far between this month. But I did manage to finish my March Christmas cards -- just in time to post them before the month ends.

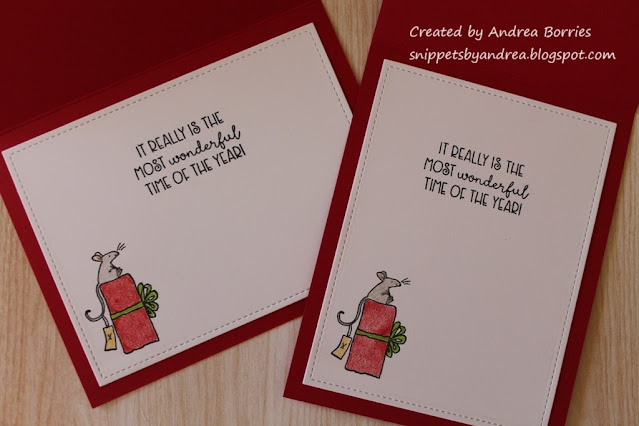
This month I used the Wonderful Time stamp set from Colorado Craft Company. I love the adorable illustrations by Anita Jeram, and this is the first set I've bought with her designs. I chose a simple layout -- just the main focal image and a sentiment -- because I didn't want to distract from these little mice decorating their Christmas tree. 

I don't love coloring the same image multiple times, so I only made eight cards of this design. I intended to make them all in horizontal orientation, but I goofed and stamped one of the inside panels vertically. Instead of throwing away that piece, I made two of the cards vertical -- and I think both layouts work.

I used Prismacolor pencils to color the images. I didn't do anything fancy with my coloring -- just some shading and a little color layering. I die cut the panels with a stitched rectangle die and adhered them to red card bases. For embellishment I placed a small twine bow on the base of the tree and added three sparkling clear sequins. 

The stamp set also included a couple of smaller images, so I decided to use one of them inside the cards along with a sentiment. I cut these panels out with the same stitched rectangle die so they coordinate with the front panels.

Thanks for stopping by!


Tuesday, March 19, 2024

First Class

Well, hello! I've been taking a little break from card making the last couple of weeks (just because I felt like doing other things) so I haven't had much to post on my blog. But today I'm going to share four cards made with the First Class stamps and dies from Ellen Hutson.


This stamp set includes a variety of images and sentiments that look like postage stamps. I stamped and die cut each image twice and colored them with alcohol markers, using the same color markers for all the images so they were easy to mix and match. I also used a casual, scribbly style to color so I didn't have to worry about them looking perfect. Then I divided up the colored images to make four cards.

The first two cards are birthday cards with the same layout. I embossed panels of colored card stock for the backgrounds, splattered them with gold paint, and adhered them to white card bases. I glued five of the postage stamp images onto the embossed card stock and used foam tape to add the "Happy Birthday" stamp in the center. For embellishment, I added a linen thread bow at the top of each card and finished with a few gold sequins.

This card also has a layout similar to the previous two. It has a horizontal orientation rather than vertical, but I used an embossed background and five images. I didn't add gold splatter to the background, but I did rub a watermark ink pad over the embossing to help the raised parts stand out. It's hard to see in the photo, but there is some looped gold thread behind the images near the upper left corner.


For the last card I used a map embossing folder for the background. Again I rubbed a watermark ink pad over the embossing. I wrapped some black-and-white baker's twine around the card front and, using foam tape, I added four of the images in a grid pattern. I finished the card with a few clear droplets.

Thanks for stopping by! I hope it won't be too long before I'm back again! :)


Wednesday, March 6, 2024

Full Bloom

One of the things I've been trying to work on with my crafting is using some of the products I own that I haven't used yet. Today's post focuses on the stamp set Full Bloom, which was one of the 2023 Stamptember stamp sets from Simon Says Stamp (in collaboration with Papertrey Ink).

I've come to enjoy stamp or die sets that have shelves and various items to place on the shelves. So the Full Bloom stamp set, with the ladder image and garden theme, immediately called to me. 

Naturally I wanted to use the ladder image for my first card, so I decorated it with a few of the images in the stamp set. I love the look of the two-step images, even though I didn't line them all up perfectly. I die cut the focal panel with the Essential Arches dies (Ellen Hutson) and matted it with rust card stock also cut into an arch. I wrapped a neutral trim around the front of a dark blue card base and used foam tape to attach the panel over the trim. I finished with two rust-colored enamel dots in the upper left corner.

For my second card I wanted to make something with a completely different look, so I focused on the floral images. I cut a piece of white card stock and, using a few different green inks, stamped the various stems along all the edges. Then I stamped the blossoms and finished with the leaves. To fill the center I used a die-cut "Birthday wishes" sentiment. I rounded the corners of the stamped panel, matted it with black card stock, and adhered it to a light green card base. To embellish the card I added a few clear droplets -- they add a fun detail without distracting from the other colors.

Thanks for stopping by!