Thursday, May 28, 2020

May Christmas card: Red snowflakes

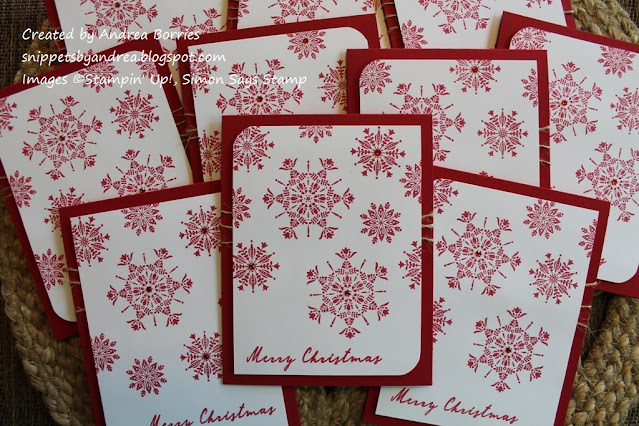
When you think of snowflakes, red is probably not the first color that comes to mind. But when I looked through the Christmas cards I had made so far this year, there were a lot of neutrals (white, cream, kraft, brown) and a few pops of color (mainly greens and blues). But there was hardly any red in the bunch. So I decided that I wanted red to be the main color for my May Christmas cards. I also wanted (surprise!) a clean and simple design. So with those things in mind, I started looking through my Christmas stamps and found the old Stampin' Up! set Northern Hearts. I love the Scandinavian-style images and was especially drawn to the snowflakes, which I thought would look really striking on a monochromatic card. So red snowflakes was the result:

Supplies (all Stampin' Up! unless otherwise noted):
Stamps: Northern Hearts, Inside Christmas Greetings (Simon Says Stamp)
Paper: Whisper White, Real Red card stock
Ink: Real Red
Accessories: Red rhinestones, jute twine (May Arts Ribbon), Corner Chomper (We R Memory Keepers), foam tape (3M)

This is a simple layout, but it really wasn't easy. I had to pitch several card fronts because the stamp slipped or I pressed too hard and got ink on the edge of the stamp and then on the card stock. Clean and simple cards (especially on white) are not the most forgiving when it comes to those little oopsies! I know I could have used a stamp positioner, but I didn't want all of the cards to look exactly the same. And since I stamped each snowflake two to four times, I would have had to set up each card front in the positioner several times, which I just didn't want to do.

At any rate, I stamped the snowflakes using Real Red ink, leaving space at the bottom of the white panel to stamp the sentiment. I rounded two opposite corners of each panel and added a red rhinestone to the center of three of the snowflakes. I planned to mount the panels on red card bases, but I wanted to break up the color and add a bit of fiber. So I wrapped jute twine around each card front three times and taped down the ends in the middle of the card front where they would be hidden. Then I applied foam tape to the back of the stamped panels and attached them to the card bases. (This card is definitely mailable, but you could easily skip the foam tape and adhere the panel directly to the card if you wanted it to be flatter.)

I haven't been good at keeping up with my blog posts, and I have a lot of cards to share -- some really cute ones, too, at least in my opinion. :) I'm going to work on getting back on track, so I'll try to get at least one more post one by the end of the month.

Thanks for stopping by today!

Wednesday, May 20, 2020

Customize stamp images with selective stamping

If you've been around my blog awhile, you know that I love cute animal stamps. (And if you're new to my blog, then welcome! I hope you find some inspiration here.) So when I saw the We'll Walrus Be Friends set in the Stampin' Up! catalog, I knew I'd have to get it. (I don't think I have any other walrus stamps, so it was totally justified, right?) I finally ordered it earlier this spring, and when I sat down to play with the set a few weeks ago, I created these two adorable cards:

Supplies (all Stampin' Up! unless otherwise noted):
Stamps: We'll Walrus Be Friends, In My Thoughts
Paper: Whisper White, Pool Party card stock
Ink: Memento Tuxedo Black, Pool Party; alcohol markers - Pool Party, Pumpkin Pie, Mango Melody (Stampin' Blends); W1, W3, E53 (Copic Sketch)
Accessories: Seaside embossing folder, Wonky Stitched Circles dies (My Favorite Things), Small Stitched Rectangle Stackables dies (Lawn Fawn), clear droplets (Pretty Pink Posh), clear Wink of Stella glitter brush pen, foam tape (3M), Art Glitter Glue (Art Institute)

Aren't they the cutest? And they were fun to make, too, because I used the selective stamping technique to modify the images from what you see in the set.

For the first card, I planned to use the sentiment "Ready or not ..." on the outside of the card and "It's your birthday!" on the inside (see photo below for the insides of the cards). The image of the walrus hiding his eyes was perfect, but I wanted him to be sitting on the little chunk of ice, which was part of a different image. So I carefully inked just the ice and water parts of the stamp with black ink and stamped it on white card stock. Then I inked up the shy walrus and added him to the scene. I could have used a marker to extend the lines of the ice chunk so they were closer to the walrus, but with the style of these images, I think it works just fine as is.

To finish the scene, I repeatedly stamped the two fish images in an arc over the walrus, turning the stamps so they are in different positions and just look like they're having fun. I colored everything with alcohol markers, added a bit of clear Wink of Stella glitter to the water and ice, and stamped the sentiment at the bottom of the panel. I die cut the panel with a stitched rectangle die and mounted it on a Pool Party card base using foam tape. I so loved how this card turned out that I even decided not to add any embellishments. Crazy!


For the second card I started by stamping the image of the walrus in the waves on white card stock. I cleaned off the stamp and then inked up just the two separate waves -- more selective stamping! -- and stamped them two more times below the walrus. I added a few stamped fish in the waves, and then colored everything with alcohol markers. I die cut the panel with a stitched circle die and used foam tape to attach it to a Pool Party card base that I had embossed with the Seaside embossing folder.

For the sentiment I used selective stamping one last time. I took the sentiment "Just floating by / to say hi", inked just the first line, stamped it on white card stock and trimmed it into a strip. Then I repeated the process with just the words "to say." Finally I stamped the separate sentiment "It's your birthday!" and trimmed that one into a strip as well. I put small strips of foam tape on the back of the strips and placed them on the card base below the focal image to make my custom sentiment. I finished this card with three clear droplets.

What do you think? I'm excited to see what other cards I can create with the We'll Walrus Be Friends stamp set. This set is retiring this year, so if you want it, get it quick! It is guaranteed available through May 22, 2020 -- just a few more days! -- and then while supplies last until June 2.

Thanks for stopping by!

Tuesday, May 12, 2020

One wildflower card, then a set

When I make a set of cards, I like to have one element in the design I can change -- such as a pop of color or a sentiment -- while leaving the rest of the card the same. That way the cards aren't all exactly the same, but they are still clearly part of a group. So when I created this wildflower card, I knew it had the potential to be a great layout for a card set.

Supplies:
Stamps: Beth's Coneflower, Art Definition, KB's Lavender (Endless Creations); Tiny Words (Simon Says Stamp); Shiplap Background (Taylored Expressions)
Paper: Blackberry Bliss, Very Vanilla card stock (Stampin' Up!)
Ink: Blackberry Bliss, River Rock, Soft Suede, Old Olive, Crushed Curry (Stampin' Up!)
Accessories: Nested Banners dies (Simon Says Stamp), Sparkle Silk (Fun Stamper's Journey), clear droplets (Pretty Pink Posh), linen thread (Stampin' Up!), sponge (Stampin' Up!), foam tape (3M), Art Glitter Glue (Art Institute)

I love these colors and flower images. I've had the coneflower stamp for quite awhile, but the lavender is newer. I think they work so well together.

To make the focal layer, I stamped the text background image near the middle of a panel of Very Vanilla card stock. I carefully inked up the flower images with different ink pads and stamped them over the text. I sponged ink around the edges of the panel to create an aged look, and then for contrast and a little sparkle, I sprinkled some Sparkle Silk over the images.

For the card base, I stamped the Shiplap Background stamp on Blackberry Bliss card stock using Blackberry Bliss ink. I adhered the panel to the card base and used foam tape to add a small banner stamped with a sentiment at the bottom of the flower stems. I used two neutral embellishments -- linen thread and clear droplets -- as the finishing touches.

And here is the set inspired by this card:

Supplies:
Stamps: Art Definition, KB's Lavender, Beth's Coneflower (Endless Creations); Tiny Words (Simon Says Stamp); Gorgeous Grunge (Stampin' Up!)
Paper: Very Vanilla, thick Very Vanilla card stock (Stampin' Up!); Plum Punch, Grass Green card stock (Gina K Designs)
Ink: Plum Punch, Grass Green, Sandy Beach, Wild Dandelion, Chocolate Truffle amalgam (Gina K Designs)
Accessories: Stitched Frame Stacklets dies (Taylored Expressions), Nested Banners dies (Simon Says Stamp), sparkling clear sequins (Pretty Pink Posh), shimmer spray made with Shimmer Liquid Watercolor (Taylored Expressions), sponge (Stampin' Up!), Art Glitter Glue (Art Institute), foam tape (3M)

I did make a few modifications to the design, in addition to the ink and card stock colors. First, I switched to a Very Vanilla card base. With a light card base, I didn't have to cut card stock panels to adhere inside the cards for writing. I also switched the image stamped on the card base from shiplap to a splatter-style image.

Since both the card base and the stamped panel were Very Vanilla, I wanted to separate them with a little color. So after I was finished stamping and sponging the panels, I glued a die-cut, stitched frame around each one (half in green, half in purple). Finally, I switched up the embellishments, using clear sequins instead of droplets because they are easier to mail. (I also left of the linen thread bow, although I honestly can't remember exactly why. I think it was just to save a little time.)


For the sentiment banners, I decided to let the recipient choose which sentiment to use on her cards -- or to leave them off altogether. I stamped eight all-occasion sentiments (two more than the number of cards in the set) on Very Vanilla card stock, cut them out with a banner die, and placed a thin strip of foam tape on the back of each one. I chose the most general sentiment ("thinking of you") and adhered it to one of the card bases, as an example of how to add the sentiments. Then I slipped the remaining mini banners into a small zip-close bag and placed them with the completed cards and envelopes in a clear acetate box.

Thanks for stopping by!

Thursday, May 7, 2020

Pinata Party pair

I have two festive pinata-themed birthday cards to share today. I'm a little late for Cinco de Mayo, so happy Siete de Mayo!

Supplies:
Stamps: Pinata Party (Concord & 9th)
Paper: Whisper White, Poppy Parade card stock (Stampin' Up!); Plum Punch card stock (Taylored Expressions); Formals Foil paper pack (Concord & 9th)
Ink: Party Dress, Tutti Frutti, Tiki Torch, Tiara, Flirty Fuschia (Catherine Pooler)
Accessories: Pinata Party dies (Concord & 9th), Celebrate die (My Favorite Things), White Perfect Accents (Stampin' Up!), white crochet thread (DMC), decorative-edge scissors (unknown), foam tape (3M), Art Glitter Glue (Art Institute)

I've never had a pinata for my birthday, but I'm all for anything filled with candy! To make the pinatas for these cards, I stamped the "fringe" stamp in several bright colors on a piece of white card stock and then die cut two of the pinata shapes. I die cut the tail, mane and flower pieces from red and purple card stock and glued them on the pinatas.

For the card bases, I used red and purple card stock and stamped clusters of candy on the background using coordinating ink color. (The card stock and inks are not from the same companies, but I think they're pretty good matches!) I added a die-cut celebrate at the bottom of the red card -- it's cut from white foil, so it has a nice shine, which you can't see in the photo -- and a decorative border on the purple card.

I added a vertical line of liquid glue near the middle of each card and glued down a piece of crochet thread for the strings holding the pinata. Using foam tape I added a pinata at the bottom of each string. To finish the cards I placed one white enamel circle in the upper right corner of each card.

Thanks for stopping by!

Friday, May 1, 2020

Flower-shaped card set

I managed to get my computer to cooperate with me, at least for the time being, so I'd better get some cards posted while I still can! Here is a fun set of flower-shaped cards that I made one of my cousins for her birthday.

Supplies:
Paper: Whisper White card stock (Stampin' Up!), Unforgettable Designer Paper Pad (My Mind's Eye)
Ink: Crumb Cake (Stampin' Up!), Iced Americano glitter marker (Nuvo)
Accessories: Floral Frames Collection dies (Stampin' Up!), Stitched Flower Frame dies (Lawn Fawn), wooden flowers (Darice), sponge (Stampin' Up!), Art Glitter Glue (Art Institute)

I've made flower-shaped cards before, but it had been awhile, and it was fun to try them again. The specific set of dies I used to create these cards is no longer available from Stampin' Up!, but you can use any large dies to make shaped cards. I just like to make sure that the shape will fit in an A2-sized envelope; the flowers here are about 4" x 4", so they don't "fill" the envelope, but that means there is space to add the leaves. You also may want to consider whether the shape will allow the card to stand up when open. Although the flowers don't have a flat edge, I placed the die so that two of the petals were directly opposite the fold, so the card can balance on the petals.

To make the card bases, first cut and fold a card base that is a bit larger than your die. Avoid using heavy or thick card stock because the die will have to cut through both layers at the same time. With the card base closed, position your die so that a little section hangs past the fold. Run the card base and die through your die cutting machine. Your card base is now shaped, with a flat section at the fold. Use the same die to cut a shape out of patterned paper or another piece of card stock. When you adhere that layer to the front of your card, it will hide the flat section, and your shape will be whole.

For this set of cards, my goal was to finish up a pack of patterned paper, and I came pretty close. I cut the main flower shape and the smaller center flower each out of six different patterns and the leaves out of a dark olive green paper from the pack. I sponged the edges of the flowers and centers with Crumb Cake ink, adhered the layers together and then attached each flower to a card base. To add the leaves, I glued them to the back of the card front.


To add a little embellishment, I used a glitter marker to create a sparkly dotted border around the flowers. The flower centers were too empty, so I glued a small wooden flower in the middle of each card.

I hope you have a wonderful weekend! I'll admit it's a little bittersweet for me. I was supposed to be on a fun, relaxing, productive craft retreat this weekend. Needless to say, that was cancelled. Instead I picked up shifts at work on some of the days I would have had off. But after I'm done tomorrow (and I only work until noon - yay!), I have three days off! I'm planning to spend as much time as I possibly can making cards - I have to finish a big bunch of cards that I will be donating, and then I need to make lots of birthday cards to give as gifts and to replenish my stash. I just hope I can keep the creative juices flowing!

Thanks for stopping by!