Tuesday, July 29, 2025
Gel print strip backgrounds
Monday, June 16, 2025
Secret Garden: Part I
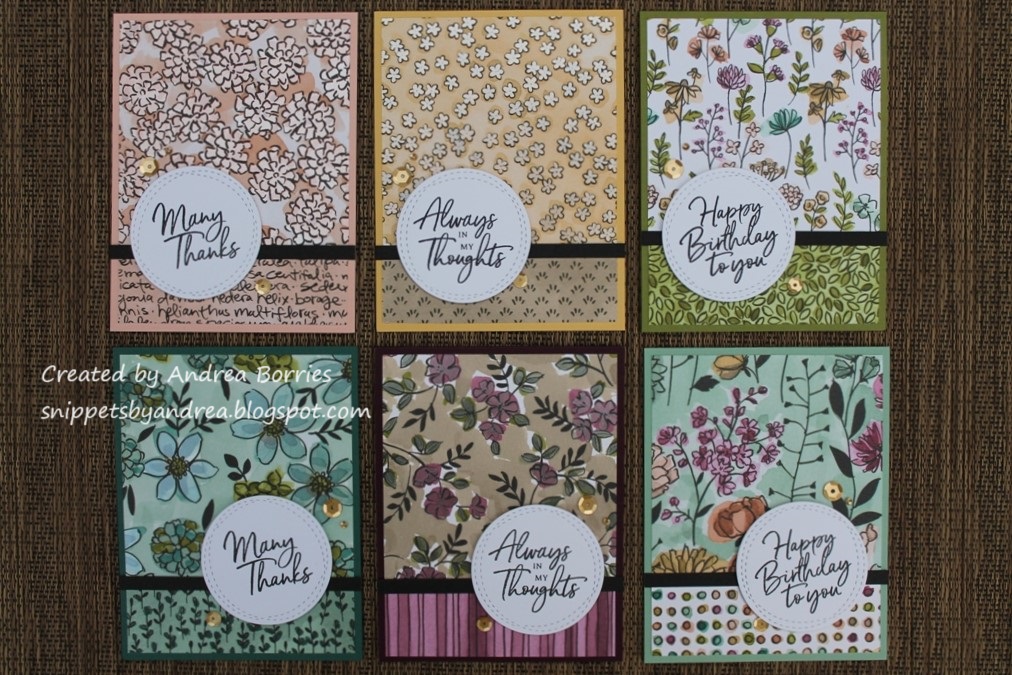
In March I ordered a subscription box from A Cherry on Top that was packed full of spring-themed products, including several items from the Secret Garden collection by Carta Bella. There was the collection pack (which included twelve double-sided 12" x 12" textured papers and a sheet of card stock sticker elements), chipboard stickers, die-cut tags and frames, and a package of embellishments. I absolutely loved the prints and the texture of the papers, but I didn't want to hoard them. So I decided to use as much of the coordinating items as I could to make cards.
Over the course of several weeks I ended up making more than sixty cards. (I found coordinating card stock in my stash and also added in some different embellishments.) I had wanted to use some of the cards to send spring/Easter greetings to family and friends, but I missed that boat. So instead I created four card sets to give as gifts and forty individual cards that I brought in to work to share with the teachers and other school staff.
I didn't take pictures of all the cards, but I do have quite a few photos, so I'm sharing the card sets in this post and some of the individual cards in the next post. For the first group of photos each picture includes two cards with the same layout/papers but different focal images. These cards I split into two card sets (one card from each photo went in the first set, and the other card went in the second set).
These are obviously a pretty simple layout, but I really wanted the pretty papers to stand out.
For the last photos, each picture is one card set. I used stamped quotes and gold die-cut foliage for the focal points on these cards, but again, the two sets use the same layout.
Saturday, May 3, 2025
For the animals
Today I participated in a Walk for Animals, a fundraiser for our local Animal Humane Society. I only registered for the Walk last month, so I didn't have a lot of time to collect donations. But I did have a few friends and family sponsor me, and I wanted to make a little something to thank them for their donations. So I started with (obviously) thank-you cards:
Of course I needed to make the cards pet-themed. (I have to thank my online stamping friend Sunshine for sharing some cards she made for her vet's office and inspiring the idea.) I used the Speech Bubble Backdrop die, Critter Chatter stamp set, and Say What? Pets stamp set, all from Lawn Fawn, to create eight cards. They're all the same basic layout with different background colors.
I used alcohol markers to color the animals very simply -- the only detail I added was stripes on the cats. On each card I gave the middle animal a speech bubble and then stamped the "translation" inside.
With the thank-you cards done, I decided to make some small gifts -- sets of four notecards and simple bookmarks -- continuing the animal theme.
To create the notecards I used the Storybook Friends stamp set and Pretty Petals Designer Series Paper (DSP) Stack (both Stampin' Up!). I chose four images from the stamp set and paired each with two DSP patterns. I colored the images with alcohol markers and punched them out with a scalloped circle punch. I covered the seam between the patterned papers with a strip of card stock punched with the Dotted Scallop Ribbon Border punch and finished each card with a trio of cream sequins.
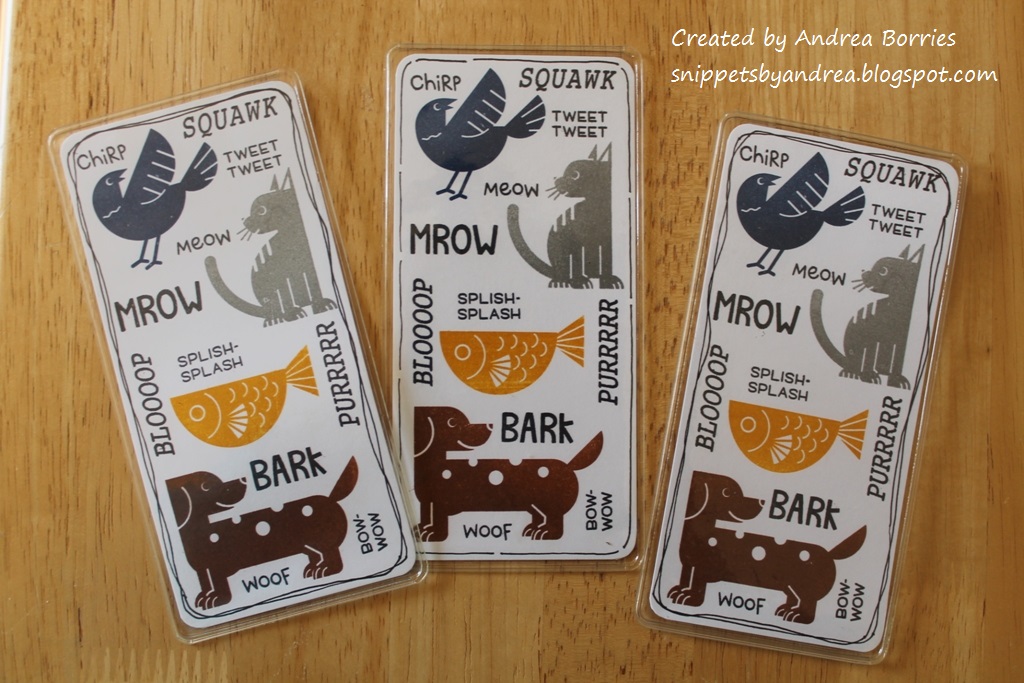
Finally, the bookmarks. I used the Critter Chatter stamp set again, but for the animals I pulled out a set from a past My Monthly Hero kit from Hero Arts. I stamped a dog, fish, cat, and bird -- each in a different color -- then filled in with the words and finished with a doodled border.
I had a great time at the Walk for Animals, and I think I'll sign up again next year. Thanks for stopping by!
Thursday, March 20, 2025
Retro Swirls card set
Wednesday, March 5, 2025
Wildflower card set
We had the weirdest winter storm last night. It started out as rain and ended up as about eight inches of heavy, wet snow. And just when all our snow was gone, we were having mild temperatures, and it looked like spring was on the horizon. Ugh. So to keep the feeling of spring alive, I'm sharing a set of floral notecards.
I used the Wildflower Background stamp (Taylored Expressions) and stamped it with black ink on eight pieces of white card stock. I chose eight colors of ink and, using a detail blender brush, I colored the flowers on each panel with one color. I die cut the panels with a stitched rectangle die, matted them with black card stock, and adhered them to card bases to match the flowers.
For the sentiments, I decided to use the Simple Strips Background stamp and die (Taylored Expressions). I chose ten sentiment strips and adhered foam tape to the back. I attached one of the sentiments to one of the cards and placed the rest of the strips in a little baggie to package with the cards. That way the recipient can choose which sentiment to use on which card -- with a couple of extra, just in case -- or they can use the cards without sentiments.
Thanks for stopping by!
Friday, October 11, 2024
Quick and easy card set
The last few weeks have been busy, and I haven't really had any time for stamping or blog posting. So today I have a short post with a quick and easy card set I made a while back and never shared.
Tuesday, August 6, 2024
Unicorns and rainbows
I know it hasn't been very long since I posted my last card set, but I've been giving a lot of them as gifts, so I need more. But today's card set is a little different (at least for me), and it makes me so happy. I hope you think so, too!
Gah! Aren't they too cute? To make the unicorns I used the Whittle Happy Unicorn die (Poppy Stamps) with shimmery white card stock for their bodies, colored card stock for manes and tails, and silver foil card stock for their horns. The card bases are Pool Party card stock with iridescent shimmer splatter and a scalloped rainbow frame (die cut with Frame in Frame 2 cutting plate, Taylored Expressions).
I finished these cards with some sparkling clear sequins for a little extra bling. All-in-all this was a pretty easy card set to create; the most time-consuming part was die cutting and gluing all the unicorn pieces. But I think I might just have to make a few more to use myself ...
Thanks for stopping by!
Saturday, July 27, 2024
You're My Type card set
I'm back to share my last card set (at least for a little while). And of course, if you don't make card sets, any of these layouts could be used for just a single card. I gravitate toward clean-and-simple layouts for card sets since I have to make multiples, so many of these designs are great for new card makers or anyone who needs to make a quick card.
For this card set I pulled out one of my typewriter stamp sets -- You're My Type (Stampin' Up!). I stamped the typewriter six times on vanilla card stock and used three different sentiments to add messages on the paper part of the typewriter images. Then I fussy cut the images (it's an old set, so no dies, but I don't actually mind cutting them out myself) and set them aside.
To make the card bases, I used thick vanilla card stock and two kinds of patterned paper -- a retired typewritten-style Designer Series Paper (Stampin' Up!) and an older floral stack (Die Cuts With a View). I adhered a 4" x 4" piece of the text paper at the top of each card, leaving a 1/8" border of card base visible. Then I added floral paper -- a different design for each card -- to the bottom part of the card base. I wanted a little bit of color at the top of the cards, too, so for each card I punched a small banner from the same floral paper and glued it at the top left edge of the card base. I used foam tape to attach the typewriter images and finished each card with a few gold sequins.
Thanks for stopping by!
Friday, July 19, 2024
Emboss resist card set
I’m back to share another card set from card-making spree last month. For this set I wanted to make something all-occasion, without sentiments, that could be used just about any time you need a card.
I decided to skip the stamping and use some old Specialty Designer Series Paper (DSP, Stampin’ Up!) to make a set of emboss resist cards. The paper is white with a clear-embossed pattern, so when you apply ink to the paper the pattern resists the color and stays white.
I chose two patterns for my cards: flowers and foliage. I applied ink to the DSP using blending brushes. For the flower pattern I used a couple shades of pink for the flowers and yellow and green for the foliage (I love how it looks like the sun shining through the leaves).
I matted each ink-blended panel with black card stock and then adhered them to white card bases. For the focal images I die cut circles of white card stock embossed with a woodgrain pattern and added black die-cut butterflies. I applied glue to just the body of each butterfly so the wings can be gently pulled up for some dimension. I finished the cards with sequins -- gold for the leaves and clear for the flowers.
Thanks for stopping by!
Monday, July 8, 2024
Monochromatic patterned paper card set
I'm back another one of the card sets I made a few weeks ago. This set features some pretty, monochromatic patterned paper and simple floral focal images.
I used the All Planned Out 1 dies (Taylored Expressions) to die cut the six patterned papers into two pieces, and then I swapped the piece for the same color patterns. I glued the pieces to white card bases and added a diagonal white strip to cover the seam where the papers meet. (The dies for white strips, as well as the circles, are also part of the All Planned Out I die set.)
Tuesday, July 2, 2024
More rainbow notecards
Last summer I shared a simple set of rainbow notecards I made using a rainbow die and sentiment strips. Well, I ended up putting that set in my card box and never did anything with it. Then a few weeks ago when a coworker asked if I had any card sets on hand, I decided to expand the set with a few more cards. Here are all the cards together:
I die cut some additional rainbow pieces and just made sure that I placed the colors in a different order than the original four cards. But I did make a little goof: When I was getting out the card stock, I grabbed the wrong purple. The original cards used Starry Sky, which is a dark, bluish purple. For the new cards I accidentally used the lighter Orchid Oasis. Oops. I decided as long as there were four of each, it wasn't a big deal. (Now, if there had been seven cards with the darker color and only one with the lighter, that would have been weird.) I did successfully choose a different sentiment strip for each card, and I finished them with the same placement of sparkly sequins.
I packaged the full set of cards and envelopes in a small white box. I had a few rainbow pieces left over so I glued them to the top of the box to make it a little more fancy and to match the cards inside.
Thanks for stopping by!
Monday, June 24, 2024
Seaside Notions card sets
A couple of weeks ago at the end of the school year, one of my coworkers asked to purchase some card sets. I had some card sets on hand, but I wanted to make a few more so she would have additional choices. The two card sets I'm sharing today were made with the Seaside Notions stamp set.
I made both sets with the same general technique: I filled an 8-1/2" x 11" piece of cream card stock with stamped images from the Seaside Notions stamp set, using a different color ink for each image. For this set I also splattered the card stock with metallic blue watercolor paint and then cut it into panels for six cards.
I matted each panel before attaching it to a cream card base. I stamped the sentiments on strips of card stock, trimmed the ends of the strips, and attached them to the cards with foam tape. I finished off the cards in this set with clear droplets.
After stamping the sheet of card stock for the second Seaside Notions card set, I spritzed it with iridescent shimmer spray, which is really hard to see in the photo. Again I matted the stamped panels, but before adhering them to the card bases, I wrapped some hemp twine around the panels. (The ends of the twine are taped to the back of the panel so I didn't have any knots.) I glued a wooden seashell embellishment over the twine and attached the panels to colored card bases. I didn't add sentiments to these cards so they can be used for any occasion.
After I finished the card sets, I had two strips of stamped card stock left over, so I made two birthday cards for my stash. I matted each strip and adhered them to colored card bases embossed with a wave texture. I added a "happy birthday" sentiment and a few clear droplets to finish off these bonus cards.
Thanks for stopping by!