 Supplies (all Stampin' Up! unless otherwise noted):
Stamps: Party with Cake
Paper: Midnight Muse, Whisper White card stock; Oh My Stars Collection Kit (Bella Blvd)
Ink: Midnight Muse, Night of Navy marker
Accessories: Party Pop-Up Thinlits dies, Baby Boy mini pearls (Doodlebug Design), foam tape (3M), Scor-Tape (Scor-Pal)
Before we get to the pop-up, here is the front of the card. I love the bright colors and bold designs in the Oh My Stars Collection Kit -- they are perfect for birthday cards! For this card I chose a pattern with a dark blue background and colorful circles and layered it on a Midnight Muse card base.
Near the middle of the card I adhered another layer of Midnight Muse card stock, sized to go behind my focal layer with about a 1/4" border on all sides. I added a strip of yellow starred paper across the mat and then added my focal layer using foam tape. Since the paper is busy, I kept the embellishment simple and just added two blue pearls.
And now for the inside:
I wanted to mimic the idea of a white focal layer surrounded by color from the front of the card, so I made a two-tone pop-up insert (see tutorial below). For a simple embellishment, I took a scrap piece of the blue patterned paper and cut out several of the circles. I glued them around the speech bubble, making sure that some were "hanging off" the edge and leaving an open space at the bottom to write my message.
Here's a step-by-step breakdown of how I made the two-tone insert:
1. Cut the paper/card stock for the inside of your card to the desired size. (I left a 1/4" border on all sides of the inner layer.) Score the insert down the middle and die cut the speech bubble.
2. Trim the speech bubble from the rest of the paper by cutting along the score lines on the left and right sides of the bubble. (Save the speech bubble and all the cut-out letters to use on another card. I'll share the one I made in my next post.)
3. Choose a contrasting paper/card stock. Cut a piece slightly larger than the die, score the paper down the middle, and die cut the speech bubble.
4. Trim off the extra card stock at the top and bottom of the speech bubble by snipping from the side just to the score line on each side (for a total of four cuts). This will leave a long tab on each side of the speech bubble.
5. Fold the speech bubble on the score lines so the middle of the bubble pops up (mountain fold) and the tabs are pointed up (valley folds).
6. Place adhesive along the tabs and attach the speech bubble to the paper that will be inside the card. In this photo, the speech bubble and yellow starred paper are upside down so you can see the tabs, which are marked with red pencil.
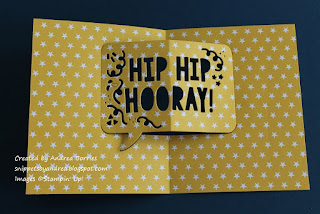
Here is the finished insert. Now it just needs to be adhered inside the card and, if desired, embellished.
I find that the easiest way to attach the insert is to place strong, double-sided adhesive with a liner, such as Scor-Tape, along all the edges and score lines. (Don't glue down the pop-up!) Without removing any of the liners, I fold the insert and place it inside the folded card base to get the desired placement. (Be sure the fold of the insert is fit snugly to the fold of the card base.) Once that's set, I remove the liner from one piece of tape along one of the sides of the card and adhere that edge to the card base. Then I open the card, remove the rest of the tape liners from only that side of the insert and carefully secure that side to the card base. With the card base still open, I fold just the insert closed and remove the rest of the tape liners. Keeping the insert folded, I close the card base on top of the insert and firmly rub to make sure all the tape is attached. That's it!
I hope my little tutorial was helpful. If you have any questions, please leave me a comment below. And remember to come back to see the card I made with the leftover die-cut pieces from this card. Thanks so much for stopping by today!


No comments:
Post a Comment