Friday, August 26, 2022

August Christmas cards: Simple winter scene

When I sat down to make my August Christmas cards, I had a rough idea of what I wanted to do. I made one card with that plan and decided that wasn't it. The card turned out okay (I added it to my Christmas card stash), but it just wasn't what I had pictured, and the process took me longer than I thought it would. So instead I went a completely different direction and ended up with a group of very clean and simple note cards featuring a little winter scene.

I used the Snow Front stamp set (Stampin' Up!) for the images and the Tiny Words Christmas set (Simon Says Stamp) for the little sentiment on the bottom. I think these watercolor-style scene-building sets are so fun, but I often have trouble putting the images together in a way I like. So for these cards I did an online search to get some ideas, and the card that most inspired me was made by Shelly Godby. I kept the placement of the mountains and trees but switched up the other elements a little -- and I especially loved the little red cardinal perched on the sentiment.

Once I decide on a layout, cards like this are very quick to stamp -- I simply choose one image (I started with the mountains) and stamp that on every card. Then I clean off that stamp and move to the next image. You could use a stamp positioner for the stamping if you want to, but I just used clear blocks because it was faster, and it didn't really matter if the placement was exactly the same on every card. With the stamping done, I simply added three sequins to each card for a subtle sparkle. (Well, they're not exactly sequins because they don't have a hole, but I'm not sure what the correct term is. Confetti? Anyway, actual sequins, or any other embellishment, would work just as well.)

I made ten of these cards, so I think that brings my total for the year up to 68 Christmas cards. Woohoo! I'll have to make a list of card recipients to be sure, but I shouldn't need too many more than that. So maybe I'll just do one more small batch in September and then be done. Of course, that's when a lot of the stamp companies start coming out with their new holiday products. Oh, well. If I end up buying any holiday goodies and not using them, they can be first up when I start the process over again in January!

Thanks for stopping by!


Thursday, August 25, 2022

Too cool for school

After my last post with the less-than-stellar pictures of some of my gel-print cards, I wanted to share a gel-print card with a good picture! :) And bonus - this gel print was one of my favorites, and I love how the card turned out, too.

Isn't that fun? I had been waiting to use this gel print because I wanted the "perfect" card for it. The colors made me think of an under the sea theme, so I decided to use the S'whale stamp set from Ellen Hutson. 

I stamped a few schools of fish around the edges of a Coastal Cabana (Stampin' Up!) card base. I die cut the gel print with a stitched rectangle die, matted it with a layer of black card stock, and then adhered it to the card base.

 
For the focal images, I stamped and die cut the whale and two more schools of fish and used foam tape to attach them to the gel print. I added three clear droplets to look like bubbles coming from the whale. To finish the card I stamped the punny sentiment "You are too cool for school" on a strip of white card stock and attached it below the whale.

Thanks for stopping by!

Gel print birthday cards

I've been trying to replenish my stash of birthday cards for awhile now, but it always seems like as soon as I make a few cards, I have to send a few out. I'm not really making a lot of progress. So last month I decided I was going to make a bunch of "quick" birthday cards using gel prints for backgrounds. I say "quick" because I have a hard time doing any crafty thing quickly; I always overthink the colors, die cuts, sentiments, etc., so it takes me a lot longer than I think it will to get anything done. But I finally did manage to finish a good batch of birthday cards.

I don't know why these photos are so washed out; they looked fine on my phone, and the colors in person are so vibrant. How frustrating.

I wasn't even going to post these photos because they look so bad, but since I had the post mostly done, I figured I'd just go ahead. At least you can see the layouts, so maybe that will be a little inspiration. (And next time I'll get out my camera to take photos and not try to save time with my phone.)

Anywho, I tried to get some variety in the cards, including a few masculine cards as well as a few kid-friendly ones. I think I used all different birthday dies and sentiments -- no matter how many birthday stamps and dies I have, I'm always looking for new and different styles. They're definitely what I use the most after some basic shapes dies.


I'm finally getting a good-sized birthday stash, but I need to keep going. I get hammered with birthdays in the fall (around a dozen in just October), and with holiday prep in full swing by that time, it's hard to focus on birthday cards. So I'll just keep plugging away!

Thanks for stopping by!


Wednesday, August 10, 2022

My first ICAD Challenge

This summer I tried a new (to me) creative challenge: the Index Card a Day (ICAD) Challenge. The goal of the challenge is to create something on an index card every day during the months of June and July, so 61 days total. Using an index card -- just a regular 3" x 5" or 4" x 6" office supply index card -- keeps your creative projects small, approachable, and less intimidating. You don't have to make something fancy or perfect or frame-able; you could practice lettering, make a collage of magazine cut-outs, scribble/draw with markers, whatever speaks to you.

The challenge includes daily prompts (a word or words to jump-start your creativity each day) and weekly themes (a big-picture concept, theme, or medium/material to explore for several days). You can use the prompt and theme together, pick one of them, or skip them altogether and do something completely different.

I didn't make it the whole 61 days of the ICAD Challenge. I got through all of June and the first few days July and then lost focus. I loved the idea and practice of making something every day, and some days I knew exactly what I wanted to do and it was great. Other days I would stare at my blank index card and feel stuck because I didn't know where to start. I thought about jumping back in a few times toward the end of July, but by then I'd lost my momentum.

I am proud of myself for making it through more than half of the challenge, though, especially since it was my first try. Maybe next year I'll try again and be more prepared. This year I learned about the challenge literally a day or two before it started and decided to do it on a whim. (Luckily, my sister had some index cards on hand.) Next year it might be fun to have a basket specifically for ICAD Challenge supplies so I can focus on using those items.

I also might reconsider posting my index cards on Instagram next year. I posted them this year, and while it's fun to share them and feel like part of a community, I always focus too much on the number of likes or comments I get or worry that what I make isn't good enough compared to what other people post. It's silly, I know, since the challenge isn't any sort of competition, but these are things I struggle with in general, not just in relation to the ICAD Challenge.

I couldn't talk about the ICAD Challenge and not share some of my creations. So here is a sampling of my index cards from the challenge (in no particular order):


Day 9. Prompt: Found. Theme: Collage, found paper, acrylics
. I cut up gel prints to make this collage, and I love how the darker spots on the "water" look like reflections of the sun and trees. The sentiment was made with alphabet stamps.


Day 33. Prompt: Quatrefoil or ogee.
I painted the index card with Ultra Gloss Air Dry Enamel, die cut the shapes from various gel prints and used a white paint pen to add accents.

Day 30. Prompt: Magical. I played around with a lot of different supplies for this card: Gelatos, Micron pens, white paint pen, silver Pearl Pen, stamps, ink, and silver foil card stock.

Day 22. Prompt: Pineapple. Theme: Patterns, murals, motifs, and/or wallpaper. I created this index card in a waiting room, so I couldn't do anything multi-media. I used markers to create a pattern inspired by the outside of a pineapple.

Day 34. I didn't use the prompt or theme for this card. I lightly sprinkled Color Burst powders on an index card and then spritzed it with water. When it was dry (I did have to blot some of the excess water) I used a paint pen to make the border and added two white butterflies. It's hard to see in the photo, but the little embellishments on the butterflies are perfect -- the colors match up, and the design in them even looks like the center of a butterfly.

Day 20. Another one with no prompt or theme. The strips that look like washi tape are made with Distress Crayons and a retired stamp set. The sentiment is stamped, and I used a Micron pen to draw the circles and dotted border.

Day 35. Prompt: Yellow. The background is made with stamps, and I punched the lemons and leaves out of gel prints. This was the last index card I made for the challenge.

Day 14. Prompt: Mood board. I think this is my favorite of all my index cards. I hadn't ever made or really used a mood board before, so I looked up some examples online, chose a theme and colors, and jumped in. I used five stamp sets (I think), and I added a little texture with burlap trim, a paper/bead flower, and a bit of washi tape.


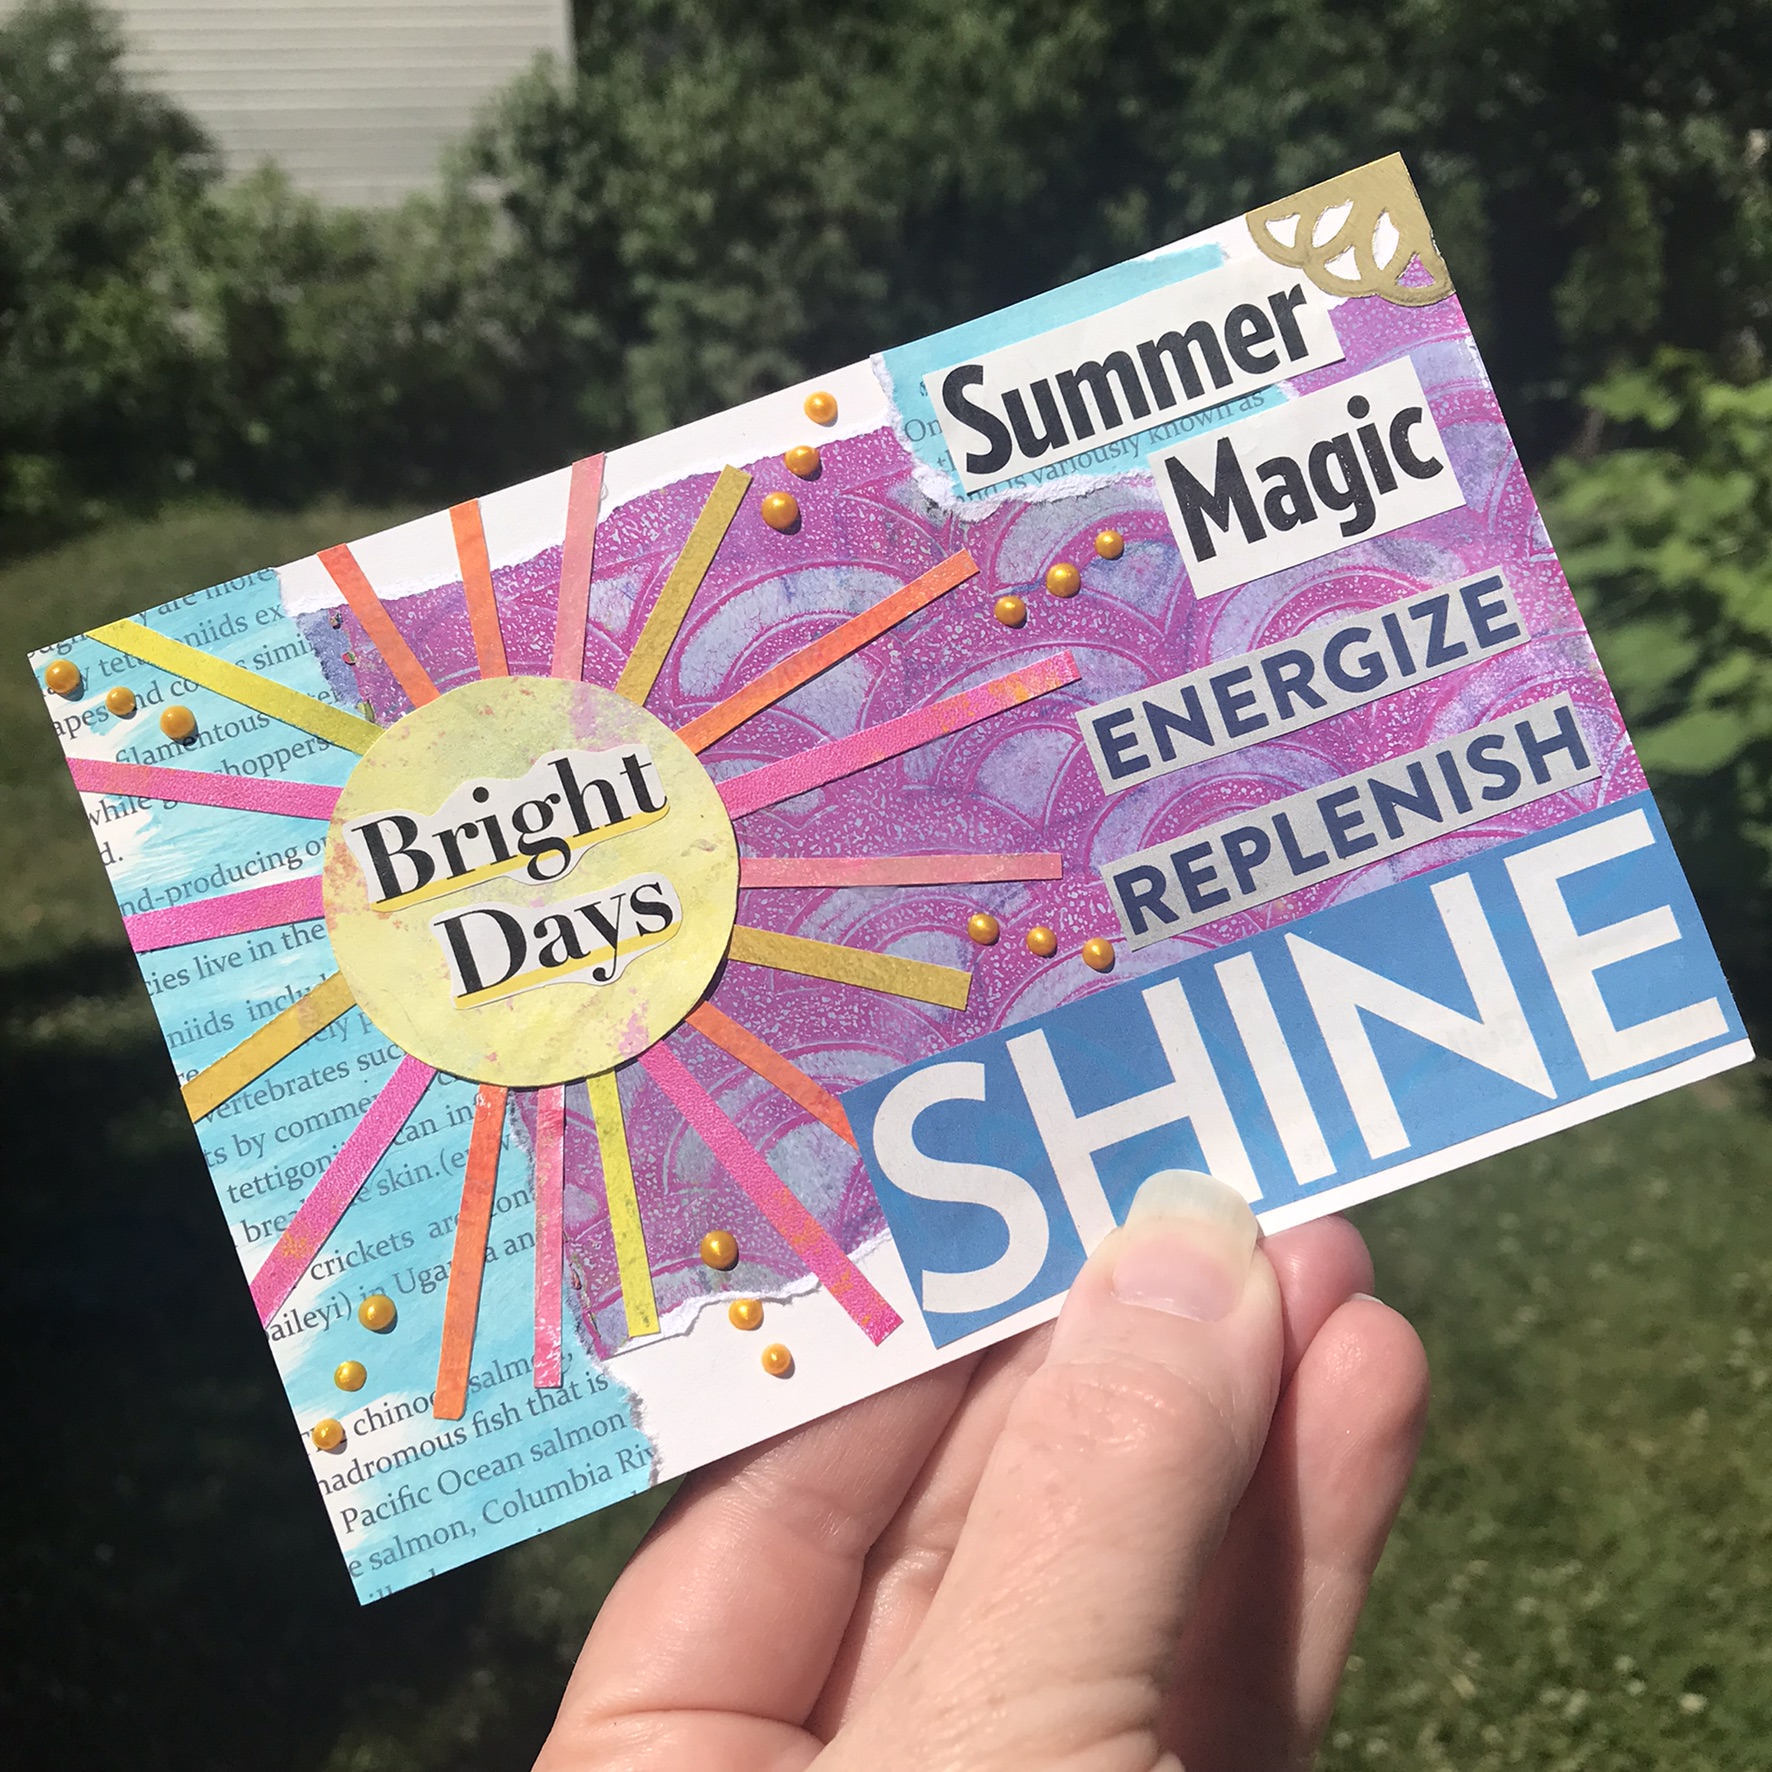
Day 21. Prompt: Solstice. Theme: Typography, found text, lyrics, poetry, lists. The purple background and sun are made with gel prints. The light blue pieces are bits of newsprint-style patterned paper that I painted with acrylic paint. The words are cut from magazines, and I added a tiny bit of gold doily in the corner and yellow dots (Pearl Pen) with the rays of the sun.


Well, there you have it. I did enjoy playing along with this challenge. I tried and learned new things, had fun, and got new ideas for card-making. I even ended up making a set of cards based on the tropical mood board index card to give to a friend. :) And maybe next year I'll be able to make even more!

Thanks for stopping by!


Sunday, July 31, 2022

Three card sets

I'm back to squeeze in one more blog post for July, and today I'm sharing three card sets (two of which I made quite awhile ago). Card sets are a fun way to try a card layout in different color combos or with different sentiments -- and they're a great item to have on hand for gift giving.


For this first set of cards, I used a rainbow-themed kit from Taylored Expressions. I know the kit is no longer available, but some of the individual products still may be around. I've also noticed that several stamp companies have similar rainbow stamps, dies, and/or stencils, so there are lots of options out there.

I started with light blue card bases and added a subtle background using a cloud stencil and the same color ink as the card stock. (I believe it's the retired Soft Sky from Stampin' Up!, which is one of my all-time favorite colors. It really is the perfect soft color for a sky, and I wish it was still available.) Then I die cut the rainbow out of six colors of card stock; I chose bright colors rather than the more traditional rainbow colors. I sorted out the different pieces, arranged them into six rainbows, and glued each rainbow to a card base.

I die-cut the clouds from white card stock and adhered one to each end of the rainbow using foam tape. Some of the clouds have a pierced border because the kit came with two different style cloud dies. I used both dies to cut my die-cutting time in half.

The sentiment stamps were shaped to fit over the top of the rainbow, so I just picked one sentiment for each card and stamped it in black ink. The final touch for each card was three clear droplets, which were perfect since they look like little drops of rain.


If you're looking for something a little more all-occasion, check out the second set of cards:


The starting point for this set was actually the washi tape (the colorful strips on the focal panels), which you could easily substitute with strips of card stock or patterned paper. I made this set for a friend who really likes washi tape, so I wanted to include it on these cards. I chose three styles of washi tape: a wide, colorful pattern; a narrow solid color; and a medium-width gold polka dot. For each focal panel, I placed a strip of each tape on a piece of white card stock and wrapped the ends around to the back. I stamped a sentiment above the strips and then tore off the top and bottom edges of the card stock.

For the card bases, I used thick white card stock and added splatters with gold watercolor paint. The paint does need a little time to dry, so you may want to create the bases first then set them aside and make the panels.

Using foam tape, I attached a focal panel to each card base near the right edge and slightly lower than center. To bring in one more metallic element, I finished off with a few gold sequins on each card.


The third card set I made on a when I was playing with watercolor paints this spring:

The colorful butterfly background on these cards was made with a watercolor resist pad from Brea Reese. It's an 8" x 8" pad of watercolor paper preprinted with white designs. When you apply paint to the paper, the design resists the paint and stays white. It's a fun and easy way to play with watercolor. You could even make your own resist paper by embossing a design on watercolor paper using embossing or watermark ink and white or clear embossing powder.

I used three colors of liquid watercolor and applied them very loosely, letting the colors do their thing and blend together in some spots. I blotted up the excess water and paint, and when the paper was dry I cut it into four 4" x 4" pieces and mounted each on a bright yellow card base. (The finished cards are about 4-1/4" square.) I added black die-cut butterflies (Stampin' Up!), a small strip sentiment (Simon Says Stamp), and a few sparkly sequins (Gina K Designs) to finish off each card.


 I used to make card sets often, and I always seemed to have a few on hand. I need to get back to making them regularly so I can replenish my stash.

Thanks for stopping by!