Tulips are one of my favorite flowers, so I couldn't pass up the Love Is Kindness stamp in the 2015 Occasions catalog from Stampin' Up! I used the stamp to make a few non-traditional valentines, and I love the yellow tulips. But for my next card, I wanted to leave the image mostly black and white, with just a pop of color.
Supplies (all Stampin' Up!):
Stamps: Love Is Kindness
Paper: Whisper White, Basic Black card stock
Ink: Memento Tuxedo Black ink pad; Old Olive, Real Red Stampin' Write markers
Accessories: Sweet Sadie washi tape, Brights Candy Dots, 1-3/8" circle punch, corner rounder, Dimensionals
What do you think? I used the tried-and-true spotlight technique to highlight just a few of the tulips and add a bit of Real Red and Old Olive to this clean layout.
The spotlight technique has been around for as long as I can remember, but I haven't tried it in ages. It's easy to do:
1. Using a line art image, stamp your focal image on your project.
2. Re-ink your stamp and stamp the image again on a separate sheet of card stock.
3. On the second image, choose what area you want to highlight and add color with markers, colored pencils, etc.
4. Punch out the colored area with a circle punch and use Dimensionals to adhere it over the original image.
That's really all there is to it. You could also try a variation, such as having more than one spotlight, using a different shape punch for the spotlight (imagine a heart for a wedding or anniversary card), or even solid images instead of line art. With solid images, you could stamp the first image using one color, then chose a different color for the spotlight portion.
Thanks for stopping by!
Tuesday, March 31, 2015
Saturday, March 28, 2015
A pair of lotus blossoms
Stampin' Up!'s annual Sale-a-Bration (SAB) promotion ends in just a few days, so I wanted to share two cards I've made with one of the popular SAB sets, Lotus Blossom.
Supplies (all Stampin' Up!):
Stamps: Lotus Blossom
Paper: Blackberry Bliss, Whisper White card stock; gold paper
Ink: Blackberry Bliss, Always Artichoke
Accessories: Fancy Fan embossing folder, Itty Bitty Accents punch pack, 1/8" gold ribbon, pearls, Dimensionals
The flower part of the Lotus Blossom set is actually a three-step image. You can stamp the flower with one, two, or three different colors. I used just one color of ink for the flower: Blackberry Bliss. I chose this color because it's dark enough to get three different tones. The first, most detailed, stamp is stamped with "full strength" ink. The second image is stamped once on scratch paper, then over the first image. The third, largest, image is stamped twice on scratch paper and then over the first two images. I think this deep purple looks great with gold, so I embellished the card with a piece of 1/8" gold ribbon tied around the card front and three gold flowers made with the Itty Bitty Shapes punch pack.
Supplies (all Stampin' Up!):
Stamps: Lotus Blossom
Paper: Lost Lagoon, Whisper White card stock
Ink: Lost Lagoon, Mossy Meadow
Accessories: Simply Scored tool, rhinestones
The lotus blossom is definitely the focal point of this clean and simple card. I again used just one color for the flower, this time Lost Lagoon. I wanted the flower to lean in from the right side of the card, so when I placed the stamp for the stem on the clear block, I shaped it into a curve.
The embossed border adds an elegant touch to this card, and it's easy to do. I just flipped over the stamped panel and used a stylus to score on the back of the card stock 1/4" away from each edge. (You also can make the border with the stamped panel facing up. In that case the border will be indented, or debossed, instead of raised.) For an extra detail, I stopped the embossed border from crossing over the flower stem. To do this, I used a pencil to lightly mark on the back of the card stock where the stem was. Then I simply skipped over that part when embossing.
The Lotus Blossom stamp set is perfect for making elegant but unfussy cards. These are actually the only two cards I've made with the set so far, so I'm looking forward to using it -- maybe with different greetings or different-colored flowers -- to make a set of note cards. Thanks for stopping by!
Supplies (all Stampin' Up!):
Stamps: Lotus Blossom
Paper: Blackberry Bliss, Whisper White card stock; gold paper
Ink: Blackberry Bliss, Always Artichoke
Accessories: Fancy Fan embossing folder, Itty Bitty Accents punch pack, 1/8" gold ribbon, pearls, Dimensionals
The flower part of the Lotus Blossom set is actually a three-step image. You can stamp the flower with one, two, or three different colors. I used just one color of ink for the flower: Blackberry Bliss. I chose this color because it's dark enough to get three different tones. The first, most detailed, stamp is stamped with "full strength" ink. The second image is stamped once on scratch paper, then over the first image. The third, largest, image is stamped twice on scratch paper and then over the first two images. I think this deep purple looks great with gold, so I embellished the card with a piece of 1/8" gold ribbon tied around the card front and three gold flowers made with the Itty Bitty Shapes punch pack.
Supplies (all Stampin' Up!):
Stamps: Lotus Blossom
Paper: Lost Lagoon, Whisper White card stock
Ink: Lost Lagoon, Mossy Meadow
Accessories: Simply Scored tool, rhinestones
The lotus blossom is definitely the focal point of this clean and simple card. I again used just one color for the flower, this time Lost Lagoon. I wanted the flower to lean in from the right side of the card, so when I placed the stamp for the stem on the clear block, I shaped it into a curve.
The embossed border adds an elegant touch to this card, and it's easy to do. I just flipped over the stamped panel and used a stylus to score on the back of the card stock 1/4" away from each edge. (You also can make the border with the stamped panel facing up. In that case the border will be indented, or debossed, instead of raised.) For an extra detail, I stopped the embossed border from crossing over the flower stem. To do this, I used a pencil to lightly mark on the back of the card stock where the stem was. Then I simply skipped over that part when embossing.
The Lotus Blossom stamp set is perfect for making elegant but unfussy cards. These are actually the only two cards I've made with the set so far, so I'm looking forward to using it -- maybe with different greetings or different-colored flowers -- to make a set of note cards. Thanks for stopping by!
Monday, March 23, 2015
Bunny basket tutorial
A few weeks ago I was out shopping, and I came across an adorable burlap bunny basket. I picked it up immediately and was sorely tempted to put it in my shopping basket. But then I thought about it: It was basically a fabric box with features stitched on. Pretty simple. Now, I haven't had enough practice with my sewing machine to attempt a fabric basket, but I could make something just as fun with paper, right? Of course!
I don't know about you, but I think they're pretty stinking cute. I used the Berry Basket die and Bow Builder punch from Stampin' Up! and just added a few extra details. They won't last as long as a fabric basket, but I'm okay with that. And this way I can have as many bunny baskets as I want.
Supplies (all Stampin' Up! except "Other items"):
Paper: Naturals White, Crumb Cake, Smoky Slate, Pink Pirouette card stock; Designer Series Paper (DSP) Patterns Stack - Brights (I used the retired version, but any DSP will work)
Ink: Project Life journaling pens
Accessories: Berry Basket die, Bow Builder punch, extra-large oval punch, Itty Bitty Accents punch pack, Ovals Collection Framelits dies, 1/16" hole punch, Neutrals Candy Dots, mini silver brads, Glue Dots, Mono Multi liquid glue, bone folder
Other items: Cotton balls, ruler, Easter grass or other basket filler
Ready to make your own bunny basket? Here are the steps I followed:
(Note: I did not include step-by-step instructions for assembling the basic basket or the bow. Check out the basket and bow videos from Stampin' Up! for more information.)
Step 1. Cut a 1/2" strip off the long side of an 8-1/2" x 11" piece of Crumb Cake card stock. Save the strip for the handle of the basket. (You can also use the extra strips from the Berry Basket die, but I wanted a longer handle.) Cut the remaining piece of card stock in half to 8" x 5-1/2". This is just big enough for the Berry Basket die.
Step 2. Die cut each 8" x 5-1/2" piece of card stock with the Berry Basket die. You will use either the scalloped strips or the straight strips for the top edge of the basket; you can use one of the remaining strips as a handle (if you didn't cut the extra strip in Step 1) or set them aside for another project.
Step 3. On one of the basket pieces, use a black marker to make a small dot about 5/16" above the middle slot. Using the dot as the center, draw three whiskers on each side. You can use a ruler or draw them freehand.
Step 4. Use the Itty Bitty Accents punch pack to punch a heart out of Pink Pirouette card stock. Use Glue Dots to adhere the heart to the center of the whiskers. Add two Candy Dots for eyes.
Step 5. Assemble the Berry Basket. I used Mono Multi liquid glue, but you could also use a strong, permanent tape, such as Sticky Strip, or a mini stapler.
Step 6. Use the second-smallest oval from the Ovals Collection Framelits dies to cut out two Crumb Cake ovals. Use the extra-large oval punch to punch out two Pink Pirouette ovals. Glue the smaller ovals onto the larger ones, aligning them near the bottom, to make the ears.
Step 7. With a bone folder, use a motion similar to curling ribbon to slightly curl up the tops of the ears.
Step 8. Glue the ears to the basket behind the face. Use the slots in
the basket as a guide for spacing the ears; I centered each ear over the
outer slots.
Step 9. Make a bow with the Bow Builder punch and DSP. Use Glue Dots to adhere the bow to the basket either by the ears (for a girl) or under the nose (for a boy).
Step 10. Punch a 1/16" hole in each end of the handle and near the top of the left and right sides of the basket.
Step 11. Use mini silver brads to attach the handle to the basket. If you do not want the handle to be moveable, you can attach it with strong adhesive or a mini stapler instead of using brads.
Step 12. Glue a cotton ball to the back of the basket for a tail.
And there you have it! I added some Easter grass to my basket, but you could use a fringe scissors to make your own filler or crumple pieces of tissue paper. I will be filling my baskets with mini seed-growing kits and a few pieces of candy. For heavier items, you could make your baskets with coaster board or chipboard so they are sturdier.
Here are my twelve baskets:
This must be what you get when you leave two bunny baskets alone for too long!
I want to make tags for my baskets, too, but I'll have to share those later. I was too excited to post this tutorial to wait for the tags. Thanks for stopping by!
I don't know about you, but I think they're pretty stinking cute. I used the Berry Basket die and Bow Builder punch from Stampin' Up! and just added a few extra details. They won't last as long as a fabric basket, but I'm okay with that. And this way I can have as many bunny baskets as I want.
Supplies (all Stampin' Up! except "Other items"):
Paper: Naturals White, Crumb Cake, Smoky Slate, Pink Pirouette card stock; Designer Series Paper (DSP) Patterns Stack - Brights (I used the retired version, but any DSP will work)
Ink: Project Life journaling pens
Accessories: Berry Basket die, Bow Builder punch, extra-large oval punch, Itty Bitty Accents punch pack, Ovals Collection Framelits dies, 1/16" hole punch, Neutrals Candy Dots, mini silver brads, Glue Dots, Mono Multi liquid glue, bone folder
Other items: Cotton balls, ruler, Easter grass or other basket filler
Ready to make your own bunny basket? Here are the steps I followed:
(Note: I did not include step-by-step instructions for assembling the basic basket or the bow. Check out the basket and bow videos from Stampin' Up! for more information.)
Step 1. Cut a 1/2" strip off the long side of an 8-1/2" x 11" piece of Crumb Cake card stock. Save the strip for the handle of the basket. (You can also use the extra strips from the Berry Basket die, but I wanted a longer handle.) Cut the remaining piece of card stock in half to 8" x 5-1/2". This is just big enough for the Berry Basket die.
Step 2. Die cut each 8" x 5-1/2" piece of card stock with the Berry Basket die. You will use either the scalloped strips or the straight strips for the top edge of the basket; you can use one of the remaining strips as a handle (if you didn't cut the extra strip in Step 1) or set them aside for another project.
Step 3. On one of the basket pieces, use a black marker to make a small dot about 5/16" above the middle slot. Using the dot as the center, draw three whiskers on each side. You can use a ruler or draw them freehand.
Step 4. Use the Itty Bitty Accents punch pack to punch a heart out of Pink Pirouette card stock. Use Glue Dots to adhere the heart to the center of the whiskers. Add two Candy Dots for eyes.
Step 5. Assemble the Berry Basket. I used Mono Multi liquid glue, but you could also use a strong, permanent tape, such as Sticky Strip, or a mini stapler.
Step 6. Use the second-smallest oval from the Ovals Collection Framelits dies to cut out two Crumb Cake ovals. Use the extra-large oval punch to punch out two Pink Pirouette ovals. Glue the smaller ovals onto the larger ones, aligning them near the bottom, to make the ears.
Step 7. With a bone folder, use a motion similar to curling ribbon to slightly curl up the tops of the ears.
Step 9. Make a bow with the Bow Builder punch and DSP. Use Glue Dots to adhere the bow to the basket either by the ears (for a girl) or under the nose (for a boy).
Step 10. Punch a 1/16" hole in each end of the handle and near the top of the left and right sides of the basket.
Step 11. Use mini silver brads to attach the handle to the basket. If you do not want the handle to be moveable, you can attach it with strong adhesive or a mini stapler instead of using brads.
Step 12. Glue a cotton ball to the back of the basket for a tail.
And there you have it! I added some Easter grass to my basket, but you could use a fringe scissors to make your own filler or crumple pieces of tissue paper. I will be filling my baskets with mini seed-growing kits and a few pieces of candy. For heavier items, you could make your baskets with coaster board or chipboard so they are sturdier.
Here are my twelve baskets:
This must be what you get when you leave two bunny baskets alone for too long!
I want to make tags for my baskets, too, but I'll have to share those later. I was too excited to post this tutorial to wait for the tags. Thanks for stopping by!
Thursday, March 19, 2015
Make-your-own-card kits
Do you need a quick little gift for a crafty friend, family member or coworker? What about a make-your-own-card kit?
Supplies (all Stampin' Up!):
Stamps: Teeny Tiny Wishes
Paper: Crumb Cake note cards and envelopes, All Abloom Designer Series Paper (DSP) Stack, Crumb Cake card stock
Ink: Memento Tuxedo Black; Daffodil Delight and Strawberry Slush ink refills
Accessories: Simply Pressed Clay, Buttons & Blossoms Simply Pressed Clay molds, Note Tag punch, mini clothespins, Blushing Bride 1/4" cotton ribbon, Island Indigo 1/4" cotton ribbon, Daffodil Delight seam binding ribbon, Mossy Meadow stitched satin ribbon, Mono Multi liquid glue, 6" x 8" cellophane bags
These card kits were easy to assemble with supplies I already had on hand. Each kit includes:
I arranged all the items in a cellophane bag and closed it with a coordinating tag and clothespin. The recipient just needs to provide adhesive and a scissors. What a fun little gift! To make it more personal, you could write a greeting or the recipient's name on the tag; I chose to leave the tags generic so the recipients could adhere them to one of the cards if they desired.
Thanks for stopping by!
Supplies (all Stampin' Up!):
Stamps: Teeny Tiny Wishes
Paper: Crumb Cake note cards and envelopes, All Abloom Designer Series Paper (DSP) Stack, Crumb Cake card stock
Ink: Memento Tuxedo Black; Daffodil Delight and Strawberry Slush ink refills
Accessories: Simply Pressed Clay, Buttons & Blossoms Simply Pressed Clay molds, Note Tag punch, mini clothespins, Blushing Bride 1/4" cotton ribbon, Island Indigo 1/4" cotton ribbon, Daffodil Delight seam binding ribbon, Mossy Meadow stitched satin ribbon, Mono Multi liquid glue, 6" x 8" cellophane bags
These card kits were easy to assemble with supplies I already had on hand. Each kit includes:
- Four 3-1/2" x 5" Crumb Cake note cards and envelopes
- Four pieces of 3" x 4-1/2" All Abloom DSP. I used the leftover 1/2" strips to decorate the tags and clothespins.
- Six buttons/flowers made with Simply Pressed Clay
- Two pieces of coordinating ribbon (I think I measured two feet of each ribbon). I wrapped the ribbons around a small scrap of white card stock rolled into a tube.
I arranged all the items in a cellophane bag and closed it with a coordinating tag and clothespin. The recipient just needs to provide adhesive and a scissors. What a fun little gift! To make it more personal, you could write a greeting or the recipient's name on the tag; I chose to leave the tags generic so the recipients could adhere them to one of the cards if they desired.
Thanks for stopping by!
Tuesday, March 17, 2015
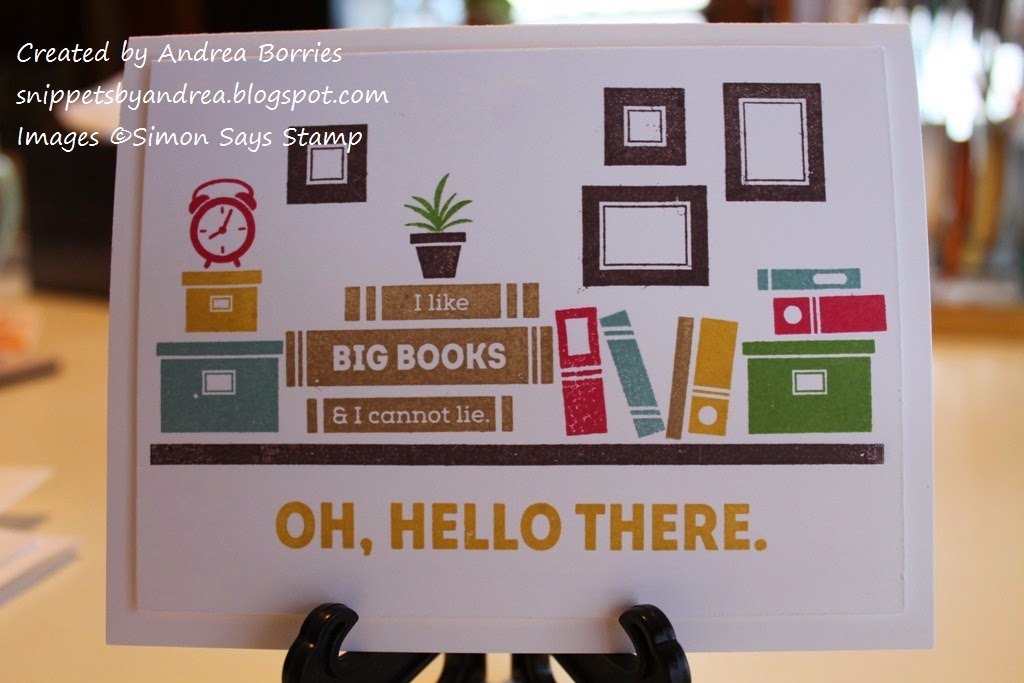
Oh, hello there
I ordered the stamp set To Thine Own Shelf a few weeks ago from Simon
Says Stamp, and the day it arrived I had to make a card:
Supplies (all Stampin' Up! unless otherwise noted):
Stamps: To Thine Own Shelf (Simon Says Stamp)
Paper: Whisper White card stock
Ink: Chocolate Chip, Baked Brown Sugar, Lost Lagoon, Gumball Green, Hello Honey, Real Red
Accessories: Dimensionals
This card makes me so happy, and I smile every time I look at it. (I also start singing "Baby Got Back," but that's a topic for another post.) I'm really pleased with how this card turned out -- except for the stray ink around the picture frames; I must have had some fuzzies stuck on the stamps -- and since the images and colors provide plenty of visual interest, I decided not to include any embellishments.
I had the perfect recipient in mind as I made this card, so it was off in the mail a few days later. Thanks for stopping by!
Supplies (all Stampin' Up! unless otherwise noted):
Stamps: To Thine Own Shelf (Simon Says Stamp)
Paper: Whisper White card stock
Ink: Chocolate Chip, Baked Brown Sugar, Lost Lagoon, Gumball Green, Hello Honey, Real Red
Accessories: Dimensionals
This card makes me so happy, and I smile every time I look at it. (I also start singing "Baby Got Back," but that's a topic for another post.) I'm really pleased with how this card turned out -- except for the stray ink around the picture frames; I must have had some fuzzies stuck on the stamps -- and since the images and colors provide plenty of visual interest, I decided not to include any embellishments.
I had the perfect recipient in mind as I made this card, so it was off in the mail a few days later. Thanks for stopping by!
Subscribe to:
Posts (Atom)