Wednesday, May 30, 2012

Birthday banner

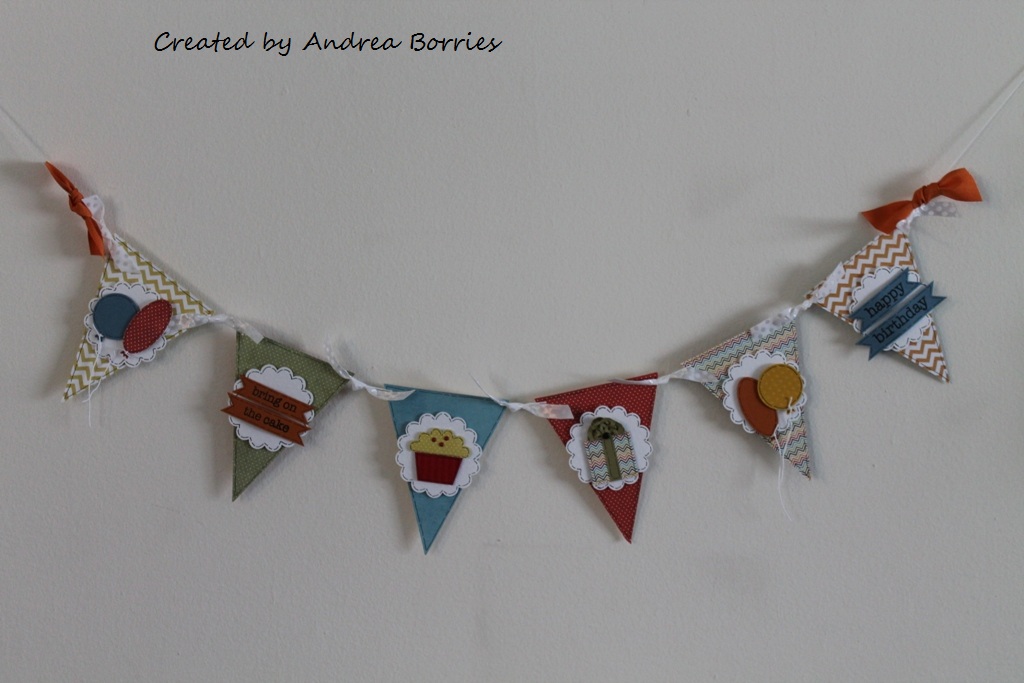
Banners are a quick and easy way to decorate for a special occasion. And if you make your own banner, you can also customize it to match a certain color combo, to coordinate with a party theme or to include the recipient's name. Here is a birthday banner I made a few weeks ago.

Supplies (all Stampin' Up!® unless otherwise noted):
Stamps: Essential Messages (Hero Arts)
Card stock: On the Bright Side - One 6" x 6" designer paper pad (My Mind's Eye); Salt, Papaya Puree Dark, Honey (Bazzill); Manila Card Blue (The Paper Company); red, green (unknown)
Ink: Jet Black StazOn, fine-tip black pen (Sharpie)
Accessories: Scallop circle punch, 1/16" hole punch, 1/4" punch (unknown), Owl Builder punch, oval punch, 1-1/4" circle punch, 1-1/4" square punch, Lace Ribbon Border punch, Perfect Pennant Bigz die, black glitter brads and 3 mm red brads (unknown), white crochet thread (DMC), white polka dot ribbon (unknown), orange grosgrain ribbon (American Crafts Elements ribbon - Funhouse), paper crimper (Fiskars), Dimensionals, Tombow Mono Multi liquid glue

To make each balloon, I used a circle or oval punch to create the basic shape. With the Owl Builder punch, I punched out the owl's foot from the same card stock and glued it behind the bottom of the balloon to make the "tail."

For the greetings, I stamped the words on strips of card stock and used a square punch to create the notch at each end.
Using a fine-point black pen, I made faux stitched lines around each pennant, scalloped circle and focal image.

To make the bow on the present, I punched a strip of card stock with the Lace Ribbon Border punch. I cut out two of the flower shapes from the punched strip, crumpled them a bit, folded them in half and attached them to the present with a brad.

To assemble the banner, I punched a 1/16" hole in the top two corners of each pennant and threaded crochet thread through the holes. Tip: Don't cut the thread off the skein until you have all the pennants attached and spaced the way you want them. And remember to leave some extra thread on each end to hang the banner.

Between each of the pennants I tied a small piece of ribbon to keep them separated.

I haven't used this banner yet, but I think I'm going to save it for October. Then I'll probably just leave it up the entire month since our family has one birthday after another! Thanks for stopping by!

Monday, May 28, 2012

Next shipment of cards for OWH

Happy Memorial Day! I didn't have any big beginning-of-summer plans this weekend, but I did spend a good chunk of my day today getting ready to send my next shipment of cards to Operation Write Home (OWH).


I went through all the cards I've made in the last few months and picked out forty in various themes (thank you, birthday, miss you, etc.). Then I put finishing touches on them -- making sure the dark card bases had lighter card stock layers inside for writing, writing "Operation Write Home" on the back, etc. -- and boxed them up. They're ready to drop in the mail tomorrow after work!

While putting together this package of cards, which will be shipped to troops overseas, wasn't exactly the most exciting way to spend my Memorial Day, it definitely was worthwhile and meaningful. Thanks for stopping by!

Sunday, May 27, 2012

How sweet

What's a birthday without a treat -- or two or three? Today I made three birthday cards that all feature some sweet treats.

Supplies (all Stampin' Up!® unless otherwise noted):
Stamps: Guilty Pleasures (Raisin Boat), Bring on the Cake
Card stock: So Saffron, Very Vanilla, Chocolate Chip
Ink: Chocolate Chip pad; Close to Cocoa, Chocolate Chip, So Saffron, Riding Hood Red markers; Signo white gel pen
Accessories: 2-1/2" circle punch, large scallop circle punch, Riding Hood Red pleated satin ribbon, polka dots embossing folder (Cuttlebug), paper piercer, Dimensionals

I stamped and colored this slice of cake three times before I was happy with the result. I wanted something that looked at least somewhat realistic, so I finally just went with my favorite combo: yellow cake with chocolate frosting. Yum. I even colored the whip cream with a white gel pen to make it stand out a bit against the vanilla card stock.

Supplies (all Stampin' Up! unless otherwise noted):
Stamps: Guilty Pleasures (Raisin Boat)
Card stock: Chocolate Chip, Whisper White, Cherry Cobbler
Ink: Basic Black, Chocolate Chip pads; Close to Cocoa, Chocolate Chip, Cherry Cobbler, Crumb Cake markers
Accessories: Cherry Cobbler seam binding ribbon, Dimensionals

After I stamped, colored and cut out these candy boxes, I wasn't exactly sure what to do with them. I eventually settled on this layout. It's okay, but I'm not completely happy with it. I think there should be something in the empty space in the top, but I couldn't decide what. So rather than end up with something I really didn't like, I decided to leave well enough alone.

Supplies (all Stampin' Up! unless otherwise noted):
Stamps: Guilty Pleasures (Raisin Boat)
Paper: Chocolate Chip, Very Vanilla card stock; Designer Series Paper (DSP) Patterns Pack - In Color
Ink: Chocolate Chip pad; Peach Parfait, Concord Crush, Pear Pizzazz, Blush Blossom, Poppy Parade markers
Accessories: Dimensionals, Tombow Mono Multi liquid glue

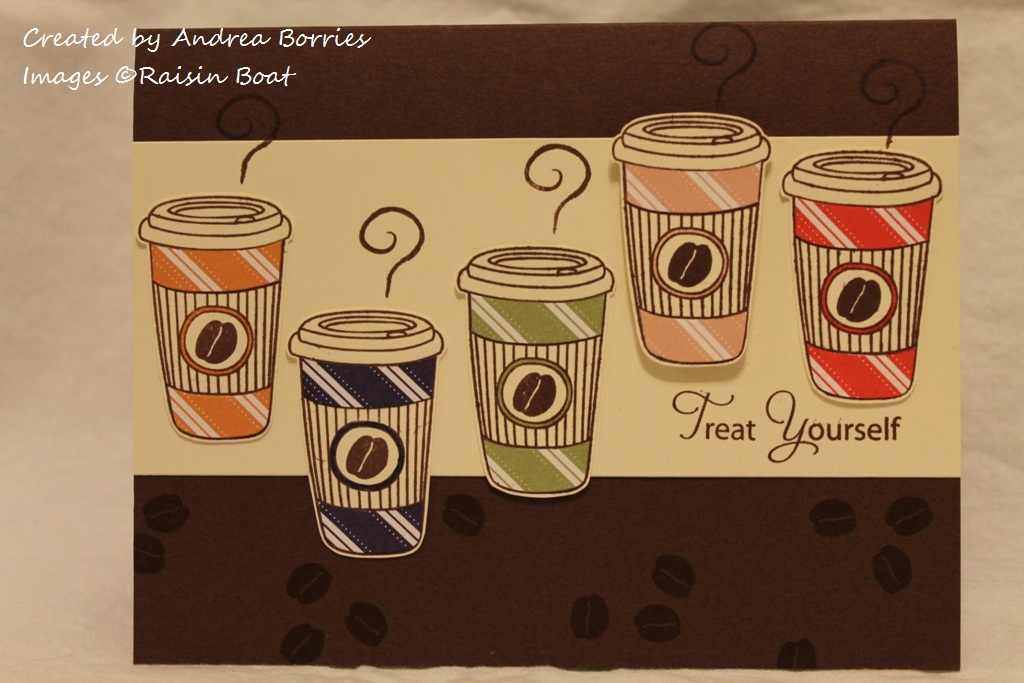
I know coffee isn't necessarily a sweet treat, but I'm not really a coffee drinker, so I prefer it loaded with whip cream and caramel. About as sweet as you can get. Anyway, to make the coffee cups, I stamped them on vanilla card stock and then on the different colors of DSP. I cut out the pieces for the top and bottom of the cup from each piece of DSP and glued them onto the images stamped on Very Vanilla.

Although I stamped birthday greetings on the inside of each of these cards, the last two would also be great for other occasions: congratulations, thank you, or even a little pick-me-up. Thanks for stopping by!

Friday, May 25, 2012

Matching card and envelope

When I make cards, I rarely decorate the envelopes. Don't get me wrong, I think matching envelopes are adorable and the perfect finishing touch to a hand-made card. I just would rather spend time focusing on the card, since the envelope will probably get tossed. (I think I may be the only person who saves the envelopes with the cards.) But the ultimate way to get an envelope to coordinate with a card is just to make your own.

Supplies:
Stamps: Garden Variety (Unity Stamp Co.)
Card stock: Natural Ivory (The Paper Company), light green (unknown), Early Bird: Brunch patterned paper (Cosmo Cricket)
Ink: Not Quite Navy, Baja Breeze, Lucky Limeade markers (Stampin' Up!); VersaMark pad (Tsukineko)
Accessories: 1-3/4" circle, 2-3/8" scallop circle, corner rounder, Itty Bitty Shapes punches (Stampin' Up!); Fun House Elements ribbon (American Crafts); Mini Pearls - Baby Blue Assortment (Doodlebug Design Inc.); Simply Scored Tool and Diagonal Plate (Stampin' Up!); Mini Glue Dots; Dimensionals (Stampin' Up!); 1/8: Scor-Tape (Scor-Pal)

This is a 3" x 3" card, which is the perfect size to include in a gift, leave on a desk or tuck into a lunch bag or briefcase. To make the stamped image, I used three markers to color directly on the rubber stamp. Then I stamped the image and punched it out. To accentuate the flower centers, I stamped the image again, punched out the centers, adhered them to the main image with Dimensionals and added mini pearls. I added a scalloped circle behind the image, tied a piece of blue ribbon around the card front and adhered the focal image to the card with Dimensionals.

I do have a supply of envelopes for 3" x 3" cards, and that would have worked just fine. But I really like this floral patterned paper, so I thought it would be fun to make a matching envelope. Plus, because the paper is two-sided, there is a cute pattern on the inside of the envelope, too. I used the Simply Scored Tool and Diagonal Plate from Stampin' Up!® to make the envelope, and it was really quick and easy. (The Diagonal Plate comes with instructions for making envelopes in a few different sizes.) I also adhered a circle of Natural Ivory card stock to the front of the envelope so there was space to write the recipient's name.

This project inspires me to make more coordinating envelopes. I've got enough patterned paper to make a mighty tall stack of them ...Thanks for stopping by!

Wednesday, May 23, 2012

Cute cars

I just have a short post today to share a couple of cards I made with some new stamping goodies.

Supplies (all Stampin' Up!® unless otherwise noted):
Stamps: Off to Party (Raisin Boat)
Card stock: Cool Caribbean, Gumball Green, Summer Starfruit, Whisper White, Basic Black
Ink: Pacific Point, Basic Black, Basic Gray
Accessories: 2-1/2" circle punch, Cupcake Builder punch, Dimensionals, Tombow Mono Multi liquid glue

I think this is an adorable stamp set, and it includes several different sayings for the license plate and accessories for the luggage rack. (The one thing that's missing from the set is a head -- or I suppose the back of the head -- of a driver. Right now the car's driving itself.) For my first card with this set, I put together a little driving-off-into-the-sunset scene. It's a fun birthday card suitable for just about anyone. I do think I should have trimmed the strip of Basic Black card stock so it was even narrower at the top to improve the perspective. 

Supplies (all Stampin' Up! unless otherwise noted):
Stamps: Off to Party, Off to the Lake (both Raisin Boat)
Card stock: Midnight Muse, Garden Green, Whisper White
Ink: Midnight Muse, Garden Green, Riding Hood Red, Daffodil Delight, Basic Gray, Basic Black, Chocolate Chip, Creamy Caramel
Accessories: Dimensionals, Tombow Mono Multi liquid glue

For this card I used the same stamp set as in the previous card and combined it with stamps from a related set. I'm not sure what occasion I'll use this card for, but I really like the way it turned out. Who could resist this bear just innocently hanging out in the car? (It makes me think of the summer vacations my family used to take. We did actually see bears on occasion, but to the best of my knowledge, none of them ended up in our car.) But I think my favorite parts are the night sky and the trees in the background -- they add detail without detracting from the focal image of the car.

Thanks for stopping by!