Friday, October 30, 2020

October Christmas card: Nordic simplicity

I wasn't sure if I was going to make any Christmas cards this month. I already had most (if not all) of the cards I needed, and it's still hard for me to focus on card-making. But when I received the October My Monthly Hero kit, I loved the Nordic-style images and wanted to make a few clean and simple cards.

Supplies:
Kit: October 2020 My Monthly Hero kit (Hero Arts)
Paper: Crumb Cake note cards and envelopes, Whisper White card stock (Stampin' Up!); Gold Mirri Sparkle Paper (The Paper Cut)
Ink: Old Olive, Real Red, Crumb Cake (Stampin' Up!); Sugar Cube (Taylored Expressions)
Accessories: Jute twine (May Arts Ribbon), Confetti Star Border Punch (Stampin' Up!), Art Glitter Glue (Art Institute)

These are note cards (3-1/2" x 5"), so they are smaller than standard A2 cards, but I think this size is perfect for these smaller images. And there are so many images to choose from in this kit! For the front of my card design I decided to use a tree, the two reverse-image deer, and a tulip-style flower.

I stamped the images in a line directly on the front of the card using Real Red, Old Olive, and Crumb Cake inks. (I thought about stamping on a layer of white card stock to adhere to the card front, but I really wanted to make a single-layer card design.) Using Sugar Cube ink, which is so far my favorite white pigment ink, I stamped a sentiment directly below the images.

To keep with the natural feel of the design, I used jute twine to make a bow, which I glued just below the sentiment. I played around with the idea of adding sequins, but since this layout is symmetrical, I thought scattering sequins would make it feel off-balance. So instead I added a tiny punched gold star to the top of the tree.

Inside the card I did add a layer of white card stock. I stamped the sentiment using Crumb Cake ink, a flower/snowflake in Real Red, and two branches in Old Olive. I love that little pop of color.

Well, now that my cards are all made, I need to get busy on some other holiday projects! Thanks for stopping by!


Saturday, October 24, 2020

Halloween roundup

The weather may feel a bit more like Christmas around here, but Halloween is next weekend. I don't do a lot of celebrating, even during non-pandemic times, but it's fun to put out a few decorations, carve a pumpkin, and maybe watch a suspenseful movie or two. To help you get in the spirit, here are a few not scary Halloween cards.

Supplies:
Stamps: Autumn Owl Cubbies (Art Impressions)
Paper: Whisper White, Night of Navy, Garden Green, Crushed Curry, Sahara Sand card stock (Stampin' Up!)
Ink: Memento Tuxedo Black (Tsukineko); colored pencils - PC1003 Spanish Orange, PC918 Orange, PC916 Canary Yellow, PC930 Magenta, PC932 Violet, PC905 Aquamarine, PC912 Apple Green, PC908 Dark Green, PC1084 Ginger Root, PC943 Burnt Ochre, PC941 Light Umber, PC947 Dark Umber, PC935 Black (Prismacolor)
Accessories: Spooky Fence die (Amuse Studio), Grassy Border Lawn Cuts die (Lawn Fawn), 1" circle punch (Stampin' Up!), Sparkle Silk (Fun Stampers Journey), Gamsol (Gamblin), blending stumps (Jack Richeson), Art Glitter Glue (Art Institute), foam tape (3M)

This was definitely my most elaborate card. It wasn't hard -- the dies that come with the stamp set cut out the owls and tree, including all the openings -- but it was a lot of coloring. I didn't spend too much time on shading or realistic coloring and instead dressed up the owls in bright colors. I die cut all the pieces and glued the owls around the tree and pumpkins.

For the card base I used Night of Navy card stock and splattered it with Sparkle Silk to create the look of a starry sky. To set the rest of the scene I added a layer of die-cut grass, a picket fence, a bright full moon, and a few hand-cut clouds. I stamped the sentiment "Hey pumpkin" in the bottom right corner and added the pumpkins and owls with foam tape.

Supplies:
Stamps: Hey Boo, Haunts & Harvest (Gina K Designs)
Paper: Whisper White, Basic Black card stock (Stampin' Up!)
Ink: Smokey Slate (Stampin' Up!), Memento Tuxedo Black (Tsukineko), W1 marker (Copic)
Accessories: Haunts & Harvest dies (Gina K designs), Dimensionals (Stampin' Up!)

I love the scripty greetings on these cards, so I combined them with several type-style sentiments to make the backgrounds. It took a little practicing to get the placement right, but I really like how they turned out. For the focal images, I stamped and die cut a group of ghosts and two clusters of bats for each card. I used a very light gray alcohol marker to add a hint of shading to the ghosts and adhered the pieces with Dimensionals.

Supplies:
Stamps: Halloween Scene Background, September 2020 My Monthly Hero kit (Hero Arts); Happy Haunting (Essentials by Ellen)
Paper: Pumpkin Pie, Whisper White, Basic Black card stock (Stampin' Up!)
Ink: VersaMark, Memento Tuxedo Black (Tsukineko); Candy Corn, Lime Zest, Plum Punch (Taylored Expressions)
Accessories: Opaque Bright White Super Fine embossing powder (WOW! Embossing Powder), Happy Haunting dies (Essentials by Ellen), blender brushes (Taylored Expressions), foam tape (3M)

For these cards, I used the same stamps and layout, and just changed the background technique. With the first two cards, I embossed the background stamp on black card stock using white embossing powder and left it at that. For the second pair, I used an embossed resist technique. I embossed the image on white card stock with white embossing powder and used blender brushes to apply three ink colors to the panel. I finished all of the cards by adding a sentiment banner and two die-cut ghosts.

Supplies:
Stamps: Halloween Scene Background (Hero Arts), Happy Haunting (Essentials by Ellen)
Paper: Whisper White, thick Whisper White, vellum, Rich Razzleberry card stock (Stampin' Up!); Royal Ultra White Felt watercolor card stock (The Paper Cut)
Ink: VersaMark (Tsukineko); Rich Razzleberry (Stampin' Up!); gansai Tambi watercolor paints - 33 Cadmium Orange, 37 Purple, 51 Sap Green Light (Kuretake)
Accessories: Happy Haunting dies (Essentials by Ellen), Large Stitched Rectangle Stackables (Lawn Fawn), Jumbo Tag dies (The Stamp Market), Clear Shimmer Spray (Avery Elle), Halloween Nights enamel dots (Stampin' Up!), white embossing powder (Hero Arts), Art Glitter Glue (Art Institute), foam tape (3M)

I needed to make a Halloween birthday card, so I decided to use this layout again. This time I embossed the background image on watercolor paper. I applied water to the paper and then dabbed on purple, green, and orange paint. The colors didn't blend together as much as I had hoped, but I still think it's a fun background. Once it was dry, I die-cut the panel with a stitched rectangle die, spritzed it with shimmer spray, and adhered it to a white card base.

I wanted to use "happy boo-thday" as my sentiment, so I needed to get creative. I looked through my word dies and found the Jumbo Tag dies from The Stamp Market (which I've had forever and never used). There are a collection of sentiments, including "happy birthday" and "for you". The "for you" is the same size as the "birthday," so I die cut both sentiments and just used the two Os from "for you" in place of the IR in "birthday." (I created the hyphen by snipping off part of an R.) I glued the letters to a piece of vellum card stock so they would stand out a bit more against the background. I added two ghosts (also spritzed with shimmer spray) and finished the card with two enamel dots.

Thanks for stopping by, and I hope you have a spook-tacular Halloween!


Tuesday, October 20, 2020

Collection of autumn cards

About two weeks ago we had beautiful sunny skies and temps in the 70s and even low 80s. Now it's snowing, and there is talk about getting 3" to 5". I don't think much of it will stick for long, though, since it's supposed to be in the 40s and rainy later this week.(At least I hope it doesn't because I still need to rake the leaves.) That's Minnesota weather for you, so I can't say I'm surprised. But this year, snow in October is just a little too much. Sigh.

Today I'm going to try to push aside thoughts of winter and stay focused on autumn by sharing the fall cards I've made. I have quite a few pictures, so I won't spend too much time about all the details. If you have any questions, just leave a comment, and I'll respond as soon as I can.

Supplies (all Stampin' Up! unless otherwise noted):
Stamps: Beautiful Autumn, Wild at Heart (Gina K Designs)
Paper: Very Vanilla, thick Very Vanilla, Crumb Cake, Early Espresso card stock; Gilded Autumn Specialty Designer Series Paper (DSP)
Ink: Early Espresso, Crumb Cake, Crushed Curry, Cajun Craze, Soft Suede, Mint Macaron
Accessories: Linen thread, Autumn Punch Pack, Wreath Builder Template (Gina K Designs), Copper Glimmer Metallic Ink (Hero Arts), sequins (Paper Pumpkin leftovers), Dimensionals, Mini Glue Dots, Art Glitter Glue (Art Institute), foam tape (3M)

These are the first two -- and so far only -- cards that I made with the Gilded Autumn Suite from Stampin' Up!. For the card on the right I stamped and punched out several leaves and acorns. I arranged them in a border along the right edge of a vanilla card base and added a stamped sentiment.

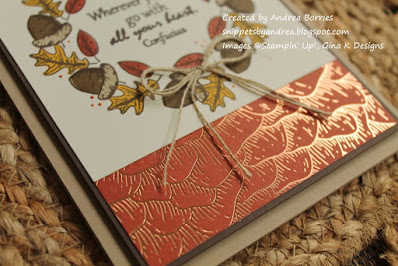
For the card on the left, I used the acorn and two leaf images with the Wreath Builder Template to create an autumn wreath. I added metallic accents by dipping a toothpick in copper ink and making dots around the wreath. I added a strip of DSP below the wreath, stamped a sentiment in the center, and glued a linen thread bow at the bottom.

Supplies:
Stamps: Essential Messages (Hero Arts), Gorgeous Grunge (Stampin' Up!)
Paper: Cajun Craze and Very Vanilla card stock, gold foil sheets, Typeset Specialty DSP (Stampin' Up!)
Ink: Cajun Craze (Stampin' Up!)
Accessories: Thankful Leaves dies (Concord & 9th), Regals Candy Dots (Stampin' Up!), linen thread (Stampin' Up!), Art Glitter Glue (Art Institute)

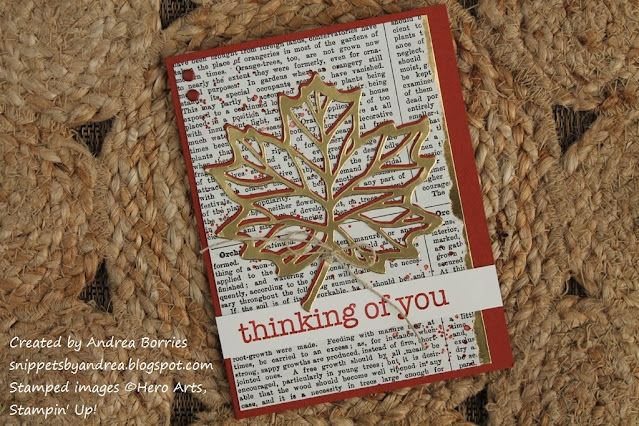
I had these die-cut leaves hanging around (maybe I cut them out last year?), so I layered them together and added a linen thread bow to make a quick focal point. For the background I stamped some splatters on a piece of newsprint DSP.

Supplies:
Kit: September 2020 My Monthly Hero kit (Hero Arts)
Paper: Pool Party, Whisper White card stock (Stampin' Up!)
Ink: Intensified Black (Hero Arts)
Accessories: Sun and Clouds dies (Taylored Expressions), Dimensionals (Stampin' Up!)

The September 2020 My Monthly Hero kit had a fun pumpkin patch/cornfield layering stamp set, which is perfect for autumn here. I wasn't in a very think-outside-the-box mood when I made these cards, so I just used the kit as designed to make these sweet cards. It's fascinating to watch the scene come together as you use the different stamps to add layers of color. I added some die-cut clouds to fill up the sky just a little.

Supplies:
Stamps: You're So Lovely (Hero Arts)
Paper: Crumb Cake, Baked Brown Sugar, Very Vanilla card stock (Stampin' Up!)
Ink: Sugar Cube (Taylored Expressions), Spa Collection mini ink pads (Catherine Pooler), Bronze Glimmer Metallic Ink (Hero Arts)
Accessories: You're So Lovely dies (Hero Arts), clear droplets (Pretty Pink Posh), water brush (Stampin' Up!), Dimensionals (Stampin' Up!), Art Glitter Glue (Art Institute)

I make floral cards all the time, whatever season it is. But this set of flower stamps, combined with the jewel tones of the Spa Collection ink pads from Catherine Pooler, seemed perfect for autumn. I stamped and die cut all the pieces and arranged them on neutral card bases that I had splattered with metallic ink. (And the card bases are two different colors; it's not just weird lighting.)

After splattering the card bases, I had some metallic ink left over, so I painted a couple strips of vanilla card stock, trimmed the ends, and adhered each strip to one of the card bases. I love that extra metallic accent. I stamped the sentiment in white ink just above each banner and finished the cards with a few clear droplets.

Supplies:
Stamps: Autumn Silhouettes, Hey Boo (Gina K Designs)
Paper: Whisper White, Delightful Dijon card stock (Stampin' Up!)
Ink: Peppermint Scrub, Mandarin Spice, Sauna, Green Tea (Catherine Pooler); Chocolate Truffle Amalgam ink (Gina K Designs)
Accessories: Regals Candy Dots, Bronze Silk Ink (Hero Arts)

These are such pretty leaf stamps that I decided to just stamp them in fall colors on white card stock and add some Bronze splatter. (Splatters seem to be my new sequins!) I mounted each panel on a Delightful Dijon card base and added a sentiment stamped on a separate layer of white card stock. I cut the sentiment layer on an angle to follow the shape of the sentiment and to keep more of the background visible.

I haven't made as many autumn cards as I wanted to this year, so I'll try to make a few more for Thanksgiving (even though it seems like we may be well into winter by then). And if you're still looking for ideas for Halloween cards, stay tuned for my next post. Thanks for stopping by!


Friday, October 16, 2020

Stamp Joy 2020

I can't believe that it's been over a week since I last posted! Sorry for the absence; it's been a little crazy, at least for me. I had some time off work, which was wonderful (had to go back today. Ugh.), participated in the virtual Stamp Joy event with Taylored Expressions (TE), and celebrated my birthday earlier this week. So blog posting wasn't at the top of my list. :) But now I need to get back on track, and I'm going to start by sharing a few photos from the at-home crafty fun of Stamp Joy.

Here are the cards I made during the event. The top four cards are from the Friday night class, which was optional. We used the same main stamp and die set to make four different cards. The rest of the cards are the make-and-take projects from Saturday, which was the main event. I think my favorite card is the blue and yellow "hello" card in the middle. To make that one we embossed the background image on watercolor paper with white embossing powder. Then we used blue and yellow liquid watercolors to create an emboss-resist wash of color.

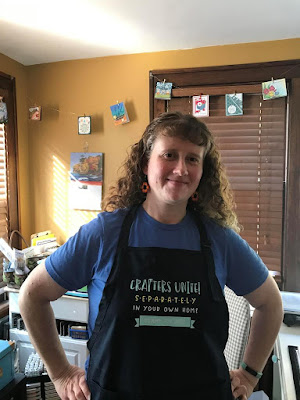
We got lots of goodies for the event, including a crafting apron. I love the saying: "Crafters unite! Separately. In your own home." That definitely sums up most of 2020.

I wasn't sure I would like wearing an apron while crafting, but it came in handy. Instead of wiping glue, ink, etc. from my hands onto my jeans, I could use the apron. :)

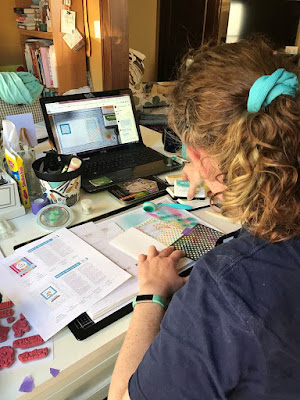
Here is my craft room setup for the event. I had to temporarily rearrange all the stuff on my tables, but this ended up working pretty well. TE sent the pieces we needed for each project in a labeled plastic baggie, and we also had thorough instructions and supply lists. I organized the baggies into two bins -- one for Friday and one for Saturday -- with some of the additional supplies we needed. Then of course I had my paper trimmer, die-cutting machine, stamp positioner, and other basic supplies ready to go.

Action shots! Here are a couple pictures of me hard at work. For the Saturday session, the presentation for each card (via Facebook Live) was about 45 minutes, then we had 15 minutes to take a break before the next project (with a longer break for lunch). It was just the right amount of time to stretch my legs, clean up my workspace, and put away (or at least out of the way) anything I was done using. The Friday class was a little more challenging since we had 30 minutes for each of the four cards, and they were presented back-to-back with no breaks.


The nice thing about crafting at home was that it was easy to make modifications, like changing a sentiment or using different embellishments, if I wanted to. And of course, I didn't have to wait in line to make the projects or worry about rushing to finish so the next person could sit down. If I didn't finish a particular card, I could either use the printed instructions to finish it later or rewatch the video.


There were also a lot of great prize giveaways during both days, including credit to the TE online store, a variety of TE products, and even products from other companies that helped sponsor the event. I wasn't lucky this time, but I know there were a lot of happy winners!


We received lots of great product to make our cards: stamps, dies, stencils, embossing folders, and even envelopes for the make-and-take projects. The stamps in the upper left corner are some of the ones we used on Saturday. Since TE manufactures their stamps, they were able to choose specific images from various sets and produce just those images for all the participants -- sort of like a sampler set. We did use supplies besides these, but for those items we could either order them if we didn't already have them (they sent the supply list out ahead of time), or we could use a similar product that we already owned.

One of the things we received in our supply box was this cute little surprise box. TE sent everyone a stamp personalized with their first initial. This would be so cute stamped on the back of a card or used to make a set of monogram note cards.

The virtual event definitely was different from going to Stamp Joy in person, but it was nice to be able to have some kind of crafty event to look forward to. I learned a lot of new tips and techniques, and I've already used one of the cards I made. I also have four more Christmas cards, and those just might be the only Christmas cards I make this month! :)

Thanks for stopping by today! I'll be back to sharing cards in my next post.


Tuesday, October 6, 2020

Alcohol ink cards

A few months ago I pulled out my alcohol inks and YUPO paper and played around with making some colorful panels to use for card making. I love the bright, bold colors of the panels as well as the cards I made with them.

Supplies:
Paper: Basic Black, thick Whisper White card stock (Stampin' Up!), woodgrain embossed card stock (Essentials by Ellen), white alcohol ink card stock (YUPO)
Ink: Chili Pepper, Sunbright Yellow, Senorita Magenta, Lime Green, Sapphire Blue, Rich Gold alcohol inks (Jacquard Pinata Color)
Accessories: Poppy Moments dies (Stampin' Up!), Sentimental Dies (Avery Elle), Bubble Blower droplets (Trinity Stamps), Art Glitter Glue (Art Institute), Dimensionals (Stampin' Up!)
Other: 91% rubbing alcohol

I thought I had taken a picture of the panels before I made the cards, but apparently not. I made one that was shades of red with gold, one that was shades of green with gold, and one that was a rainbow (more with that one later). I decided to use the red and green panels to create some flowers, and the Poppy Moments dies were perfect.

The flowers and leaves are made with layering dies; between that and the different shades created with the alcohol inks, these poppies have a lot of depth. I die cut two poppies, two buds, and two different leaves for my card. With all that color and gold sparkle, I wanted to keep the card base clean and simple. A panel of woodgrain-textured white card stock was perfect because it adds interest to the background without being a distraction.

With the flowers placed near the top of the card, I wanted to add some visual weight at the bottom. I adhered a narrow strip of black card stock along the bottom edge and then added a black die-cut "celebrate" sentiment right above it. For a simple embellishment I added three bubble droplets (they are clear but have an iridescent quality).

Supplies:
Paper: 110-lb Solar White card stock (Neenah), alcohol ink card stock (YUPO)
Ink: Chili Pepper, Sunbright Yellow, Lime Green, Sapphire Blue, Senorita Magenta (Jacquard Pinata Color)
Accessories: Lucky to Know You die (Simon Says Stamp), sparkling clear sequins (Pretty Pink Posh), shimmer mist made with Shimmer Liquid Watercolor (Taylored Expressions), Art Glitter Glue (Art Institute)
Other: 91% rubbing alcohol

I originally wanted to make this card for a friend for St. Patrick's Day, although I didn't get to it it until a couple of months later. But the sentiment is true all year 'round, and I know she appreciated it when she did receive it. 

At any rate, I used five alcohol ink colors to create this fluid, swirly rainbow. I trimmed the panel down, but it was still too large for an A2-size card So instead I made this one for a business-size or #10 envelope, which is 4-1/8" x 9-1/2". (Now I would call it a slimline card, but when I made this back in May, that style wasn't yet all the rage.)

I used white card stock for the base, splattered it with shimmer mist for a little sparkle, and adhered the rainbow panel in the center. For the sentiment, I cut the phrase from white card stock two or three times and glued the layers together to give it some "oomph." Then I glued the words near the top of the rainbow panel and surrounded it with a few clear sequins.

Supplies:
Stamps: Simple Strips Background (Taylored Expresisons)
Paper: Thick Whisper White, Basic Black card stock (Stampin' Up!); alcohol ink card stock (YUPO)
Ink: Chili Pepper, Sunbright Yellow, Lime Green, Sapphire Blue, Senorita Magenta (Jacquard Pinata Color)
Accessories: Simple Strips and Stitched Frames dies (Taylored Expressions), Bitty Butterfly and Elegant Butterfly punches (Stampin' Up!), white embossing powder (Hero Arts), Dimensionals (Stampin' Up!)

After I made the first card, I had some pieces of the rainbow panel leftover that I didn't want to throw away, so I decided to make one more quick card. Using two different size punches, I punched several butterflies out of the alcohol ink panel. For the card base I glued a black die-cut frame to a white card and then arranged eight of the butterflies inside the frame. (The larger butterflies are attached with Dimensionals.) I finished the card with a simple embossed sentiment strip.

Thanks for stopping by!


Friday, October 2, 2020

Variations on a meadow

I am always intrigued by scene-building stamp sets, but sometimes I find that I have a hard time actually building a scene with them. That's what happened when I bought the stamp set My Meadow, which has a variety of watercolor-style elements that can be combined to make all kinds of scenes. I didn't immediately know what I wanted to make with this set, so I really just had to play with it in order to come up with a few layouts.

Supplies (all Stampin' Up! unless otherwise noted):
Stamps: My Meadow, Greetings Mix I (Simon Says Stamp)
Paper: Whisper White, Crumb Cake, Pear Pizzazz card stock; Spring Market 6" x 6" paper pad (Carta Bella)
Ink: Basic Gray, Pear Pizzazz, Real Red, Wild Wasabi, Daffodil Delight, Blueberry Bushel, Soft Sky
Accessories: Magnolia Lane ribbon combo pack, Subtles Candy Dots, foam tape (3M)

I love the wheelbarrow in the My Meadow stamp set, so that's what I used for these first two cards. It's less intimidating to focus on a few elements of a scene-builder set than to try using all the pieces on one card. I stamped the wheelbarrow, flowers, grass, and clouds on a panel of white card stock, added a sentiment at the bottom of each panel, and then matted them with a layer of Pear Pizzazz card stock. 

For the card bases, I used Crumb Cake card stock and added a piece of green-and-white gingham paper on the bottom half of the card. I adhered a piece of neutral ribbon along the top of the printed paper and used foam tape to add the focal panel to each card. I finished off with two light green Candy Dots in the bottom right corner of each card.

Supplies (all Stampin' Up! unless otherwise noted):
Stamps: My Meadow, Snow Front, Four You
Paper: Whisper White, thick Whisper White, Early Espresso, Crumb Cake card stock
Ink: Crumb Cake, Wild Wasabi, Marina Mist, Early Espresso, Mossy Meadow, Pear Pizzazz, Soft Sky; Memento Tuxedo Black (Tsukineko); journaling pen
Accessories: Clear Wink of Stella glitter brush pen, linen thread, black/white twine, foam tape (3M)

For these two card I wanted a design that was a little more masculine; I was putting together a group of cards to send to a nursing home last spring and most of my "thinking of you" cards are flowery or feminine. I combined My Meadow with Snow Front, a similar style stamp set, to create the woodsy scene on the left and the monochromatic card on the left. These took a lot more "playing" to create than the first two cards, and I practiced several arrangements on scratch paper first.

Once everything was stamped, I mounted the woodsy panel on Early Espresso card stock, added Wink of Stella glitter to give it a little sparkle (see below), and then tied a piece of linen thread around the panel. For the monochromatic panel, I used a journaling pen to draw a frame and then added black-and-white twine and a bow. I used foam tape to adhere each panel to a card base and stamped "thinking of you" along the bottom of the card.

The last two cards have a little different style. I made them during a Face Time craft day challenge with a friend. She chose a few stamp sets, and I selected several color combinations -- without knowing what the other person had picked -- and then we had to make cards with those items. For the cards made with My Meadow we had to use black, white, and one other color (we could switch the color between cards). That was definitely a challenge! Here are the two I created:

Supplies (all Stampin' Up! unless otherwise noted):
Stamps: My Meadow, Tiny Words (Simon Says Stamp)
Paper: Whisper White, Basic Black, Pumpkin Pie, Daffodil Delight card stock; Golden Honey Specialty Designer Series Paper (DSP)
Ink: VersaFine Onyx Black, Memento Tuxedo Black (Tsukineko); Pumpkin Pie, Daffodil Delight
Accessories: Rectangle masking stencils (Taylored Expressions), Small Stitched Rectangle Stackables dies (Lawn Fawn), Stitched Shapes and Layering Ovals dies, yellow enamel dots (Eyelet Outlet), Halloween Night enamel dots, black/white baker's twine, 1/8" Basic Black taffeta ribbon, Daffodil Delight stitched grosgrain ribbon, blender brushes (Taylored Expressions), foam tape (3M)

For my first card (on the left), I decided to use Pumpkin Pie for my color because I thought it might make a good autumn card. Using masking stencils, I ink blended an orange rectangle on white card stock, creating a slight ombre effect by apply more ink at the top of the rectangle. I stamped a few trees and a flock of birds using black ink and then cut out the panel with a stitched rectangle die. I matted it with black card stock and used foam tape to attach it to a Pumpkin Pie card base tied with black-and-white twine. I finished the card with two orange enamel dots in the upper left corner.

For my second card, I wanted to create the look of a black-and-white photo with one pop of color. I went back to the wheelbarrow scene I used previously, stamped most of it with black ink and used Daffodil Delight for just the flowers. I die cut the image with a stitched oval die and matted it with a yellow scalloped oval. For the background I adhered a piece of DSP to a layer of black card stock and wrapped two pieces of ribbon -- one black and one yellow -- around the panel vertically, securing the ends on the back. I adhered the panel to a Daffodil Delight card base and used foam tape to attach the oval. Three yellow enamel dots are the finishing touch.

I hope these cards gave you a little inspiration for similar stamp sets that you may have. Thanks for stopping by!