Tuesday, May 26, 2015

A new technique and a new challenge

While I'm usually a stick-to-the-basics card maker (stamps, ink, and paper), sometimes it's fun to try something new. So last week I experimented with a new technique: using molding paste and a stencil to create a background for a card. And while I was trying one new thing, I decided to make it two and designed my card for the latest Fab Friday challenge. I've checked out the Fab Friday challenges before, but this was my first time participating. This time the challenge was a sketch (see diagram below), and I think it worked perfectly for what I had in mind:

Card featuring a background made with molding paste and a stencil. Stamped images from By the Tide stamp set.
Supplies (all Stampin' Up! unless otherwise noted):
Stamps: By the Tide
Paper: Sahara Sand, Basic Gray, Very Vanilla card stock; 6" x 6" Wood Designer Cardstock Paper (My Mind's Eye)
Ink: Sahara Sand (pad and refill), Basic Gray, Island Indigo
Accessories: Mini Pebbles stencil (The Crafter's Workshop), light molding paste (Golden), Regals Candy Dots, Island Indigo cotton ribbon, Essentials Paper-Piercing Pack, paper-piercing tool, Dimensionals

This was actually my second attempt at the background. The first time I applied the paste directly out of the container. The white paste was too stark against the Sahara Sand card stock, so I tried adding color by sponging and painting ink over the top. It worked but wasn't what I wanted for this card. For my second try I put a bit of paste in a separate container and mixed in a couple drops of Sahara Sand ink refill. Success! It was softer than the straight white, but still light enough to stand out. Once the background was dry, it was time to tackle the rest of the card.

Sketch for Fab Friday 64 chellenge.
The pebble-style background made me think of river rocks, so I wanted to play with a water/beach/ocean theme. I'm still in love with one of my latest ocean-themed cards, so I reached for the By the Tide stamp set. For the focal panel I used a square of Sahara Sand card stock stamped twice: first with the text image in Sahara Sand ink (stamped multiple times to cover the whole piece) and second with the coral image in Basic Gray ink. To add some texture, I pierced a border around the square. Then I mounted it on a piece of Basic Gray card stock and tied a piece of Island Indigo ribbon around the panel.

For the panel along the left side of the card I used a piece of patterned paper that looked like weathered wood. I love the detail of the wood grain and the perceived texture it adds to the card. I used Dimensionals to adhere the square panel over the patterned paper and then added a stamped and hand-cut Island Indigo fish as the accent in the upper left corner. I adhered the whole card front on a Basic Gray card base and, as a final embellishment, placed an Island Indigo Candy Dot in the upper right corner to add one more touch of color.

I enjoyed this new technique and playing along with the Fab Friday challenge, so I hope to do both again soon. Thanks for stopping by!

Saturday, May 23, 2015

Elegant gray butterfly

What colors do you imagine when you think about a butterfly? The first ones that pop into my mind are the orange and black of a monarch butterfly. But then I think of the blues, yellows, greens, and purples. Pretty much any color except gray. But a gray butterfly was exactly what this card needed:

Monochromatic gray card made with printed vellum, embossed card stock, and die-cut butterfly.
Supplies (all Stampin' Up! unless otherwise noted):
Paper: Basic Gray card stock, Sheer Perfection Designer Vellum
Accessories: Butterfly Thinlits dies, Wink of Stella clear glitter brush pen (ZIG), Tea Party embossing folder (Lifestyle Crafts), rhinestones

Putting this card together was definitely, well, a process. It started with the piece of vellum. I wanted to try coloring the flowers with alcohol markers; it worked, but it wasn't the look I wanted. So I trimmed off a strip that I hadn't colored yet ... and didn't know what to do with it.

Eventually I decided to add some texture. I found a floral pattern embossing folder that worked well with the flowers on the vellum and embossed part of a piece of Basic Gray card stock. I placed the card stock in the folder so the left side stuck out about 1-1/4" from the folder and did not get embossed. Then I laid the vellum along the unembossed strip, folded the top and bottom of the strip over and adhered it to the back of the Basic Gray card stock.

I really liked the monochromatic panel, so I cut and folded a Basic Gray card base. But I didn't adhere the panel to the base because I couldn't figure out how to embellish the card. So the pieces sat for a week until I had a friend over to stamp. I showed her the partially done card, told her I wasn't sure what it needed, and she immediately said, "A butterfly."

And it was as simple as that. Well, almost. I still had to decide what color the butterfly should be. I tried pink. Nope. Light blue. Uh-uh. Should I stick with the monochromatic scheme and add a gray butterfly? Would that be too weird? I wasn't sure if it would work, but I cut out a gray butterfly ... and I loved it. It was perfect. I adhered the middle of the butterfly to the embossed panel and pulled the wings up. To add a little sparkle and elegance, I placed a strip of rhinestones along the body of the butterfly and used my Wink of Stella pen to paint clear glitter along the border of the card base. I adhered the panel to the card base, and the card was finally done. And I think it was worth the wait.

Thanks for stopping by!

Friday, May 22, 2015

First solo sewing project: lavender sachets

For Christmas my parents gave me a sewing machine, which was quite a surprise. I'd been thinking about getting one for a few years but never really got any farther than just the thinking. I did some practice stitching to try out the different features on the machine, and several weeks later I took a field trip to the fabric store. With all the new crafting possibilities swirling around in my imagination, I bought a little sewing box, an easy pattern for making pajama pants, some pretty fabric to make said pants, and a few other necessities. But I had to put that project aside because I always seemed to be in the middle of some kind of card-making endeavor.

Fast forward to April, and my sister and I went to the Minnesota Textile Center's textile garage sale. It's an event geared toward reuse and recycling: Community members donate items to be sold -- anything and everything related to sewing, including patterns, thread, notions, fabric, even partially completed projects -- and proceeds benefit the Textile Center, with surplus materials donated to schools and other nonprofit organizations. I bought a grab bag of different trims, odds and ends of fabric, some patterns and books, and even a partially finished purse (all the extra fabric was included, so even if I decide not to finish the purse, it was a great deal for the fabric alone). It was a crazy experience, but it got me excited about sewing again.

I knew I couldn't start with the pajama pants, though. I needed something much easier first, so I decided to make sachets. I ordered some dried lavender and washed one of the fabric pieces I picked up at the textile sale. And then everything sat again while I made other gifts and worked on the garden with my sister. Sigh. I had actually wanted to make the sachets to give to my aunts, grandma, and mom on Mother's Day, but it just didn't happen.

Simple lavender sachets made with fabric and a ribbon loop for hanging.
Finally this week I got out the sewing machine and made eleven lavender sachets. I think they look pretty good, and they smell wonderful!

For a pattern I cut a piece of chipboard into a 4" square. I used a pencil to trace the square on the back of the fabric and then cut out the fabric (two layers at a time), leaving about 1/4" of fabric around the pencil line.This way I could sew right along the line and didn't have to worry about a seam allowance.

I decided to add a ribbon loop on one side of the sachets so they can be hung on a hook or a hanger. I chose a couple of 1-1/4" wide ribbons from Stampin' Up! -- Old Olive striped grosgrain and Pink Pirouette two-toned ribbon -- that coordinated with the fabric. I used about 4" or 5" of ribbon for each sachet (I never measured them, just snipped off a piece), folded it in half, and pinned it with the folded part between the layers of fabric (front sides of the fabric facing each other). Then I turned on the sewing machine and sewed everything together, leaving an opening about 1" wide on one of the sides.
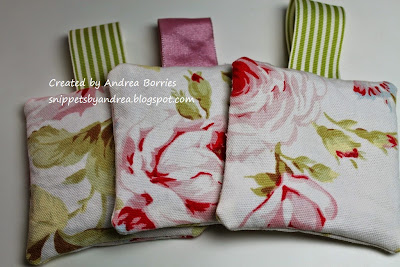
Simple lavender sachets made with fabric and a ribbon loop for hanging.
I pulled the fabric and ribbon through the opening so the sachet was right-side out, then I carefully spooned the dried lavender in the opening until the sachets felt reasonably full. Again, I didn't use any precise measurements, but I had a 1/2 pound bag of lavender (which is a really good-sized bag), and that was enough for all eleven sachets with maybe a third of the bag still left. Then I hand-stitched the opening closed, and that's it!

I finished all of the sachets in one day, so it was a quick and easy endeavor. And now that I've got one sewing project under my belt, I think I might tackle those pajama pants. Thanks for stopping by!


Tuesday, May 19, 2015

Birthday balloons

I'm not sure what happened to spring in Minnesota. It's certainly gone into hiding for a few days. We had the potential for frost last night, so we brought out a bunch of old sheets to cover up the veggies as much as we could. This morning it's still only 38°F; hard to believe Memorial Day is coming up next week. But I know that in just a few weeks we'll be in the middle of heat and humidity and I'll be wishing for a cool snap, so I won't complain too much.

Something I won't complain about at all is birthday cards. They're fun to make, fun to give, and fun to receive. I'm actually not sure which of those I like best! Today I'm going to share three birthday card designs that feature balloons.

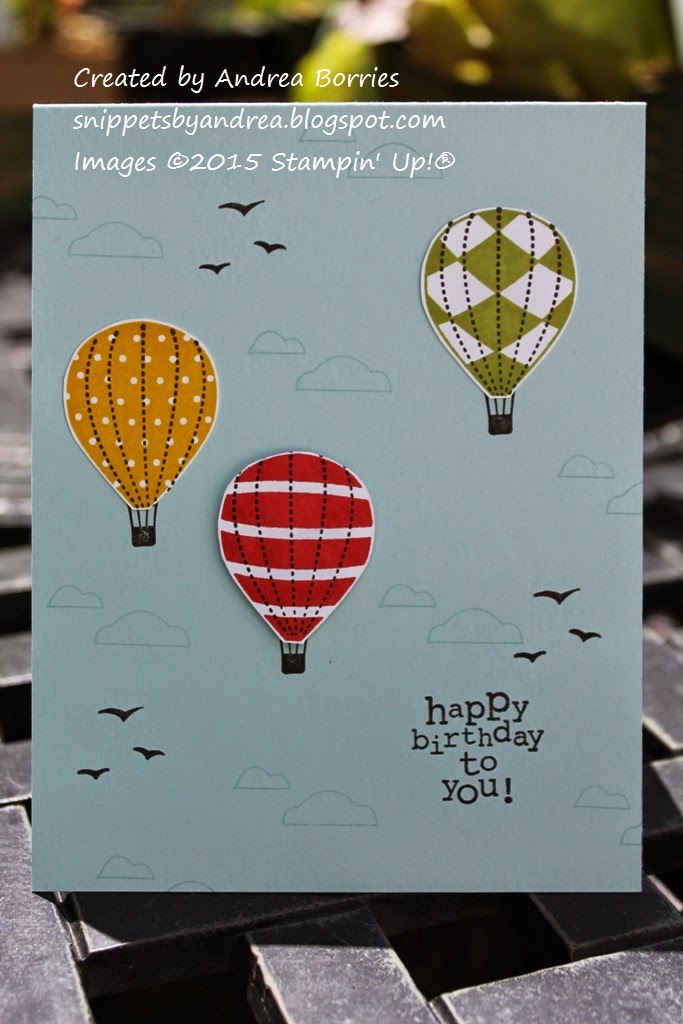
Birthday card made with the Up, Up & Away stamp set.
Supplies (all Stampin' Up!):
Stamps: Up, Up & Away
Paper: Soft Sky, Whisper White card stock
Ink: Soft Sky, Early Espresso, Crushed Curry, Poppy Parade, Lucky Limeade
Accessories: Dimensionals

This was actually the last card I made for the stash I gave to my uncle. It was the afternoon of the party, and I needed a quick and easy design. This card fit the bill perfectly, and as a bonus it's gender neutral and could even be used for other occasions by changing the sentiment.

There's nothing too complicated with this card, which is pretty typical for me; I don't think a card has to have twenty layers, a dozen embellishments, or a time-consuming technique to be impressive. I stamped the balloons on Whisper White card stock, cut them out, and adhered them to the card base with Dimensionals (I stamped the balloon baskets first). Then I filled in the background with a few clouds, birds, and the sentiment. Easy peasy.

Birthday card made with the Celebrate Today stamp set.
Supplies (all Stampin' Up! unless otherwise noted):
Stamps: Celebrate Today
Paper: Daffodil Delight, Whisper White card stock
Ink: Daffodil Delight, Tangelo Twist, Tempting Turquoise, Island Indigo
Accessories: White baker's twine, foam dots (unknown)

The Celebrate Today set is currently in the 2015 Occasions catalog from Stampin' Up!, but it's also carrying over to the next annual catalog. I'm excited that this set is staying around because I love these bold balloons and the different ways you can use them. You can make these balloons into hot air balloons, too, but I decided to go with more traditional birthday balloons. Again I used basic stamping and cutting to make this card. (There are coordinating Framelits dies to cut out the balloons, but it's actually just as fast for me to cut out the stamped images by hand.) I think this card could use some sequins or rhinestones, but I was trying keep it "guy appropriate," so I skipped the sparkles.

One-layer birthday card made with the Sketch a Party and Sew You stamp sets.
Supplies (all Stampin' Up! unless otherwise noted):
Stamps: Sketch a Party, Sew You (March 2015 Paper Pumpkin kit)
Paper: 110-pound white card stock (Recollections)
Ink: Real Red, Daffodil Delight, Bermuda Bay, Memento Tuxedo Black
Accessories: Bermuda Bay sequins, Glue Dots

This card is another gender-neutral design, and it's even more "simple" than the previous two -- no cutting! To make the balloons, I stamped the outline image in each color. Then using the same colors, I stamped the inside/filler image on scratch paper before stamping it on the card, so it is lighter in color.

For the sentiment I used stamps from the March 2015 Paper Pumpkin kit. The "Happy birthday to" and "you" are separate stamps, so I used black for the first part and Bermuda Bay for the "you" to make it stand out.

I did have to add a few sequins to this card because it needed something. But they're blue sequins, so I don't think the guys would object too much, right?

Thanks for stopping by!

Saturday, May 16, 2015

The sea, the sea, it calls to me

We're back to birthday cards today, and I'm going to share a few designs that have a sea or nautical theme. These designs really could be used for any occasion, and they are great options when you need a masculine card. (And again, I apologize for the poor photos. Grr. If I still had the cards I would take new pictures that didn't have weird shadows in them.)

Focal panel created by stamping the bird image from Wetlands twice on watercolor paper and then adding Crumb Cake, Lost Lagoon, and Soft Sky ink with an Aqua Painter.
Supplies (all Stampin' Up!):
Stamps: Wetlands, Plane & Simple
Paper: Crumb Cake card stock, watercolor paper
Ink: Jet Black StazOn, Crumb Cake, Lost Lagoon, Soft Sky
Accessories: Aqua Painter, Crumb Cake seam binding ribbon, Neutrals Candy Dots, sponge

Of the cards I'm sharing today, this is the only one with a birthday sentiment on the front of the card. But you could easily omit or change that sentiment to have a great all-occasion card.

To make the focal image, I stamped the bird image twice across a piece of watercolor paper. Then I used an Aqua Painter to apply washes of color: Crumb Cake for sand, Lost Lagoon for water, and Soft Sky for the sky. I let it dry for a bit and then adhered it to a Crumb Cake card base, which I had sponged with Crumb Cake ink. For a couple of simple embellishments I added a Crumb Cake Candy Dot and a piece of Crumb Cake seam binding ribbon tied in a knot.

Collage-style stamping with The Open Sea stamp set and the Triple Time technique.
Supplies (all Stampin' Up!):
Stamps: The Open Sea
Paper: Cherry Cobbler, Very Vanilla card stock
Ink: Cherry Cobbler, Night of Navy, Crumb Cake
Accessories: Natural trim, game spinner, 1/16" hole punch

I used collage-style stamping with the Triple Time technique for this card. But once I had all the panels stamped and matted, I had a hard time deciding how to embellish the card. Since the background is pretty busy, I decided my embellishments should be pretty neutral. I wrapped a piece of natural trim around the smallest panel, tied it in a knot, and frayed the edges a bit. Then I remembered that I had a pack of retired game spinners, so I decided to make a little compass. I stamped one of the compass images on a scrap of card stock and cut out the circle (I cut off the N-E-S-W directions). I punched a 1/16" hole in the middle of the circle and attached the spinner with the included brad. Then I adhered the compass to the upper left corner of the smallest panel. It really spins, too!

Sea-themed card with By the Tide images stamped on the focal panel and background paper of weathered boards.
Supplies (all Stampin' Up! unless otherwise noted):
Stamps: By the Tide
Paper: Whisper White, Night of Navy card stock; wood designer card stock paper (My Mind's Eye)
Ink: Night of Navy, Hello Honey, Sahara Sand
Accessories: Pewter jumbo eyelet, Cappuccino baker's twine (Hemptique), corner rounder, Crop-A-Dile (We R Memory Keepers), foam dots (unknown)

I've never been to the East Coast, but this card makes me think of an old seafood restaurant in New England, a little mom-and-pop place just off the shore that's been weathered by years of sun, sea spray, and storms.

This card is my favorite out of this group. There's nothing "fancy" or complicated about it, but I just love how everything came together: the weathered boards on the background paper, the navy with a pop of yellow, the cut-out seashell, and the jumbo eyelet with baker's twine bow. It creates a very calm, peaceful feeling for me.

Card made with Backwoods stamp set and Houndstooth embossing folder.
Supplies (all Stampin' Up!):
Stamps: Backwoods
Paper: Lost Lagoon, River Rock, Very Vanilla card stock
Ink: Lost Lagoon, Chocolate chip markers; Lost Lagoon, River Rock, Pear Pizzazz, Crisp Cantaloupe ink pads
Accessories: Houndstooth embossing folder, River Rock stitched grosgrain ribbon, corner rounder, Blender pen, Dimensionals

To make the fish images for this card, I used Lost Lagoon and Chocolate Chip markers to apply ink to the rubber stamp (blue on the waves and brown on the fish). Then I stamped the image on Very Vanilla card stock and used a Blender Pen and ink to color in the fish (Pear Pizzazz along the top of the fish, River Rock in the middle, and Crisp Cantaloupe along the bottom).

I matted each fish image with River Rock card stock and adhered them in a column on a Lost Lagoon card base embossed with a houndstooth pattern. I adhered a piece of River Rock ribbon along the left side of the card for a simple embellishment.

I don't know about you, but these cards have definitely put me in the mood for an ocean vacation. Thanks for stopping by!