Tuesday, August 27, 2024

August Christmas cards: Happiest holidays

We've had a lot of heat and humidity lately, so it feels a little weird to make holiday cards with snowflakes. But I know that fall is right around the corner, and winter will be right on its heels, so I need to keep the Christmas cards coming. Here is this month's design:

One of my goals with these cards was to use a few things I hadn't used before. I managed to do that and also use a few older items that aren't in frequent rotation. As it turns out, almost everything I used on these cards was from a different company, and for some reason that makes me extra happy. Here are the supplies:

  • Brilliant Blue and Ballet Blue ink and card stock (Stampin' Up!)
  • Sugar Cube ink (Taylored Expressions)
  • Snowflake background (Stamp Oasis) 
  • Jumbo Snowflake die (Erin Lee Creative)
  • Snowflake Set #1 dies (Echo Park)
  • Happiness stamps and dies (Honey Bee Stamps)
  • Inside Greetings - Holiday (Sunny Studio) -- For the sentiment inside the cards.
  • Blue rhinestones (HAI)
  • Iridescent shimmer spray (Altenew)

I think most of the card design is self-explanatory, but I'll point out a few things that might be hard to notice in the pictures. First, the word "happiest" is die cut twice for each card (from Brilliant Blue card stock). I layered the pieces together before gluing them on the cards. Actually, it's two separate dies ("happ" and "iest") because the set comes with different pieces so you can make different words, like "happy," "happiness," etc. I used a blue rhinestone for the dot on the "i."

Second, the white snowflakes are only glued down in the center. I like that they curl up just a bit for a little dimension. Part of the reason they do that is because I sprayed them with iridescent shimmer mist, which the third hard-to-see detail. It's a little better in this photo:


Well, maybe that's not much better. You'll just have to trust me that they are indeed sprayed with shimmer mist. It gives the snowflakes a little oomph, so they're not just plain white card stock.

And that's it for my August Christmas cards. I should make a preliminary Christmas card list to get an estimate of how many cards I'll need. I'll probably do one more batch next month, but I'm not sure how many more I'll need after that.

Thanks for stopping by!


Monday, August 26, 2024

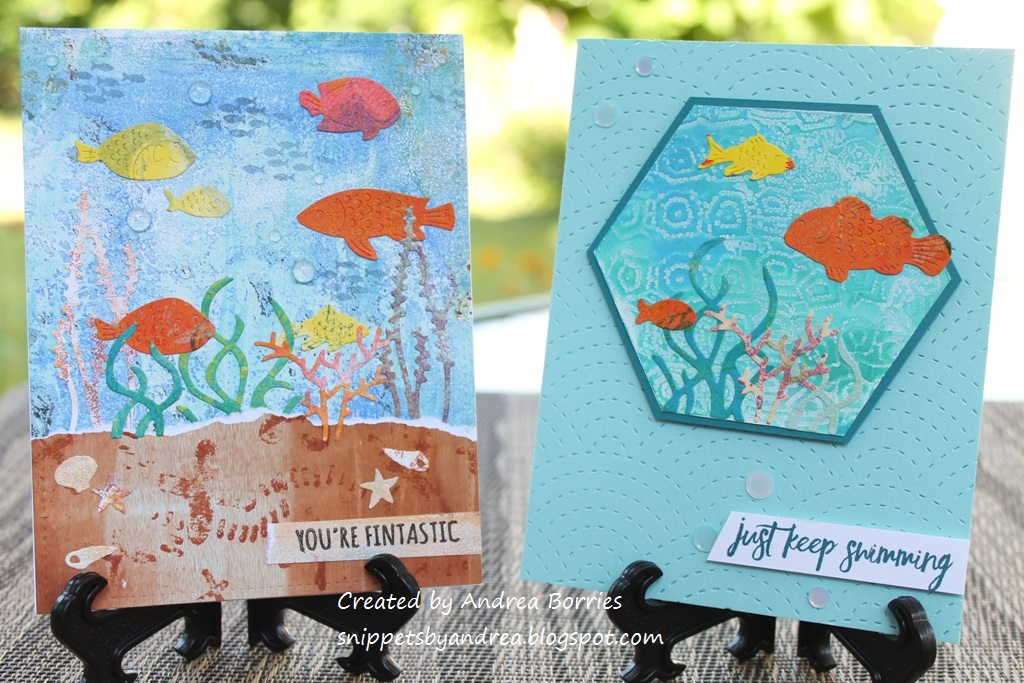
Underwater gel print scenes

The batch of cards I'm sharing today was definitely the most time-consuming of the gel-print cards I made this time around. But I think they were worth the effort.

For these cards, I used various gel prints to make all the parts of the underwater scenes. I chose one main print for the background/water for each card, cut it with a stitched rectangle die, and adhered it to a white card base. To create the sand I tore a brown gel print into wide strips and cut the bottom and sides of each stripe with the stitched rectangle die so it would match the stitching on the background.  Then I used bits and pieces left over from a variety of other gel prints to create fish, kelp, coral, and seashells with the School of Fish die (Memory Box) and the Build-a-Scene - Underwater dies (Taylored Expressions). I even used a gel print to make the sentiment strip. I played around until I was happy with the arrangement and then glued everything down. I finished with some sequins to create the look of bubbles.

I don't usually stamp directly on the gel prints because they have a rough texture. But I wanted to stamp some little schools of fish in the background to add more depth. I tried Distress Oxide inks (Faded Jeans and Broken China) and VersaFine (Onyx Black). All of the inks worked, but I did notice that the images stamped with Distress Oxides got sort of blurry as they dried, as if the ink was bleeding. Luckily that was fine for these cards -- it's sort of an underwater effect, which is perfect.

I made one more card like the first two, although I did change the sentiment, and then I tried a different card layout. I have a set of small, shaped gel presses, and one of them is a hexagon. I had a hexagon print that looked like it would make a good underwater scene, so I trimmed off the extra paper, matted it with blue-green card stock, and then trimmed down the mat. I added the die-cut pieces and set the piece aside to work on the card base. I chose light aqua card stock and die cut the card front with the Fanfare Cutting Plate (Taylored Expressions) on the card front. The pattern reminds me of scales or waves, and I think it adds a nice, subtle detail. I used foam tape to attach the focal piece and a sentiment strip, and I finished the card with clear sequins.

Thanks for stopping by!


Saturday, August 24, 2024

Encouraging cards

Today I'm sharing three more cards made with gel prints. Gel prints make great, easy backgrounds for cards because all you really need to add is a focal image and/or a sentiment. That's what I did for this group of encouraging cards.

Card on the left: The two colored leaf/flower images on this card were ones I made last summer as part of a mini online watercolor class. I wanted to use them together, so I looked for a gel print with coordinating colors. I die cut the gel print with a stitched rectangle die and adhered it to a burgundy card base. I placed the images near the upper left corner of the card. It felt like something was missing, so I looked through my dies and found a few small flower and foliage dies that I cut from copper card stock and added around the painted images. The colors of this card have a very autumn/Thanksgiving vibe to me, so I chose a sentiment about gratitude. I stamped it on vanilla card stock, tore the side of the card stock to add a little texture and adhered it near the bottom right corner. I finished the card with a copper flower by the sentiment and a few cream sequins.

Card on the right: I started by -- you guessed it -- cutting the gel print with a stitched rectangle die and adhering it to a lavender card base. I could trim the gel print with a paper cutter instead of using a die, but many times the pattern on a gel print (if I used a stencil) is slightly crooked and not lined up straight with the edge of the paper. That means I end up trimming the paper at a slight angle and then trying to get an even rectangle. It's easier to place a die where I want it, tape it down so it doesn't move and then die cut the gel print. Anyway, I used a die to cut a heart outline from black card stock and another gel print. I layered the hearts together, slightly offset so the black heart looks like a shadow, and glued them to the middle of the card. I stamped a sentiment on white card stock, cut out the individual words, and glued them down the middle of the card. I finished with several tiny black and white clay hearts.

For the last card I started with two more watercolor leaves I created last summer. I found a coordinating gel print, cut it with a stitched rectangle die, and adhered it to a blue-green card base. I stamped the sentiment on a wide strip of white card stock and then ran my bone folder along the edges of the white piece to distress them just a bit. I glued the strip about an inch above the bottom of the card base and added the leaves to the left side. I finished the card with some cool greenish/bluish/purpley sequins that pull together all the colors in the gel print and leaves.

There are a couple of things I would change about this card if I could make it again. First, I think the white card stock is a little too stark; I think I would try a very light blue or green instead to make it a little softer. Second, I would stamp the sentiment a little more to the right. I didn't realize until I glued down the strip that the words were going to be so close to the leaves. I could have pulled it off and made a new one, but I didn't want to wreck the gel print, so I left it.

I've got one more group of gel print cards to share, so stay tuned for my next post. Thanks for stopping by!


Friday, August 23, 2024

'Feline' fine

I haven't made any gel prints recently, and one of the reasons is because I have a whole pile of prints I need to use. So I pulled out the pile, gathered some dies, and got to work. Today's gel print cards, which are pretty meow-velous, are made with the Feline die from Penny Black.

Both this first card and the next one are the same layout, just different gel prints for the backgrounds. I wanted to make birthday cards, so I chose two prints that were fun, bright colors. For each card, I cut the print using a stitched rectangle die to cover the entire front of an A2 card and glued it onto a white card base. I cut the Feline die out of black card stock and adhered it in the middle of the card. I found a small party hat die in my stash (this one is from the No Drama dies from Taylored Expressions -- it's the perfect size) and cut a hat out of five different card stock colors that coordinated with the gel print. I added a little Wink of Stella to the hats and then glued them on the die-cut cats. I finished each card with a few coordinating sequins.

I thought about adding a "happy birthday" sentiment to the front of these cards, but I couldn't find a style or layout that I really liked. So I decided to leave the sentiment to just the inside of the cards. (I think the one I used said "Live it up on your birthday and all year long.")

I had the negative pieces left from the first two cards, so I layered them together and made one more card. For this card I used a smaller stitched rectangle die to cut the gel print background. Then I glued the die-cut pieces to the remaining part of the same gel print and trimmed it along the edges of the black card stock. I attached the focal piece slightly above the middle of the card and added one tiny white clay heart between two of the cats. Finally, I stamped the sentiment on a scratch piece of white card stock, cut it into a strip, and added it near the lower right corner of the card.

Stayed tuned for more gel print cards. Thanks for stopping by!


Saturday, August 17, 2024

Sweet birthday treats

I have a serious sweet tooth, so when I saw that the August theme for the Stay Crafty with A Blog Named Hero challenge was "Sugar Sugar," I figured I should enter. The challenge is to make something sweet, so I decided to go with birthday cupcakes.

I used the Color Layering Cupcake stamps and dies (Hero Arts) to create the cupcakes. I wanted to have lemon frosting on my cupcakes, so I used two shades of yellow ink. The cupcake is chocolate, of course, and I used two shades of teal ink for the cupcake liner. I also stamped a few chocolate sprinkles on my cupcakes.

For the card base I used Bermuda Bay card stock and a Chocolate Chip frame made with Stitched Frame Stacklets 1 dies (Taylored Expressions). Inside the frame I stamped streamers, stars, and confetti images from the Cheeky Birthday stamp set (Hero Arts). I adhered the cupcakes in the lower left part of the card -- the front cupcake is popped up with foam tape -- and added a sentiment strip in the upper right corner. I finished the card with a few yellow sequins.

While I had out the Color Layering Cupcake stamp set, I decided to make two more cards. (Note: The rest of the cards in this post are not challenge entries.)

I stayed with the same kind of cupcake, but I switched the color of cupcake liner to purple. I cut the Birthday Message Cover Plate (Hero Arts) out of Lavender Lace card stock. For the first card (left), I adhered the die-cut layer to a Lavender Lace card base for a subtle, textured look. I adhered the cupcake just above the middle of the card and added a die-cut Gorgeous Grape "celebrate" (My Favorite Things) below the cupcake. Again I finished the card with yellow sequins.

For the second card, I used the letters from the die-cut Birthday Message panel and glued them to a Gorgeous Grape card base. I attached the cupcake toward the left side of the card using foam tape and added a small sentiment strip (Tiny Words Birthday, Simon Says Stamp) to the right of the cupcake. I chose sparkling clear sequins for a little bit of sparkle.

Since I'm sharing cards with sweet birthday treats, here is one last card:

This card came together pretty quickly. A few weeks ago I pulled out the Cake stamp set (Ellen Hutson) to make a birthday card, and in the package I found three images that I'd previously colored and die cut. Score! I took out those pieces and used foam tape to attach them to white stitched circles. While I was deciding on a card base, I found this one in my paper files, already stamped the scattered dots along the fold. I thought it looked like confetti falling, so I went with it. I arranged the images on the card base, added a stamped sentiment, and finished with some clear sequins.

I hope you have a sweet day. Thanks for stopping by!