Monday, July 14, 2014

Flower Patch blooming birthday card

I think I am in love with Stampin' Up!'s new Flower Patch stamp set and coordinating Flower Fair Framelits dies. There are different sizes and styles of leaves and flowers, and since the stamps are made out of photopolymer, it is easy to layer the images. Then you can use the Framelits dies to quickly cut out the stamped flowers -- or skip the stamping and just cut the flowers out of different colors of card stock. It all makes my inner flower child pretty happy. And here is the first card I made with these fun products:

Supplies (all Stampin' Up!):
Stamps: Flower Patch
Paper: Pool Party, Whisper White card stock
Ink: Wild Wasabi, Garden Green, Tangerine Tango, Poppy Parade, Crushed Curry, Baked Brown  Sugar
Accessories: Flower Fair Framelits dies, rhinestones, Glue Dots, Dimensionals

I wanted a tropical feel for my card, so I chose orange, red and yellow for the flowers. Once everything was stamped I started die-cutting. Some of the pieces aren't cut exactly right because the Framelits dies shifted a bit as I was running them through the Big Shot. (That's what I get for using a too-warped cutting plate with my magnetic platform.) But it doesn't bother me too much, especially since this was my first time using the set and Framelits. And it proves that it's a handmade card, right?

I played around with the flower layout, and when I had an arrangement I liked, I used Glue Dots, Dimensionals and regular tape-style adhesive to attach the pieces to the Pool Party card base at different heights. Finally, I stamped the sentiment in the lower left corner of the card and added a little embellishment by placing a rhinestone in the center of each yellow flower as well as a few surrounding the bouquet.

Thanks for stopping by!

Saturday, July 12, 2014

A little birdie told me

Yesterday I received my first big Stampin' Up! order from the new catalog (yippee!), and I actually took time last night and this afternoon to create a few cards with my new goodies (double yippee!). The card I'm sharing today uses one of the new hostess sets, Hello Love.

Supplies (all Stampin' Up!):
Stamps: Hello Love
Paper: Whisper White, Soft Sky card stock
Ink: Jet Black StazOn, Soft Sky, Crushed Curry
Accessories: Cupcake Builder punch, Crushed Curry baker's twine, Summer Sun corduroy button, Glue Dots, Dimensionals

The idea for this card started forming while I was mounting the stamps, and I'm really pleased with how it turned out. The card is 3-3/4" square, and the white layers on the front and inside are 3-1/4" square.

To make the clouds on the front of the card I punched out the frosting part of the Cupcake Builder punch from Whisper White and Soft Sky card stock. I layered the pieces together and adhered them to the card with Glue Dots. For the sun I pulled out a long-retired Summer Sun corduroy button, added a bow of Crushed Curry baker's twine (love how well the two yellows coordinate) and adhered it near the clouds with a Dimensional.

Now for the "punch line" ...

Cute, right? I left enough space on the inside layer to include a short handwritten message or to just sign my name.

Because this card isn't standard size, I made my own envelope for it using a piece of Soft Sky Prints Designer Series Paper and the Envelope Punch Board.

Thanks for stopping by!

Wednesday, July 9, 2014

A growing garden

One of the fun things about our new home is that we have our own garden (or half a garden, since we share it with the tenant upstairs). We chose a variety of fruits and vegetables to plant -- bell peppers, broccoli, cucumbers, strawberries, a few different types of tomatoes, and zucchini -- as well as a few perennials.

The front half is our garden. The two small tomato plants on the left were late additions -- my sister brought them home from work -- and they replaced the strawberries, which were decimated by the hard June rain and/or the vast multitude of rabbits that live in our neighborhood. (We don't mind much; they need to eat, too. And they're so cute!) The empty space in the middle left (near the rhubarb) was the broccoli; that was definitely eaten. There are two of four stalks left, but as soon as the leaves grow back, they become a critter's lunch. We also tried planting some seeds in the pots -- marigolds, oregano and basil -- but no luck; I think the seeds were too old.

A few of my first tomatoes! This plant was a
variety called Early Girl , so it seems
appropriate that it has the first tomatoes.
Blooms starting to come out on the bell pepper.


This is one of the perennials, called Bee Balm.
We planted two zucchini plants. I never knew
they had such beautiful yellow flowers.

Our cucumber plant seems to be on a mission to take over the whole garden. It's in the middle in the first picture above, but in the week since I took these picture, it's spread even more, curly tendrils reaching in all directions.

I can't wait until we have our first harvest. Thanks for stopping by!

Saturday, July 5, 2014

Faux-postage owls

I'm back for my second blog post this week. Woo hoo! That's one thing I can check off my to-do list. I love that feeling of accomplishment, even if it's only something little. In fact, I've been known to add things on my to-do list that I've already done, just so I can have something to check off. Just sayin'. If one of the things on your to-do list is to send a card to a friend, here's a cute design for you:

Grayish tan card with stamped splatters on the background. Focal image is four owls stamped in different colors, punched out with a square punch then layered on punched out postage stamp shapes. The layered pieces are adhered to the card in a square to look like a block of postage stamps.
Supplies (all Stampin' Up! unless otherwise noted):
Stamps: Fox and Friends, Lovely Little Labels, Gorgeous Grunge, Teeny Tiny Wishes
Paper: River Rock, Very Vanilla card stock
Ink: River Rock, Mossy Meadow, Marina Mist, Night of Navy, Baked Brown Sugar
Accessories: 1" square punch, Postage Stamp punch, washi tape (We R Memory Keepers), Dimensionals, Mono Multi liquid glue

I think cards featuring faux postage stamps are really cute and fun, and if you follow my blog, you've probably seen them before. To make the faux postage stamps for this card, I stamped the owl images on Whisper White card stock and punched them out with the 1" square punch. (I tried to position the punch the same way for each image, and I think I got pretty close.) Then I stamped the one-cent image in the upper right corner and adhered each square to a piece of Whisper White card stock punched with the Postage Stamp punch.

To make the background for the card, I stamped one of the splatter images from Gorgeous Grunge set a few times from the lower left corner to the upper right corner. I used the same color ink as the card base, River Rock, so the effect is subtle. I adhered a strip of washi tape across the card (I love the woodgrain look with the owls), stamped a sentiment and used Dimensionals to adhere the completed faux postage stamps to the card base.

Here's hoping your to-do list isn't too long this weekend. Thanks for stopping by!

Wednesday, July 2, 2014

Back on track

I can't believe it's already July. The first half of 2014 was pretty crazy for me, and at this point I'm not sure the second half is going to be much better. Sigh. But I need to get back on track with my crafting and blogging, so I've given myself the goal of doing two posts a week. Ideally, I hope to get back to three a week, but I want to start off with a manageable goal. So without further ado, let's get to the good stuff.

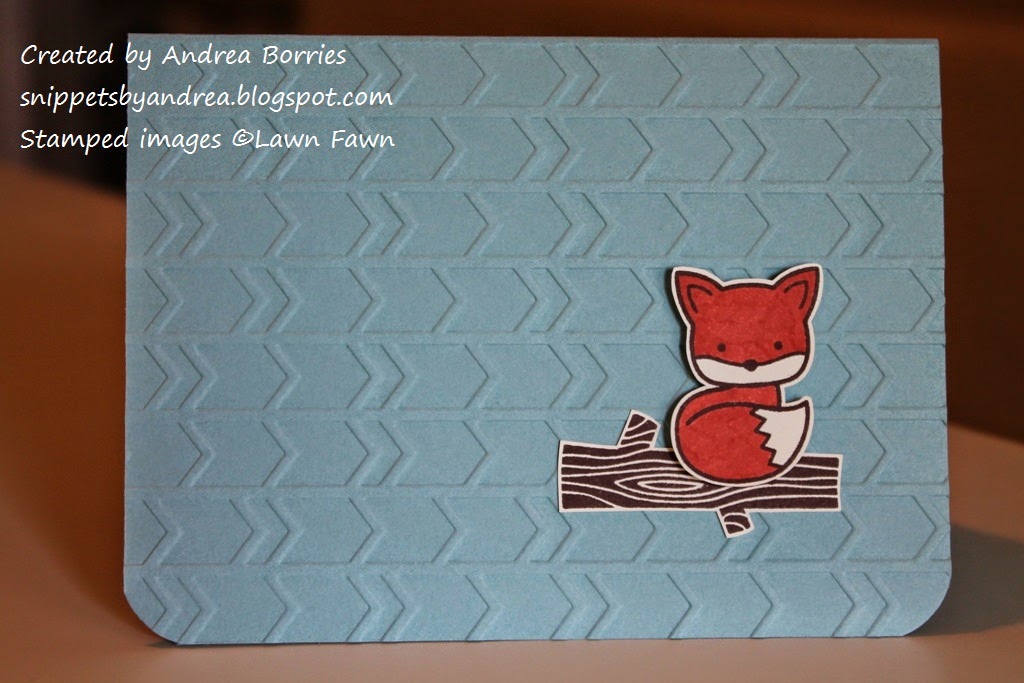
Last week a good friend asked me to make her a couple sets of hand-stamped cards. I was more than happy to oblige, and over the weekend I put together a few sample cards to see what she liked. Today I'll share the first two cards, which have a "foxy" theme.

Supplies (all Stampin' Up! unless otherwise noted):
Stamps: Into the Woods (Lawn Fawn)
Paper: Baja Breeze, Very Vanilla card stock
Ink: Chocolate Chip, Dusty Durango
Accessories: Arrows embossing folder, Crop-A-Dile Corner Chomper (We R Memory Keepers), Dimensionals

This is a very clean and simple little card, but I love, love, love this image. The embossed background adds some visual interest to the card without making it too busy.

Supplies (all Stampin' Up! unless otherwise noted):
Stamps: Storybook Friends
Paper: Very Vanilla card stock; First Edition Specialty Designer Series Paper (DSP)
Ink: Jet Black StazOn, Dusty Durango, Bashful Blue
Accessories: Baker's twine (Hemptique), gold sequin trim, sponges, Glue Dots

For the focal image on this card I stamped the fox from Storybook Friends but omitted the sentiment at the bottom of the stamp. I added a strip of DSP, with a torn and sponged edge, along the bottom of the card and finished everything off with a few gold sequins and some baker's twine.

Thanks for stopping by!