In the last few weeks I've made a good-sized dent in my stash of birthday cards. Between all the September and October birthdays in our family and the fact that I didn't have much time to make cards while moving, I had pretty slim pickings for the five cards I needed on Sunday (a couple were being mailed late, but I figure better late than never). The only answer to that is to sit down and make more, so I decided to focus on masculine birthday cards.
Supplies (all Stampin' Up!®):
Stamps: Card Games, Game Night
Paper: Sahara Sand, Island Indigo card stock; Designer Series Paper (DSP) Patterns Pack - In Color
Ink: Island Indigo, Sahara Sand, Poppy Parade, Blush Blossom
Accessories: White gel pen, Island Indigo baker's twine, Stamp-a-Ma-Jig, Tombow multipurpose adhesive
I've made a card with some version of this layout a few times; it's fun, cute and easy. I stamped the card image in Island Indigo and Poppy Parade. I cut out the diamond shapes from the Poppy Parade image, adhered them to the Island Indigo card and then used markers to color the background and faces on the image. To make the other four cards, I traced the stamped and cut-out card four times onto a sheet of DSP (I try to pick a pattern that looks like a traditional deck of cards), cut them out and then used a white gel pen to make border around the edges. I finished the design with a stamped border, a strip of card stock and a piece of baker's twine.
Supplies (all Stampin' Up!):
Stamps: Asian Art
Card stock: Naturals Ivory, Cajun Craze, Sahara Sand, Soft Suede
Ink: Jet Black StazOn, Cajun Craze, Sahara Sand, Soft Suede, Garden Green
Accessories: Regals brads, 1-1/4" circle punch, Dimensionals
I've always liked the images in the Asian Art stamp set, but I have to admit that I have a hard time creating cards with them. As a result, these stamps have seen precious little ink over the years. I'm pleased with how this card turned out, though; I like the colors, the layout and the clean background. And although I stamped a birthday sentiment inside, this card would be great for any occasion.
Supplies (all Stampin' Up! unless otherwise noted):
Stamps: In the Wild, It's Your Birthday, Rough Edges Alphabets, Party Time petit fours set (DeNami Design)
Card stock: Naturals Ivory, Basic Black, Lucky Limeade
Ink: Jet Black StazOn; markers: Basic Black, Lucky Limeade, Pumpkin Pie, Real Red
This is not like the cards I usually make, but it's my favorite of this bunch. I love the combination of the different styles of images (something I don't normally do) and the contrast of the black and white animals to the brightly colored party items. I realized after I finished the card that it doesn't have any embellishments, but I think that works here; there isn't anything to detract from the bold images.
I knew I wanted to have the greeting "party animal" inside the card, but I couldn't find one among all my stamps (hard to believe, I know). I decided to pull out one of my small alphabet sets and make my own greeting. I purposely stamped the letters at odd angles -- if you stamp them imperfectly on purpose then it's easy to hide any "mistakes." I'm planning to give this card to my brother, and I think he'll get a kick out of it.
Thanks for stopping by!
Tuesday, October 23, 2012
Sunday, October 21, 2012
Ornament Keepsakes cards
This month the SoShelli.com Creative Challenge is to make anything related to the holidays. I'm not quite ready to start making holiday decor or gift items -- though I should be since Christmas always seems to come so quickly -- but I can make Christmas cards just about any time of the year. And this was the perfect "excuse" to get out my new Ornament Keepsakes stamp set and the coordinating Framelits dies to see what I could create.
Supplies (all Stampin' Up!®):
Stamps: Ornament Keepsakes, Petite Pairs, Merry Minis
Card stock: Soft Suede, Very Vanilla
Ink: Soft Suede, Old Olive
Accessories: Holiday Ornaments Framelits dies, Top Note die, Merry Minis punch pack, champagne glass glitter, linen thread, sponge, Tombow multipurpose adhesive, Mini Glue Dots, Dimensionals
When I first saw these stamps and dies in the Holiday Catalog, I fell in love with them. The ornaments are different shapes and sizes, and they all have different patterns, so you could use just this stamp set for your Christmas cards and no two cards would have to be exactly the same. I wanted to use a somewhat muted color combination for my first card, so I chose Old Olive and Soft Suede. I used a few "rustic" elements -- sponging on the card base and Very Vanilla layer and a double bow made with linen thread -- and for contrast added a little sparkle by gluing glass glitter on the ornament tops.
For the inside of the card I repeated the same Top Note die-cut shape from the front of the card. I also wanted to include a few ornaments, but the Keepsake Ornaments seemed a little overwhelming inside the card. So I pulled out my Merry Minis stamp set and punches (also from the Holiday Catalog) and added a few tiny ornaments. It's just the right finishing touch for this card.
Supplies (all Stampin' Up!):
Stamps: Ornament Keepsakes, Season's Greetings
Paper: Cherry Cobbler, Very Vanilla, Crumb Cake card stock; Festival of Prints Designer Series Paper (DSP)
Ink: Crumb Cake, Soft Suede
Accessories: Holiday Ornaments Framelits dies, extra large oval punch, Itty Bitty Shapes punch pack, pearls, linen thread, Crumb Cake seam binding ribbon, Soft Suede taffeta ribbon, Tombow multipurpose adhesive
For this card I wanted to create a way to have one of the ornaments actually hanging and moveable on the card front. I selected one of the smaller ornament stamps and decided that the extra large oval punch would work well as the ornament's "frame." I stamped and die cut two of the ornament shapes and glued them together, back-to-back, with a small piece of linen thread between them and then set that piece aside.
On to the card construction. I used a 4-1/2" x 3-1/4" piece of DSP (half of one of the Festival of Prints sheets) and a 4-3/4" x 3-1/2" layer of Crumb Cake card stock. First I held the DSP in place on the card front (without gluing) and punched the oval in the card base and DSP together. Then I adhered the DSP to the Crumb Cake layer and punched the oval through that piece of card stock, using the hole in the DSP as a guide. I decided I needed to break up the large pattern on the DSP just a little, so I layered a piece of Crumb Cake seam binding ribbon with a piece of Soft Suede taffeta ribbon and adhered them to the right side of the panel.
To assemble the card I laid the ornament inside the oval opening and glued the linen thread to the Cherry Cobbler card base at the top of the oval. Then I adhered the Crumb Cake and DSP panel to the card base, concealing the end of the thread between the pieces. To embellish the ornament I used the Itty Bitty Shapes punch pack to punch two Cherry Cobbler flowers. I curled up the edges on one of the flowers, glued it to the second flower, added a pearl in the middle and then adhered the completed flower to the middle of the ornament. I repeated the element on the card front by adding three more flowers in the upper right corner of the layered panel.
For the inside of the card I added a layer of Crumb Cake card stock and stamped a greeting on the right side of the card. I had to use a greeting with a vertical orientation rather than a horizontal one so you wouldn't see it through the opening on the card front. This verse is from a retired Stampin' Up! set, but it is one of my all-time favorite Christmas greetings. To add some interest to the left side I adhered a thin strip of the same DSP I used on the card front, making sure that it wouldn't peek through the opening either.
Guess I got a little long-winded with this post, hunh? Sorry about that. I wanted to try to explain everything clearly, but if you still have questions, leave me a comment below and I will respond as soon as I can. I have a few non-Christmas ideas to try out with this stamp set, too, but that will have to wait for another time. Thanks for stopping by!
Supplies (all Stampin' Up!®):
Stamps: Ornament Keepsakes, Petite Pairs, Merry Minis
Card stock: Soft Suede, Very Vanilla
Ink: Soft Suede, Old Olive
Accessories: Holiday Ornaments Framelits dies, Top Note die, Merry Minis punch pack, champagne glass glitter, linen thread, sponge, Tombow multipurpose adhesive, Mini Glue Dots, Dimensionals
When I first saw these stamps and dies in the Holiday Catalog, I fell in love with them. The ornaments are different shapes and sizes, and they all have different patterns, so you could use just this stamp set for your Christmas cards and no two cards would have to be exactly the same. I wanted to use a somewhat muted color combination for my first card, so I chose Old Olive and Soft Suede. I used a few "rustic" elements -- sponging on the card base and Very Vanilla layer and a double bow made with linen thread -- and for contrast added a little sparkle by gluing glass glitter on the ornament tops.
For the inside of the card I repeated the same Top Note die-cut shape from the front of the card. I also wanted to include a few ornaments, but the Keepsake Ornaments seemed a little overwhelming inside the card. So I pulled out my Merry Minis stamp set and punches (also from the Holiday Catalog) and added a few tiny ornaments. It's just the right finishing touch for this card.
| This is the card lying flat on the table. |
Supplies (all Stampin' Up!):
Stamps: Ornament Keepsakes, Season's Greetings
Paper: Cherry Cobbler, Very Vanilla, Crumb Cake card stock; Festival of Prints Designer Series Paper (DSP)
Ink: Crumb Cake, Soft Suede
Accessories: Holiday Ornaments Framelits dies, extra large oval punch, Itty Bitty Shapes punch pack, pearls, linen thread, Crumb Cake seam binding ribbon, Soft Suede taffeta ribbon, Tombow multipurpose adhesive
For this card I wanted to create a way to have one of the ornaments actually hanging and moveable on the card front. I selected one of the smaller ornament stamps and decided that the extra large oval punch would work well as the ornament's "frame." I stamped and die cut two of the ornament shapes and glued them together, back-to-back, with a small piece of linen thread between them and then set that piece aside.
| This is the card standing up. |
| This is the back of the card front and ornament. I added one punched flower but left off the curled one and the pearl so the card closes flat. |
| This is the card when it is open. |
Guess I got a little long-winded with this post, hunh? Sorry about that. I wanted to try to explain everything clearly, but if you still have questions, leave me a comment below and I will respond as soon as I can. I have a few non-Christmas ideas to try out with this stamp set, too, but that will have to wait for another time. Thanks for stopping by!
Friday, October 19, 2012
Wonderful Winterland
I am not a winter person. The snow, the well-below-zero windchill temperatures, the icy sidewalks. Ugh. It all will be here very soon and will last for much too long. But despite my dislike of actual winter, I do love winter-themed stamp sets, whether delicate snowflakes, peaceful winter scenes or children frolicking in drifts of snow. So when I saw the set Wonderful Winterland in the Stampin' Up!® holiday catalog, I knew I wanted to get it. I actually ordered it a couple of months ago before I moved, and I finally had my first chance to use it yesterday.
Supplies (all Stampin' Up!):
Stamps: Wonderful Winterland
Card stock: Whisper White, Bashful Blue, silver glimmer paper
Ink: Jet Black StazOn, Bashful Blue, Pink Pirouette, Certainly Celery, Blush Blossom, Close to Cocoa
Accessories: Blender pen, Window Frames Collection Framelits dies, Delicate Designs embossing folders, Color Spritzer tool, Simply Scored tool and Diagonal Plate, 1/16" hole punch, silver cord, Dimensionals
Although all the images in this stamp set are adorable, I think this one is the reason I bought the set. It's just too cute. And with the right color combination and greeting, this image could even work for a Valentine's Day card.
I started this card by stamping the image, coloring it with a blender pen and cutting it with one of the Window Frames Collection Framelits dies. I layered a 2-3/8" square piece of silver glimmer paper behind the die-cut image. (Note: I didn't want to "waste" the glimmer paper that was hidden behind the image, so I used a square punch to remove some of the paper for a later project.) I embossed a strip of white card stock, layered strips of silver glimmer paper behind the top and bottom and then adhered the strip to a Bashful Blue card base. (It's difficult to see in this photo, but I spritzed the card base with the Bashful Blue marker before adhering the pieces.) Using Dimensionals, I attached the die-cut image over the strip. I needed a little something in the upper right corner, so I folded the corner down, punched a 1/16" hole and tied a bow with a piece of silver cord. I really like the way this card turned out, but I realized after I was finished that I had meant to pierce holes around the edge of the die-cut focal image, which would have been a nice extra detail.
Supplies (all Stampin' Up!):
Stamps: Wonderful Winterland
Card stock: Whisper White
Ink: Jet Black StazOn, Pink Pirouette, Certainly Celery, Baja Breeze, Closet to Cocoa, Blush Blossom
Accessories: Blender pen, Labels Collection Framelits dies, Houndstooth embossing folder, Stampin' Pierce mat, paper piercer, Festive Paper-Piercing Pack, striped Pink Pirouette ribbon, Dimensionals
For this card I started with a Whisper White card base and embossed a 4" x 5-1/4" piece of white card stock with a houndstooth texture. I stamped, colored and die cut the focal image with a Labels Collection Framelit die and then pierced a row of holes around the edge. I wrapped a piece of Pink Pirouette ribbon around the bottom portion of the embossed card stock and used Dimensionals to adhere the focal image over the ribbon. I pierced holes around the outside of the focal image and then attached the whole piece to the card base with Dimensionals.
Supplies (all Stampin' Up!):
Stamps: Wonderful Winterland, Many Merry Messages
Card stock: Night of Navy, Crumb Cake, Whisper White
Ink: Jet Black StazOn, Night of Navy, Real Red, Crumb Cake, Blush Blossom, Illluminate
Accessories: 2-3/8" scallop circle punch, 2-1/2" circle punch, 1/16" hole punch, corner rounder, Finishing Touches Edgelits dies, blender pen, red gingham ribbon, Dimensionals
I thought I should probably try out one of the other images in this stamp set, so I chose this adorable little snow angel, which I colored and punched out with a scallop circle punch. I used the Illuminate ink pad to stamp the snowflakes on the top part of the card and the greeting along the bottom edge. I added a strip of die-cut Crumb Cake card stock to break up the card front and then tied a piece of red gingham ribbon over the strip. I layered the focal image on a Crumb Cake circle and used Dimensionals to adhere it over the ribbon.
These cards almost make me excited about the impending winter. Almost. Thanks for stopping by!
Supplies (all Stampin' Up!):
Stamps: Wonderful Winterland
Card stock: Whisper White, Bashful Blue, silver glimmer paper
Ink: Jet Black StazOn, Bashful Blue, Pink Pirouette, Certainly Celery, Blush Blossom, Close to Cocoa
Accessories: Blender pen, Window Frames Collection Framelits dies, Delicate Designs embossing folders, Color Spritzer tool, Simply Scored tool and Diagonal Plate, 1/16" hole punch, silver cord, Dimensionals
Although all the images in this stamp set are adorable, I think this one is the reason I bought the set. It's just too cute. And with the right color combination and greeting, this image could even work for a Valentine's Day card.
I started this card by stamping the image, coloring it with a blender pen and cutting it with one of the Window Frames Collection Framelits dies. I layered a 2-3/8" square piece of silver glimmer paper behind the die-cut image. (Note: I didn't want to "waste" the glimmer paper that was hidden behind the image, so I used a square punch to remove some of the paper for a later project.) I embossed a strip of white card stock, layered strips of silver glimmer paper behind the top and bottom and then adhered the strip to a Bashful Blue card base. (It's difficult to see in this photo, but I spritzed the card base with the Bashful Blue marker before adhering the pieces.) Using Dimensionals, I attached the die-cut image over the strip. I needed a little something in the upper right corner, so I folded the corner down, punched a 1/16" hole and tied a bow with a piece of silver cord. I really like the way this card turned out, but I realized after I was finished that I had meant to pierce holes around the edge of the die-cut focal image, which would have been a nice extra detail.
Supplies (all Stampin' Up!):
Stamps: Wonderful Winterland
Card stock: Whisper White
Ink: Jet Black StazOn, Pink Pirouette, Certainly Celery, Baja Breeze, Closet to Cocoa, Blush Blossom
Accessories: Blender pen, Labels Collection Framelits dies, Houndstooth embossing folder, Stampin' Pierce mat, paper piercer, Festive Paper-Piercing Pack, striped Pink Pirouette ribbon, Dimensionals
For this card I started with a Whisper White card base and embossed a 4" x 5-1/4" piece of white card stock with a houndstooth texture. I stamped, colored and die cut the focal image with a Labels Collection Framelit die and then pierced a row of holes around the edge. I wrapped a piece of Pink Pirouette ribbon around the bottom portion of the embossed card stock and used Dimensionals to adhere the focal image over the ribbon. I pierced holes around the outside of the focal image and then attached the whole piece to the card base with Dimensionals.
Supplies (all Stampin' Up!):
Stamps: Wonderful Winterland, Many Merry Messages
Card stock: Night of Navy, Crumb Cake, Whisper White
Ink: Jet Black StazOn, Night of Navy, Real Red, Crumb Cake, Blush Blossom, Illluminate
Accessories: 2-3/8" scallop circle punch, 2-1/2" circle punch, 1/16" hole punch, corner rounder, Finishing Touches Edgelits dies, blender pen, red gingham ribbon, Dimensionals
I thought I should probably try out one of the other images in this stamp set, so I chose this adorable little snow angel, which I colored and punched out with a scallop circle punch. I used the Illuminate ink pad to stamp the snowflakes on the top part of the card and the greeting along the bottom edge. I added a strip of die-cut Crumb Cake card stock to break up the card front and then tied a piece of red gingham ribbon over the strip. I layered the focal image on a Crumb Cake circle and used Dimensionals to adhere it over the ribbon.
These cards almost make me excited about the impending winter. Almost. Thanks for stopping by!
Monday, October 15, 2012
Shake it up, baby!
Recently one of my friends told me that her six-year-old daughter loves the cards I send to them, and she still has out the Christmas card I sent last year. It was a shaker card with glitter "snow," and my friend's daughter said it was like her own little snow globe. Aww. You've gotta' love the appreciation and admiration of children. So how could I not make her a shaker card for Halloween?
Supplies (all Stampin' Up!® unless otherwise noted):
Stamps: Best Witches, Too Cute to Spook (both Unity Stamp Company)
Card stock: Whisper White, Lovely Lilac
Ink: Jet Black StazOn, Lovely Lilac, Almost Amethyst, Wild Wasabi, Crushed Curry, Blush Blossom, Pumpkin Pie
Accessories: Oval shaker card pouches (Impression Obsession), white mini shaker overlays (The Paper Cut), black and orange grosgrain ribbons, Halloween confetti (unknown), black rhinestones (Jolee's)
The shaker pouches I used were self-adhesive, and the overlays were pre-cut to 4" x 5-1/4" -- perfect for layering on an A2 card -- and they already had a hole cut to fit around the shaker. I filled the shakers with some Halloween confetti I had on hand. (Quick story: When I was in college I loved to send cards and letters, and I filled all of them with some type of confetti. More than once I heard about confetti being strewn all over a room when someone ripped open an envelope. And I always had to smile when I walked through the campus post office and saw little bits of confetti on the floor. Now I can send the confetti without the mess!) I noticed that the shaker pouches were a bit static-y, so I rubbed a used dryer sheet on the inside of the pouch and on the card stock to keep the confetti from clinging. I love this cute little witch, so I made two versions of this card with slightly different color combinations. I think I like the one on the left a little better because the orange really pops.
Supplies (all Stampin' Up! unless otherwise noted):
Stamps: Too Cute to Spook (Unity Stamp Company), Spooky Bingo Bits
Card stock: Whisper White
Ink: Jet Black StazOn, Lucky Limeade, Only Orange, Lovely Lilac
Accessories: Oval shaker card pouches (Impression Obsession), white mini shaker overlays (The Paper Cut), Halloween confetti (unknown)
The witch cards seemed a little on the girly side, so I thought I'd better make a couple of boyish monster cards to keep it even. I love the little Frankenstein monster in the shaker surrounded by mummies, spiders and little green creatures. The greeting inside these cards -- "Have a monster of a time!" -- fits perfectly.
Supplies (all Stampin' Up! unless otherwise noted):
Stamps: Too Cute to Spook (Unity Stamp Company), Spooky Bingo Bits
Card stock: Basic Black
Ink: Illuminate, Jet Black StazOn, Lucky Limeade
Accessories: Oval shaker card pouches (Impression Obsession), white mini shaker overlays (The Paper Cut), Halloween confetti (unknown), 1/8" Lucky Limeade organdy ribbon, black rhinestones (Jolee's)
Since I was on a roll with shaker cards, I decided to make a couple more and try out my new Illuminate ink pad. The Illuminate pad is really fun; it doesn't have a color, but instead makes a watermark-type of impression with a little bit of shine. (Think of it as a shimmery version of the VersaMark pad.) For these two shaker cards I focused on black and white and threw in a few punches of green. And I don't know if you noticed, but I coordinated the confetti and the stamps; both cards have ghost images and confetti, and then one has spiders while the other has black cats. It's the little things that make me happy.
Thanks for stopping by!
Supplies (all Stampin' Up!® unless otherwise noted):
Stamps: Best Witches, Too Cute to Spook (both Unity Stamp Company)
Card stock: Whisper White, Lovely Lilac
Ink: Jet Black StazOn, Lovely Lilac, Almost Amethyst, Wild Wasabi, Crushed Curry, Blush Blossom, Pumpkin Pie
Accessories: Oval shaker card pouches (Impression Obsession), white mini shaker overlays (The Paper Cut), black and orange grosgrain ribbons, Halloween confetti (unknown), black rhinestones (Jolee's)
The shaker pouches I used were self-adhesive, and the overlays were pre-cut to 4" x 5-1/4" -- perfect for layering on an A2 card -- and they already had a hole cut to fit around the shaker. I filled the shakers with some Halloween confetti I had on hand. (Quick story: When I was in college I loved to send cards and letters, and I filled all of them with some type of confetti. More than once I heard about confetti being strewn all over a room when someone ripped open an envelope. And I always had to smile when I walked through the campus post office and saw little bits of confetti on the floor. Now I can send the confetti without the mess!) I noticed that the shaker pouches were a bit static-y, so I rubbed a used dryer sheet on the inside of the pouch and on the card stock to keep the confetti from clinging. I love this cute little witch, so I made two versions of this card with slightly different color combinations. I think I like the one on the left a little better because the orange really pops.
Supplies (all Stampin' Up! unless otherwise noted):
Stamps: Too Cute to Spook (Unity Stamp Company), Spooky Bingo Bits
Card stock: Whisper White
Ink: Jet Black StazOn, Lucky Limeade, Only Orange, Lovely Lilac
Accessories: Oval shaker card pouches (Impression Obsession), white mini shaker overlays (The Paper Cut), Halloween confetti (unknown)
The witch cards seemed a little on the girly side, so I thought I'd better make a couple of boyish monster cards to keep it even. I love the little Frankenstein monster in the shaker surrounded by mummies, spiders and little green creatures. The greeting inside these cards -- "Have a monster of a time!" -- fits perfectly.
Supplies (all Stampin' Up! unless otherwise noted):
Stamps: Too Cute to Spook (Unity Stamp Company), Spooky Bingo Bits
Card stock: Basic Black
Ink: Illuminate, Jet Black StazOn, Lucky Limeade
Accessories: Oval shaker card pouches (Impression Obsession), white mini shaker overlays (The Paper Cut), Halloween confetti (unknown), 1/8" Lucky Limeade organdy ribbon, black rhinestones (Jolee's)
Since I was on a roll with shaker cards, I decided to make a couple more and try out my new Illuminate ink pad. The Illuminate pad is really fun; it doesn't have a color, but instead makes a watermark-type of impression with a little bit of shine. (Think of it as a shimmery version of the VersaMark pad.) For these two shaker cards I focused on black and white and threw in a few punches of green. And I don't know if you noticed, but I coordinated the confetti and the stamps; both cards have ghost images and confetti, and then one has spiders while the other has black cats. It's the little things that make me happy.
Thanks for stopping by!
Sunday, October 14, 2012
Easy neighbor thank-you gift
One night last week our downstairs neighbors invited me and my sister to join them for dessert. It was fun to chat and get to know them a little better. (It was also a little strange because we're not used to visiting with neighbors; we chatted politely with the people in our old apartment building, but we never spent time with anyone there.)
Before we left, our neighbors also gave us some delicious homemade applesauce. I decided I would refill the jar with something before I return it, but what? The jar is fairly narrow, so cookies wouldn't fit very well. I thought about some sort of snack mix, but that seemed too ordinary. Finally I decided to do what I know how to do best: make a set of cards.
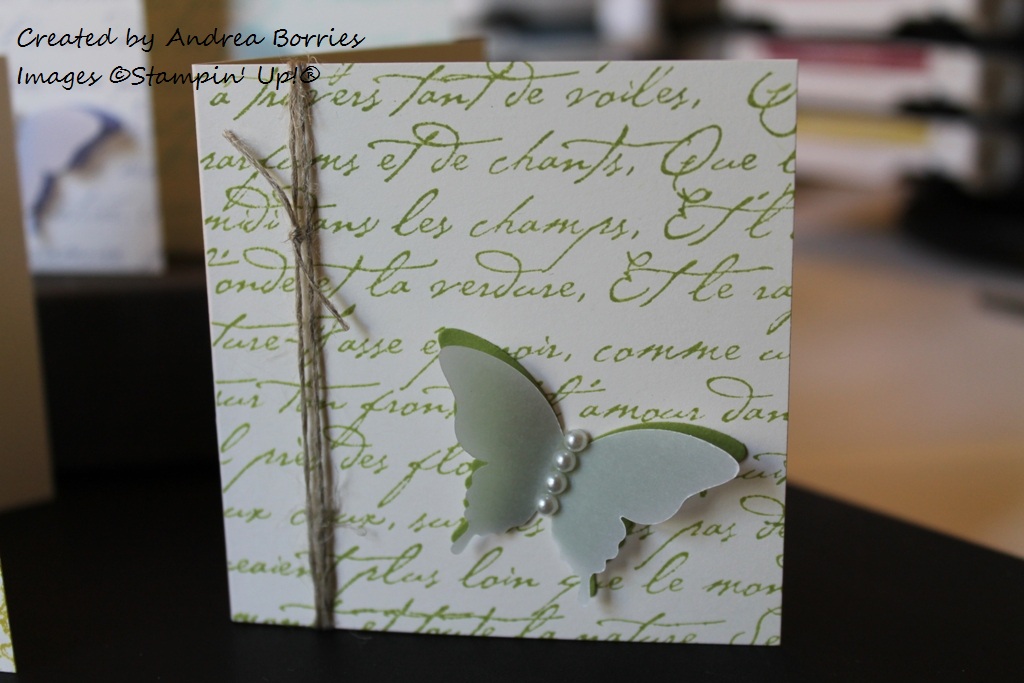
Supplies (all Stampin' Up!®):
Stamps: French Script
Card stock: Vellum card stock, Very Vanilla, Wisteria Wonder, Summer Starfruit, Island Indigo, Calypso Coral, Pool Party, Lucky Limeade
Ink: Wisteria Wonder, Summer Starfruit, Island Indigo, Calypso Coral, Pool Party, Lucky Limeade
Accessories: Elegant Butterfly punch, linen thread, pearls
I designed a simple 3" x 3" card and then used the same design in different colors for the rest of the cards. (I also stamped the flaps of the envelopes to coordinate with the cards.) I used the five 2011 - 2013 In Colors from Stampin' Up! (Wisteria Wonder, Island Indigo, Calypso Coral, Pool Party, Lucky Limeade) and added Summer Starfruit from the 2012 - 2014 collection.
I was excited to have a chance to use my new Elegant Butterfly punch for this card set. I punched two butterflies for each card: one from colored card stock and one from vellum card stock. I adhered the colored butterfly to the stamped card front. Then to give the butterfly and the card some dimension, I adhered just the center of the vellum butterfly over the colored one and gently pulled the wings up. I added pearls for the butterflies body.
Unfortunately I think these cards are just a bit too wide to fit in the jar. When we finish the applesauce I'll check to be sure, but otherwise they're just as cute packaged in a cellophane bag with a little ribbon bow. And I"m sure they will be appreciated just as much.
Thanks for stopping by!
Before we left, our neighbors also gave us some delicious homemade applesauce. I decided I would refill the jar with something before I return it, but what? The jar is fairly narrow, so cookies wouldn't fit very well. I thought about some sort of snack mix, but that seemed too ordinary. Finally I decided to do what I know how to do best: make a set of cards.
Supplies (all Stampin' Up!®):
Stamps: French Script
Card stock: Vellum card stock, Very Vanilla, Wisteria Wonder, Summer Starfruit, Island Indigo, Calypso Coral, Pool Party, Lucky Limeade
Ink: Wisteria Wonder, Summer Starfruit, Island Indigo, Calypso Coral, Pool Party, Lucky Limeade
Accessories: Elegant Butterfly punch, linen thread, pearls
I designed a simple 3" x 3" card and then used the same design in different colors for the rest of the cards. (I also stamped the flaps of the envelopes to coordinate with the cards.) I used the five 2011 - 2013 In Colors from Stampin' Up! (Wisteria Wonder, Island Indigo, Calypso Coral, Pool Party, Lucky Limeade) and added Summer Starfruit from the 2012 - 2014 collection.
I was excited to have a chance to use my new Elegant Butterfly punch for this card set. I punched two butterflies for each card: one from colored card stock and one from vellum card stock. I adhered the colored butterfly to the stamped card front. Then to give the butterfly and the card some dimension, I adhered just the center of the vellum butterfly over the colored one and gently pulled the wings up. I added pearls for the butterflies body.
Unfortunately I think these cards are just a bit too wide to fit in the jar. When we finish the applesauce I'll check to be sure, but otherwise they're just as cute packaged in a cellophane bag with a little ribbon bow. And I"m sure they will be appreciated just as much.
Thanks for stopping by!
Subscribe to:
Posts (Atom)
