Friday, September 29, 2017

Metal meets brick

I know many card-makers have a hard time creating masculine cards, myself included. For me, I think that's at least party because so many embellishments -- rhinestones, glitter, sequins, etc. -- have a decidedly feminine feel, leaving the more manly cards feeling a little boring. I tried to remedy that with this birthday card:

Supplies (all Stampin' Up! unless otherwise noted):
Paper: Basic Gray card stock, Through the Lens: Metal patterned card stock (Elizabeth Craft Designs), black glimmer paper
Ink: Memento Tuxedo Black
Accessories: Scribble Happy Birthday die (Poppy Stamps), Brick Wall embossing folder. Metal Mesh and screw brads (Making Memories), sponge

I'm not sure I love the way this card turned out, but it's definitely not boring. I started with a pack of 6" x 6" paper where all the patterns are different close-up photos of metal. I chose a bright, bold piece and layered it on a Basic Gray card base. I cut another smaller piece of Basic Gray card stock, embossed it with a brick wall pattern, lightly sponged on some black ink and adhered it along the top of the card.

I added another metal element to the card with a small piece of metal mesh, which I attached at an angle with two brads I also added a third brad in the lower right corner for balance. To add the sentiment I die cut "happy birthday" out of black glimmer paper and used liquid glue (I can't remember exactly which one) to adhere it over the mesh.

And that's it! What do you think? Too bold? Too busy? Thanks for stopping by!

Saturday, September 23, 2017

Folded pinwheel birthday card

I have quite a few cards I made over the summer that I still haven't posted on my blog. I'm going to work on getting caught up with those, and here is the first one:

Supplies (all Stampin' Up! unless otherwise noted):
Stamps: Inside and Out: Birthday (Papertrey Ink)
Paper: Thick Very Vanilla, Riding Hood Red card stock; The Sweetest Thing - Tangerine paper pad (My Mind's Eye)
Ink: Basic Gray
Accessories: Spectacular Spin Shapeabilities dies (Spellbinders), Stitched Shapes Framelits dies, Small Stitched Rectangle Stackables dies (Lawn Fawn), Button Boutique buttons, linen thread, champagne sequins (The Makery), Glue Dots, Mono Multi liquid glue

My sister bought me this set of pinwheel-style dies for last Christmas. They're fun to use, although I'll admit that it can be tricky to get the paper out of the die since they're so detailed. But when I get one of the shapes to turn out right, it does make a great focal image on a card.

Since I used double-sided patterned paper for this pinwheel, I matted it with a circle of solid card stock to help show the details. I added two small flags of the same patterned paper on the side of the circle and a button tied with linen thread to the center of the pinwheel.

For the base of the card I used thick Very Vanilla card stock with a layer of light blue plaid paper. I adhered the focal piece to the center of the card, stamped a sentiment in the lower right corner, and added three sequins as a finishing touch.

This would be a great layout for almost any occasion, and I think it would be fun to make a set of these using different patterned papers. Thanks for stopping by!

Oh, baby!

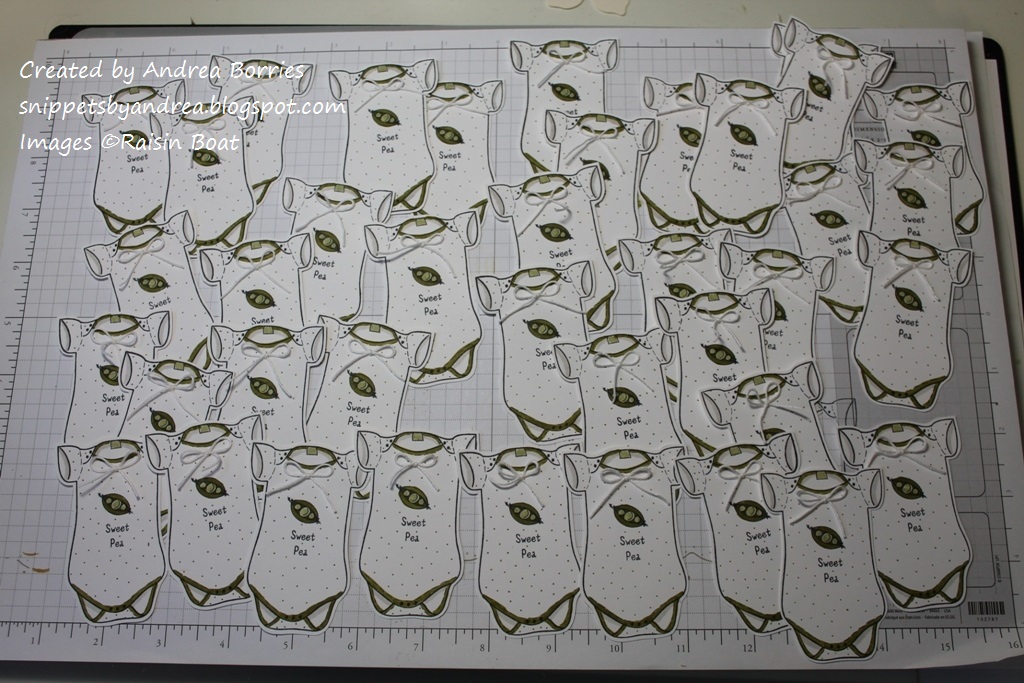
Next weekend we're having a shower to celebrate the soon-to-be-arriving first baby for one of my cousins. There are a lot of little ones on that side of my family, but it's been a few years since we've had a baby shower. I love shopping for all those adorable little baby things -- and making cute baby cards. I volunteered to make the invitations, and I thought I'd share them.

Supplies (all Stampin' Up! unless otherwise noted):
Stamps: Onesie (Raisin Boat)
Paper: Sahara Sand, Whisper White, Old Olive card stock; Succulent Garden Designer Series Paper (DSP)
Ink: Memento Tuxedo black; Old Olive, Pear Pizzazz, Always Artichoke markers; Warm Gray No. 3 alcohol marker (Copic Ciao); white gel pen
Accessories: Old Olive brads, white crochet thread (DMC), Mono Multi liquid glue, Dimensionals

My cousin doesn't know whether she is having a boy or a girl, so the card design and color combo needed to be neutral. I decided to use Sahara Sand and Old Olive, with white and accents of lighter green (Pear Pizzazz) and darker green (Always Artichoke). I also wanted to keep the layout fairly simple since I needed to make about forty cards of the same design.

I used Sahara Sand card stock for the card base and adhered a strip of plaid Sahara Sand DSP matted with Old Olive near the bottom of the card. I added two Old Olive brads to the strip and drew white faux stitches above and below the DSP.

The focal point of the card -- and the most tedious part to make -- was a onesie. I stamped the main image, along with the little pea pod and "Sweet Pea" sentiment, on white card stock and used markers to add color and shading. The image still looked too stark, so I added some Old Olive polka dots with the fine tip of the marker and a white bow made with crochet thread at the neckline.

I cut out all the onesies by hand and used Dimensionals to adhere them to the card bases, slightly toward the left side of the card. Then I stamped the "oh, baby!" sentiment to the right of the onesie, above the DSP layer.

For the inside of the invites, I typed up the pertinent details and printed them four to a page on standard printer paper. I cut them apart and used double-sided tape to adhere an insert inside each card. (I used just a small piece of tape, so if anyone was so inclined, they could carefully remove the insert and re-use the card.)

I do think these cards are pretty cute, although I was glad when they were done. I also volunteered to make six sets of cards as prizes for shower games, and I'll be sharing those soon. Thanks for stopping by!

Saturday, September 16, 2017

Dapper gentlemen

I am on the HR team at work, and one of my responsibilities is to plan the team calendar each month, including fun activities to have available in the break room. Occasionally I design and prep the materials for my coworkers to make a simple card, which is what I did last Father's Day. I realized recently that I never posted that card design, so here it is:

Supplies (all Stampin' Up! unless otherwise noted):
Paper: Whisper White, Basic Black, Soft Suede, Chocolate Chip, Bashful Blue, Pumpkin Pie, Old Olive, Real Red card stock; various Designer Series Paper (DSP)
Accessories: Stitched Shapes Framelits dies, Hipster Icon dies (Hero Arts), banner punch, Tiny Attacher (Tim Holtz), Dimensionals, Mono Multi liquid glue

I had to keep the design simple enough to be completed in fifteen minutes (by people who are not stampers or card makers), and at first I wasn't sure where to start. I poked around online looking for some ideas, and when I came across the set of Hipster Icons dies, I knew they would be perfect. So for my card layout I settled on a white card base with a large layer of DSP, die-cut pieces in various colors glued on a white oval, and a small banner stapled near the upper left corner of the card. (I made these cards with some of the leftover pieces after Father's Day, and I added the Basic Black layer behind the DSP.) I also wanted to keep the design generic enough to be used for a variety of occasions, just in case anyone didn't specifically need a Father's Day card, and I think this layout fits the bill nicely.

Thanks for stopping by!

Prize winner!

Last week Taylored Expressions celebrated their ninth birthday, and as part of the festivities they had a birthday sketch challenge. Nine challenge participants were randomly selected to win a prize package filled with crafty goodies, and I was lucky enough to be one of the winners! Here is what was included in the package:


Isn't that awesome?! It's a great selection of stamps; dies; an embossing folder; coordinated paper, ink and embellishments; and even some candy to nibble while crafting. I didn't have any of these products yet -- and Swedish Fish have been one of my favorite candies since I was a kid -- so I'm looking forward to trying them out!

Thanks for stopping by!