I was looking through photos of some of my past stamping projects, and I found one I never shared on my blog: a winter-themed matchbook teabag holder.
I think I made about fifty of these teabag holders during the 2015 holiday season. (I'm not sure why I never posted this project, but better later than never, I guess.) My friend and yoga teacher gave them to her yoga students as a little holiday gift.
Unfortunately, I don't have a supply list or dimensions for this teabag holder, but I followed the same basic directions I outlined in an earlier post about matchbook teabag holders.
I wanted to keep these relatively simple, so I used a piece of retired Designer Series Paper (DSP) for the background and a punched shape for the focal image. For a little embellishment, I used a rhinestone in the center of the snowflake and a piece of washi tape to cover the staple in the bottom of the matchbook. It would be easy to modify this project for any theme or occasion by just changing the DSP and focal shape. Wouldn't they be cute as place cards for a baby or bridal shower?
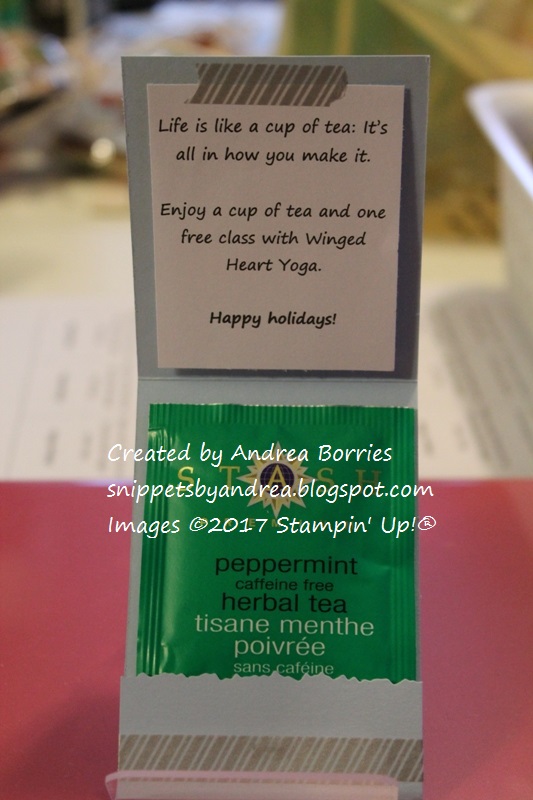
Inside the matchbook I used a small piece of washi tape to adhere a piece of paper with a typed sentiment. It would certainly be easy to stamp or write a sentiment directly inside the matchbook, but I used the separate paper so it acted as a coupon that recipients could turn in for a free yoga class.
I also chose the colors of the matchbook to coordinate with the teabag wrapper. I used a green-wrapped peppermint teabag in half of these matchbooks, and for the other half I used DSP with Cherry Cobbler to coordinate with red-wrapped chai spice teabags. That detail certainly isn't necessary, but I like it when everything matches.
To make these more child-friendly, swap out the teabag for a small pack of fruit snacks, M&Ms or other sweet treat. An older child could even help make and decorate the matchbooks for a fun project.
Thanks for stopping by!
Friday, January 20, 2017
Saturday, January 14, 2017
Coordinating birthday card and tealight cake
One of my coworkers celebrated her birthday at the end of December, and since she had given me a box of homemade cookies at Christmas, I wanted to return the thoughtful gesture with a little birthday gift. I went to our local candy shop and got a small chocolate bar that was molded to say "happy birthday" and then made a birthday card and coordinating tealight birthday cake.
Supplies (all Stampin' Up! unless otherwise noted):
Paper: Whisper White note cards and envelopes; Crumb Cake, Watermelon Wonder, Night of Navy card stock; gold glimmer paper; Affectionately Yours Specialty Designer Series Paper (DSP)
Accessories: Bake Me a Cake dies and Sun & Cloud dies (Taylored Expressions), Itty Bitty Accents punch pack, scallop circle punch, 1/2" circle punch, 3/4" circle punch, pearls, Wink of Stella gold glitter brush pen, gold metallic thread, Rhythm 'n Blues cup sequins (Craft Medley), Mono Multi liquid glue
Other: Battery-operated tealights
I wanted to make a card that was festive, but not frilly and definitely not Christmasy. (I've always thought it must be hard to have a birthday so close to Christmas.) So I settled on a layer cake with bold colors and gold accents.
I die cut the various parts of the cake out of card stock, DSP and gold glimmer paper. I adhered the pieces together and embellished the cake with a small punched flower on the top and a few pearls.
For the card base, I used a gold Wink of Stella glitter brush pen to create a spatter background, added some looped gold thread and then added the finished cake. I added three blue sequins to bring out the Night of Navy in the cake.
For the tealight cake, I wrapped the candle with a strip of DSP and added a narrow strip of gold glimmer paper along the bottom. To make the top I punched a scallop circle out of DSP and then punched a 1/2" circle out of the middle. I added a small pearl on each scallop and slipped the DSP over the candle "flame." I wanted a little more pizzazz on the cake, so I made a ring of gold glimmer paper using 1/2" and 3/4" circle punches and added that to the top. I love the extra little sparkle and shine when the candle is lit.
Thanks for stopping by!
Supplies (all Stampin' Up! unless otherwise noted):
Paper: Whisper White note cards and envelopes; Crumb Cake, Watermelon Wonder, Night of Navy card stock; gold glimmer paper; Affectionately Yours Specialty Designer Series Paper (DSP)
Accessories: Bake Me a Cake dies and Sun & Cloud dies (Taylored Expressions), Itty Bitty Accents punch pack, scallop circle punch, 1/2" circle punch, 3/4" circle punch, pearls, Wink of Stella gold glitter brush pen, gold metallic thread, Rhythm 'n Blues cup sequins (Craft Medley), Mono Multi liquid glue
Other: Battery-operated tealights
I wanted to make a card that was festive, but not frilly and definitely not Christmasy. (I've always thought it must be hard to have a birthday so close to Christmas.) So I settled on a layer cake with bold colors and gold accents.
I die cut the various parts of the cake out of card stock, DSP and gold glimmer paper. I adhered the pieces together and embellished the cake with a small punched flower on the top and a few pearls.
For the card base, I used a gold Wink of Stella glitter brush pen to create a spatter background, added some looped gold thread and then added the finished cake. I added three blue sequins to bring out the Night of Navy in the cake.
For the tealight cake, I wrapped the candle with a strip of DSP and added a narrow strip of gold glimmer paper along the bottom. To make the top I punched a scallop circle out of DSP and then punched a 1/2" circle out of the middle. I added a small pearl on each scallop and slipped the DSP over the candle "flame." I wanted a little more pizzazz on the cake, so I made a ring of gold glimmer paper using 1/2" and 3/4" circle punches and added that to the top. I love the extra little sparkle and shine when the candle is lit.
Thanks for stopping by!
Friday, January 13, 2017
Kitty update
It's been about two months since we adopted out two tabbies, Shawn and Gus, so I thought I'd post a quick update and share a few photos.
Shawn and Gus can be cuddly -- on their terms, like any respectable cats --and it's especially cute when they snuggle together:
Aww, brotherly love. Or is that a choke hold?
The boys are very playful. They run around like crazy, sometimes chasing each other and sometimes just because. I bought them some toy mice for Christmas, and Shawn especially loves to bat them around and carry them in his mouth, leaving them on the couch or my sister's bed. We also have a wand toy with a feather on the end that they both are crazy about. They jump, flip and run around in circles trying to catch the feather, and when we want to take a break we have to hide the toy so they don't destroy the feather. (Gus has found and pulled the toy out of a couple of hiding spots.)
And after all that playing, you have to take a break, right?
It's synchronized cat poses. (And that's one of the infamous mice to the left and in front of Shawn.)
Shawn and Gus are still shy and skittish at times -- they pretty much hide the entire time we have company -- but overall they've adjusted very well.
Thanks for stopping by!
Shawn and Gus can be cuddly -- on their terms, like any respectable cats --and it's especially cute when they snuggle together:
Aww, brotherly love. Or is that a choke hold?
The boys are very playful. They run around like crazy, sometimes chasing each other and sometimes just because. I bought them some toy mice for Christmas, and Shawn especially loves to bat them around and carry them in his mouth, leaving them on the couch or my sister's bed. We also have a wand toy with a feather on the end that they both are crazy about. They jump, flip and run around in circles trying to catch the feather, and when we want to take a break we have to hide the toy so they don't destroy the feather. (Gus has found and pulled the toy out of a couple of hiding spots.)
And after all that playing, you have to take a break, right?
It's synchronized cat poses. (And that's one of the infamous mice to the left and in front of Shawn.)
Shawn and Gus are still shy and skittish at times -- they pretty much hide the entire time we have company -- but overall they've adjusted very well.
Thanks for stopping by!
Saturday, January 7, 2017
2017 mini desktop calendar
I didn't make many handcrafted Christmas gifts this year (I've already shared the snowman tealight ornaments and cinnamon sugar jars), but I think my favorite was a mini desktop calendar with an easel display stand. I made four calendars to give away (and one to keep!), and all the recipients seemed to really like them.
I have several pictures to share, so I won't go into detail about each page. The 3" x 4" calendar pages were from Taylored Expressions and were preprinted with the calendar dates and colored background area. I used the coordinating Build a Scene - Calendar dies to cut out the card stock border for each month. Additional specific supplies for each month are listed with each photo (all supplies are Stampin' Up! unless otherwise noted).
January
Stamps: Winter Penguin (Lawn Fawn)
Paper: Whisper White, Basic Gray card stock
Ink: Memento Tuxedo Black, Basic Gray, Smokey Slate, Pumpkin PIe, Pool Party
Accessories: Frosted Sequins, Fine-Tip Glue Pen
February
Stamps: Quick Critters stamp and die combo (Taylored Expressions)
Paper: Soft Suede, Whisper White, Pink Passion card stock; Into the Woods Designer Series Paper (DSP)
Ink: Early Espresso, Pink Passion, white gel pen
Accessories: Heart border punch, gold Wink of Stella glitter brush pen, Dimensionals, Mono Multi liquid glue
March
Paper: Cucumber Crush, Whisper White card stock; gold glimmer paper
Accessories: Circles Collection Framelits dies, banner punch, small heart punch, Essentials Paper-Piercing Pack, paper-piercing mat and tool, Dimensionals
April
Paper: Bermuda Bay, Daffodil Delight, Crushed Curry, Whisper White card stock
Accessories: Sun and Clouds dies (Taylored Expressions), rhinestones, Dimensionals
May
Paper: Old Olive, Real REd, Pumpkin Pie, Rich Razzleberry, Smoky Slate card stock
Accessories: Flowers and Stems dies, Watering Can die (Taylored Expressions); Brights Candy Dots; Mono Multi liquid glue
June
Paper: Vellum, Basic Black, Pumpkin Pie card stock
Accessories: Butterflies Thinlits dies, Bold Butterflies Framelits dies, rhinestones, Glue Dots
July
Paper: Island Indigo card stock, silver glimmer paper, All Abloom DSP Stack
Accessories: Stars Framelits dies, Star Confetti border punch, Dimensionals
August
Stamps: Stuck on You (Lawn Fawn)
Paper: Whisper White, Chocolate Chip card stock
Ink: Baked Brown Sugar, Chocolate Chip, Kiwi Kiss, Sweet Sugarplum
Accessories: Stuck on You Lawn Cuts dies (Lawn Fawn), Dimensionals, Mono Multi liquid glue
September
Stamps: To Thine Own Shelf (Simon Says Stamp)
Paper: Night of Navy, Whisper White card stock
Ink: Night of Navy, Cucumber Crush, Real Red, Chocolate Chip
Accessories: Mono Multi liquid glue
October
Paper: Basic Black card stock, silver glimmer paper
Accessories: Bat punch, 1-1/4" circle punch, Dimensionals
November
Paper: Crumb Cake card stock, copper foil sheets, Affectionately Yours Specialty DSP
Accessories: Autumn Accents die, linen thread
December
Paper: Textured Old Olive card stock, gold paper
Ink: White gel pen, black permanent marker (Sharpie)
Accessories: Merry Minis trio punches, gold Wink of Stella glitter brush pen, Glue Dots, Dimensionals
I thought the calendars turned out so cute, and I didn't want each page to just get tossed away at the end of the month. So when I packaged up the calendars I included a little note with ideas for reusing the pages (e.g., cut off the top portion and use it as a gift tag or write a note and slip it in a lunch bag or backpack).
Thanks for stopping by!
I have several pictures to share, so I won't go into detail about each page. The 3" x 4" calendar pages were from Taylored Expressions and were preprinted with the calendar dates and colored background area. I used the coordinating Build a Scene - Calendar dies to cut out the card stock border for each month. Additional specific supplies for each month are listed with each photo (all supplies are Stampin' Up! unless otherwise noted).
January
Stamps: Winter Penguin (Lawn Fawn)
Paper: Whisper White, Basic Gray card stock
Ink: Memento Tuxedo Black, Basic Gray, Smokey Slate, Pumpkin PIe, Pool Party
Accessories: Frosted Sequins, Fine-Tip Glue Pen
February
Stamps: Quick Critters stamp and die combo (Taylored Expressions)
Paper: Soft Suede, Whisper White, Pink Passion card stock; Into the Woods Designer Series Paper (DSP)
Ink: Early Espresso, Pink Passion, white gel pen
Accessories: Heart border punch, gold Wink of Stella glitter brush pen, Dimensionals, Mono Multi liquid glue
March
Paper: Cucumber Crush, Whisper White card stock; gold glimmer paper
Accessories: Circles Collection Framelits dies, banner punch, small heart punch, Essentials Paper-Piercing Pack, paper-piercing mat and tool, Dimensionals
April
Paper: Bermuda Bay, Daffodil Delight, Crushed Curry, Whisper White card stock
Accessories: Sun and Clouds dies (Taylored Expressions), rhinestones, Dimensionals
May
Paper: Old Olive, Real REd, Pumpkin Pie, Rich Razzleberry, Smoky Slate card stock
Accessories: Flowers and Stems dies, Watering Can die (Taylored Expressions); Brights Candy Dots; Mono Multi liquid glue
June
Paper: Vellum, Basic Black, Pumpkin Pie card stock
Accessories: Butterflies Thinlits dies, Bold Butterflies Framelits dies, rhinestones, Glue Dots
July
Paper: Island Indigo card stock, silver glimmer paper, All Abloom DSP Stack
Accessories: Stars Framelits dies, Star Confetti border punch, Dimensionals
August
Stamps: Stuck on You (Lawn Fawn)
Paper: Whisper White, Chocolate Chip card stock
Ink: Baked Brown Sugar, Chocolate Chip, Kiwi Kiss, Sweet Sugarplum
Accessories: Stuck on You Lawn Cuts dies (Lawn Fawn), Dimensionals, Mono Multi liquid glue
September
Stamps: To Thine Own Shelf (Simon Says Stamp)
Paper: Night of Navy, Whisper White card stock
Ink: Night of Navy, Cucumber Crush, Real Red, Chocolate Chip
Accessories: Mono Multi liquid glue
October
Paper: Basic Black card stock, silver glimmer paper
Accessories: Bat punch, 1-1/4" circle punch, Dimensionals
November
Paper: Crumb Cake card stock, copper foil sheets, Affectionately Yours Specialty DSP
Accessories: Autumn Accents die, linen thread
December
Paper: Textured Old Olive card stock, gold paper
Ink: White gel pen, black permanent marker (Sharpie)
Accessories: Merry Minis trio punches, gold Wink of Stella glitter brush pen, Glue Dots, Dimensionals
I thought the calendars turned out so cute, and I didn't want each page to just get tossed away at the end of the month. So when I packaged up the calendars I included a little note with ideas for reusing the pages (e.g., cut off the top portion and use it as a gift tag or write a note and slip it in a lunch bag or backpack).
Thanks for stopping by!
Friday, January 6, 2017
April 2017 OnStage display stamper submission
Happy new year! I'm trying to get back into the swing of things after the holidays and other family events, so my first blog post of the year is my application for display stamper at Stampin' Up!'s April OnStage event. At OnStage, demonstrators get together to learn creative techniques and business tips, to make projects, and to get sneak-peeks of upcoming products. There are also display boards filled with sample cards, scrapbook pages and other projects. Demonstrators can apply to stamp projects for the display boards, and I decided to throw my hat into the ring.
For the application, I had to create three cards, a scrapbook page, and two 3D items. I will include the products used for each item, but I'll keep the details to a minimum. If you have any specific questions, post a comment and I'll reply as soon as I can.
Supplies (all Stampin' Up!):
Stamps: Flower Patch
Paper: Whisper White, Thick Whisper White card stock
Ink: Memento Tuxedo Black, Daffodil Delight, Crushed Curry, Pear Pizzazz, Old Olive, Calypso Coral, Real Red, Pool Party
Accessories: Flower Fair Framelits, Brick Wall embossing folder, White Perfect Accents, Dimensionals, Glue Dots
It's been brutally cold lately, and these bright flowers were just what I needed. I used Glue Dots and Dimensionals to adhere the die-cut flowers on the embossed background so they're at different heights. To add extra dimension and shape to the banner, I stacked three Dimensionals behind the middle of the banner, gently curled up the ends and placed a Glue Dot near each end.
Supplies (all Stampin' Up!):
Stamps: Butterfly Basics
Paper: Pear Pizzazz, So Saffron, Early Espresso, Very Vanilla card stock
Ink: So Saffron, Pear Pizzazz, Early Espresso, VersaMark
Accessories: Layering Circles Framelits dies, Bold Butterfly Framelits dies, gold sequin trim, gold natural trim, gold and clear Wink of Stella glitter brush pens, clear embossing powder, Mono Multi liquid glue, Dimensionals, Glue Dots
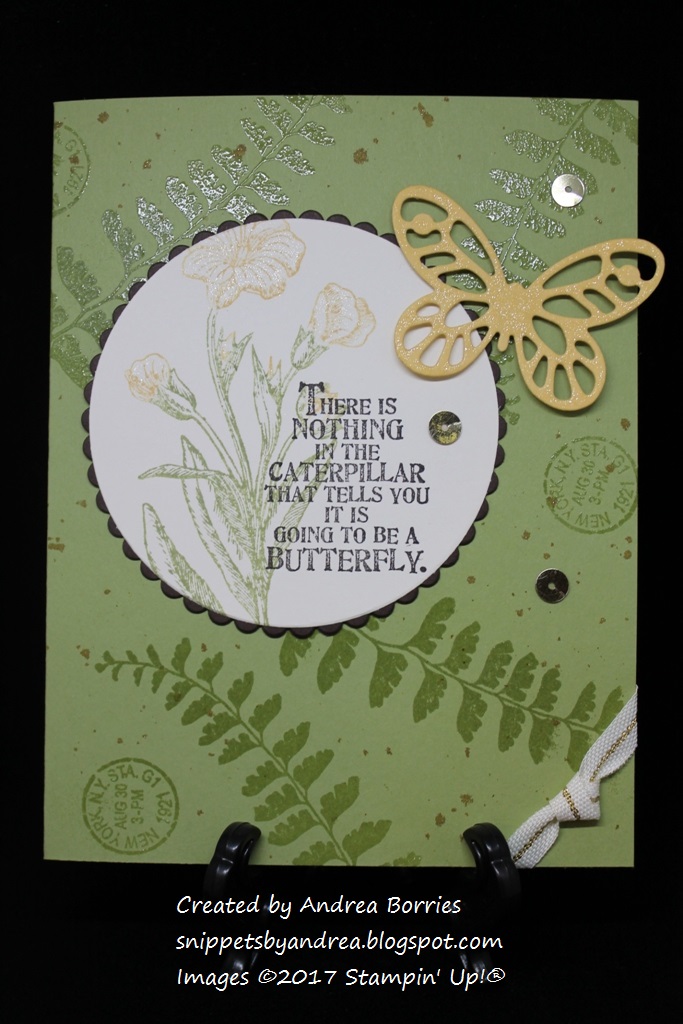
To make the background for this card, I stamped the leaves and postmark with VersaMark ink and embossed them with clear embossing powder. I tapped the gold Wink of Stella glitter brush pen to make the splatters.
For a little extra sparkle I painted the yellow stamped flowers and the die-cut butterfly with the clear Wink of Stella glitter brush pen.
Supplies (all Stampin' Up!):
Stamps: By the Tide, Wetlands
Paper: Very Vanilla, Soft Suede card stock; Serene Scenery Designer Series Paper (DSP) Stack
Ink: Soft Suede
Accessories: Burlap ribbon, linen thread, Subtles enamel shapes, corner rounder, sponge, Dimensionals
I love how the images, background paper and burlap ribbon on this card combine to create a great nautical feeling. To soften the straight lines of the Very Vanilla layers and the DSP, I rounded two of the corners on each piece. I used a piece of linen thread to gather the burlap ribbon and add a fun detail without the bulk of a bow or knot.
Supplies (all Stampin' Up!):
Stamps: Labeler Alphabet, Falling Leaves, Hardwood
Paper: Whisper White card stock
Ink: Pumpkin Pie, Cherry Cobbler, Old Olive, Early Espresso, Crumb Cake, Project Life journaling pen
Accessories: Variety Pack 6" x 8" Project Life Photo Pocket Pages, Seasonal Snaphot 2015 Project Life Accessory Pack, linen thread, Glue Dots
Autumn is my favorite season, and I had a lot of fun combining these fall photos with some of the elements from the Seasonal Snapshot 2015 Project Life Accessory Pack. The wooden piece with the leaf cut-out looked a little plain, so I stamped it with the Hardwood background stamp and Crumb Cake ink to add some subtle visual interest. I used stamps to create my own journaling cards, added sequins in one of the pockets and adhered a linen thread bow on one of the pumpkins in the photo of the red wagon. I love how easy it was to put this together with the Project Life pocket pages and accessories.
Supplies (all Stampin' Up!):
Stamps: Hey, Chick
Paper: Shimmery White, Basic Black card stock; window sheets
Ink: Jet Black StazOn, watercolor pencils
Accessories: Layering Circles Framelits dies, Aqua Painter, linen thread, 1/8" hole punch, Simply Scored Tool, Sticky Strip
For my first 3D project I made an oldie-but-goodie treat holder called a sour cream container. I used two fun new products -- the Hey, Chick stamp set and watercolor pencils -- and they worked perfectly together.
I used the Simply Scored Tool to make two scores lines along each long side of the card stock so when the container is assembled it has a more finished look. I adhered everything together with Sticky Strip to make sure it stayed closed. I wanted to add a little embellishment, so I punched two 1/8" holes on either end and tied a bow with double strands of linen thread.
Here's another view so you can see the tag on the top:
For my last 3D project, I made a mini banner with the new Lift Me Up stamp set, Up and Away Thinlits dies, and Carried Away DSP.
Supplies (all Stampin' Up!):
Stamps: Lift Me Up
Paper: Whisper White card stock, Carried Away DSP
Ink: Watermelon Wonder, Peekaboo Peach, Smoky Slate, Mint Macaron, Early Espresso
Accessories: Up and Away Thinlits dies, Pyramid Pals Thinlits dies, Affectionately Yours Designer Washi Tape, linen thread, Metallic Enamel Shapes, Sprinkles Embellishments, Metallic Foil Doilies, 1/16" hole punch, Mono Multi liquid glue, Fine-Tip Glue Pen, Dimensionals
I used the Pyramid Pals Thinlits dies to make the triangle pennant shapes, and folded strips of washi tape to make the small striped pennants. For embellishment, I used a gold doily behind the sentiment, gold enamel hearts on the washi tape pennants and Sprinkles Embellishments on the hot-air balloons.
This mini banner would be perfect hanging on a mirror, picture frame or bulletin board. And it's just the right size to fold up, tuck in a padded envelope and send to a friend for a fun surprise.
I hope you enjoyed my projects for my display stamper submission. Wish me luck and thanks for stopping by!
For the application, I had to create three cards, a scrapbook page, and two 3D items. I will include the products used for each item, but I'll keep the details to a minimum. If you have any specific questions, post a comment and I'll reply as soon as I can.
Supplies (all Stampin' Up!):
Stamps: Flower Patch
Paper: Whisper White, Thick Whisper White card stock
Ink: Memento Tuxedo Black, Daffodil Delight, Crushed Curry, Pear Pizzazz, Old Olive, Calypso Coral, Real Red, Pool Party
Accessories: Flower Fair Framelits, Brick Wall embossing folder, White Perfect Accents, Dimensionals, Glue Dots
It's been brutally cold lately, and these bright flowers were just what I needed. I used Glue Dots and Dimensionals to adhere the die-cut flowers on the embossed background so they're at different heights. To add extra dimension and shape to the banner, I stacked three Dimensionals behind the middle of the banner, gently curled up the ends and placed a Glue Dot near each end.
Supplies (all Stampin' Up!):
Stamps: Butterfly Basics
Paper: Pear Pizzazz, So Saffron, Early Espresso, Very Vanilla card stock
Ink: So Saffron, Pear Pizzazz, Early Espresso, VersaMark
Accessories: Layering Circles Framelits dies, Bold Butterfly Framelits dies, gold sequin trim, gold natural trim, gold and clear Wink of Stella glitter brush pens, clear embossing powder, Mono Multi liquid glue, Dimensionals, Glue Dots
To make the background for this card, I stamped the leaves and postmark with VersaMark ink and embossed them with clear embossing powder. I tapped the gold Wink of Stella glitter brush pen to make the splatters.
For a little extra sparkle I painted the yellow stamped flowers and the die-cut butterfly with the clear Wink of Stella glitter brush pen.
Supplies (all Stampin' Up!):
Stamps: By the Tide, Wetlands
Paper: Very Vanilla, Soft Suede card stock; Serene Scenery Designer Series Paper (DSP) Stack
Ink: Soft Suede
Accessories: Burlap ribbon, linen thread, Subtles enamel shapes, corner rounder, sponge, Dimensionals
I love how the images, background paper and burlap ribbon on this card combine to create a great nautical feeling. To soften the straight lines of the Very Vanilla layers and the DSP, I rounded two of the corners on each piece. I used a piece of linen thread to gather the burlap ribbon and add a fun detail without the bulk of a bow or knot.
Supplies (all Stampin' Up!):
Stamps: Labeler Alphabet, Falling Leaves, Hardwood
Paper: Whisper White card stock
Ink: Pumpkin Pie, Cherry Cobbler, Old Olive, Early Espresso, Crumb Cake, Project Life journaling pen
Accessories: Variety Pack 6" x 8" Project Life Photo Pocket Pages, Seasonal Snaphot 2015 Project Life Accessory Pack, linen thread, Glue Dots
Autumn is my favorite season, and I had a lot of fun combining these fall photos with some of the elements from the Seasonal Snapshot 2015 Project Life Accessory Pack. The wooden piece with the leaf cut-out looked a little plain, so I stamped it with the Hardwood background stamp and Crumb Cake ink to add some subtle visual interest. I used stamps to create my own journaling cards, added sequins in one of the pockets and adhered a linen thread bow on one of the pumpkins in the photo of the red wagon. I love how easy it was to put this together with the Project Life pocket pages and accessories.
Supplies (all Stampin' Up!):
Stamps: Hey, Chick
Paper: Shimmery White, Basic Black card stock; window sheets
Ink: Jet Black StazOn, watercolor pencils
Accessories: Layering Circles Framelits dies, Aqua Painter, linen thread, 1/8" hole punch, Simply Scored Tool, Sticky Strip
For my first 3D project I made an oldie-but-goodie treat holder called a sour cream container. I used two fun new products -- the Hey, Chick stamp set and watercolor pencils -- and they worked perfectly together.
I used the Simply Scored Tool to make two scores lines along each long side of the card stock so when the container is assembled it has a more finished look. I adhered everything together with Sticky Strip to make sure it stayed closed. I wanted to add a little embellishment, so I punched two 1/8" holes on either end and tied a bow with double strands of linen thread.
Here's another view so you can see the tag on the top:
For my last 3D project, I made a mini banner with the new Lift Me Up stamp set, Up and Away Thinlits dies, and Carried Away DSP.
Supplies (all Stampin' Up!):
Stamps: Lift Me Up
Paper: Whisper White card stock, Carried Away DSP
Ink: Watermelon Wonder, Peekaboo Peach, Smoky Slate, Mint Macaron, Early Espresso
Accessories: Up and Away Thinlits dies, Pyramid Pals Thinlits dies, Affectionately Yours Designer Washi Tape, linen thread, Metallic Enamel Shapes, Sprinkles Embellishments, Metallic Foil Doilies, 1/16" hole punch, Mono Multi liquid glue, Fine-Tip Glue Pen, Dimensionals
I used the Pyramid Pals Thinlits dies to make the triangle pennant shapes, and folded strips of washi tape to make the small striped pennants. For embellishment, I used a gold doily behind the sentiment, gold enamel hearts on the washi tape pennants and Sprinkles Embellishments on the hot-air balloons.
This mini banner would be perfect hanging on a mirror, picture frame or bulletin board. And it's just the right size to fold up, tuck in a padded envelope and send to a friend for a fun surprise.
I hope you enjoyed my projects for my display stamper submission. Wish me luck and thanks for stopping by!
Subscribe to:
Posts (Atom)