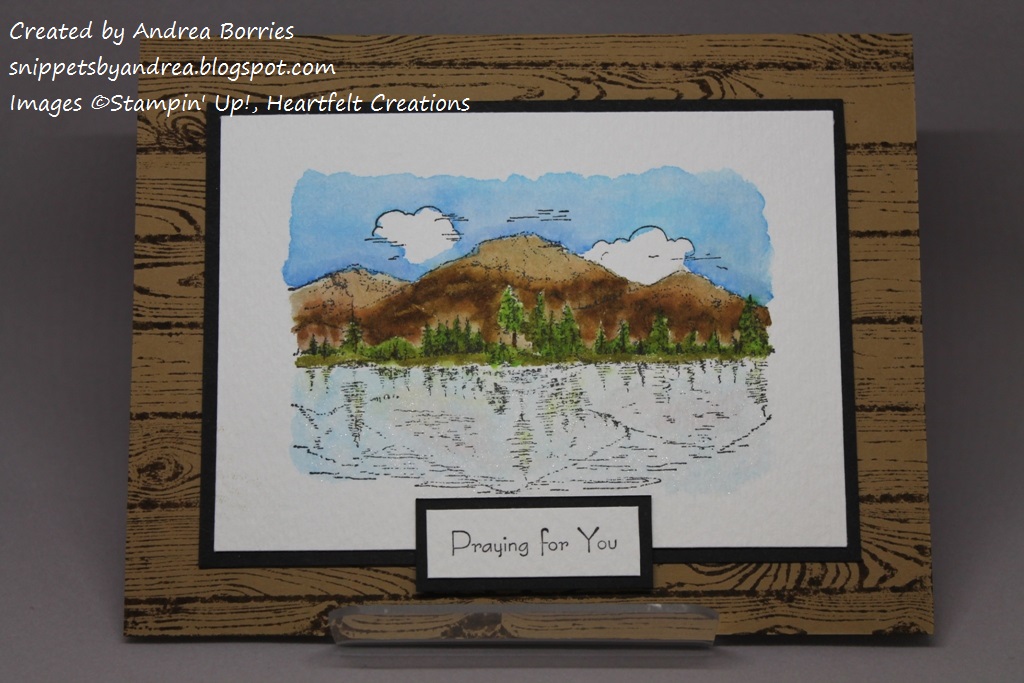
I don't keep many sympathy cards on hand, so when my uncle passed away recently I needed to make a card for my aunt and cousins. One of the things my uncle loved was spending time at their family cabin in northern Minnesota. So instead of making a sympathy card with the traditional flower images, I decided to use a nature scene.
Supplies (all Stampin' Up! unless otherwise noted):
Stamps: Natural Beauty (Heartfelt Creations), Hardwood, Very Versatile
Paper: Basic Black, Baked Brown Sugar card stock; watercolor paper (Strathmore)
Ink: Soft Suede, Jet Black StazOn; ZIG Clean Color Real Brush pens, Nos. 036, 041, 061, 043, 065, 037; clear Wink of Stella glitter brush pen
Accessories: Water brush with detail tip (ZIG), Dimensionals
I realize we don't have mountains in Minnesota, but I love the serenity of this image, so I thought it would be appropriate for a sympathy card. I stamped the image on watercolor paper using StazOn ink and then colored it with ZIG Clean Color Real Brush pens. I haven't quite mastered the technique, but it is fun, and I was pretty pleased with the results (although I do wish I had a gray pen for the mountains instead of just browns). I add a light layer of clear Wink of Stella over the water to give it a sparkling-in-the-sun look.
I mounted the focal image on a layer of Basic Black card stock and then used Dimensionals to adhere the panel to a Baked Brown Sugar card base stamped with the Hardwood background stamp. I wasn't sure of the best way to add the sentiment; I debated stamping it directly on the focal layer, moving the separate layer to the side, or even omitting it altogether. I finally decided to keep everything centered and attach the sentiment at the bottom middle of the focal image.
I've been busy the last couple of days rearranging my stamps and supplies (I have a lot of new stuff that I haven't used yet!). I wanted to get everything organized because I have the next few days off work and I want to stamp up a storm. So stay tuned later this week for (I hope!) fun new projects.
Thanks for stopping by!
Monday, June 20, 2016
Wednesday, June 15, 2016
Sunshine Wishes Thinlits dies to the rescue
Last weekend I needed to make an anniversary card. I didn't have much time, and I didn't really have any ideas -- until I remembered I had ordered the new Sunshine Wishes Thinlits dies in my last Stampin' Up! order. I was saved!
Supplies (all Stampin' Up! unless otherwise noted):
Stamps: Grunge Elements (Artistic Outpost)
Paper: Calypso Coral, Early Espresso card stock; Stella & Rose - Mabel paper pad (My Mind's Eye)
Ink: Early Espresso
Accessories: Sunshine Wishes Thinlits dies, sequins (Paper Pumpkin leftovers), Fine-Tip Glue Pen
This heart shape was one of the reasons I wanted to order these dies as soon as I saw them. And they made this card so simple. One Calypso Coral heart and one Early Espresso heart along with the word "love" are the focal images. I added a few sequins for a little sparkle and stamped around the edge of the background paper for a distressed look. And that's it! I'll definitely be keeping this set of dies on hand for those "I need a quick card" occasions.
Thanks for stopping by!
Supplies (all Stampin' Up! unless otherwise noted):
Stamps: Grunge Elements (Artistic Outpost)
Paper: Calypso Coral, Early Espresso card stock; Stella & Rose - Mabel paper pad (My Mind's Eye)
Ink: Early Espresso
Accessories: Sunshine Wishes Thinlits dies, sequins (Paper Pumpkin leftovers), Fine-Tip Glue Pen
This heart shape was one of the reasons I wanted to order these dies as soon as I saw them. And they made this card so simple. One Calypso Coral heart and one Early Espresso heart along with the word "love" are the focal images. I added a few sequins for a little sparkle and stamped around the edge of the background paper for a distressed look. And that's it! I'll definitely be keeping this set of dies on hand for those "I need a quick card" occasions.
Thanks for stopping by!
Saturday, June 11, 2016
Hollywood glitz
In my post a couple of weeks ago, I mentioned that I submitted two cards for a contest at the Rubber Stamp Expo. Well, today was the big day ... and I didn't win. It's a bummer, but I'm actually not as disappointed as I thought I'd be. There were more entries than the other two years I'd entered, and the theme this year was "Hollywood glitz," which is so not my usual style. At any rate, now that the contest is over, I'll share my cards with you.
Supplies (all Stampin' Up! unless otherwise noted):
Stamps: Print Pattern, Sparkles and Smiles (Penny Black)
Paper: Basic Black, Shimmery White card stock; silver glitter paper; red foil sheets
Ink: VersaMark, Memento Tuxedo Black, Stardust Clear Gelly Roll pen (Sakura)
Accessories: Dress Up Framelits dies, Fancy Fan embossing folder, Iridescent Ice embossing powder, rhinestones, Dimensionals
When I thought about my stamping supplies in relation to glitz and glamor, I decided that a shiny red dress would fit the bill. I die cut the dress from red foil and added a silver glimmer paper belt and rhinestone buttons. I adhered the dress to a black dress form and used Dimensionals to attach it to a piece of embossed Shimmery White card stock.
For the card base I stamped the Print Pattern background on a Basic Black card with VersaMark ink and embossed it with Iridescent Ice embossing powder. I stamped a sentiment on a Shimmery White pennant and added a few dots with a Stardust Gelly Roll pen. I finished off the card with a few more sequins. (Note: The card base is slightly narrower than 4-1/4", so the card will still fit in an A2 envelope even though the pennant extends past the edge of the card.)
Supplies (all Stampin' Up! unless otherwise noted):
Stamps: From the Garden, Endless Birthday Wishes, Tin of Cards, Over the Rainbow, Designer Typeset; Seriously Amazing, Birthday Bundle, Hello Sunshine, Blissful Bouquet (all Stampin' Up! Paper Pumpkin); Good Fortune (Lawn Fawn); To Thine Own Shelf (Simon Says Stamp)
Paper: Baked Brown Sugar, Real Red card stock; black glitter paper; gold foil sheets
Ink: Baked Brown Sugar, VersaMark
Accessories: Stars Framelits dies, clear and gold detail embossing powders, pearls, alphabet stencil (Frances Meyer, Inc.), sequins (Craft Medley Box of Chocolate and Paper Pumpkin leftovers), Wink of Stelly gold glitter brush pen, Fine-Tip Glue Pen
For this card I took the idea of a Hollywood star and changed it up a bit. I cut a star from black glitter paper for the glitz. I added a red banner in a nod to the red carpet and stamped and embossed the words "you are a." Then I traced the letters for "star" on a gold foil sheet and cut out the letters by hand. (I don't mind fussy cutting, but this was the point when I really wished I owned some sort of alphabet dies.) To give the letters a marquee look, I added tiny pearls to look like lights. (I got this idea from a post by another Stampin' Up! demo, Allison Okamitsu, who is very creative and talented.) I glued all the pieces onto the star and then attached everything to the card base with Dimensionals.
For the background, I stamped various sentiments from a whole bunch of different stamp sets. It was a little time consuming, but I was really happy with the overall effect. Then for a last touch of sparkle I added a few sequins.
Even though I didn't win the card contest, I had a great time at the stamp expo. And between this stamp show, the one I went to in April and the new Stampin' Up! catalog, I have a huge pile of new goodies to play with. I'd better get to work! Thanks for stopping by!
Supplies (all Stampin' Up! unless otherwise noted):
Stamps: Print Pattern, Sparkles and Smiles (Penny Black)
Paper: Basic Black, Shimmery White card stock; silver glitter paper; red foil sheets
Ink: VersaMark, Memento Tuxedo Black, Stardust Clear Gelly Roll pen (Sakura)
Accessories: Dress Up Framelits dies, Fancy Fan embossing folder, Iridescent Ice embossing powder, rhinestones, Dimensionals
When I thought about my stamping supplies in relation to glitz and glamor, I decided that a shiny red dress would fit the bill. I die cut the dress from red foil and added a silver glimmer paper belt and rhinestone buttons. I adhered the dress to a black dress form and used Dimensionals to attach it to a piece of embossed Shimmery White card stock.
For the card base I stamped the Print Pattern background on a Basic Black card with VersaMark ink and embossed it with Iridescent Ice embossing powder. I stamped a sentiment on a Shimmery White pennant and added a few dots with a Stardust Gelly Roll pen. I finished off the card with a few more sequins. (Note: The card base is slightly narrower than 4-1/4", so the card will still fit in an A2 envelope even though the pennant extends past the edge of the card.)
Supplies (all Stampin' Up! unless otherwise noted):
Stamps: From the Garden, Endless Birthday Wishes, Tin of Cards, Over the Rainbow, Designer Typeset; Seriously Amazing, Birthday Bundle, Hello Sunshine, Blissful Bouquet (all Stampin' Up! Paper Pumpkin); Good Fortune (Lawn Fawn); To Thine Own Shelf (Simon Says Stamp)
Paper: Baked Brown Sugar, Real Red card stock; black glitter paper; gold foil sheets
Ink: Baked Brown Sugar, VersaMark
Accessories: Stars Framelits dies, clear and gold detail embossing powders, pearls, alphabet stencil (Frances Meyer, Inc.), sequins (Craft Medley Box of Chocolate and Paper Pumpkin leftovers), Wink of Stelly gold glitter brush pen, Fine-Tip Glue Pen
For this card I took the idea of a Hollywood star and changed it up a bit. I cut a star from black glitter paper for the glitz. I added a red banner in a nod to the red carpet and stamped and embossed the words "you are a." Then I traced the letters for "star" on a gold foil sheet and cut out the letters by hand. (I don't mind fussy cutting, but this was the point when I really wished I owned some sort of alphabet dies.) To give the letters a marquee look, I added tiny pearls to look like lights. (I got this idea from a post by another Stampin' Up! demo, Allison Okamitsu, who is very creative and talented.) I glued all the pieces onto the star and then attached everything to the card base with Dimensionals.
For the background, I stamped various sentiments from a whole bunch of different stamp sets. It was a little time consuming, but I was really happy with the overall effect. Then for a last touch of sparkle I added a few sequins.
Even though I didn't win the card contest, I had a great time at the stamp expo. And between this stamp show, the one I went to in April and the new Stampin' Up! catalog, I have a huge pile of new goodies to play with. I'd better get to work! Thanks for stopping by!
Sunday, June 5, 2016
Background made with DSP scraps
Do you hold on to those little leftover pieces of patterned paper because you can't bear to toss them? I certainly do. One great way to use them up is by creating a block-style background for a card.
Supplies (all Stampin' Up!):
Stamps: Daydream Medallions, Party Hearty
Paper: Island Indigo, Whisper White card stock; Sycamore Street Designer Series Paper (DSP)
Ink: Island Indigo, Pool Party
Accessories: Floral Frames Collection Framelits dies, Summer Smooches Designer Fabric Brads, 1-3/4" circle punch, rhinestones, Dimensionals
This technique is great for packs of patterned paper because the colors and styles are all coordinated for you. The DSP I used here, Sycamore Street, has a lot of strong colors and patterns so I wasn't sure how well it would work for this card. It's definitely a busy background, but I like it.
To make this background, collect several scraps of coordinating patterned paper. Choose a piece and adhere it in one corner of your card front, leaving a narrow border of card stock (I went with about 1/8"). Working from that corner, keep adding pieces, trimming as necessary to make them fit. Be sure to mix up the size, shape and orientation of the pieces. This technique is also fun to do with solid color card stock (I like to use three or four colors) or pieces that are all the same color but are embossed with different textures.
I used a large focal image with plenty of white showing to break up all the patterns. I cut out both stamped pieces with the Floral Frames Collection Framelits dies and attached them together with a fabric brad. I added two flags at the bottom of the focal point (another pattern from the Sycamore Street DSP pack) and attached it to the card.
Thanks for stopping by!
Supplies (all Stampin' Up!):
Stamps: Daydream Medallions, Party Hearty
Paper: Island Indigo, Whisper White card stock; Sycamore Street Designer Series Paper (DSP)
Ink: Island Indigo, Pool Party
Accessories: Floral Frames Collection Framelits dies, Summer Smooches Designer Fabric Brads, 1-3/4" circle punch, rhinestones, Dimensionals
This technique is great for packs of patterned paper because the colors and styles are all coordinated for you. The DSP I used here, Sycamore Street, has a lot of strong colors and patterns so I wasn't sure how well it would work for this card. It's definitely a busy background, but I like it.
To make this background, collect several scraps of coordinating patterned paper. Choose a piece and adhere it in one corner of your card front, leaving a narrow border of card stock (I went with about 1/8"). Working from that corner, keep adding pieces, trimming as necessary to make them fit. Be sure to mix up the size, shape and orientation of the pieces. This technique is also fun to do with solid color card stock (I like to use three or four colors) or pieces that are all the same color but are embossed with different textures.
I used a large focal image with plenty of white showing to break up all the patterns. I cut out both stamped pieces with the Floral Frames Collection Framelits dies and attached them together with a fabric brad. I added two flags at the bottom of the focal point (another pattern from the Sycamore Street DSP pack) and attached it to the card.
Thanks for stopping by!
Thursday, June 2, 2016
Grow, garden, grow!
We had a gorgeous afternoon, so I took advantage of the sun and snapped a few pictures of the newly planted garden.
Here's the whole garden -- with the new compost bin my dad built. And that corner of the garden is perfect for it because it often stayed too damp for the veggies. We also tried putting down some material to block the weeds. This one is a recycled paper-like product that we can just till into the soil in the fall.
This is the back half of the garden. The cages on the left side are for pepper plants, and the three taller ones in the back are the tomatoes. The four plants in the back right corner are Brussels Sprouts, and the one in the foreground on the right is a sunburst squash (related to pattypan squash).
And here's the front half of the garden. On the left the first plant is zucchini (just one plant this year, thank goodness), and then there are four broccoli plants. The trellis in the middle is for the two cucumber plants, and then behind the trellis (or below, depending on your perspective), will be lettuce, if it comes up. The lettuce plants we bought ended up looking a little raggedy before we planted them, so we added some lettuce seeds for good measure. On the right side is the rhubarb and then the two bean towers.
Here are our crazy strawberries. Last summer I planted strawberries in the two large pots sitting outside the garden. This spring the pots are filled with just weeds, and the strawberries planted themselves in the garden. So we let them just have that corner (along with a few pots of herbs). The large bush in the upper left corner is raspberries, so that will be our berry patch.
We already have a few good-sized strawberries. There were actually a few berries I was looking forward to picking in May but some of the local fauna enjoyed them before we could.
The two strawberries I picked today probably could have used one more day of ripening. But I was worried that I might not see them again if I waited.
Fresh strawberries. Yum!
I also put out some fresh bird food in the backyard, and one of our chipmunk friends wasted no time filling his cheeks. (How they cram all that food in there I'll never know.) He was too busy to even care that I was taking pictures.
I'll try to post a few garden updates over the summer so you can see how things are progressing. Thanks for stopping by!
Here's the whole garden -- with the new compost bin my dad built. And that corner of the garden is perfect for it because it often stayed too damp for the veggies. We also tried putting down some material to block the weeds. This one is a recycled paper-like product that we can just till into the soil in the fall.
This is the back half of the garden. The cages on the left side are for pepper plants, and the three taller ones in the back are the tomatoes. The four plants in the back right corner are Brussels Sprouts, and the one in the foreground on the right is a sunburst squash (related to pattypan squash).
And here's the front half of the garden. On the left the first plant is zucchini (just one plant this year, thank goodness), and then there are four broccoli plants. The trellis in the middle is for the two cucumber plants, and then behind the trellis (or below, depending on your perspective), will be lettuce, if it comes up. The lettuce plants we bought ended up looking a little raggedy before we planted them, so we added some lettuce seeds for good measure. On the right side is the rhubarb and then the two bean towers.
Here are our crazy strawberries. Last summer I planted strawberries in the two large pots sitting outside the garden. This spring the pots are filled with just weeds, and the strawberries planted themselves in the garden. So we let them just have that corner (along with a few pots of herbs). The large bush in the upper left corner is raspberries, so that will be our berry patch.
We already have a few good-sized strawberries. There were actually a few berries I was looking forward to picking in May but some of the local fauna enjoyed them before we could.
The two strawberries I picked today probably could have used one more day of ripening. But I was worried that I might not see them again if I waited.
Fresh strawberries. Yum!
I also put out some fresh bird food in the backyard, and one of our chipmunk friends wasted no time filling his cheeks. (How they cram all that food in there I'll never know.) He was too busy to even care that I was taking pictures.
I'll try to post a few garden updates over the summer so you can see how things are progressing. Thanks for stopping by!
Subscribe to:
Posts (Atom)
