Friday, August 15, 2025

Backgrounds with Distress Oxide inks

I've been wanting to do more with my Distress Oxide inks lately. So I bought a few more colors to add to my collection, I stamped some swatch cards, and of course, best of all, I spent some time playing. I cut a couple sheets of white card stock into quarters and experimented by blending the inks on the card stock and also by "smooshing" the ink -- applying ink to my glass mat, spritzing with water, and then placing the paper in the wet ink to pick up the color. After the panels were dry, I got to work making cards. Today I'm sharing two of the finished cards; I'll share the others in future posts.

Note: I just realized I didn't make any supply notes for these cards, so I don't have specific product names. If you have questions about the supplies I used, leave me a comment and I'll do my best to get the info for you.

With both of these cards, I used the Distress Oxide panels as card backgrounds. For the first card (left) I used blues and purples with the ink smooshing technique. I think I overworked the background a little because the colors are more blended together than I intended. But it's still pretty! I applied light blue stencil butter through a butterfly stencil to add the focal images. When that was dry I stamped the Xs along the right and left edges and attached the panel to a black card base. I added a black die-cut "celebrate" for the sentiment and finished the card with a few sparkling clear sequins.

For the second card I applied the Distress Oxide inks on the card stock using bending tools. I don't do a lot of ink blending, so I'm not very good at getting a seamless transition between colors. Oh, well. After I did the blending, I spritzed the panel with water, let that dry, and then used the same ink colors to stamp a few doodle-type images. Then I stamped some other images and small words using black ink. Finally I used a clear paste and a stencil to add some subtle texture.

When everything was dry, I added a die-cut circular "wish" sentiment and adhered the panel to a black card base. Again, I finished the card with a few sparkling clear sequins. I really like how all the different elements of this card came together.

Thanks for stopping by!


Sunday, August 10, 2025

August Christmas cards: Gel print kit

I didn't think I was going to be able to make any Christmas cards this month. We are doing some work on our house, so my craft room is filled with boxes of random stuff, and I can barely get in the room. But as luck would have it, I entered a drawing on Instagram and won a Christmas card gel printing kit from Gelli Arts. Almost everything I needed was included in the kit -- even a gel plate, brayer, and some paint. I just needed my scissors/trimmer and adhesive. I sat down to create at the coffee table, and here are my finished cards:

The kit was designed to make two cards and ornaments (the white card bases in the top row). I love the idea of including an ornament right on the card! I added a few extra card bases and twine so I could make five cards total. And of course I had to add a few sequins on the tree ornaments. :) I'm still debating if I should add some sparkle to the star ornaments. Maybe I'll take them off the cards and add some spatter. What do you think?

Thanks for stopping by!


Friday, August 8, 2025

Using up some scraps

After I made my January Christmas cards, I had a bunch of skinny strips leftover from the alcohol ink panels. I don't usually save those tiny strips, but these were too pretty to just toss. Instead I used a double-sided adhesive sheet, lined up the strips, and created a couple of striped panels. I finally turned those panels into two birthday cards:

One of the striped panels was almost the size of an A2 card so I used it as a background (card on the left). I cut the Birthday Message Cover Plate die (Hero Arts) out of holographic card stock, adhered it over the background and attached it to a white card base.

I used foam tape to add a sentiment strip near the bottom of the card front. Then I finished off the card with several blue rhinestones clustered around the sentiment strip.

For the second striped panel, which was smaller than the first, I die cut two large butterflies using the Detailed Butterflies, Mini dies (Sizzix - Tim Holtz). I cut the outlines for those butterflies out of black card stock and glued the layers together. I also cut out some tiny butterflies using the Intricate Mini Butterflies die (Memory Box). I arranged the butterflies around the stamped sentiment on a light purple card base and adhered them using liquid glue (and foam tape behind the wings of the large butterflies). I added a strip of the alcohol ink panel and a twine bow toward the bottom of the card front and finished with a cascade of droplets.

Thanks for stopping by!

Sunday, August 3, 2025

Blue birthdays

I am always in need of more birthday cards. I try to keep a good-sized stash on hand so I can choose a card that fits the recipient. So when I sat down to turn some backgrounds into cards, I knew birthday cards were the way to go.

For the cards I'm sharing today, both of the backgrounds were foiled using stencils from The Crafter's Workshop along with Transfer Gel Duo and Deco Foil from Therm O Web. 


To coordinate with the green numbers on this background, I die cut three balloons using two different shades of green card stock. I taped a piece of white crochet thread to the back of each balloon and then attached the balloons to the panel. I wrapped each piece of string to the back of the panel and secured them before adhering the panel to a white card base. I used a white paint pen to add details to the balloons and finished the card with a sentiment strip and blue rhinestones. I had the perfect sentiment for inside the card: "Age is just a number (in your case a really high one)." 


The foil on this panel is pearlescent, so I chose light blue foil card stock for the accents. I used the A2 Thin Frame Cover Plate die (Taylored Expressions) to cut out the frame and the Big Birthday die (Honey Bee Stamps) for the sentiment. I cut the shadow die for the sentiment out of vellum to help it stand out a little more. The panel is adhered to a white card base, and I decided to skip the embellishments because there's already a lot of shine happening on this card.

Thanks for stopping by!

Tuesday, July 29, 2025

Gel print strip backgrounds

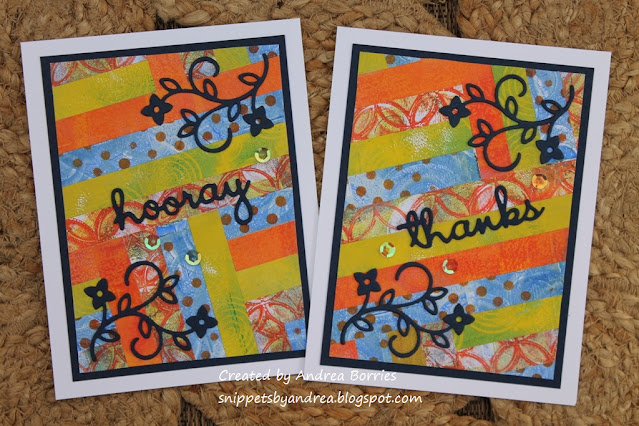
When I was looking through my collection of gel prints I found four background pieces made with gel prints cut into strips and adhered to double-sided adhesive sheets. (They're similar to the crazy quilt scrap papers I shared in the past.) I decided they would make a good card set, and here are the results:


I think my favorite thing about these cards is that I used navy card stock instead of black for the mats and die cuts. I know it looks black in the photos, but in person the dark blue looks so good with the colors in the gel prints. I need to remember to use navy as a neutral more often. 


The backgrounds were in two arrangements -- horizontal stripes and diagonal stripes -- so I used two different layouts for my cards. For the cards with horizontal stripes, I used a tall branch die cut and short two-word phrases for the sentiments. The strips were useful in making sure I adhered the sentiments straight. I die cut each piece twice and glued them together to give them a little more "oomph." (All the dies I used for these cards are from the retired Well Written die set from Stampin' Up!)  


I struggled with the layout for the cards with diagonal stripes. I played around with the pieces for awhile and finally settled on this arrangement. I placed a curly-style branch in the lower left and upper right corners and added the sentiments at an angle near the middle of the panels. I finished all of the cards with three sequins grouped around the sentiments.

Thanks for stopping by!

Sunday, July 27, 2025

Sending hugs

When I was looking through my gel prints recently, I found the pieces for a card that I'd prepped years ago but never actually put together. I figured it was about time to assemble that card.

First I used Dr. Ph. Martin's Bleed Proof White to add white splatter to the card base. I tore the top and bottom edges of the gel print (the letters were already cut out) and adhered it to the card base. I'd backed the letters with black cardstock for shadows, so I decided to try the eclipse technique, which I've never done before. I glued the letters back into the gel print, fitting the black shadows into the openings. (Looking at it now, I'm wondering if I should have used foam tape for the letters to help them stand out a little more.) I used foam tape to add the flag with "sending" at the top of the gel print and finished the card with gold sequins.

Thanks for stopping by!


Saturday, July 26, 2025

July Christmas cards: Joyful Christmas Flora

One of my online cardmaking friends, Kate Deignan, has great layout ideas for using patterned paper. Last month she shared one of those layouts on the 12 x 12 Cardstock Shop blog ("Patterned Paper Handmade Card Template"), and I decided to use it for my July Christmas cards. I pulled out the Joyful Christmas Flora 6 x 6 paper pad (Carta Bella), found some coordinating card stock in my stash, and got to work.

The layout I used required two 1" x 4" strips, two 1" x 2-3/4" strips, and one 1-5/8" x 2-7/8" piece for the center. It was fun (and a bit of a challenge) to mix and match the papers and find combinations I liked. I used about half the pad of paper and ended up making eighteen cards, although not all of them used that layout. 


For the focal images on these cards, I used a variety of dies (branches, deer, trees, etc.) as well as some images I cut out of the patterned paper. I used enamel dots, sequins, buttons, and twine for embellishment and added some shine with gold card stock and a sparkle gel pen, which unfortunately doesn't show up in the photos. The die-cut sentiments were made with the Joyful Christmas Messages stamps and dies (Hero Arts).


I'm pretty happy with how these cards turned out, but they took me a lot longer to make than I thought they would. Trying to settle on just the right focal image, embellishment, or what have you was slow going. I need to stop thinking I'll be able to crank out cards when I'm using patterned paper! :)

Thanks for stopping by!

Tuesday, July 22, 2025

A quick challenge card

I do the majority of my stamping and crafting on the weekends. I find that I have a really hard time mustering the energy to do much of anything after I get home from work during the week. I'd like to change that, though, so one day last week I managed to sit down after work and make a quick, clean and simple birthday card.

The inspiration for this layout came from a sketch challenge. My current favorite craft shopping site is A Cherry on Top, and I discovered that they have weekly sketch challenges for scrapbooking, art journaling, and card making. Last week's card sketch really appealed to me, so I gave it a go.

The main elements of the sketch were six circles, the sentiment in the middle of the card, and splatter images behind the sentiment. For my card I used the Wonky Backdrops stamp set (Ellen Hutson) for the circle image as well as the cluster of stars. Since the circle was larger than those on the sketch, I overlapped them when stamping to make sure they'd all fit. The ink colors are from the Party Collection - Date Night inks (Catherine Pooler), and I arranged them in rainbow order so the colors would look ok where they were layered. Then, using black ink, I stamped the star cluster a few times in a swoosh across the middle of the card.


Before I assembled the card, I splattered it with Pearl Shimmer Splash (Brutus Monroe). (I was experimenting with flicking the applicator, so I got some lines as well as dots.) I adhered some looped silver thread at the middle of the card front and then used foam tape to adhere the strip with the sentiment over it. I finished the card with a few iridescent droplets mixed in with the stars.

This card really didn't take long to make, and the best part was that it was randomly chosen as the challenge winner. Woohoo! I'm going to try to enter more of the card sketch challenges and maybe even a few art journal ones, too. Thanks for stopping by!


Saturday, July 12, 2025

My first Snarky Cat

I've been on a little mixed-media kick lately, and I've ordered several of the Tim Holtz mixed media stamp/stencil sets. So naturally, when I sat down to play with them, I had to get out my Distress Oxide inks. Using ink blending and ink "smooshing," I made eight Distress Oxide panels. I used some of the panels to make die-cut shapes, and others became backgrounds for cards. The card I'm sharing today has a little of both.


I love the Snarky Cat stamps from Tim Holtz, and my friend Sunshine (A Little Ray of Sunshine blog) has inspired me with some great cards made with these images. I can definitely relate to this crazy cat -- I'm always thankful I don't have a thought bubble over my head!

For this card I started with a green Distress Oxide panel die cut with a deckled rectangle die. I stamped some scribble images in green and added the sentiment in black along the top. Using a blender brush I created a patch of darker green ink to act as a grounding place for the cat image. I stamped the cat on the green panel and again on one of the other Distress Oxide panels I made. I cut out the second cat by hand and paper pieced it over the image on the green background. I colored the white parts of the cat's eyes with a paint pen.

I layered the green panel onto black card stock and then a white card base. The card needed something else, so I used a Micron pen to doodle a border on the card base. I purposely made the border a little crazy to match the image, and I finished the card with several Xs in the lower left corner of the green panel.

Thanks for stopping by!


Wednesday, July 9, 2025

Granny Squares

I wish I knew how to crochet -- I really want to be able to make granny squares. I've tried to learn a few times, and I've even successfully completed a couple of crochet kits. But I've never gotten very far; it doesn't seem to "stick," and I have to start at the beginning every time I try again. (I know it's because I don't keep practicing so I don't really have a good excuse.) So when I found the Granny Squares stamp and die set from Altenew, I had to get it. Here are the first two cards I've made using the set.


The granny square image is a layering stamp set so it's really easy to use different colors -- and the possible color combinations are endless. As I did with the Plants and Vases set, for my first card I used the product packaging as the inspiration for my first card. I stamped four granny squares together on a white panel as well as a fifth square on a separate piece of white card stock. I die cut the extra square and used foam tape to add it, at an angle, to the middle of the other stamped images. I added the sentiment below the granny squares, attached the panel to a card base, and finished with a few sequins.


For the second card, I stamped and die cut three granny squares. I struggled to arrange them in a layout I liked, so I tried a mini slim card (3-1/2" x 6") instead of an A2 size. I created a simple border by scoring a line 1/4" away from each edge. I adhered one square at an angle on each side of the card and then used foam tape to add the third square overlapping the first two. I kept the embellishment simple and just added a white bow to the middle of the center square.

Maybe this winter I'll try crocheting again. Until then, this is a fun substitute. :) Thanks for stopping by!


Sunday, July 6, 2025

Plants and Vases

I can't believe it's been almost two weeks since my last blog post. It seems like I get on a roll for a little while but I can't quite stick with it. Oh, well. I'll just try to pick it back up again. Today I have a quick post to share a couple of cards made with the Plants and Vases stamp and die set from Altenew.

The stamps in the set include several different branches and sentiments, and the dies are two vases with embossed designs. For the first card I made with this set (the card on the right), I used the product packaging for inspiration. I stamped the branches in four different colors on a white panel. I added a strip of kraft card stock along the bottom to ground the vases, which I die cut from two different colors of card stock. I stamped "happy birthday" in the upper right corner, cut out the panel with a deckle-edge die, and added it to a dark brown card base. The finishing touch was a few sequins.

For the second card, I inked just one of the branches with a berry-colored ink. I stamped the image on a panel of white card stock and then stamped it a couple of more times -- once on either side of the first image -- without reinking the stamp. I added a kraft vase and matted the panel with kraft card stock. I used a berry card base to coordinate with the branches and added a piece of ribbon. Using foam tape, I adhered the panel a bit to the right of the center of the card base. I finished the card with a few enamel dots.

Thanks for stopping by!


Wednesday, June 25, 2025

June Christmas cards: Forest flora mixed media

Once the summer solstice hit, Mother Nature took her job seriously. It's been horribly humid, and last weekend we had excessive heat warnings. But that gave me the perfect excuse to stay inside and work on my Christmas cards for June. I used the Forest Floor 2 stamp set from Tim Holtz as the starting point for a group of mixed-media cards.


I used a lot of different products for these cards, so I'm including a supply list for my reference. I know I won't remember everything I used, and I hope it helps you, too!

Supplies
Stamps: Forest Floor 2 CMS497 (Stampers Anonymous - Tim Holtz), Feathers & Frost (Stampin' Up!), Vicki Boutin Art Layers (American Crafts)
Paper: Very Vanilla, Handsome Hunter card stock (Stampin' Up!)
Ink: Handsome Hunter, Cherry Cobbler, Early Espresso, Old Olive, Baked Brown Sugar, Crumb Cake (Stampin' Up!)
Accessories: Pattern Party Decorative Masks (Stampin' Up!), Fern Green Paper Glaze (Picket Fence Studios), Gilded Shimmer Splash (Brutus Monroe), confetti sequins (unknown), hemp twine (May Arts), foam tape (A Cherry on Top)


To make the front panels, I followed these steps:

1. Stamp two pieces of 8-1/2" x 11" card stock with the main images. I used a different ink color for each image and worked from largest to smallest. Remember to change the orientation of the images and allow some of them to go off the edge of the card stock.
2. Trim the card stock into panels. I cut mine to 4-1/8" x 5-3/8" so there is just a narrow border of the card base around the panel.
3. Check the balance of the main images on each panel and fill in any open space along the edges with more stamped images.
4. Stamp filler images in a light color. I used a stamp with handwritten text and a stamp with a cluster of plus signs.
5. Add splatter. I used gold because I wanted some sparkle.
6. Distress the edges of the panels. I ran the blade of an open scissors along the edges, curled the corners, and added a few little tears on each panel.
7. Use paste/glaze and a stencil to add texture in a few places on each panel. (The top left card in the first photo has a different color Paper Glaze. I tried a cream colored paste first but wasn't crazy about it, so I switched to the green.)


Phew! Once that was done and the paste was dry, I glued each panel to a Handsome Hunter card base. I stamped "Season's Greetings" on 3/4" wide strips of Very Vanilla card stock and distressed the long edges of each strip. I wrapped twine around each strip to the right of the sentiment and tore off the left edge. Using foam tape I attached a sentiment near the bottom of each card and trimmed it even with the right edge of the card.

I tried a few different embellishments and settled on some confetti sequins because they're neutral and subtle but still add a little more sparkle.

These cards were more involved than what I usually do for holiday cards, but I'm really pleased with how they turned out. Thanks for stopping by!


Sunday, June 22, 2025

CAS First Communion card

I know I've mentioned before that I don't often make religious cards. I can't always avoid it, though, when there are religious celebrations in my extended family. Last month my cousin's son celebrated his First Communion, so I created this clean and simple (CAS) card to send him.


Using Misty Moonlight ink, I stamped a brushstroke-style image four times near the upper right corner of the card base. I started with the first (darkest) impression about halfway up the card and then stamped three more times (without re-inking the stamp) continuing up toward the top of the card. 

I created the chalice with the Vases Builder punch -- just turn the vase upside down -- and Marina Mist card stock. The communion wafer was made with Naturals Ivory card stock and a 1/2" circle punch. I glued the two pieces together and used foam tape to attach them over the stamped brushstrokes.

I stamped the two-part sentiment "celebrate your day" below the focal point and toward the right side of the card. I love the mixed fonts and sizes used together. I finished the card with two score lines near the bottom edge to provide a little balance and fill some of the white space.

Thanks for stopping by!


Thursday, June 19, 2025

Gel print collage cards

Sometime this summer I want to have another all-day gel printing session. I've been saving various household items to make interesting patterns, and I've got new stencils to try. But before I do that I'm trying to use more of the prints I've already made. So for a start, last weekend I made two gel print collage cards.


For the flower card, I cut circles out of three different gel prints and then went around each circle and snipped out triangles to create the petals. I added smaller circles for the flower centers and leaves behind the flowers. (I also added clear Wink of Stella glitter on the flower centers, but it doesn't show up in this picture.) I used a heavyweight white card base, added a white die-cut frame for a little texture, and glued on the flowers. I wanted to fill a little white space, so I added a couple of flying bugs and drew little dashed lines for their "flight paths." I stamped a birthday sentiment in the lower right corner to finish the card.

For the golf card, I started with a few online searches to get some inspiration. Once I had an idea, I used various gel prints to cut out the background, putting green, hole, pole, flag, and golf ball. The golf ball is supposed to look like it's sailing right into the hole; I thought about drawing a line to show the path, but I decided I liked it better without. I used white pigment ink and white embossing powder to add the sentiment and drew a border around the edges. Inside the card I wrote "Hope your day is a hole-in-one."

Neither one of these cards has any sequins or other embellishments. What?! I considered it, but with the colors and textures of the gel prints, I don't really think they needed anything else. Shocking, I know.

Thanks for stopping by!


Tuesday, June 17, 2025

Secret Garden: Part II

As I mentioned in my last post, here are the rest of the cards I made with products from the Secret Garden collection (Carta Bella). Well, it's not all the cards; I didn't take pictures of all forty-something cards. But I did take pictures of a reasonable sample. I think you'll get the idea. :)

I'm not going to include details since this will already be a long post. So if you have questions, leave a comment and I'll do my best to answer.


There you have it! I still have a few bits and pieces left of these beautiful papers, along with lots of the stickers, so I'll make a few more cards some time. After making more than sixty cards with these products, I needed a little break. :)

Thanks for stopping by!


Monday, June 16, 2025

Secret Garden: Part I

In March I ordered a subscription box from A Cherry on Top that was packed full of spring-themed products, including several items from the Secret Garden collection by Carta Bella. There was the collection pack (which included twelve double-sided 12" x 12" textured papers and a sheet of card stock sticker elements), chipboard stickers, die-cut tags and frames, and a package of embellishments. I absolutely loved the prints and the texture of the papers, but I didn't want to hoard them. So I decided to use as much of the coordinating items as I could to make cards.

Over the course of several weeks I ended up making more than sixty cards. (I found coordinating card stock in my stash and also added in some different embellishments.) I had wanted to use some of the cards to send spring/Easter greetings to family and friends, but I missed that boat. So instead I created four card sets to give as gifts and forty individual cards that I brought in to work to share with the teachers and other school staff.

I didn't take pictures of all the cards, but I do have quite a few photos, so I'm sharing the card sets in this post and some of the individual cards in the next post. For the first group of photos each picture includes two cards with the same layout/papers but different focal images. These cards I split into two card sets (one card from each photo went in the first set, and the other card went in the second set).


These are obviously a pretty simple layout, but I really wanted the pretty papers to stand out. 

For the last photos, each picture is one card set. I used stamped quotes and gold die-cut foliage for the focal points on these cards, but again, the two sets use the same layout.


That's it for the first batch of Secret Garden cards. If you have questions about any details, please leave me a comment. I didn't want to include too much info and make the post even longer. And stay tuned for part two!

Thanks for stopping by!