Saturday, July 31, 2021

Thank-you cards with DSP

I can't believe that we're already almost into August. I know it's cliche, but where does the time go? When I was looking through the photos of my cards to be posted, I realized I never shared this group of cards, which I made more than six months ago. Uff da. It's a good thing that thank-you cards never go out of season!

Here's the context: After the Jan. 6 insurrection at the U.S. Capitol, I was part of a campaign (started on Instagram) to recognize the workers who had to clean up all of that mess. So I needed to make a good number of cards in a short amount of time, and I didn't personally know the recipients, who would be both men and women. That was a challenge for me, so I decided to pull out -- you guessed it -- some Designer Series Paper (DSP). Using the DSP for the card backgrounds and also the die-cut sentiments, I created sixteen thank-you cards.

Supplies:
Stamps: Special Sentiments (Penny Balck)
Paper: Thick Very Vanilla card stock, This and That Epic Day DSP (Stampin' Up!)
Ink: Memento Tuxedo Black (Tsukineko)
Accessories: All About You dies (Concord & 9th), Bitty Banner punch (Stampin' Up!), Large Stitched Rectangle Stackables dies (Lawn Fawn), Art Glitter Glue (Art Institute)

When I started making the cards, I knew I wanted to keep them flat so they were easy to mail. And I didn't want to use any bumpy embellishments that would potentially set off a metal detector or cause some other sort of alarm. That meant the DSP really needed to be the star. I settled on the (long-retired) This and That Epic Day DSP because it has good colors and patterns that are pretty gender neutral. The distressed style also adds some visual interest, and it seemed fitting when I thought about the historic documents at our nation's capital.

I used a stitched rectangle die to cut out A2-sized layers of the DSP and adhered each one to a thick Very Vanilla card base. Then I cut out a whole bunch of "thank you"s and matched each one to a card. If the background pattern was busy I tried to use a more solid-color sentiment; and if the background was a bit more plain, I went for a colorful sentiment. The "you" die also cut out a thin border around the word, so I mixed those up to add an extra fun detail.

To take the place of an embellishment, I added a little punched banner at the top of each card. On some of the cards I also added a stamped sentiment to the die-cut portion. And that's it -- simple, but just right for the occasion (at least I think so). Cards don't need to be fancy to express our appreciation (or friendship or love or whatever). I sometimes need to remind myself of that.

Thanks for stopping by!


Thursday, July 29, 2021

Happy thoughts at the beach

I'm not a huge fan of the hot, humid weather during summer, so the past couple of weeks has been the worst. I would love a nice relaxing day at the beach (preferably with a light, cool breeze -- is that asking too much?), but for now I'll live vicariously through this card:

Supplies:
Stamps: Totally Random Sayings Vol. 3 (Essentials by Ellen), Gorgeous Grunge (Stampin' Up!)
Paper: Whisper White, Crumb Cake, Pool Party, Garden Green card stock (Stampin' Up!)
Ink: Pool Party, Crumb Cake (Stampin' Up!); Memento Tuxedo Black (Tsukineko)
Accessories: Beach Chairs die (Rubbernecker Stamps), Grass #2 die (Rubbernecker Stamps), High Flying Kites die (Poppy Stamps), Whale of a Time sequins (Stampin' Up!), blending brush (Picket Fence Studios), Art GLitter Glue (Art Institute)

Doesn't that look so calm and relaxing?

I started with a Pool Party card base and decided where I wanted to position the horizon. Using a piece of paper (or a sticky note, masking paper, card stock scrap - whatever you have for a straight edge) to cover the top part of the card, I used a blending brush to add a bit of Pool Party ink to create the water.

For the sand, I cut a piece of Crumb Cake card stock as wide as the card base and then tore along the top. I wanted to add more texture, so I used a splatter-style stamp to add a bunch of little dots to the sand. (If you don't have a stamp, you could make your own splatter with a marker or watercolor paint.) Then I adhered that piece to the card base, making sure the top overlapped the bottom edge of the "water."

I die-cut and glued down a white Adirondack chair, several bits of green grass, and a few wispy little clouds. I finished the card with a stamped sentiment and three seashell sequins.

Thanks for stopping by!


Wednesday, July 21, 2021

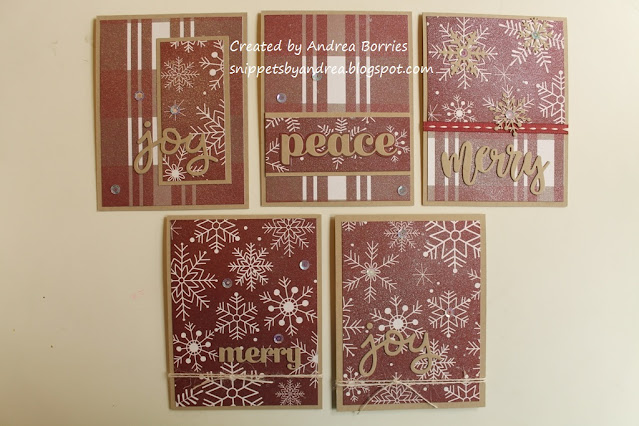
July Christmas cards: Simple shimmer

I know I've already shared a few Christmas card ideas this year using patterned paper (or upcycled calendar pages), so I hope you don't mind one more. I've been struggling for card ideas, and patterned paper is an easy place to start. (Though these "easy" cards always seem to take me just as long as other cards because I obsess about every little detail.)

Supplies:
Paper: Winterberry patterned card stock (My Mind's Eye); Cherry Cobbler, Crumb Cake, Evening Evergreen, Whisper White card stock (Stampin' Up!)
Accessories: Stitched Rectangle Stackables dies (Lawn Fawn), Merry die (Concord & 9th), Merry Sugar Script die (Birch Press Design), Big Peace Sugar Script die (Birch Press Design), Scripty Joy die (Lawn Fawn), Snowflake Set #1 dies (Echo Park Paper Co.), Note Tag punch (Stampin' Up!), jute twine (May Arts Ribbon), sequins (Paper Pumpkin leftovers), clear shimmer spray (Avery Elle), stitched ribbon (Stampin' Up!), Art Glitter Glue (Art Institute)

I few years ago I went to a crop event and took home a door prize with three double-sided papers from the Winterberry line from My Mind's Eye. I pulled them out earlier this month and decided it was time to use them up!

One of the pieces was a gray background with winter flowers and foliage. I used stitched rectangle dies to cut out panels, trying to get a good focal image on each panel. I sprayed all the panels with shimmer mist, and they're so sparkly in person (hard to capture in a photo).

I adhered the panels to coordinating card bases, added a die-cut sentiment, and finished off the cards with a few sequins. First batch done!

With the other two sheets in the pack, each had one side that was a maroon and white pattern, so I decided to try using them together. I struggled a bit with finding the right color card stock to use with these papers and finally settled on a neutral kraft. I think these cards feel so cozy!

This batch of cards was finished off the same way as the first: layered on card bases with die-cut sentiments and sequins. I had to go for the shimmer mist again because I didn't want the cards to be too plain, and I also added twine or ribbon to several of these cards.

Once I'd made all the cards I could, I had some scraps left over that were just big enough to make a few gift tags. I just punched out the tags from patterned paper, punched out the same number of tags from white card stock and then glued a white tag to the back of each patterned tag. I punched a little hole in the top of each tag and added a bit of twine. I may go back and stamp a To/From on the tags or add a little embellishment, but we'll see when the time comes to use them.

Thanks for stopping by!


Sunday, July 11, 2021

One-sheet wonder birthday cards

In my post yesterday I mentioned that I'd like to do more watercolor techniques in my cardmaking. Another thing I need to work on is using more patterned paper. I have a pretty solid collection, and I don't seem to use it as much as I should. So I was excited when I found a YouTube video for a one-sheet wonder technique using 6" x 6" papers. I used three pieces of patterned paper, along with coordinating card stock, to create these six birthday cards:

Supplies (all Stampin' Up! unless otherwise noted):
Stamps: Picture Perfect Birthday, Gorgeous Grunge, Tiny Words Birthday (Simon Says Stamp)
Paper: Cupcakes and Carousels Designer Series Paper (DSP) Stack; Very Vanilla, thick Very Vanilla, Bermuda Bay, So Saffron, Calypso Coral, Early Espresso card stock
Ink: Early Espresso, Calypso Coral, So Saffron, Bermuda Bay
Accessories: Celebrate die (My Favorite Things), block-style Happy Birthday die (Avery Elle), Nested banners dies (Simon Says Stamp), It's Your Day die (Simon Says Stamp), script-style Happy Birthday die, Metallic Baker's Twine and Sequins Combo Pack, Coral Reef sequins (Close to My Heart), blue ribbon (unknown), jute twine (May Arts Ribbon), foam tape (3M), Art Glitter Glue (Art Institute)

If you're not familiar with one-sheet wonders, they are techniques that provide a template for cutting a piece of patterned paper so every piece is used on a card and there are no leftover scraps. There are many, many patterns out there (just do an internet search for one-sheet wonder template), but I decided to stick with the one in the video, which was made by Jacque Williams, a Stampin' Up! demonstrator in New Zealand.

Double-sided patterned papers are fun to use with one-sheet wonder techniques, because you get twice as many patterns to choose from. Since I used three different sheets of DSP, I had a total of six patterns -- lots of ways to mix and match the pieces for my cards!

For most of the cards, I just added a die-cut and/or stamped sentiment to the card front. But for the card on the left in this photo, I wanted to add an image, too. I stamped the party blowers and sentiment on Very Vanilla card stock using inks that coordinated with the DSP and then used a marker to add the stripes on the blowers, the clusters of dots, and the border around the panel. I also stamped some confetti in the upper left and lower right corners of the card base. You don't see a lot of the DSP in that card, but it's a great little accent. I finished off all the cards with sequins, and I also added ribbon or twine to most of them.

I'm looking forward to trying more one-sheet wonder templates -- and maybe one of these days I'll make a dent in my stash of patterned paper! Thanks for stopping by!


Saturday, July 10, 2021

Loose watercolor Mod Floral

One thing I want to work on with my cardmaking is to do more watercolor techniques. Not realistic watercolor painting -- I'm not that skilled -- but really just using all my watercolor supplies more often. I got a start by using watercolor markers with the fun Mod Floral die from Ellen Hutson to create a soft, feminine birthday card.

Supplies:
Stamps: Cake (Essentials by Ellen)
Paper: Gray Granite, Grapefruit Grove card stock (Stampin' Up!); watercolor paper (Strathmore)
Ink: Gray Granite (Stampin' Up!); Soft Peach, Gold, Apple, Olive Green Brushmarker Pro watercolor markers (Karin)
Accessories: Mod Floral die (Essentials by Ellen), clear shimmer spray (Avery Elle), jute twine (May Arts Ribbon), rhinestones (Stampin' Up!), Art Glitter Glue (Art Institute)

I love that the cluster of die-cut flowers is large enough to be the focus of a card, but you could also trim it down to make a smaller grouping. (The die does also cut out a few individual buds and leaves, which I used to add some dimension by layering them onto parts of the large cluster.)

I die cut the Mod Floral die from watercolor paper and applied a light layer of water to the paper. Using watercolor markers I added peach to the flowers, yellow to the flower centers, and green to the leaves. I used a "loose" style and wasn't very particular or careful; I just went back and forth between the markers and plain water, moving or adding color until I was happy with the result.


Once the watercolor was dry, I spritzed the die cut with shimmer spray and then adhered it (and the extra layered pieces) near the upper left corner of a light gray card base. I wanted to bring in a little more of the peach color, so I added a strip of Grapefruit Grove card stock along the bottom edge of the card front. I stamped the birthday sentiment using gray ink in the open lower right corner.

When I poked out the flower centers from the die cut, I noticed that they looked like little cross stitches. I decided to go with that and glued three of them in a row just above the strip of Grapefruit Grove card stock. For the rest of the embellishments, I scattered some rhinestones around the flowers and tied a length of jute twine around the bottom of the card.

Do you have favorite watercolor techniques (or tips) for cardmaking? Leave me a comment and let me know! Thanks for stopping by!