Tuesday, December 29, 2020

Birthday cards for all, part 2

If you need ideas for birthday cards, this post (and the previous part 1) are the posts for you. These will probably be my last blog posts of the year, and since I still have so many cards from 2020 to share, I'm gathering together almost all of my remaining birthday cards into a couple of posts. I'll provide supply lists, but probably not much else because these posts are already going to be long. Be sure to leave a comment below if you have questions about anything.

This post will primarily include cards geared toward kids and guys. Part 1 included cards that are gender neutral or slightly feminine.

Supplies:
Stamps: Rawr, Speech Bubbles (Avery Elle)
Paper: Whisper White, Chocolate Chip, Pool Party, Granny Apple Green (Stampin' Up!)
Ink: Oreo (Taylored Expressions); Pool Party (Stampin' Up!); alcohol markers: BV02 and BV04 (Copic), Pool Party, Mango Melody, Poppy Parade, Granny Apple Green Blends (Stampin' Up!); white paint pen (Posca)
Accessories: Rawr dies (Avery Elle), Wood Frame Nested Infinity dies (Hero Arts), Stitched Hillside Borders dies (Lawn Fawn), Nested Banners dies (Simon Says Stamp), cloud stencil strips (Taylored Expressions), blender brushes (Taylored Expressions), Connect glue (Gina K Designs), foam tape (3M)


Supplies:
Stamps: Really High Five (Lawn Fawn)
Paper: Whisper White, thick Whisper White card stock (Stampin' Up!); Salt Water Taffy card stock (Taylored Expressions)
Ink: Memento Tuxedo Black (Tsukineko); Salt Water Taffy (Taylored Expressions); colored pencils PC1072, PC1074, PC913, PC992, PC944, PC997, PC921, PC1002, PC916, PC928, blender pencil (Prismacolor)
Accessories: Really High Five dies (Lawn Fawn), cloud stencil strip (Taylored Expressions), blender brush (Taylored Expressions), clear droplets (Pretty Pink Posh), Sparkle Silk (Fun Stampers Journey), Art Glitter Glue (Art Institute), Corner Chomper (We R Memory Keepers), Dimensionals (Stampin' Up!)

See the photo below for a better look at the sparkle on these cards.


Supplies:
Stamps: Itty Bitty Elements (Pinkfresh Studio), Tiny Words Birthday (Simon Says Stamp)
Paper: Thick Very Vanilla, Very Vanilla card stock (Stampin' Up!); Spring Fling 6" x 6" card stock (Honey Bee Stamps)
Ink: Memento Tuxedo Black (Tsukineko); colored pencils PC945, PC946, PC904, blender pencil (Prismacolor)
Accessories: Chalk Talk dies (Stampin' Up!), Small Stitched Rectangle Stackables dies (Lawn Fawn), Spring Fling enamel dots (Honey Bee Stamps), Crisp Cantaloupe thick baker's twine (Stampin' Up!), Art Glitter Glue (Art Institute), Dimensionals (Stampin' Up!)


Supplies:
Stamps: Magical Day (Neat & Tangled)
Paper: Melon Mambo card stock (Stampin' Up!), watercolor paper (Strathmore)
Ink: Onyx Black VersaFine (Tsukineko); Melon Mambo (Stampin' Up!); Cool Aqua, Cerise brush markers (Karin); Art Philosophy Metallic Accents paint (Prima); Micron 05 black pen (Sakura)
Accessories: Sparkling clear sequins (Pretty Pink Posh), clear embossing powder (Stampamania), Ovals Collection dies (Stampin' Up!), Nested Banners dies (Simon Says Stamp), foam tape (3M), Art Glitter Glue (Art Institute)

I added metallic watercolor paint to the unicorns mane, tail, horn, and heart. See the photo below for a better look.


Supplies:
Stamps: Party with Cake (Stampin' Up!)
Paper: Thick Whisper White, Night of Navy, Pumpkin Pie, Pool Party, Crushed Curry, Bermuda Bay card stock (Stampin' Up!); Studio G paper pack (Hampton Art)
Ink: Night of Navy (Stampin' Up!)
Accessories: Balloons dies (Simon Says Stamp), Florence sequins (Close to My Heart), white crochet thread (DMC), foam tape (3M), Art Glitter Glue (Art Institute)
 
 
Supplies:
Paper: Whisper White, Night of Navy card stock (Stampin' Up!); Studio G paper pack (Hampton Art)
Accessories: Party Pop-Up dies (Stampin' Up!), star sequins (Hero Arts), Florence sequins (Close to My Heart), foam tape (3M), Art Glitter Glue (Art Institute)
 
Below is another version of this card.


Supplies:
Stamps: Traveler, Gorgeous Grunge (Stampin' Up!); Birthday Greetings (Gina K Designs)
Paper: Very Vanilla, Soft Suede card stock (Stampin' Up!)
Ink: Crumb Cake, Soft Suede (Stampin' Up!)
Accessories: Pocket Watch washi tape (Eyelet Outlet), jute twine (May Arts Ribbon), Burlap Ribbon Trim (Stampin' Up!), vintage brads (Stampin' Up!), sponge (Stampin' Up!)

Below is a picture of another layout with this style card as well as the inside of one of the cards.


That's it for part 2. I hope you found something to inspire you in this post and/or part 1. I've  still got plenty more cards to share, so stay tuned in the new year! Thanks for stopping by!


Birthday cards for all, part 1

If you need ideas for birthday cards, this post (and the subsequent part 2) are the posts for you. These will probably be my last blog posts of the year, and since I still have so many cards from 2020 to share, I'm gathering together almost all of my remaining birthday cards into a couple of posts. I'll provide supply lists, but probably not much else because these posts are already going to be long. Be sure to leave a comment below if you have questions about anything.

This post will primarily include cards that are gender neutral or slightly feminine. Part 2 will include cards geared toward guys and kids.

Supplies:
Stamps: Happy Birthday (The Stamping Village)
Paper: Bermuda Bay, Daffodil Delight, Granny Apple Green, Whisper White, Basic Black card stock (Stampin' Up!)
Ink: Memento Tuxedo Black (Tsukineko); Blends/Blendabilites markers: Daffodil Delight, Mango Melody, Poppy Parade, Bermuda Bay, Granny Apple Green (Stampin' Up!)
Accessories: Streamers embossing folder (Taylored Expressions), Stitched Frame Stacklets and Skinny Mini Party Borders dies (Taylored Expressions), Art Glitter Glue (Art institute)


Supplies:
Stamps: Pizza My Heart (Lawn Fawn), Many Happy Birthdays (Stampin' Up! Paper Pumpkin)
Paper: Whisper White, thick Whisper White, Poppy Parade, So Saffron, Baked Brown Sugar card stock (Stampin' Up!)
Ink: Poppy Parade, Baked Brown Sugar, Cajun Craze, Mango Melody, Cucumber Crush (Stampin' Up!); Memento Tuxedo Black (Tsukineko); Blends/Blendabilites markers: Smoky Slate, Poppy Parade (Stampin' Up!)
Accessories: Neutrals Candy Dots (Stampin' Up!), red enamel dots (Eyelet Outlet), foam tape (3M), Art Glitter Glue (Art Institute), sponge (Stampin' Up!)

Below is a photo with one of the pizza cards open. I made the inside of both cards the same.

Supplies:
Stamps: Big Day (Stampin' Up!)
Paper: Basic Black, Whisper White card stock; Brights Designer Series Paper (DSP) (Stampin' Up!)
Ink: Memento Tuxedo Black (Tsukineko); Blends markers: Flirty Flamingo, Granny Apple Green, Daffodil Delight (Stampin' Up!)
Accessories: Washi tape (Stampin' Up!), black enamel dots (Eyelet Outlet)


Supplies:
Stamps: Picture Perfect Birthday (Stampin' Up!)
Paper: Thick Whisper White card stock (Stampin' Up!)
Ink: Memento Tuxedo Black (Tsukineko); Poppy Parade, Mango Melody, Coastal Cabana, Gorgeous Grape (Stampin' Up!)
Accessories: Corner Chomper (We R Memory Keepers), sparkling clear sequins (Pretty Pink Posh), clear shimmer spray (Avery Elle), Art Glitter Glue (Art Institute)


Supplies:
Stamps: Happy Birthday (The Stamping Village)
Paper: Thick Whisper White, Whisper White, Basic Gray card stock (Stampin' Up!); Happy Day paper pad (My Mind's Eye)
Ink: Basic Gray; Blends markers: Daffodil Delight, Pumpkin Pie, Bermuda Bay (Stampin' Up!)
Accessories: Nested Stitched Label dies (Stampin' Up!), Florence sequins (Close to My Heart), foam tape (3M), Art Glitter Glue (Art Institute)


Supplies:
Stamps: Bold Shapes, Gorgeous Grunge (Stampin' Up!)
Paper: Thick Whisper White, Whisper White, Flirty Flamingo, Mango Melody, Pineapple Punch, Lemon Lime Twist card stock (Stampin' Up!)
Ink: Flirty Flamingo, Mango Melody, Pineapple Punch, Lemon Lime Twist (Stampin' Up!)
Accessories: 1-1/4" and 1-3/8" square punches (Pretty Pink Posh), Connect glue (Gina K Designs), foam tape (3M)


Supplies:
Stamps: Happy Birthday (The Stamping Village)
Paper: Sahara Sand, Whisper White card stock (Stampin' Up!); Happy Day paper pad (My Mind's Eye)
Ink: Sahara Sand, So Saffron, Crushed Curry, Pink Pirouette (Stampin' Up!); Passionate Pink (Gina K Designs)
Accessories: Pearls, 2020-2022 In Color Enamel Dots, white twine, Stitched So Sweetly dies, Everyday Label punch, Itty Bitty Accents punch pack (all Stampin' Up!)


Supplies:
Stamps: Endless Birthday Wishes, Party with Cake (Stampin' Up!)
Paper: Pool Party, Bermuda Bay, Whisper White card stock (Stampin' Up!)
Ink: Memento Tuxedo Black (Tsukineko); Pool Party, Bermuda Bay Blends markers (Stampin' Up!)
Accessories: Small Stitched Rectangles Stackables dies (Lawn Fawn), sparkling clear sequins (Pretty Pink Posh), clear Wink of Stella glitter brush pen (Kuretake), foam tape (3M), Art Glitter Glue (Art Institute)

I colored the cake stands with clear Wink of Stella glitter to add some sparkle. You can see it a little better in the photo below.

That's it for the first batch of birthday cards. Be sure to check out part 2 for more ideas. Thanks for stopping by!


Thursday, December 24, 2020

Watercolor field of flowers

Merry Christmas Eve! After a stretch of milder-than-usual weather, we had a good blizzard yesterday, so we definitely will be having a white Christmas. It makes me wish I had a nice snow-themed card to share today. But alas, I don't. Instead it's a much more spring-y scene.

Supplies:
Paper: Watercolor paper (Strathmore), Berry Bliss card stock (Stampin' Up!)
Ink: Watercolor paints (Beam Paints)
Accessories: Jute twine (May Arts Ribbon), Scor-Tape (Scor-Pal)

Did you notice that I didn't use any stamps or die-cuts on this card? Instead, I used watercolor paints to create a simple, loose field of flowers. I watched a Make Your Own Beginner Watercolor Card video by Sharon Cullen for inspiration and tips. It was a very clear, easy-to-follow tutorial, and I really enjoyed trying it out. I think I had a bit too much water on my flowers, though, because the pink spread out a little more than I would have liked. But the nice thing about watercolor is that it doesn't have to be precise or perfect. And I think this card still looks pretty good.

I want to try more watercolor painting in the new year. For Christmas last year one of my gifts was an online watercolor class, and I think I've only completed the introductory lesson. I did get the supplies, though, so now I just need more crafty time and energy (and fewer things to stress me out)!

Thanks for stopping by today, and I hope Christmas brings you moments of peace, hope, and joy!


Tuesday, December 22, 2020

Retirement cards on the lighter side

I have always gravitated toward lighthearted, funny, or sarcastic cards over the mushy, sappy ones. So when my friend's husband retired this fall, I took the chance to make a humorous card for him -- and one for my friend, too.

They're completely different styles, but both cards make me smile, and I love how they turned out. Here are the details:

Supplies:
Kit: August 2020 My Monthly Hero kit (Hero Arts)
Stamps: To Seize or Not To Seize (Hero Arts)
Paper: Whisper White, Crumb Cake card stock (Stampin' Up!)
Ink: Memento Tuxedo Black (Tsukineko); Crumb Cake (Stampin' Up!); Blends/Blendabilities markers: Pineapple Punch, Real Red, Night of Navy, Old Olive, Smoky Slate, Pumpkin Pie, Bronze, Mocha, Nude, Ivory (Stampin' Up!)
Accessories: Word Bubbles dies and Mini Treat Bag dies (Stampin' Up!), Basic Pattern Decorative Masks (Stampin' Up!), blender brush (Picket Fence Studios), foam tape (3M)

What better way to spend retirement than relaxing in a hammock with a cool glass of lemonade? I know I'd definitely enjoy that. And the August 2020 My Monthly Hero kit had the perfect stamp set for the occasion. I stamped, colored, and die cut several images from the kit and set them aside to work on the card base.

For the base I chose neutral Crumb Cake card stock and used a stencil, blender brush, and Crumb Cake ink to add a subtle pattern that I thought had a bit of a tropical feel. Then I used a small paintbrush to add splatters of black ink for a little more visual interest.

I arranged the die-cut images near the bottom of the card and added the thought bubble stamped with the sentiment "Not my circus, not my monkeys" above them. As it turned out, that phrase is one of the recipient's favorite sayings, so it was perfect!

Supplies:
Stamps: Bazinga (Ink Road Stamps)
Paper: Whisper White, thick Whisper White, Basic Black card stock (Stampin' Up!)
Ink: Memento Tuxedo Black (Tsukineko); Distress Oxide inks: Black Soot, Fired Brick, Worn Lipstick, Broken China, Peeled Paint (Ranger); 05 Micron pen (Sakura)
Accessories: Moonstone Glimmer Paste (Nuvo), stencil THMM1 (Stampers Anonymous), Detailed Bee dies (Stampin' Up!), Tutti-Frutti washi tape (Stampin' Up!), Tiny Attacher (Tim Holtz), foam tape (3M)

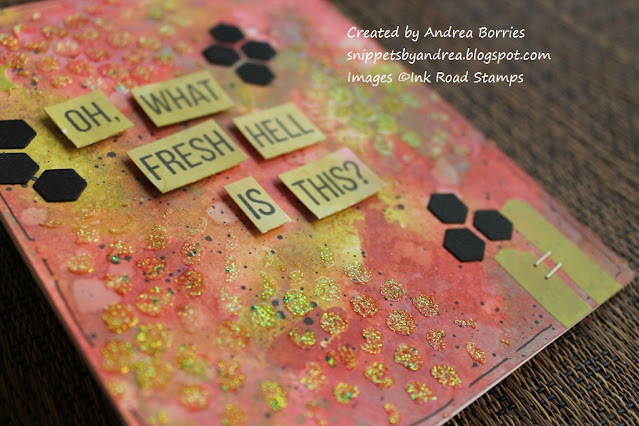
My friend wasn't sure she was ready to have her husband retire, so I had to use the sentiment "Oh, what fresh hell is this?" for her card. 

I decided to do a little multi-media project for this card, which is a bit out of my comfort zone. (I spend too much time worrying about whether everything looks "right"!) I found a Distress Oxide-inked panel that I liked in a box of unfinished bits and pieces, and then I just started the layering.

First I splattered some black ink on the panel. Then I applied glimmer paste through a stencil in a few patches to add texture and a little glitz. I placed pieces of washi tape and tiny staples near the top left and bottom right corners and doodled a border around the panel with a black pen.

I didn't want the sentiment on stark white card stock, so I found another inked panel in my stash that coordinated with the background and stamped the sentiment on it with black ink. I cut apart the words and added them to the card base with foam tape. I finished the card with three clusters of tiny black hexagons. It's not my usual style, but I think it turned out pretty good!

What type of card do you prefer: silly or sentimental? Thanks for stopping by!


Thursday, December 17, 2020

A day at the lake

December is just flying by! I can't believe it's been almost two weeks since my last post -- and only one week until Christmas. I've been frantically trying to finish all my holiday projects and to dos, and I think I'm finally in the home stretch. But this will be a short post tonight, because I do have a few tasks I'd like to check off my list tonight.

I made the cards for today's post months ago (as with so many of the cards I still have to share), so they are a little out of season, at least for those of us in the Northern Hemisphere. But it's always fun to dream about a day at the lake, right?

Supplies:
Kit: July 2019 My Monthly Hero (Hero Arts)
Paper: Balmy Blue, Garden Green, Early Espresso, Whisper White card stock (Stampin' Up!); 110-lb Solar White card stock (Neenah)
Ink: Lime Green, Forest, Dusty Blue, Sand Stone, Cocoa (Hero Arts [in the kit]); Real Red, Sahara Sand, Tip Top Taupe (Stampin' Up!); Momento Tuxedo Black (Tsukineko)
Accessories: High Flying Kites dies (Poppy Stamps), Express-o Yourself mini prills (USArt Quest), clear Wink of Stella glitter brush pen (Kuretake), Art Glitter Glue (Art Institute), foam tape (3M)

I love both of these scenes, but the lake monster casually swimming by on the right-hand card really cracks me up! Both of these cards are made with mostly stamping, die cutting, and layering. I did add some clear Wink of Stella glitter in the "water" to add some detail and a bit of sparkle. You can see it a little in the close-up photo below.

After you spend all day swimming at the lake, it's time for some sunset fishing, right? That was the focus on the next card.

Supplies:
Kit: July 2019 My Monthly Hero (Hero Arts)
Paper: Whisper White card stock (Stampin' Up!)
Ink: Fossilized Amber, Wild Honey, Spiced Marmalade, Abandoned Coral, Seedless Preserves, Salty Ocean, Faded Jeans Distress Oxide inks (Ranger); Momento Tuxedo Black (Tsukineko)
Accessories: Blender brushes (Picket Fence Studios), masking paper (Inkadinkadoo), clear shimmer spray (Avery Elle), foam tape (3M)

I covered the bottom half of the card stock panel with masking paper while I used blender brushes and distress oxide inks to create the sunset on the top part of the card stock. Then I moved the masking paper to the top of the card and blended the water. (I was bummed to see that when I removed the masking paper from the sky, it pulled off tiny spots of ink, so the sunset isn't as smooth as it could be.) I also spritzed some clear shimmer spray over the water to activate the inks and add sparkle.

The background was definitely the challenging part of this card. Once that was done, it was just a matter stamping, die cutting and layering on the images.

Thanks for stopping by today! I'll try to be back soon with more cards to share.


Friday, December 4, 2020

2020 Christmas card recap

How is it possible that Christmas is three weeks away?! It seems like 2020 has lasted forever and flown by at the same time. I'm not done making gifts yet, and I haven't really started shopping. How about you? 

I do have my Christmas cards made, and I'm addressing/mailing them in batches so it's not such an overwhelming task. But just in case you're still looking for some Christmas card ideas, I thought I'd do a quick recap of the cards I made this year. There are a few clean and simple designs that wouldn't take much time to create. (Click on the links to read the posts and to see additional pictures.)

January: Winter pine boughs

 
February: Wonderful snowman


March: Holly jolly penguin


April: Home for the holidays


May: Red snowflakes


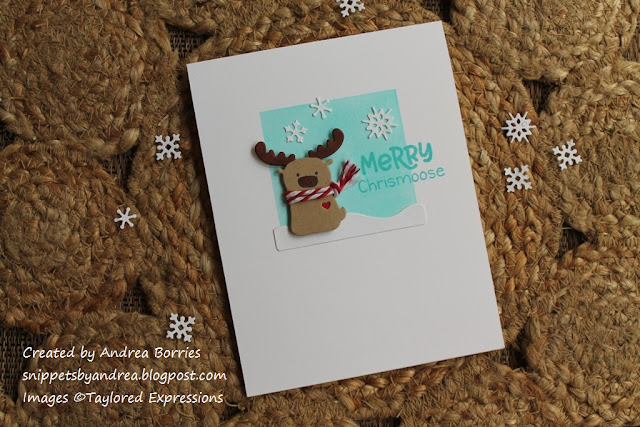
June: Merry Chrismoose


July: Playing with paper


August: Santa gnome


September: Watercolor lights


October: Nordic simplicity


I actually did end up making some cards in November. I used a cute winter-themed scrapbook kit (coordinating patterned paper, stickers, and journaling cards) to put together about twenty cards, but I completely forgot to take pictures! Oops.

I hope you find some inspiration for your cards -- or ideas to tuck away for next year. Thanks for stopping by!


Monday, November 30, 2020

Card sets with patterned paper

This year I signed up to be a "holiday helper" with the local chapter of Little Brothers - Friends of the Elderly (LBFE). LBFE is a network of non-profit volunteer-based organizations that work to relieve isolation and loneliness among the elderly. Normally they host an event for their members and volunteers to celebrate the holiday season, but that wasn't possible this year because of COVID-19. Instead, LBFE asked for holiday helpers to send care packages of treats and small gifts to elder friends during the holiday season.

I signed up for one friend for Thanksgiving and two for the December holidays, and I had fun putting together their care packages. I wanted to include something handmade for each holiday friend, so I made some simple card sets.

Supplies:
Paper: Thick Very Vanilla, Cajun Craze, Lost Lagoon card stock (Stampin' Up!); Stella and Rose paper pad (My Mind's Eye)
Accessories: Thinking of You die (Honey Bee Stamps), Thanks die (Taylored Expressions), Hugs Sugar Script die (Birch Press Design), Scripty Hello die (Lawn Fawn), Itty Bitty Shapes punch pack (Stampin' Up!), Bitty Banner punch (Stampin' Up!), sparkling clear sequins (Pretty Pink Posh), Connect Glue (Gina K Designs)

I had to put these together fairly quickly, so I kept the supplies minimal. My goals were to keep the cards flat for easy mailing and to make them as gender neutral as possible.

I grabbed a pack of patterned paper, and once I settled on a layout, I cut several sheets of the paper into the sizes I needed and mixed and matched the patterns. I chose four sentiment dies -- hugs, thanks, thinking of you, and hello -- and die cut one of each for each card set.

This layout would be so easy to customize for any occasion -- just change the patterned papers and/or the sentiments. You could also make them "fancier" by using ribbon instead of card stock for the solid strip across the card, adding a die-cut layer(s) behind the sentiment, and/or adding more embellishments.

I packaged each four-card set in a clear box with envelopes and a sheet of postage stamps. I hope the recipients enjoy using them!

Once these sets were all done, I had some odds and ends of patterned paper left. I wanted to finish off the pack, so I created four additional cards for my stash: two hello and two birthday.

Supplies:
Paper: Thick Very Vanilla, Cajun Craze, Lost Lagoon, Early Espresso card stock (Stampin' Up!); Stella and Rose paper pad (My Mind's Eye)
Accessories: Regals Candy Dots (Stampin' Up!), pearls (Stampin' Up!), Birthday Cheer dies (Honey Bee Stamps), Big Hello Sugar Script dies (Birch Press design), Happy Birthday die (Stampin' Up!), Funky Foliage Thinlits dies (Sizzix - Tim Holtz), Stitched So Sweetly dies (Stampin' Up!),
Itty Bitty Shapes punch pack (Stampin' Up!), Bitty Banner punch (Stampin' Up!), Connect Glue (Gina K Designs), foam tape (3M)

These cards took quite a bit longer for me to design since I was working with different sizes and shapes of the leftover patterned paper. With some of the smaller pieces I die cut several of the Funky Foliage shapes, layering together the different patterns and colors. The rest of the paper made great background panels and strips. I was really pleased with how these cards turned out!

Thanks for stopping by today!