Sunday, February 28, 2021

February Christmas cards: Cards from calendars

It's been a rough few weeks, and I haven't had much energy for card making. But I did want to make my February Christmas cards, and I just managed to squeeze them in. Rather than making cards from scratch, though, I used pages from old calendars. I really like the finished cards, but I'll admit that it does feel a bit like cheating.

The calendars I used for my cards today are from Paper Source, which is a stationery and gifts retailer. They have a good variety of calendars and planners, but some of my favorites are the ones featuring their own colorful artwork. One style is large (about 12" x 20") with the artwork filling the whole page and a small calendar grid in the bottom right corner. This style is specifically designed for you to repurpose the pages, and the backs are even printed with cutting guides for things like file folders, gift boxes, bookmarks, and cards.

I had two of these calendars from several years ago, and I finally decided to start cutting them up. For some of the pages, I did the suggested projects -- I really like the file folders, for instance, and the prints on those pages are often too large for cards. A couple of the pages I made into my own gift bags using a gift bag punch board. But for most of the pages, I simply cut or die cut them into rectangular pieces to use on card fronts. I've got a pretty good pile going, and I used some of the wintery ones for this batch of Christmas cards.

Supplies:
Stamps: Inside Christmas Greetings (Simon Says Stamp)
Paper: Handsome Hunter, Sahara Sand, Poppy Parade, Shaded Spruce card stock (Stampin' Up!)
Ink: Shaded Spruce (Stampin' Up!), white paint pen (Posca)
Accessories: Layering Circles and Stitched Shapes dies (Stampin' Up!), Stitched Rectangle Stackables dies (Lawn Fawn), Merry Sugar Script die (Birch Press Design), rhinestones (Stampin' Up!), white gesso (Art Basics), liquid watercolor shimmer (Taylored Expressions), Art Glitter Glue (Art Institute), foam tape (3M)
Other: Old calendar pages (Paper Source)

I think these birds on the snowy pine branches are so cute. I used rectangle stitched dies to cut pieces for six card fronts. To make the cards with the stitched rectangle panels, I mixed some white gesso with liquid watercolor shimmer and then painted over the snowy areas on the branches. Then I thinned the mixture a little more and splattered it on the pieces to create the look of falling snow. (Some of my splatter drops got a little gloppy -- I guess those are just big, fat snowflakes.) I was hoping the shimmer would show up in the gesso, but it really doesn't. Oh, well. I still like the result.

When the gesso was dry, I mounted the panels on Handsome Hunter card bases. For the "merry" sentiment, I die cut the word three times for each card and glued them together before adhering them to the card so it really stands out. I also added a rhinestone or two to each card for a hint of sparkle.

When those cards were done, I used the extra bits and pieces to make two more cards. For those cards I used Sahara Sand card bases, which was almost a perfect match for the background of the calendar page. I used a circle die to create a focal image for one of the cards. For the second one I hand cut a bird and several branches and berry clusters from the leftover scraps. I layered the pieces together and then used a white paint pen to make dots around the completed image. I added a few rhinestones to those cards, too. 

Supplies:
Stamps: Stitched with Cheer (Stampin' Up!)
Paper: Whisper White, Crumb Cake, Poppy Parade card stock (Stampin' Up!)
Ink: Garden Green (Stampin' Up!), white paint pen (Posca)
Accessories: Bunch of Banners dies (Stampin' Up!), Large Stitched Rectangle Stackables dies (Lawn Fawn), Ovals Collection dies (Stampin' Up!), 1-1/4" and 1-3/8" circle punches (Stampin' Up!), paper piercer (Stampin' Up!), sparkling clear sequins (Pretty Pink Posh), Corner Chomper (We R Memory Keepers), Art Glitter Glue (Art Institute), foam tape (3M)
Other: Old calendar pages (Paper Source)

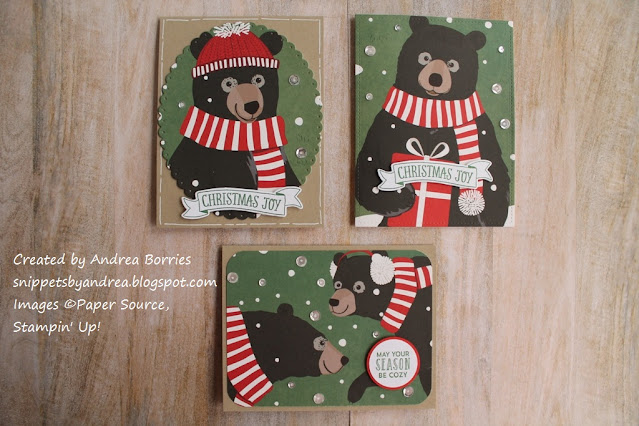
These bears are adorable, too, but since they're a lot bigger than the birds, I was only able to make three cards from this calendar page. For the top two cards, I used dies to cut out the images; the rectangle piece was cut with a stitched die, and I used a paper piercer to pierce a hole in each scallop of the oval for an extra little detail. For the bottom card I just used my paper cutter to cut out the image and then rounded the corners. I added punched or die cut a stamped sentiment for each card and added a few clear sequins over some of the snowflakes for a little shine and simple embellishment.

Thanks for stopping by!


Saturday, February 13, 2021

Valentine cuteness

After making all my valentines for Meals on Wheels, I had a little time to make a few cards of my own. I had bought a few new stamp and die sets specifically for the holiday, and they made the cutest cards.

Supplies:
Stamps: Sending Love (Waffle Flower)
Paper: Pool Party, Smoky Slate, Blushing Bride, Calypso Coral, Whisper White, Early Espresso card stock (Stampin' Up!)
Ink: Pool Party (Stampin' Up!), Memento Tuxedo Black (Tsukineko)
Accessories: Mailbox die (Waffle Flower), Set the Scene - Clouds stencil (Taylored Expressions), blender brush (Taylored Expressions), Art Glitter Glue (Art Institute)

I love this little mailbox die! It's actually designed to be a gift card holder and even has little tabs inside to secure a gift card. But you can just cover up the tabs to make a fun interactive card, which is what I did for these three cards:

The mailbox die set also includes all the dies to make these little envelopes, so I die cut a bunch of them out of three colors of card stock and filled up each mailbox.  Aren't they cute? I especially love the little wax seal for the back of the envelopes.

For the rest of the card design, I used Pool Party card bases and ink blended some subtle clouds in the background. A few scraps of brown card stock made posts for the mailboxes.

Supplies:
Stamps: Sending Love (Waffle Flower)
Paper: Whisper White note cards and envelopes; Whisper White, Crumb Cake card stock (Stampin' Up!)
Ink: Crumb Cake (Stampin' Up!); Memento Tuxedo Black (Tsukineko); alcohol markers - C1, W1 (Copic); Real Red, Flirty Flamingo, Mango Melody, Pool Party, Bronze, Crumb Cake Blends (Stampin' Up!)
Accessories: Sending Love dies (Waffle Flower), Stitched So Sweetly dies (Stampin' Up!), Clear Drip Drops (Taylored Expressions), foam tape (3M), Art Glitter Glue (Art Institute)

These are the most adorable cards. Unfortunately, I didn't get great pictures, and when I lightened the photo, it washed out the colors. But you get the idea. I stamped, colored, and cut a mouse, mailbox, and two postage stamp images for each card. I adhered them to Crumb Cake scalloped rectangles and attached each rectangle to a white note card. I stamped a few hearts in Crumb Cake and added three clear droplets for embellishment on each card.

Supplies:
Stamps: Snail Mail (Reverse Confetti)
Paper: Whisper White note cards and envelopes; Basic Black, Whisper White confetti (Stampin' Up!)
Ink: Real Red, Pool Party (Stampin' Up!); Memento Tuxedo Black (Tsukineko); alcohol markers - W1 (Copic); Pool Party, Mango Melody, Crumb Cake, Real Red Blends (Stampin' Up!)
Accessories: Snail Mail dies (Reverse Confetti), Stitched So Sweetly dies (Stampin' Up!), resin hearts (Stampin' Up!), foam tape (3M), Art Glitter Glue (Art Institute)

Snail mail! I used a similar layout as the previous cards but turned it horizontally. I used black card stock for the scalloped rectangles so the bright colors would really pop. And instead of leaving the background white, I repeatedly stamped several images from the set in a few different colors.

I hope you have a happy Valentine's Day! Thanks for stopping by!


Friday, February 5, 2021

2021 Meals on Wheels valentines

If you've been around for awhile, you may remember that every year I make a bunch of valentines for the organization that manages the Meals on Wheels program in my area. The cards are delivered to clients along with their meals, and I hope they bring an extra bit of cheer to their day. If you're new here, check out the Meals on Wheels valentines I've made in years past. There are a lot of easy, quick, and cute ideas. I also try to keep some of the designs more masculine or gender neutral since I don't know who will be receiving them.

I dropped off this year's 92 cards at the community center this morning, so it seemed like the perfect time to share the designs on my blog as well. And if you still plan to make some cards for Valentine's Day, maybe these will give you some inspiration. (There are a lot of pictures, so I apologize in advance for the long post.)

Supplies:
Stamps: Mini Love Cards (Colorado Craft Company)
Paper: Whisper White, Crumb Cake, Soft Suede, Pear Pizzazz, So Saffron, River Rock card stock (Stampin' Up!); olive green card stock (unknown)
Ink: Memento Tuxedo Black (Tsukineko); Mossy Meadow, Lovely Lipstick, Granny Apple Green, So Saffron, Soft Suede, Crumb Cake Blends markers (Stampin' Up!); R81 marker (Copic)
Accessories: Stitched Shapes dies (Stampin' Up!), white rhinestones (Taylored Expressions), foam tape (3M), Art Glitter Glue (Art Institute)
Other: Gel prints made with various acrylic paints, white envelope paper (Stampin' Up!), and a gel press plate (Gelli Arts)

Several weeks ago I spent a day just making a bunch of gel prints, and I started my valentines with those. The prints were 6" x 6", so for this group of cards I cut several prints in half and used them as backgrounds behind these sweet images I colored with alcohol markers.

Supplies:
Paper: Thick Whisper White and various colored card stock (primarily Stampin' Up!)
Accessories: Hearts Entwined die (My Favorite Things), sequins (unknown), Art Glitter Glue (Art Institute)
Other: Gel prints made with various acrylic paints, white envelope paper (Stampin' Up!), and a gel press plate (Gelli Arts)

For this batch of cards, I trimmed several of the gel prints down to A2 size (4-1/4" x 5-1/2") and adhered each one to a heavy white card base. I chose a coordinating color of card stock for each card and die cut it with the Hearts Entwined die. When adhering the die cuts to the cards I left in some of the "throw-away" pieces to create some solid hearts along with the outlines.

Supplies:
Stamps: You Color My World (Unity Stamp Co.)
Paper: Whisper White, Bermuda Bay, Poppy Parade, Coastal Cabana card stock (Stampin' Up!)
Ink: Memento Tuxedo Black (Tsukineko); Poppy Parade, Mango Melody, Bermuda Bay, Bronze, Smoky Slate Blends markers (Stampin' Up!)
Accessories: Postage Stamps Nested Frame Cuts dies (Hero Arts), resin hearts (Stampin' Up!), Art Glitter Glue (Art Institute)
Other: Gel prints made with various acrylic paints, white envelope paper (Stampin' Up!), and a gel press plate (Gelli Arts)

I thought these colorful gel prints worked perfectly with the paint can image, so I colored the image and sentiment using coordinating markers. I die cut each image with a postage stamp-style die and adhered it to the center of the gel print background.

Supplies:
Paper: Poppy Parade, Real Red, Crushed Curry, Pineapple Punch, Bermuda Bay, Coastal Cabana, Naturals White card stock (Stampin' Up!)
Ink: Journaling pen (Stampin' Up!)
Accessories: Heart punch (Stampin' Up!)
Other: Gel prints made with various acrylic paints, white envelope paper (Stampin' Up!), and a gel press plate (Gelli Arts)

After I trimmed down the gel prints for the previous group of cards, I had some usable pieces left over. I punched some hearts out of those pieces, as well as out of some coordinating card stock scraps, and combined them into this simple layout (my favorite for quick-and-easy valentines). I doodled a border around each card to frame the hearts.

Supplies:
Paper: Thick Very Vanilla card stock (Stampin' Up!), Insta Photo Fun card stock (DCWV), crinkle card stock, cork sheets, vintage choral sheet music (unknown)
Ink: Gold glimmer metallic paint (Hero Arts)
Accessories: Heart punch (Stampin' Up!), resin hearts (Stampin' Up!)
Other: Gel prints made with various acrylic paints, white envelope paper (Stampin' Up!), and a gel press plate (Gelli Arts)

I warned you that this was a favorite layout. :) I love that it's gender neutral, and you can mix it up with different colors, textures, prints, etc. I included one gel print heart on each card and then used a variety of items from my stash. (The kraft hearts with black print are from a paper bag printed with vintage-style newspaper ads that I received a stamp order in -- I think it was Honey Bee Stamps.) I splattered the card bases with gold before adding the hearts.

Supplies:
Stamps: Monster Love (Concord & 9th)
Paper: Brocade Blue, Ruby Red, Sweet Sugarplum, thick Whisper White, thick Very Vanilla card stock (Stampin' Up!); striped paper (American Crafts)
Ink: Memento Tuxedo Black (Tsukineko), white paint pen (Posca)
Accessories: Monster Love dies (Concord & 9th), foam tape (3M), white crochet thread (DMC)

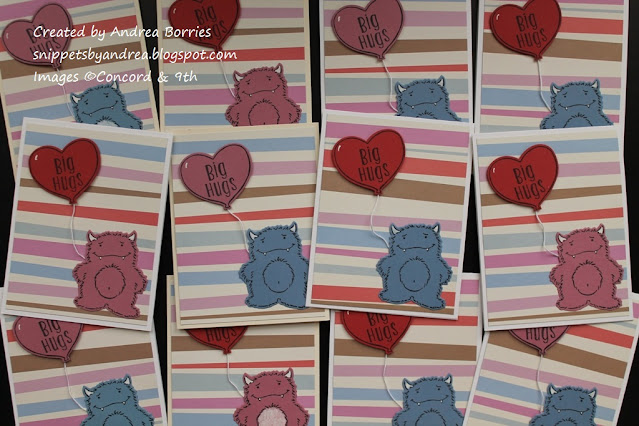
I bought this stamp/die set ages ago and had never used it. But I thought it was perfect for some cute valentines. And I saved time by stamping the images on colored card stock instead of coloring them.

Supplies:
Stamps: This Little Piggy (Stampin' Up!)
Paper: Whisper White, Crumb Cake, thick Whisper White card stock; Subtles Designer Series Paper (DSP) Stack (Stampin' Up!)
Ink: Memento Tuxedo Black (Tsukineko); alcohol markers - W1 (Copic), Crumb Cake, Flirty Flamingo, Granny Apple Green, Soft Sky (Stampin' Up!)
Accessories: Jute twine (May Arts Ribbon), resin hears (Stampin' Up!)

I love this cute little piggy! I did color in these images, but I didn't worry too much about blending and shading. I used a simple twine bow or three white resin hearts (depending on the orientation of the card) for a simple embellishment.

Supplies:
Stamps: Gnome-One Like You (Unity Stamp Co.)
Paper: Whisper White, thick Whisper White card stock; Brights and Neutrals DSP Stacks (Stampin' Up!)
Ink: Memento Tuxedo Black (Tsukineko); alcohol markers - W1 (Copic), Real Red, Crumb Cake, Smoky Slate, Nude (Stampin' Up!
Accessories: Resin hearts (Stampin' Up!)

These gnomes are so cute -- and easy to color since they aren't too detailed. I used two pieces of DSP for the background, and instead of having them meet or overlap, which I would usually do, I left about a 1/4" space between the two pieces. I really like the finished layout!

Supplies:
Stamps: Tree's Company (Raisin Boat)
Paper: Sea Glass card stock, Zoe paper, Hello Lovely paper (Close to My Heart); Petal Pink card stock (Stampin' Up)
Ink: Soft Suede (Stampin' Up!)
Accessories: Hearts dies (Little B), white tea lace paper doilies (Stampin' Up!), foam tape (3M)

These are probably the most feminine cards of the bunch, but I love the combination of the coral and sea glass colors. And the doilies work perfectly behind the hearts.

Supplies:
Stamps: Etched Flowers (Darkroom Door), Bloom with Heart (Fun Stampers Journey)
Paper: Petal Pink, Soft Sea Foam card stock (Stampin' Up!)
Ink: Petal Pink, Soft Sea Foam (Stampin' Up!); Oreo (Taylored Expressions); Pigma Micron 03 black pen (Sakura)
Accessories: Sparkle Silk (Fun Stampers Journey), resin hearts (Stampin' Up!)

This was the last batch of cards I made, and it's also the only layout that is a single-layer one. I was worried they would be too plain, but in the end I really like them. I stamped the hearts using the same color ink as the card stock, stamped the sentiment in black, and then splattered on some sparkle, doodled a border, and added one small resin heart on each card. Simple, but lovely.

That's it! I hope you found some ideas for your own valentines or other cards. Thanks for stopping by!


Thursday, February 4, 2021

Old stamp, new look

I've bought a lot of stamps over the years, and it's interesting to see how styles and trends (and my tastes) have changed. A lot of those stamps have come and gone, but I definitely have some favorites that I intend to hang onto for the long haul. It's fun to pull out those oldies-but-goodies and give them a new look, like this card featuring Love Is Kindness.

Supplies:
Stamps: Love Is Kindness (Stampin' Up!)
Paper: Night of Navy, Crumb Cake card stock (Stampin' Up!)
Ink: Sugar Cube (Taylored Expressions); Deco Brush Metallic Markers - gold, green, pink (Karin); white paint pen (Posca)
Accessories: Skyscape Mini Coverplate dies (Catherine Pooler), jute twine (May Arts Ribbon), Opaque Bright White Fine embossing powder (Wow! Embossing Powder), foam tape (3M)

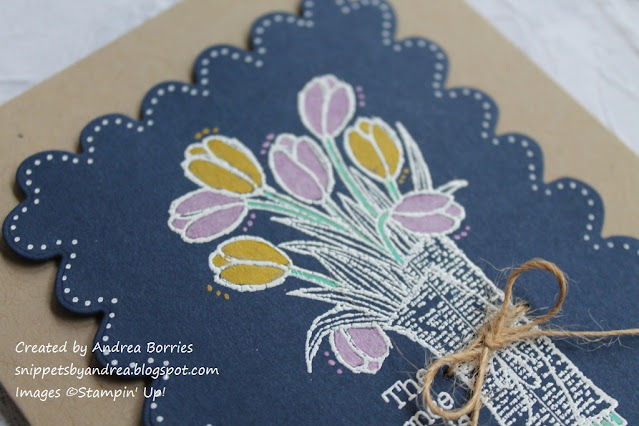
For my birthday last fall I received a set of Karin brand Deco Brush Metallic Markers, and I wanted to try coloring with them on dark card stock. The Love Is Kindness stamp was perfect because I could practice with the small areas in the tulips.

I stamped the image using white pigment ink on navy card stock and then embossed it with fine white detail white embossing powder. Then I used the metallic gold, green, and pink markers to color just the flowers and stems. I wanted to color to stand out, so I left the rest of the image plain and cut it out with a scalloped rectangle die.

To bring in some more white, I used a paint pen to add a dotted border around the scallops. I repeated the dots next to each tulip using the same color as the flower. For embellishment, I punched a small hole on either side of the base of the bouquet, threaded some twine through the holes, and tied it off in a bow.

I struggled with what color card base to use for this card. My first inclination was to use white, but that actually ended up looking too stark. So I settled on Crumb Cake, which I think looks nice with the twine bow, and used foam tape to attach the navy panel.

Do you like to get out old stamps to use with new techniques or tools? Give it a try!

Thanks so much for stopping by today!