Showing posts with label other creative endeavors. Show all posts

Wednesday, July 5, 2023

Watercolor in the backyard

Over the weekend I wanted to do something crafty, but I wasn’t in the mood to make cards. I know some crafters use those days to make a stack of ink-blended backgrounds, die cut a bunch of sentiments, or other tasks like that. Those ideas have never really worked for me, so instead I gathered a few supplies and did some art in my backyard.

Here are the supplies I used: two small pieces of watercolor paper, two Micron pens, a paintbrush, a container of water (I love the empty containers from Talenti gelato because they are clear and have a screw-on lid), a travel card of paint samples from Beam Paints, and a plastic mat.

I was inspired by an artist named Andrea Nelson. She has wonderful videos of fun, doable art projects for all ages, and I highly recommend checking her out on Instagram or YouTube. For my projects, I used a Micron pen to make squiggly lines across each piece of watercolor paper. Then I used another Micron pen with a slightly smaller tip to round off each place where the lines intersected. (The photo above shows the pieces at this stage.) You could use Sharpie markers or other pens instead; you just want to make sure that the ink is waterproof if you plan to add watercolor paint.

The next step was to add paint. For one of the pieces I decided to make a rainbow with the colors blending into each other across the squiggly lines. For the second piece I used a limited color palette (four colors and gold) and just filled in the different sections created by the lines.

Once I was done painting I wanted to add more detail to the rainbow card. I used the Micron pen with the smaller tip and filled all the white space on the paper with little circles. My hand definitely got tired, but having to concentrate on all those circles did help block out all the other random thoughts in my brain.

I decided to turn this piece into a postcard and send it to my local art supply store, Wet Paint, for their annual Summer Postcard Program. This is the third year I’ve sent in postcards for this program, and it’s a fun, low-key project for the summer. To turn this into a postcard I just added a few lines on the back: one vertical line in the middle and a few horizontal lines on the right side to write the address. I also sprayed a light coat of sealant on the front so the paint wouldn’t run if the card got wet in the mail.

Although I liked the look of the circles on the rainbow card, I didn’t think my hand could fill in another card. So I decided to leave the second piece as is. I tried to capture the sparkle of the gold paint in the picture, but it’s tricky. It really has so much shine.

My plan for this piece is to turn it into a greeting card. I’ve trimmed it down just a bit so I can add it onto a 5” by 7” card base. The card base is a neutral stone color (similar to kraft), which is perfect. I haven’t finished the card yet because I’m still debating whether I want to add a mat of black card stock and possibly a sentiment strip. What would you do?

I really enjoyed taking a little time to make these two projects, and I’m looking forward to making more in the future. Do you have a go-to art/craft technique or project that you turn to when you’re not sure what you want to make? If so, let me know what it is in the comments!

Thanks for stopping by!


Wednesday, August 10, 2022

My first ICAD Challenge

This summer I tried a new (to me) creative challenge: the Index Card a Day (ICAD) Challenge. The goal of the challenge is to create something on an index card every day during the months of June and July, so 61 days total. Using an index card -- just a regular 3" x 5" or 4" x 6" office supply index card -- keeps your creative projects small, approachable, and less intimidating. You don't have to make something fancy or perfect or frame-able; you could practice lettering, make a collage of magazine cut-outs, scribble/draw with markers, whatever speaks to you.

The challenge includes daily prompts (a word or words to jump-start your creativity each day) and weekly themes (a big-picture concept, theme, or medium/material to explore for several days). You can use the prompt and theme together, pick one of them, or skip them altogether and do something completely different.

I didn't make it the whole 61 days of the ICAD Challenge. I got through all of June and the first few days July and then lost focus. I loved the idea and practice of making something every day, and some days I knew exactly what I wanted to do and it was great. Other days I would stare at my blank index card and feel stuck because I didn't know where to start. I thought about jumping back in a few times toward the end of July, but by then I'd lost my momentum.

I am proud of myself for making it through more than half of the challenge, though, especially since it was my first try. Maybe next year I'll try again and be more prepared. This year I learned about the challenge literally a day or two before it started and decided to do it on a whim. (Luckily, my sister had some index cards on hand.) Next year it might be fun to have a basket specifically for ICAD Challenge supplies so I can focus on using those items.

I also might reconsider posting my index cards on Instagram next year. I posted them this year, and while it's fun to share them and feel like part of a community, I always focus too much on the number of likes or comments I get or worry that what I make isn't good enough compared to what other people post. It's silly, I know, since the challenge isn't any sort of competition, but these are things I struggle with in general, not just in relation to the ICAD Challenge.

I couldn't talk about the ICAD Challenge and not share some of my creations. So here is a sampling of my index cards from the challenge (in no particular order):


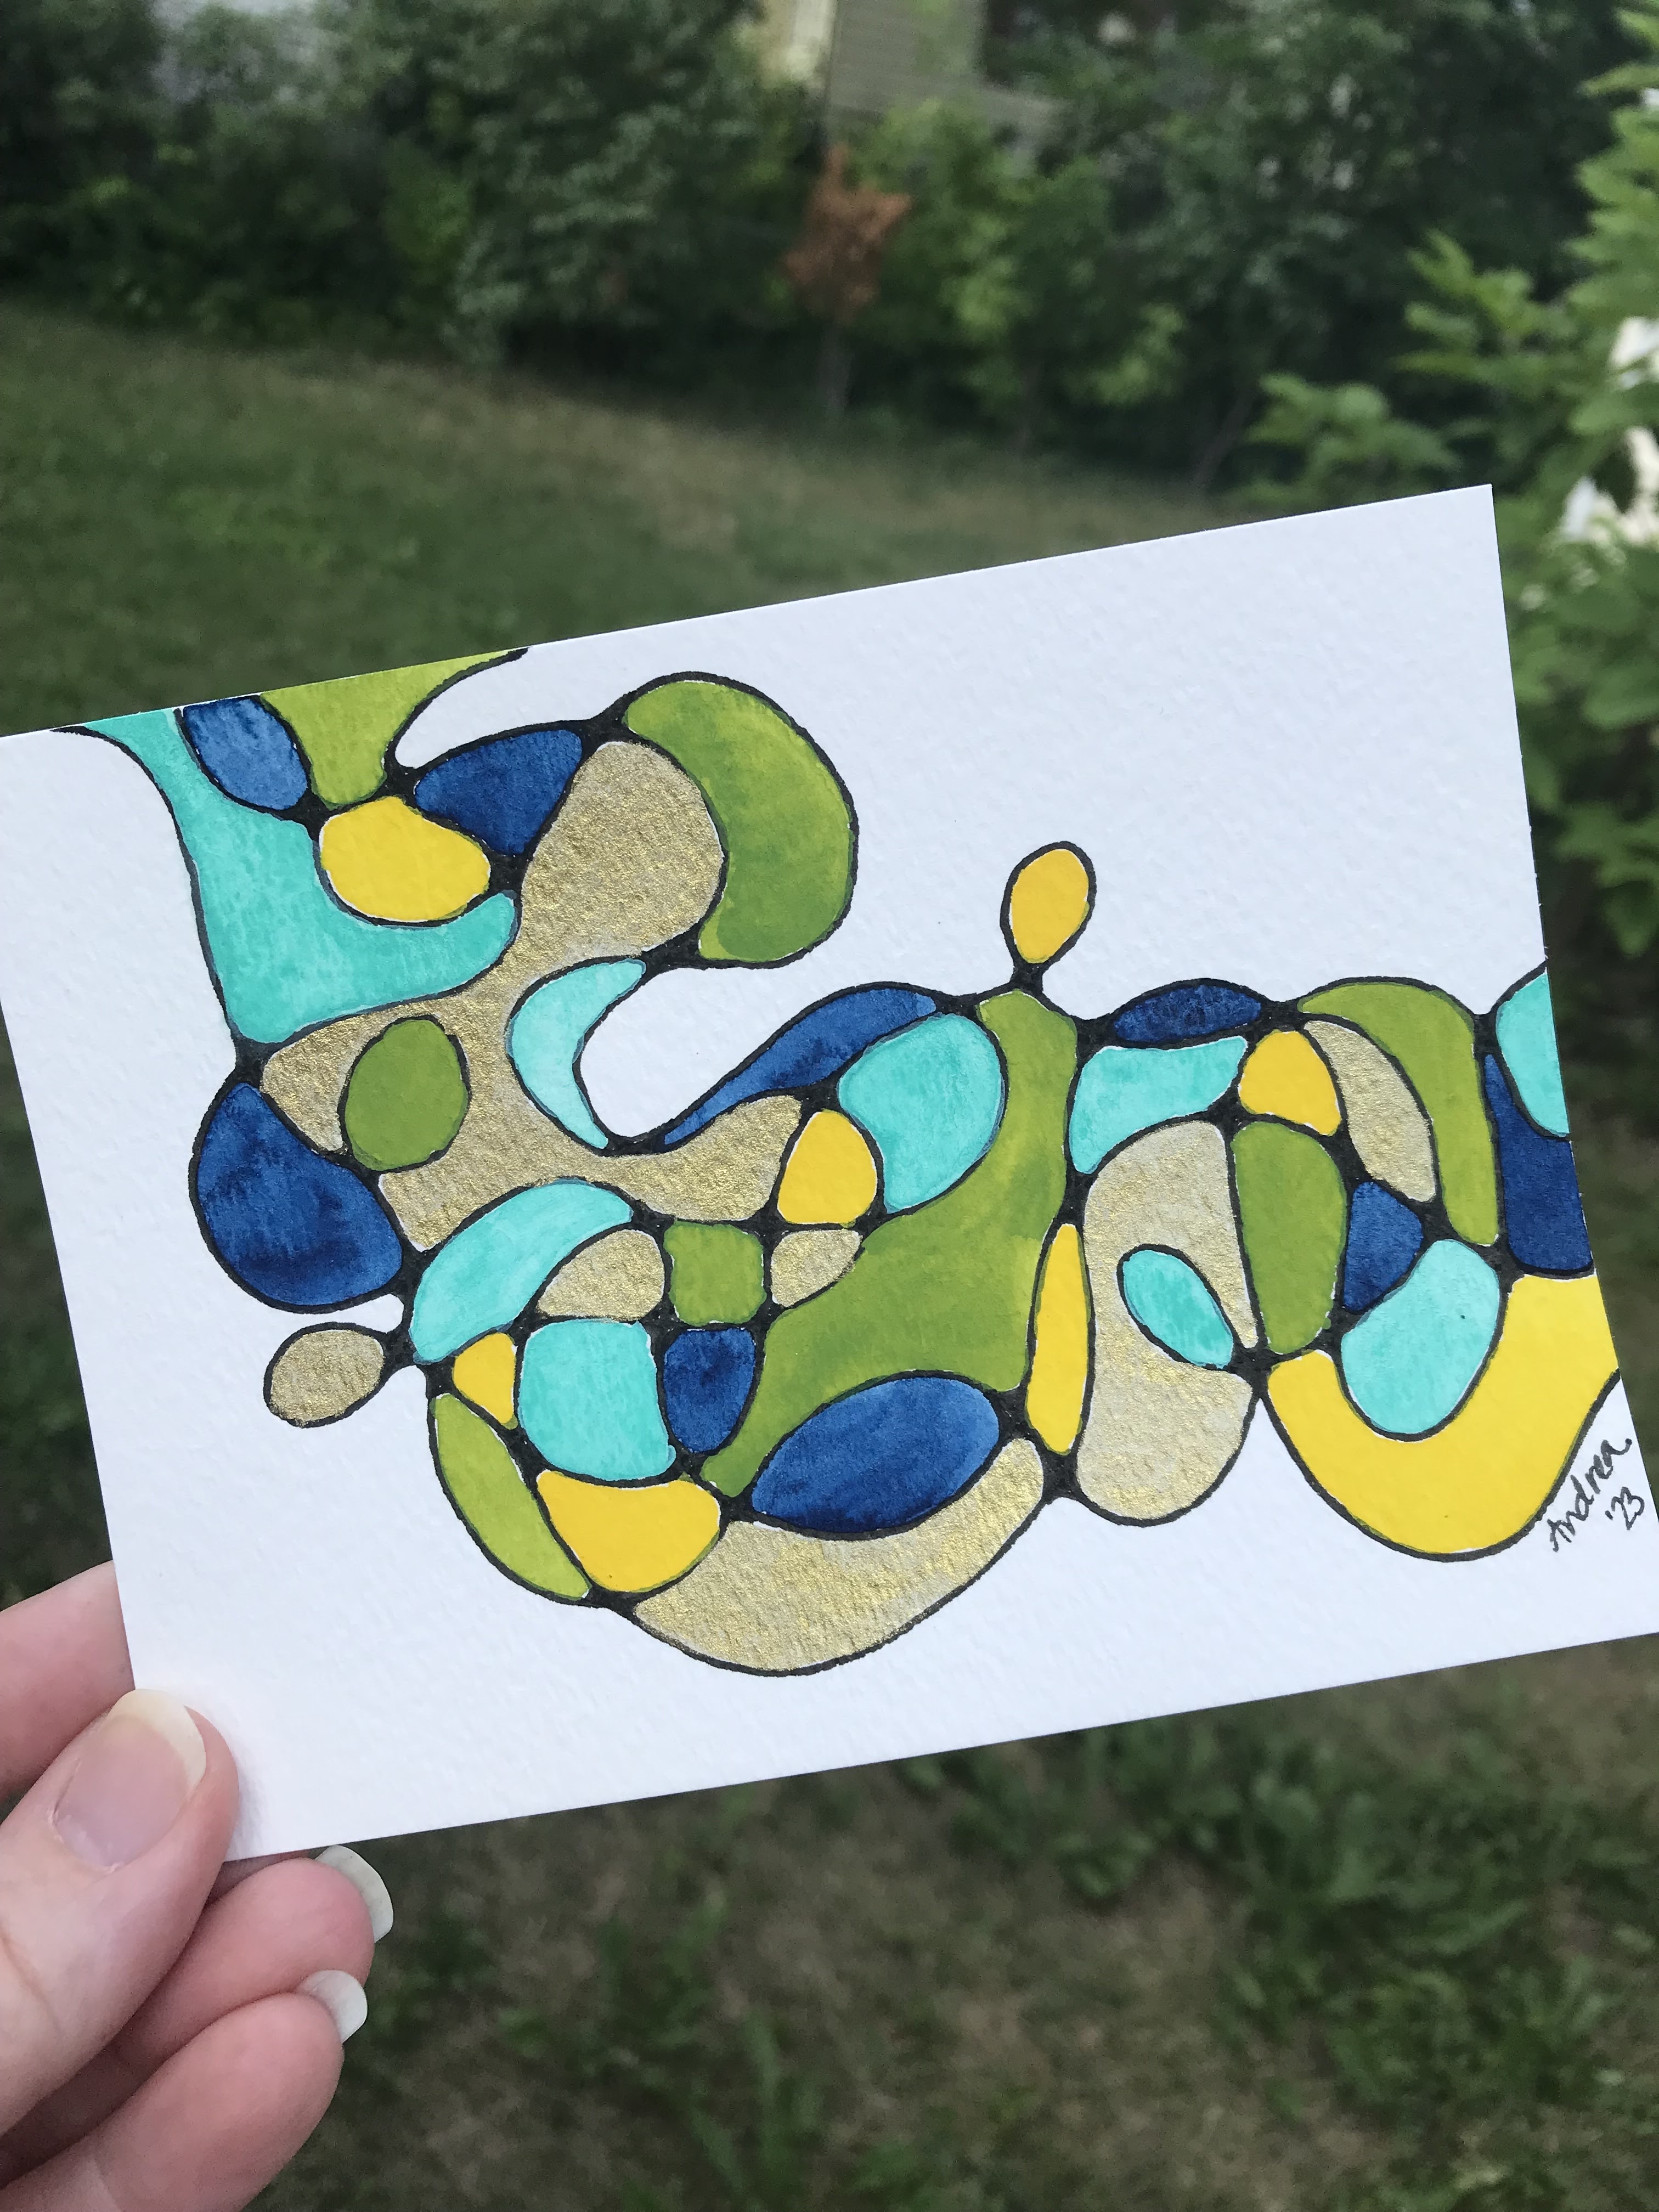
Day 9. Prompt: Found. Theme: Collage, found paper, acrylics
. I cut up gel prints to make this collage, and I love how the darker spots on the "water" look like reflections of the sun and trees. The sentiment was made with alphabet stamps.


Day 33. Prompt: Quatrefoil or ogee.
I painted the index card with Ultra Gloss Air Dry Enamel, die cut the shapes from various gel prints and used a white paint pen to add accents.

Day 30. Prompt: Magical. I played around with a lot of different supplies for this card: Gelatos, Micron pens, white paint pen, silver Pearl Pen, stamps, ink, and silver foil card stock.

Day 22. Prompt: Pineapple. Theme: Patterns, murals, motifs, and/or wallpaper. I created this index card in a waiting room, so I couldn't do anything multi-media. I used markers to create a pattern inspired by the outside of a pineapple.

Day 34. I didn't use the prompt or theme for this card. I lightly sprinkled Color Burst powders on an index card and then spritzed it with water. When it was dry (I did have to blot some of the excess water) I used a paint pen to make the border and added two white butterflies. It's hard to see in the photo, but the little embellishments on the butterflies are perfect -- the colors match up, and the design in them even looks like the center of a butterfly.

Day 20. Another one with no prompt or theme. The strips that look like washi tape are made with Distress Crayons and a retired stamp set. The sentiment is stamped, and I used a Micron pen to draw the circles and dotted border.

Day 35. Prompt: Yellow. The background is made with stamps, and I punched the lemons and leaves out of gel prints. This was the last index card I made for the challenge.

Day 14. Prompt: Mood board. I think this is my favorite of all my index cards. I hadn't ever made or really used a mood board before, so I looked up some examples online, chose a theme and colors, and jumped in. I used five stamp sets (I think), and I added a little texture with burlap trim, a paper/bead flower, and a bit of washi tape.


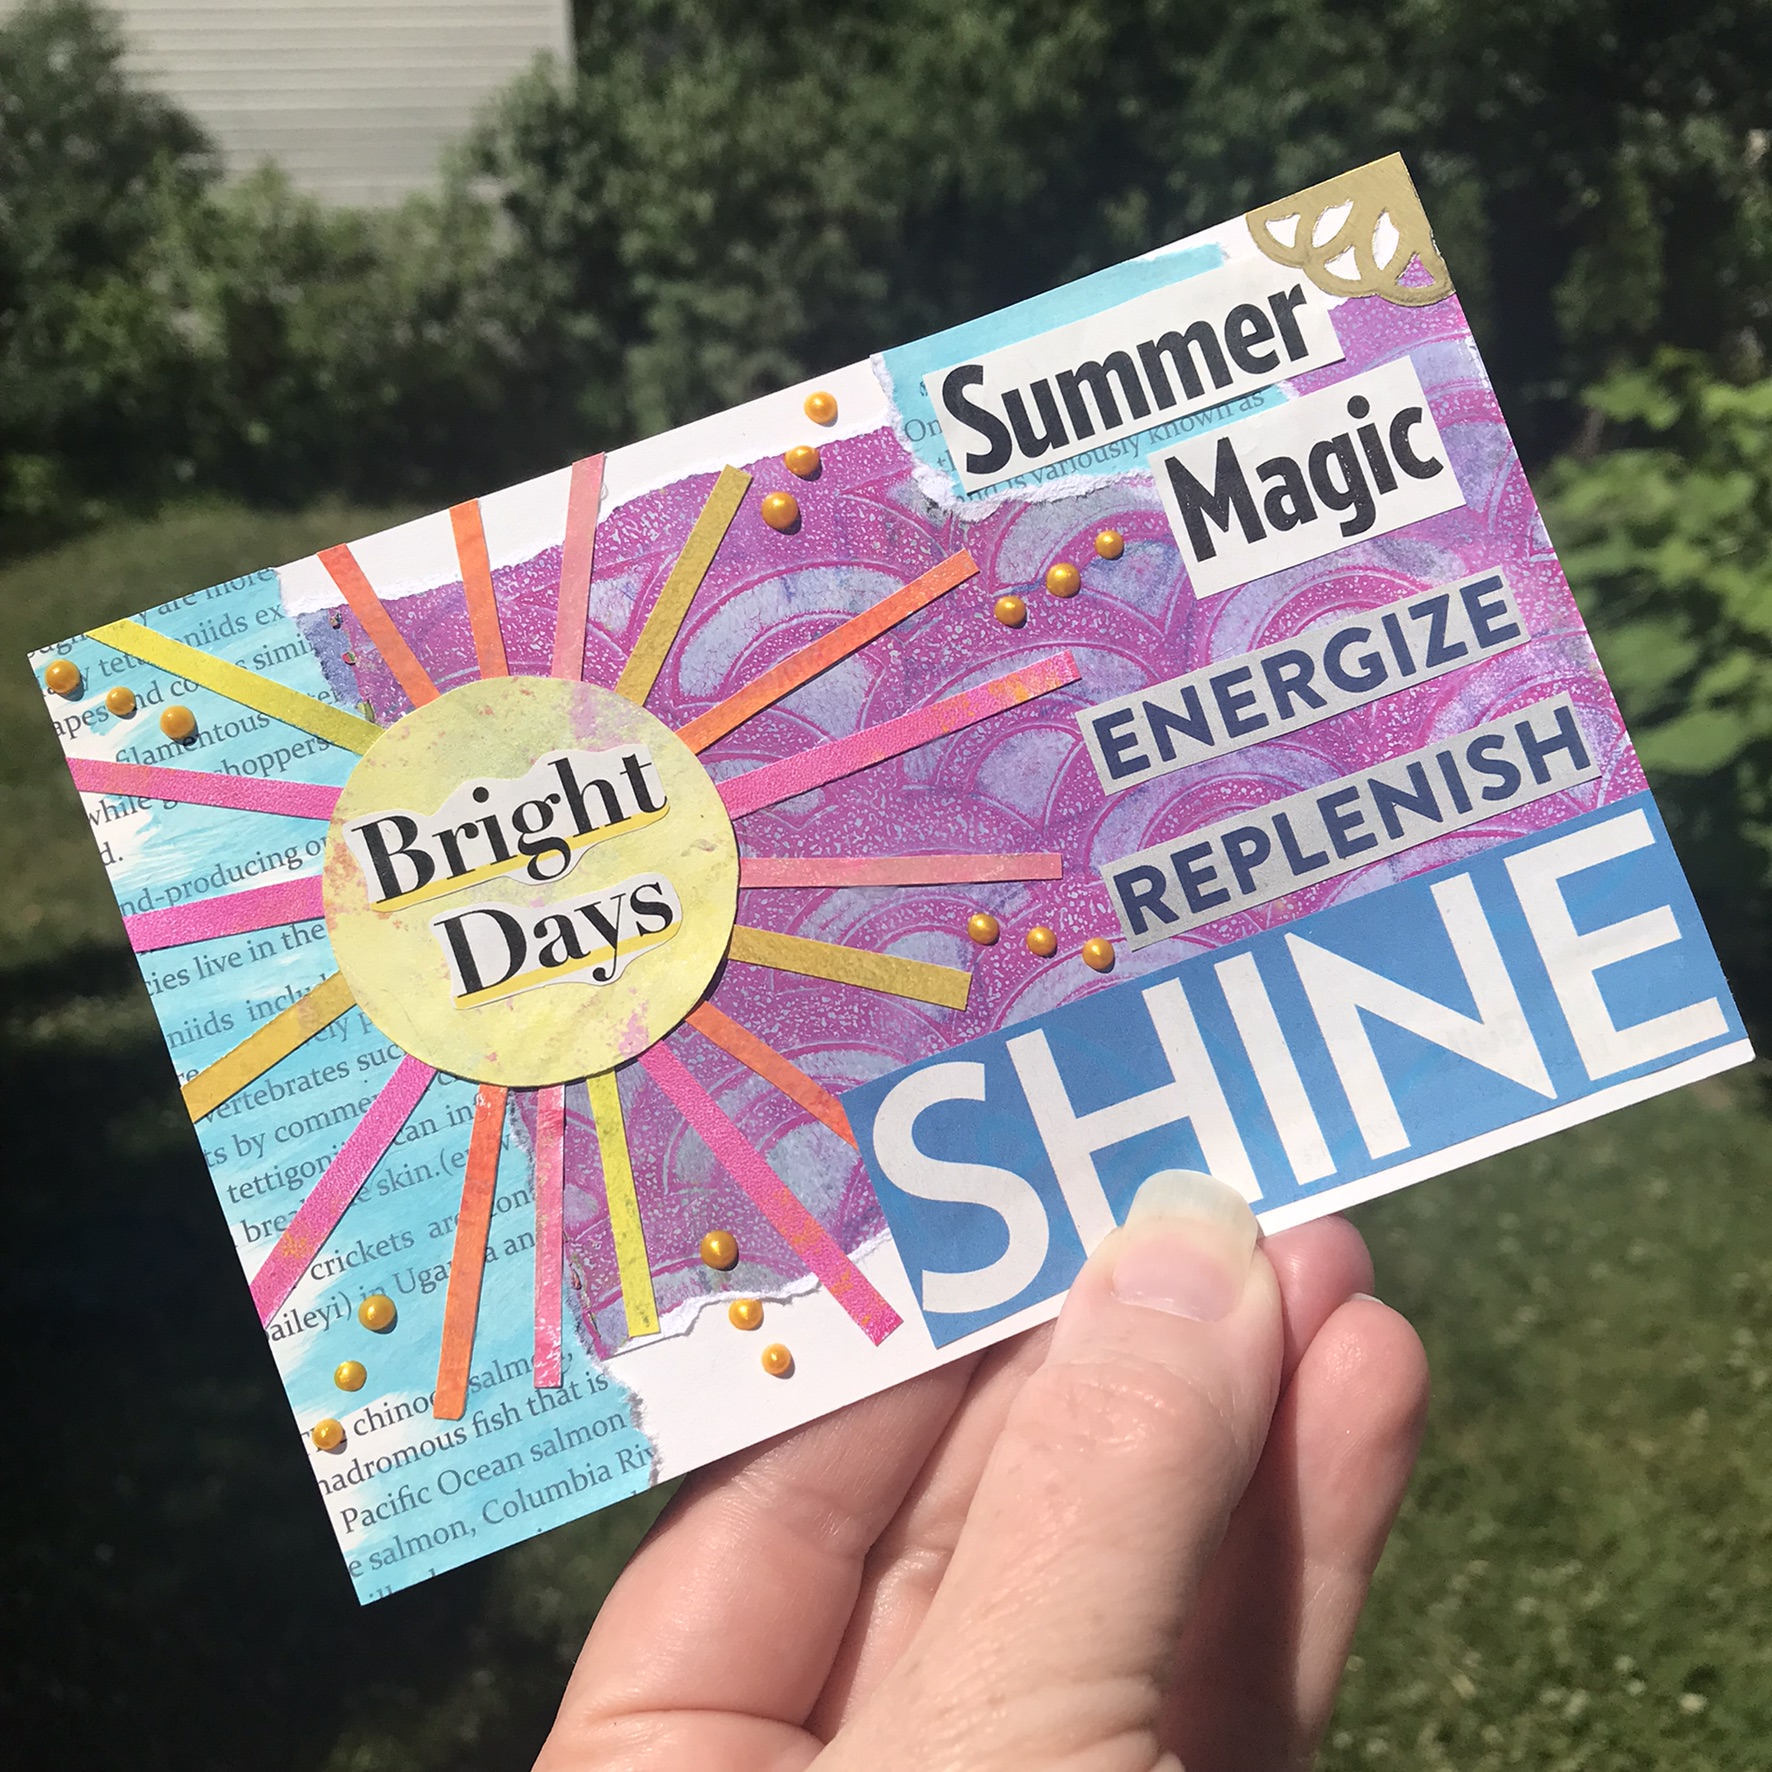
Day 21. Prompt: Solstice. Theme: Typography, found text, lyrics, poetry, lists. The purple background and sun are made with gel prints. The light blue pieces are bits of newsprint-style patterned paper that I painted with acrylic paint. The words are cut from magazines, and I added a tiny bit of gold doily in the corner and yellow dots (Pearl Pen) with the rays of the sun.


Well, there you have it. I did enjoy playing along with this challenge. I tried and learned new things, had fun, and got new ideas for card-making. I even ended up making a set of cards based on the tropical mood board index card to give to a friend. :) And maybe next year I'll be able to make even more!

Thanks for stopping by!


Sunday, January 16, 2022

Pandemic postcard exchange

Hello! I know a month ago I said I was going to take a break from my blog. And it’s been nice to just create over the past few weeks without worrying about supplies or pictures or whether something was good enough to post.

But I think, more specifically, that I needed to get away from believing I had to post certain things in a certain way at certain times. One of the reasons I started my blog was because I’ve always wanted to be on a design team, and a blog was a way to get my work “out there.” So I tried to post regularly and have thorough supply lists, etc. As time went on, though, design teams seemed less and less likely (for a variety of reasons), so my blog just came to be a chore.

As it turns out, though, I do have things I want to share, just in a less “formal” way. So for now that’s what I’m going to do: I’ll post when and if I have something to share, whenever that may be, and we’ll see how it goes.


Today I wanted to share a few postcards I created this morning. Last week I signed up for a postcard exchange (through a local letterpress studio) to just reach out to other people during the pandemic. I decided to make my own postcards, so this morning I cut some heavyweight white card stock into 4” x 6” pieces and tested out my Micron pens and alcohol markers. The markers didn’t smear the ink, and as long as I used a light hand and didn’t do much blending, the markers didn’t leak through the paper. Perfect!

Now I do not have great drawing skills (one of the reasons I enjoy stamping), so I settled on a few simple, doodle-y designs and just went for it. I started each postcard with a border, then drew the images/sentiments, and finally colored the designs in a scribble style using a bright, cheery color palette. On the back of each card I wrote my note on the left side and added lines for the recipient’s address on the right.

This was a fun Sunday morning project, and I may just make some more to send on my own. Thanks for stopping by!

Andrea

Saturday, June 12, 2021

Postcard art: watercolor rainbow, painted paper collage

For the past several years, my neighborhood art supply store, Wet Paint, has done a Summer Postcard Project. "Friends and fans" of Wet Paint are encouraged to create an original piece of art on a postcard and mail it to the store, and they display all of the postcards in the store windows. I've thought about participating several times, but either I forgot about it, or I wasn't sure what to make, or I didn't really think of myself as an artist. You know. Well I decided that this year I was finally going to create at least one postcard for this project. And last week I made -- and mailed! Don't forget that part -- two postcards! They're bright and colorful, and I love how they turned out.

This first one was inspired by artist Josie Lewis, whose art is filled with rainbows and bright colors. I follow Josie on Instagram, and she issued an "assignment" to create a piece using washi tape and watercolors. I really liked the painting Josie made as her example of washi and watercolor, so I used that as my inspiration.

I used the skinniest washi tape I have and applied it around the edges of the postcard to create a border. Then I added five more strips radiating out from the bottom right corner. Once that was ready to go, I used my sampler watercolor pallet from Beam Paints and a flat brush to paint all the colors in my rainbow. (The postcard is made with watercolor paper, so it can hold up to the paint.)

I wanted to add a little sparkle, so before I pulled off the washi tape, I used my gold watercolor (also from Beam Paints) to add some shiny splatters. Once everything was mostly dry (I used my heat tool to speed up the process), I carefully peeled off the washit tape. I was worried that the paint got under the tape in a few spots because it wasn't sticking very well, but all the lines came out pretty clean. So happy!

My second postcard was a tribute to children's book author and illustrator Eric Carle, who passed away a few weeks ago. Having worked in childcare for nine years, I read many of Eric Carle's books many, many times, and they were always class favorites. So when another artist I follow on Instagram, Lauren Blair, announced that she was going to be doing a live follow-along workshop creating painted paper collages in honor of Eric Carle, I knew that was my next postcard.

I pulled out some of my acrylic paints and several sheets of lightweight card stock and started painting. I did try mixing colors on several of the sheets to create texture and interest, but I ended up blending them too much. Oh, well.

While the painted pages dried, I worked on the background of my postcard. Using a pencil and ruler I lightly drew lines across the postcard, and then I used a black Micron pen to write out the names of some of Eric Carle's books. When I filled up the paper, I went back and erased the pencil lines.

Once the paint was dry, I started cutting out shapes to create my butterfly. I played around with the arrangement and then started gluing everything onto the postcard. The placement of my butterfly was a little higher than I had wanted, to I cut out a few tiny butterflies to fill up some of the open space.

Before I mailed the postcards, I sprayed both of them with a matte sealer to help them hold up in the mail. (They don't have to go very far, so I'm not too concerned.) Now I need to walk by the store to see if they made it and are on display -- and I might just make one or two more!

Thanks for stopping by!


Friday, October 16, 2020

Stamp Joy 2020

I can't believe that it's been over a week since I last posted! Sorry for the absence; it's been a little crazy, at least for me. I had some time off work, which was wonderful (had to go back today. Ugh.), participated in the virtual Stamp Joy event with Taylored Expressions (TE), and celebrated my birthday earlier this week. So blog posting wasn't at the top of my list. :) But now I need to get back on track, and I'm going to start by sharing a few photos from the at-home crafty fun of Stamp Joy.

Here are the cards I made during the event. The top four cards are from the Friday night class, which was optional. We used the same main stamp and die set to make four different cards. The rest of the cards are the make-and-take projects from Saturday, which was the main event. I think my favorite card is the blue and yellow "hello" card in the middle. To make that one we embossed the background image on watercolor paper with white embossing powder. Then we used blue and yellow liquid watercolors to create an emboss-resist wash of color.

We got lots of goodies for the event, including a crafting apron. I love the saying: "Crafters unite! Separately. In your own home." That definitely sums up most of 2020.

I wasn't sure I would like wearing an apron while crafting, but it came in handy. Instead of wiping glue, ink, etc. from my hands onto my jeans, I could use the apron. :)

Here is my craft room setup for the event. I had to temporarily rearrange all the stuff on my tables, but this ended up working pretty well. TE sent the pieces we needed for each project in a labeled plastic baggie, and we also had thorough instructions and supply lists. I organized the baggies into two bins -- one for Friday and one for Saturday -- with some of the additional supplies we needed. Then of course I had my paper trimmer, die-cutting machine, stamp positioner, and other basic supplies ready to go.

Action shots! Here are a couple pictures of me hard at work. For the Saturday session, the presentation for each card (via Facebook Live) was about 45 minutes, then we had 15 minutes to take a break before the next project (with a longer break for lunch). It was just the right amount of time to stretch my legs, clean up my workspace, and put away (or at least out of the way) anything I was done using. The Friday class was a little more challenging since we had 30 minutes for each of the four cards, and they were presented back-to-back with no breaks.


The nice thing about crafting at home was that it was easy to make modifications, like changing a sentiment or using different embellishments, if I wanted to. And of course, I didn't have to wait in line to make the projects or worry about rushing to finish so the next person could sit down. If I didn't finish a particular card, I could either use the printed instructions to finish it later or rewatch the video.


There were also a lot of great prize giveaways during both days, including credit to the TE online store, a variety of TE products, and even products from other companies that helped sponsor the event. I wasn't lucky this time, but I know there were a lot of happy winners!


We received lots of great product to make our cards: stamps, dies, stencils, embossing folders, and even envelopes for the make-and-take projects. The stamps in the upper left corner are some of the ones we used on Saturday. Since TE manufactures their stamps, they were able to choose specific images from various sets and produce just those images for all the participants -- sort of like a sampler set. We did use supplies besides these, but for those items we could either order them if we didn't already have them (they sent the supply list out ahead of time), or we could use a similar product that we already owned.

One of the things we received in our supply box was this cute little surprise box. TE sent everyone a stamp personalized with their first initial. This would be so cute stamped on the back of a card or used to make a set of monogram note cards.

The virtual event definitely was different from going to Stamp Joy in person, but it was nice to be able to have some kind of crafty event to look forward to. I learned a lot of new tips and techniques, and I've already used one of the cards I made. I also have four more Christmas cards, and those just might be the only Christmas cards I make this month! :)

Thanks for stopping by today! I'll be back to sharing cards in my next post.


Tuesday, September 29, 2020

September Christmas card: Watercolor lights

September has been a challenging month for me. I'm anxious about basically everything, I'm tired and on edge, and I just haven't been feeling very creative. I get excited about the idea of card making; I look forward to having days off work so I can sit in my craft space and make a bunch of cards. But when those days come, I get stuck, nothing seems to work, and I'm just not into it.

So for my September Christmas cards, I made literally one card. Here it is:

Supplies:
Paper: Watercolor paper (Strathmore), Real Red card stock (Stampin' Up!)
Ink: Watercolor paints (Beam Paints), Stardust glitter Gelly Roll pen (Sakura), ultra fine point black permanent marker (Sharpie)

One beautiful afternoon last week, I gathered up some basic painting supplies and decided I was going to watercolor in the back yard. (Actually, now that I think about it, it was the first day of autumn, but the weather felt like summer, and I was painting something wintery. Funny!) The first thing I wanted to try was painting a string of lights. I chose a few bright colors from my palette and painted three oblong bulb shapes for each color. (I need more practice to make them the same shape!) I tried to space them out across the paper and have them pointing different directions, and I also left a little white spot on each one for a highlight or reflection.

I set aside the paper to do some other watercolor painting (some successful, some not), and once the paint was dry I used an ultra fine point permanent marker to draw a base on each bulb and then the loopy string connecting them all. To make it into a card I trimmed the panel just a bit and adhered it to a red card base. This card is about 4-1/2" x 6", so it's larger than the traditional A2-size card. Maybe the bigger size makes up for it being the only one.

I debated for a long time whether I should add anything else to the card. Maybe a little stamped sentiment tucked into an open space? Or a large die-cut word across the middle? Some sequins? I finally settled on using a sparkly gel pen to draw a few tiny lines at the end of each bulb to make it look like they are shining. I'm not sure I'm in love with that detail, but it's done.

And there you have my one and only Christmas card for September. I really only need to make a few more cards to be set for this year, so I'm not too concerned. I'm doing an online card-making event next week, and I think we'll be making a few holiday cards then, so that will probably be enough for me.

Thanks for stopping by!


Saturday, December 15, 2018

Lego winter village 2018

It’s been a few years since I put out my Lego winter village (I think 2014 was the last appearance), but this year it’s taking center stage — and the entire coffee table — in the living room. We even expanded the village with a firehouse — just in case Santa gets stuck in a chimney. Here are a few photos of the village:


So far everything has remained intact, and there have been no invasions by abominable snow cats. Fingers crossed that the villagers remain safe for at least another week.

Thanks for stopping by!

Wednesday, December 5, 2018

Framed floral card set

I had typed up this whole post last week, then just as I was getting ready to publish it, something happened and it was gone. Argh. I was too tired that night to redo it all, and I've been too annoyed to do it since then. But I really need to get back to a better blogging schedule, so I decided I should just get this one done.

Supplies (all Stampin' Up! unless otherwise noted):
Paper: Whisper White card stock, Whisper White note cards and envelopes, Somerset Velvet watercolor paper (Marco's Paper)
Ink: Tim Holtz Distress Oxide ink pads: Worn Lipstick, Spiced Marmalade, Wild Honey, Twisted Citron, Peacock Feathers, Seedless Preserves (Ranger); gold paint pen (Sharpie); gold Wink of Stella glitter brush pen
Accessories: Floral Squares dies (Pinkfresh Studio), metallic washi tape (Hand Made Modern - Target), various sequins (Craft Medley), Dimensionals, Glue Dots

To make the focal image for each card, I pressed a Distress Oxide ink pad onto water color paper and then used a slightly damp paintbrush to smooth out the color. I die cut the framed floral shapes out of white card stock, adhered each one over a colored square, and then trimmed off the extra water color paper.

I wanted to add a little sparkle to the framed flowers, so I used a gold paint pen to carefully add gold to just the frame portion of the die cuts. (If I had this to do over, I would add the gold before gluing the frame to the watercolor paper.)

For the card bases, I used Whisper White note cards. I used a gold Wink of Stella glitter brush pen to fleck gold sparkles onto the top part of each card, and I added a strip of gold patterned washi tape along the bottom of the card.

I used Dimensionals to add the flower images to the card bases and then added three coordinating sequins to each card.

As a side note, I made it through National Novel Writing Month (NaNoWriMo). I didn't get to the  50,000-word goal (I wrote just over 27,000 words), but I did write at least a little bit every day during November, which is better than I did during my previous attempts. I'll take that as my victory.

Thanks for stopping by!

Wednesday, November 7, 2018

Bold birthday balloons

I had hoped that when October was done I would be able to get back on a more regular blogging schedule of posting at least twice per week. But then at the last minute I decided to sign up for NaNoWriMo (National Novel Writing Month). The goal of NaNoWriMo is to write a 50,000-word novel during the month of November. That amounts to 1,667 words per day. So now the computer time I would have spent working on my blog is spent trying to figure out what the heck I'm going to write next in my "novel." (I use that word very lightly, and I'm honestly not sure how long I'll stick with it.)

But I'm squeezing in a quick blog post tonight. So without further ado, the parade of birthday cards continues.

Supplies (all Stampin' Up! unless otherwise noted):
Stamps: Whole Lotta' Happy (WPlus9 Design Studio)
Paper: Thick Whisper White, Berry Burst, Lemon Lime Twist, Pool Party card stock; alcohol ink card stock (YUPO)
Ink: Craft Whisper White; Wild Plum, Aqua, Lettuce alcohol ink (Ranger); white gel pen
Accessories: White embossing powder, Balloons dies (Simon Says Stamp), Sitting Pretty Nautical Accessories (Taylored Expressions), glitter enamel dots, clear Wink of Steall glitter brush pen, white crochet thread (DMC), "Happy" die-cut sticker (Paper Pumpkin leftovers), Dimensionals
Other: Gel plate (Gel Press), hand sanitizer, spritzer with rubbing alcohol

This card started with an alcohol ink background I made using a gel plate. I wasn't crazy about the whole background, so I decided to use it for die cuts instead. I used a set of balloon dies to cut out three balloons, and I tied a bow of white crochet thread around the end of the largest balloon.

For the background I chose three card stock colors that coordinated with the alcohol ink -- Berry Burst, Pool Party and Lemon Lime Twist -- and cut several strips that were 4" long and of varying widths. I arranged four of the strips at the top of a white card base and one strip along the bottom. I left the middle part white and added a die-cut Pool Party "happy" sticker. To finish the sentiment, I used white embossing powder to emboss "birthday." I added the three balloons to the top part of the card and embellished with a few glitter enamel dots and two die-cut arrows.

Thanks for stopping by!

Saturday, August 5, 2017

Birthday crafting session

Last month one of my awesome and crafty friends turned eleven years old. (Where does the time go?!) To celebrate the occasion, today she came over with her mom (also a super awesome friend; we went to college together), and we had a little birthday crafting session.

Supplies (all Stampin' Up!):
Kit: Heartfelt Banner Designer Kit
Paper: Pear Pizzazz, Calypso Coral, Coastal Cabana card stock
Accessories: Butterflies Thinlits dies

To start off, the birthday girl put together a quick little banner from a fun kit. For an extra punch of color, I die cut a few butterflies out of coordinating card stock and added them to the basic kit supplies. She was excited to think about what she would clip on the banner once she got home.

Supplies (all Stampin' Up!):
Kit: Something Good to Eat Paper Pumpkin (September 2016)
Paper: Very Vanilla card stock
Ink: Crushed Curry, Chocolate Chip
Accessories: Crushed Curry baker's twine, clear Wink of Stella glitter brush pen, Note Tag punch, 1/8" hole punch

Next up we made some little treat tubes. I never used my Paper Pumpkin kit from last Halloween (I wasn't intentionally hoarding it; I just didn't have a need for sixteen treat tubes at the time!), so I decided that would be a fun project. But since it's not quite time for Halloween, I needed a more summery theme. I bought some chocolate-covered sunflower seeds from the local candy store and designed a tag using the sunflower image and one of the sentiments from the set. It was the perfect combination and tasty, too! (We had to sample a few of the treats to make sure they passed quality control, after all.)

After stamping the tags, we added a little sparkle to the sunflowers by painting Wink of Stella over the center of the flower. It's so pretty when it catches the light!

For assembly, we punched 1/8" holes in the top of each tag. We tied a piece of Crushed Curry baker's twine around the top of the tube, fed both of the twine ends through the hole in the tag and then tied another knot and a bow on the front of the tag.

Finished treat tubes and happy crafters!


Supplies (all Stampin' Up! unless otherwise noted):
Stamps: Summer Splash
Paper: Crumb Cake, Whisper White, Cool Caribbean card stock
Ink: Cool Caribbean, Calypso Coral, Lucky Limeade, Crumb Cake
Accessories: Burlap ribbon trim, 2" circle and 2-3/8" scalloped circle punches, Tiny Attacher (Tim Holtz), Mini Action Wobble springs (Art Impressions), 4 mm clear droplets (Pretty Pink Posh),
Art Glitter glue (Art Institute Glitter)

There isn't anything terribly complicated about this card, but the octopus on the Mini Action Wobble spring was a big hit!

For the card base, we stamped the sea life and bubble images on a piece of Whisper White card stock and adhered it to a Crumb Cake card. To add some texture we attached a piece of burlap ribbon trim with mini staples. (This has become my favorite method for adding this ribbon onto cards. Adhesive doesn't always work well with the burlap texture, and I love the contrast between the metal and textile.) As a final touch we glued on three clear droplets to look like splashing water.

Getting just the right stamp placement.

Masterpieces!

I had so much fun crafting and visiting with friends today -- and it was my second fun stamping day this week! (I think I might have craft day every day if I could.) After we were done creating, I gave the birthday girl a bin full of various card-making supplies as part of her present. She was pretty excited about it, and I think she'll be busy for awhile!

Thanks for stopping by!