Wednesday, July 31, 2024

Deco Florals

When I went to the stamp show a couple of weeks ago, I got some fun new goodies. I put a few of those items together -- the Deco Florals stamps and dies (Pink and Main), the Mod Stitched Rectangle dies (Pink and Main), and the Tim Holtz Distress Spray in Peeled Paint (Ranger Ink) -- to make a couple of quick cards.

I chose eight of the flower/leaf shapes from the Deco Florals stamp set and stamped each image on white card stock using a different color from the Urban Oasis ink collection (Catherine Pooler). I die cut the images with the coordinating dies and split them into two groups.

Using the Mod Stitched Rectangle dies, I cut two of the second-largest shape from white card stock. (I did notice that the dies, which are pink, left a faint pink tinge in the stitched lines on the card stock. I'm not sure if it's because they're new or because the card stock was thick and therefore my die-cutting "sandwich" was too tight, but I'm hoping that doesn't keep happening.) I spritzed one panel with Peeled Paint Distress Spritz and the other with Iridescent Shimmery spray (Altenew), which you can't really see in the photo.

When the panels were dry, I added the die-cut flowers and leaves. On the Distress Spritz panel I used foam tape, and on the other card they are glued directly on the panel. I stamped the "Happy Birthday" sentiment from the stamp set on two strips of white card stock, trimmed the strips, and used foam tape to add one strip to each card. I attached the panels to white card bases (foam tape for one, glue for the other) and finished them with clear droplets.

To be honest these are not my favorite cards, but sometimes when I get new stamps, I just need to make something to get a feel for the images and to get some creative juices flowing. Next time I use this set I hope I'll have more ideas.

Thanks for stopping by!


Monday, July 29, 2024

Life is 'tweet'

When I saw the Tweet Life stamp set and layering stencils (Concord and 9th) last year, I knew I would get them. I had to wait a while -- they never seemed to be both in stock when I thought about ordering -- but now that I have them, I know they'll make some adorable cards. Here are my first two:


I wanted to keep these first cards clean and simple, so I used white card bases and did my stenciling directly on the cards. For the large bird, I went with a bright, bold magenta and purple -- not a usual color choice for me. When the stenciling was done, I used the stamp set to add the black beak and eye, brown legs (though I think I should have made those black, too), some tone-on-tone details, and the sentiments. I felt like I needed some white on the bird, so I used a gel pen to draw a few accents. The purple ink on the wing was so strong that it absorbed into the white. I went over those parts again, but they still have a little purple tinge. I finished the card with three purple sequins.

For the second card I used a more familiar color palette -- yellow, green, and blue. The stencils make all nine birds at once, but it would be easy to do just one row or even a single small bird. I used sticky notes to cover parts of the stencil so I could make the birds in each row and column a different color. After stenciling, I again used the stamp set to add details and a sentiment. The final touch again was a few sequins.

These products are really fun, and I'm looking forward to trying them with other layouts and color combinations. Thanks for stopping by!


Sunday, July 28, 2024

July Christmas cards: Cranberry Christmas

I try to limit the patterned paper I buy (simply because I already have more than enough), but recently my aunt asked me if I wanted any of the paper she was no longer using. When I saw the Cranberry Christmas stack (Die Cuts With a View), I knew it would make really pretty Christmas cards.

I decided to use the All Planned Out 1 die set (Taylored Expressions), which has been a go-to for me lately. I chose two pieces of patterned paper that I thought worked well together, but after I picked them I realized that the red piece has silver foil and the floral one has gold. I don't usually mix metallics when I'm making cards, but I figure Christmas cards is the perfect opportunity.

I cut the main die (to make the background pieces) five times from each 12" x 12" piece of paper. Then I adhered one piece of each pattern to a light gray card base. I had enough patterned paper leftover to make two more cards, each with just one of the patterns. (For the card with only the gray floral paper I used a Cherry Cobbler card base.) I die cut the strips from gold and silver foil card stock (six of each color) and used one strip for each card.

For seven of the twelve cards I used focal images from the the Cranberry Christmas paper, trimmed or die cut to fit the card layouts. I did add three die-cut "merry"s to the piece that looked like a journaling card (top right card in photo). For the other five cards I used a couple of dies from my stash: Nordic Tree (Erin Lee Creative) and Big Joy (Simon Says Stamp). I die cut each image two times for each card and glued the die cuts together to make them thicker. To finish each card I added sequins in either gold or silver to match the decorative strip.

I don't know if I've ever made gray Christmas cards before, but I think they elegant, especially with the metallic accents. Thanks for stopping by!


Saturday, July 27, 2024

You're My Type card set

I'm back to share my last card set (at least for a little while). And of course, if you don't make card sets, any of these layouts could be used for just a single card. I gravitate toward clean-and-simple layouts for card sets since I have to make multiples, so many of these designs are great for new card makers or anyone who needs to make a quick card.

For this card set I pulled out one of my typewriter stamp sets -- You're My Type (Stampin' Up!). I stamped the typewriter six times on vanilla card stock and used three different sentiments to add messages on the paper part of the typewriter images. Then I fussy cut the images (it's an old set, so no dies, but I don't actually mind cutting them out myself) and set them aside.

To make the card bases, I used thick vanilla card stock and two kinds of patterned paper -- a retired typewritten-style Designer Series Paper (Stampin' Up!) and an older floral stack (Die Cuts With a View). I adhered a 4" x 4" piece of the text paper at the top of each card, leaving a 1/8" border of card base visible. Then I added floral paper -- a different design for each card -- to the bottom part of the card base. I wanted a little bit of color at the top of the cards, too, so for each card I punched a small banner from the same floral paper and glued it at the top left edge of the card base. I used foam tape to attach the typewriter images and finished each card with a few gold sequins.

Thanks for stopping by!


Friday, July 19, 2024

Emboss resist card set

I’m back to share another card set from card-making spree last month. For this set I wanted to make something all-occasion, without sentiments, that could be used just about any time you need a card.

I decided to skip the stamping and use some old Specialty Designer Series Paper (DSP, Stampin’ Up!) to make a set of emboss resist cards. The paper is white with a clear-embossed pattern, so when you apply ink to the paper the pattern resists the color and stays white. 

I chose two patterns for my cards: flowers and foliage. I applied ink to the DSP using blending brushes. For the flower pattern I used a couple shades of pink for the flowers and yellow and green for the foliage (I love how it looks like the sun shining through the leaves).

I matted each ink-blended panel with black card stock and then adhered them to white card bases. For the focal images I die cut circles of white card stock embossed with a woodgrain pattern and added black die-cut butterflies. I applied glue to just the body of each butterfly so the wings can be gently pulled up for some dimension. I finished the cards with sequins -- gold for the leaves and clear for the flowers.

Thanks for stopping by!


Saturday, July 13, 2024

Contest entries -- and a winner!

This weekend there was a stamp show in my neck of the woods. It's a show I've been going to for years; it's much smaller now than it used to be, but it's still fun to browse and see things in person. One of my favorite parts of the show is the card contests. There are two themes every year, and I try to enter two cards for each theme. Three winners for each theme receive money to spend with the vendors at the show. And this year one of my cards was a winner!

This is my winning card for the theme "Sunny." I won second place and got $75 to spend. Yippee! I wanted a layered, vintage-feeling card, so I used kraft card stock and earthy colors. On the card base I stamped a grid background stamp. (I purposely applied ink to the stamp unevenly so it stamped with sort of a blotchy look.) Then I stamped a sunflower image three times in a darker color. I used a script stencil with gold paste to add more texture to the background and sponged ink around the edges of the card base.

For the focal panel, I stamped the Aged Shadow stamp (Hero Arts) on kraft card stock, tore the edges around the stamp, and then inked the torn edges. I wrapped twine around the bottom of the piece and added the die-cut sunflower image (colored with colored pencils) and sentiment. I attached the panel to the card base and finished with some gold sequins.

This was my other entry for the "Sunny" theme. I used the Stay Golden stamp set from Ellen Hutson. I stamped the sun and the wavy water lines using dye (water-based) ink on watercolor paper, and then I used a damp paintbrush to blend out some of the color. Then, with the help of a stamp positioner, I restamped the wavy lines to make them bolder. I matted the panel with black card stock and adhered it to a yellow card base that I had splattered with gold watercolor. I embossed and die cut the "stay golden" sentiment and finished the card with silver stars on the wavy lines to look like the sun sparkling on the water. 

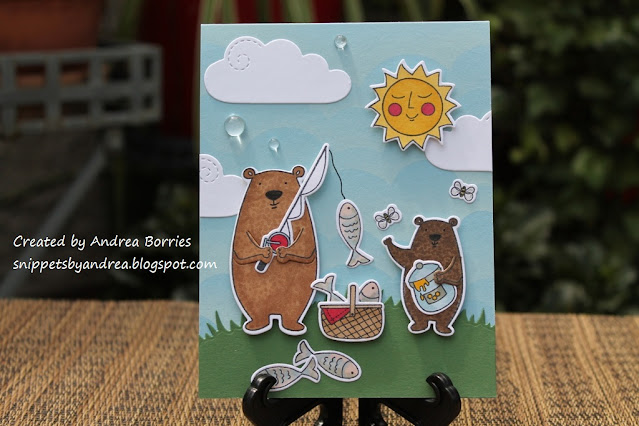
The second theme for the card contests was "Come and Get It." I'll admit I struggled with this theme. After some thought I decided to create a little picnic-y scene. I ink bended clouds on a light blue card base, added die-cut clouds and sun, and placed a grassy green hill at the bottom of the card. Then I stamped, colored, and die cut the bears and all their accessories and arranged them in the scene. I think these bears look ready to invite you to their feast of fish and honey!

For my second "Come and Get It" card, I went with a kitchen motif. I used the Flippin' Awesome stamps and dies (Taylored Expressions) and chose one color for each image. I stamped and die cut a bunch of images and then spent a lot of time arranging them on a white card base. I wanted to add a greeting, so I used an alphabet stamp to create the sentiment "What's cookin'?" then die cut it with a stitched circle and matted it with a red scalloped circle. Once I was happy with the arrangement, I glued everything down and filled in some empty spaces with enamel hearts.

I had some pieces left over after I made this card, so I created one more card to add to my stash:

Here’s a picture of me with the “Sunny” card entries:


Thanks for stopping by!


Monday, July 8, 2024

Monochromatic patterned paper card set

I'm back another one of the card sets I made a few weeks ago. This set features some pretty, monochromatic patterned paper and simple floral focal images.

I used the All Planned Out 1 dies (Taylored Expressions) to die cut the six patterned papers into two pieces, and then I swapped the piece for the same color patterns. I glued the pieces to white card bases and added a diagonal white strip to cover the seam where the papers meet. (The dies for white strips, as well as the circles, are also part of the All Planned Out I die set.)


For the focal images I used the Simply Fabulous stamp set (Stampin' Up!). I used one floral image and one sentiment for each color. I adhered the circles to the cards with foam tape and finished the cards with white enamel dots.


I had six strips of card stock left over from trimming the patterned paper, so I had to make one last card to add to my birthday stash. I trimmed each strip to 4" long and then adhered them to a white card base, leaving a large space between the second and third strips. (Tip: Start by adhering the top and bottom strips, leaving a 1/8" white border at the edges of the card. Then move to the next two strips in. Decide where you want the "empty" space and add the last two strips.) 

I stamped "happy birthday" in the open space and decorated the card with clusters of die-cut flowers. (Again, the dies are from the All Planned Out I die set. So handy!) Some of the flowers are glued directly to the card base, and some are popped up with foam tape. Finally I added some white enamel dots around the flowers. I really love the way this card turned out!

Thanks for stopping by!

Tuesday, July 2, 2024

More rainbow notecards

Last summer I shared a simple set of rainbow notecards I made using a rainbow die and sentiment strips. Well, I ended up putting that set in my card box and never did anything with it. Then a few weeks ago when a coworker asked if I had any card sets on hand, I decided to expand the set with a few more cards. Here are all the cards together:

I die cut some additional rainbow pieces and just made sure that I placed the colors in a different order than the original four cards. But I did make a little goof: When I was getting out the card stock, I grabbed the wrong purple. The original cards used Starry Sky, which is a dark, bluish purple. For the new cards I accidentally used the lighter Orchid Oasis. Oops. I decided as long as there were four of each, it wasn't a big deal. (Now, if there had been seven cards with the darker color and only one with the lighter, that would have been weird.) I did successfully choose a different sentiment strip for each card, and I finished them with the same placement of sparkly sequins.

I packaged the full set of cards and envelopes in a small white box. I had a few rainbow pieces left over so I glued them to the top of the box to make it a little more fancy and to match the cards inside.

Thanks for stopping by!