Showing posts with label cards - general. Show all posts

Sunday, September 7, 2025

Spectrum Gardenia

With my craft room temporarily out of commission, I decided to make some cards at the dining room table with minimal supplies. I dug out the necessary tools (glue, scissors, etc.), white card stock, some pre-folded card bases, basic embellishments, and a few sentiment stamp sets. For the “meat” of the cards I used a few products from the Spectrum Gardenia collection (49 and Market): 12” x 12” card stock, ephemera, and washi tape. These are traditionally scrapbooking products, so some of the items are tricky to use on cards, but I did my best. I also found a few odds and ends that I’d made and never used that ended up working for these cards.


There you have it! Did you catch the upside-down card in the last photo? I promise I made the card the right way; I just goofed up the picture. Ha ha!

I’ll admit that I used more supplies than I originally intended. I kept thinking of the perfect punch or twine or what have you and had to wade through the craft room to find it. But I’m happy with how the cards turned out, so the extra effort was worth it.

As a little back-to-school surprise, I brought all these cards to the school where I work for the teachers and staff to use. Sharing is caring. :) Thanks for stopping by!


Saturday, August 30, 2025

'Seas' the day

In my last couple of posts I've shared cards I made after creating a variety of colorful card stock panels with Distress Oxide inks. On some of the cards I used the Distress Oxide panels as backgrounds, and on others I used the panels to die cut images. On today's cards, I did both. These also happen to be my favorite cards of the bunch.


On the mermaid card the background is one of the Distress Oxide panels, embossed with an underwater-themed embossing folder and then spritzed with a shimmer mist. I stamped the mermaid tail on another panel and then die cut it, along with a few tiny seashells. I used other Distress Oxide panels to die cut some coral, and I also used those panels to cut out larger layered seashells for two other cards (the white card above and one further down this post).


The mermaid tail needed some sparkle, so I used a Stardust Gelly Roll to color some of the scales and to add lines on the fluke. I finished the card by adding a sentiment (also stamped on a piece of Distress Oxide panel for perfect coordination) and a handful of sequins.


For the second card, I went more clean and simple. I spritzed a white card base with shimmer mist and adhered a die-cut white fishing net on top. I used three of the die-cut layered seashells and adhered them to the card with foam tape. When I cut out the seashells, I used different areas of the Distress Oxide panel (e.g., darker areas or places where one color was more prominent) for the different layers, which I think adds a lot of depth and realism. I finished this card with a sentiment and a few pearls.


The third card is kind of a mix of the first two: I focused on the seashells, like the second card, but also embossed the background, like the first one. (The embossing folder is technically going sideways on this card, but I don't think it matters too much. It still evokes the feeling and movement of water.)


I also spritzed this card with shimmer mist -- it reminds me of the sun sparkling on water. I finished this card with a sentiment and a few pearls.

My craft room is still out of commission while we're working on the basement. But I've moved some supplies to the dining room table so I can still do a bit of card making. I'll probably be posting just once a week for a while since I won't have as many cards to share. Thanks for stopping by!


Tuesday, July 29, 2025

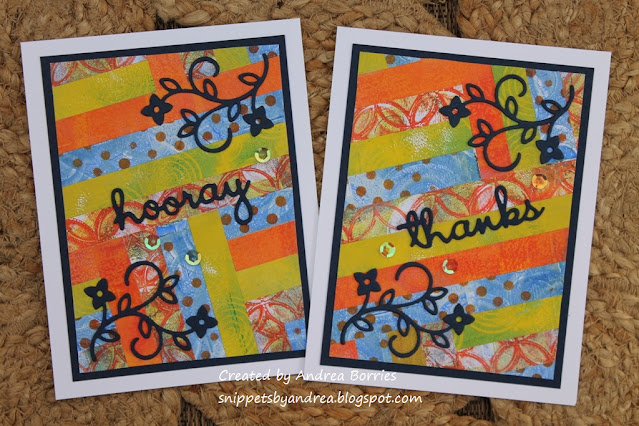
Gel print strip backgrounds

When I was looking through my collection of gel prints I found four background pieces made with gel prints cut into strips and adhered to double-sided adhesive sheets. (They're similar to the crazy quilt scrap papers I shared in the past.) I decided they would make a good card set, and here are the results:


I think my favorite thing about these cards is that I used navy card stock instead of black for the mats and die cuts. I know it looks black in the photos, but in person the dark blue looks so good with the colors in the gel prints. I need to remember to use navy as a neutral more often. 


The backgrounds were in two arrangements -- horizontal stripes and diagonal stripes -- so I used two different layouts for my cards. For the cards with horizontal stripes, I used a tall branch die cut and short two-word phrases for the sentiments. The strips were useful in making sure I adhered the sentiments straight. I die cut each piece twice and glued them together to give them a little more "oomph." (All the dies I used for these cards are from the retired Well Written die set from Stampin' Up!)  


I struggled with the layout for the cards with diagonal stripes. I played around with the pieces for awhile and finally settled on this arrangement. I placed a curly-style branch in the lower left and upper right corners and added the sentiments at an angle near the middle of the panels. I finished all of the cards with three sequins grouped around the sentiments.

Thanks for stopping by!

Sunday, July 27, 2025

Sending hugs

When I was looking through my gel prints recently, I found the pieces for a card that I'd prepped years ago but never actually put together. I figured it was about time to assemble that card.

First I used Dr. Ph. Martin's Bleed Proof White to add white splatter to the card base. I tore the top and bottom edges of the gel print (the letters were already cut out) and adhered it to the card base. I'd backed the letters with black cardstock for shadows, so I decided to try the eclipse technique, which I've never done before. I glued the letters back into the gel print, fitting the black shadows into the openings. (Looking at it now, I'm wondering if I should have used foam tape for the letters to help them stand out a little more.) I used foam tape to add the flag with "sending" at the top of the gel print and finished the card with gold sequins.

Thanks for stopping by!


Saturday, July 12, 2025

My first Snarky Cat

I've been on a little mixed-media kick lately, and I've ordered several of the Tim Holtz mixed media stamp/stencil sets. So naturally, when I sat down to play with them, I had to get out my Distress Oxide inks. Using ink blending and ink "smooshing," I made eight Distress Oxide panels. I used some of the panels to make die-cut shapes, and others became backgrounds for cards. The card I'm sharing today has a little of both.


I love the Snarky Cat stamps from Tim Holtz, and my friend Sunshine (A Little Ray of Sunshine blog) has inspired me with some great cards made with these images. I can definitely relate to this crazy cat -- I'm always thankful I don't have a thought bubble over my head!

For this card I started with a green Distress Oxide panel die cut with a deckled rectangle die. I stamped some scribble images in green and added the sentiment in black along the top. Using a blender brush I created a patch of darker green ink to act as a grounding place for the cat image. I stamped the cat on the green panel and again on one of the other Distress Oxide panels I made. I cut out the second cat by hand and paper pieced it over the image on the green background. I colored the white parts of the cat's eyes with a paint pen.

I layered the green panel onto black card stock and then a white card base. The card needed something else, so I used a Micron pen to doodle a border on the card base. I purposely made the border a little crazy to match the image, and I finished the card with several Xs in the lower left corner of the green panel.

Thanks for stopping by!


Wednesday, July 9, 2025

Granny Squares

I wish I knew how to crochet -- I really want to be able to make granny squares. I've tried to learn a few times, and I've even successfully completed a couple of crochet kits. But I've never gotten very far; it doesn't seem to "stick," and I have to start at the beginning every time I try again. (I know it's because I don't keep practicing so I don't really have a good excuse.) So when I found the Granny Squares stamp and die set from Altenew, I had to get it. Here are the first two cards I've made using the set.


The granny square image is a layering stamp set so it's really easy to use different colors -- and the possible color combinations are endless. As I did with the Plants and Vases set, for my first card I used the product packaging as the inspiration for my first card. I stamped four granny squares together on a white panel as well as a fifth square on a separate piece of white card stock. I die cut the extra square and used foam tape to add it, at an angle, to the middle of the other stamped images. I added the sentiment below the granny squares, attached the panel to a card base, and finished with a few sequins.


For the second card, I stamped and die cut three granny squares. I struggled to arrange them in a layout I liked, so I tried a mini slim card (3-1/2" x 6") instead of an A2 size. I created a simple border by scoring a line 1/4" away from each edge. I adhered one square at an angle on each side of the card and then used foam tape to add the third square overlapping the first two. I kept the embellishment simple and just added a white bow to the middle of the center square.

Maybe this winter I'll try crocheting again. Until then, this is a fun substitute. :) Thanks for stopping by!


Tuesday, June 17, 2025

Secret Garden: Part II

As I mentioned in my last post, here are the rest of the cards I made with products from the Secret Garden collection (Carta Bella). Well, it's not all the cards; I didn't take pictures of all forty-something cards. But I did take pictures of a reasonable sample. I think you'll get the idea. :)

I'm not going to include details since this will already be a long post. So if you have questions, leave a comment and I'll do my best to answer.


There you have it! I still have a few bits and pieces left of these beautiful papers, along with lots of the stickers, so I'll make a few more cards some time. After making more than sixty cards with these products, I needed a little break. :)

Thanks for stopping by!


Saturday, May 31, 2025

A few last retreat cards

Today I'm sharing the last few cards that I made at my craft retreat. It's kind of a miscellaneous grouping.

These two cards both used the patterned paper we received in our goodie bags from the retreat organizer. They also happen to be cards that helped me mark off squares on my craft retreat BINGO card. The card on the left used at least four patterned papers -- I used strips of different widths and added a die-cut sentiment in the widest strip. And the card on the right was made using a layout from an idea book. The focal layer seemed a little plain, so I added a doodled border around the sentiment. I really like that extra detail.


The baby card in this group was another BINGO square. I chose a mystery grab bag of die-cut pieces and embellishments and had to make them into a card or scrapbook layout. My grab bag included the letters, card stock buttons, sequins, and heart banners (there are three banners glued together to give it depth), as well as a few other things. I don't make a lot of baby cards, so this was a little challenge, but I think it turned out pretty well.

The card in the middle was one I made when I was tired of coloring. (I learned that if/when I go on another craft retreat or weekend I won't plan on doing so much coloring.) I borrowed a stamp set and inks from my friend so I could just do some good ol' stamping. It was a much-needed break -- and I love the finished card.

Finally, the card on the right was made with the Ice Cream Day Mini stamp set (Colorado Craft Company). The Anita Jeram animal characters are so cute, and I'd had this stamp for a very long time without using it. It was perfect for an easy birthday card.

And that's it for the cards I made at the craft retreat. It wasn't as many as I'd hoped to make, but all-in-all it was still a productive weekend. Thanks for stopping by!

Friday, May 23, 2025

Sketchbook flowers

I'm back with more cards from my craft retreat, and this time it's a group of cards made with the Sketchbook Bouquet and Sketchbook Florals stamp sets from Taylored Expressions. I stamped the images on white and Toffee card stock and colored them with Prismacolor pencils and gamsol. I also used the coordinating dies to cut out some of the images.

There are several pictures, so I won't add too many details. If you have any questions, leave a comment and I'll do my best to answer them.

I think these two are my favorite cards out of the bunch; I love the bright colors with the touch of black.


I used white craft ink to add splatters to the card on the right. Unfortunately it took a long time to dry, and I accidentally smeared it. I didn't want to toss the panel so I just left it. Maybe I'll add some kind of embellishment over it later.


The layout for the card on the left was inspired by a card I found online. During the retreat, everyone had a BINGO card with various crafty tasks to complete. One of them was to "scraplift" a scrapbook layout, but since I was making cards, I found a card design to copy instead.


I used more white splatter on the card on the left (as well as one of the cards below), but this time I was more careful to avoid smearing it.


Since I made so many cards with these sets, I tried to use different layouts and focus on different occasions (although I still made sure to create a few birthday cards). Do you have a favorite of the group?

Thanks for stopping by!
Friday, April 18, 2025

Sending smiles

I was looking through some photos of projects I never posted and found a fun card made with the Happy Mailbox Cubbies stamp and die set (Art Impressions):

I'm not exactly sure why I never posted this card -- I made it several years ago, so if I had a good reason, it's forgotten now. At any rate, better late than never.

Seeing this card reminds me that I need to use this stamp set again; I've only ever used it to make this card. It's a cool set, though, because the die that cuts out the mailboxes creates several doors and openings, so you can add whichever letters and packages you like. There is a fair amount of coloring, which isn't always my thing, but it's not too detailed.

Since there's a lot going on in this focal image, I kept the rest of the card simple. I used patterned papers for the background then wrapped linen thread around the card front several times and tied it in a bow. I finished by adding the sentiment "Sending smiles across the miles" on a banner near the bottom right corner.

Thanks for stopping by!


Saturday, April 12, 2025

Painted Pencil Mushrooms

I love mushroom-themed craft products, so I was excited when a friend gave me the Painted Pencil Mushrooms stamp and die set (Sizzix, 49 and Market Collection). I combined the set with Apothecary ink collection (Catherine Pooler Designs) to create four all-occasion cards.

To create each of the focal image mushrooms, I used mini ink pads to apply color to the stamp. Then I lightly spritzed the stamp with water before stamping it on white card stock. I stamped the outline in black and cut it out with the coordinating die. For these two cards, I used the silhouette images from the set to stamp the card bases. I added a stamped sentiment, wrapped twine around the card front, and finished with gold sequins.

For the second two cards I used embossing folders to give texture to the card bases and then added gold splatter. I added the sentiments on strips of white card stock and finished with gold sequins. The card on the left had a lot of empty space on the top so I attached a little ribbon flag along the top edge with a mini stapler.

Thanks for stopping by!


Saturday, March 29, 2025

Talking in Circles

Last month I purchased the Talking in Circles cardmaking kit from Taylored Expressions. The kit included dies to cut circles, half circles, and quarter circles, as well as preprinted card stock "maps" in A2 and mini slim card sizes. You can glue the die-cut pieces directly on the maps so you don't have to worry about getting everything perfectly aligned. Yay! When I sat down to play with the kit I had fun cutting a bunch of pieces from card stock scraps and creating several cards.


If you look at just the arrangement of the die-cut pieces on these two cards, without paying attention to the colors, you'll notice that they have the same layout. Using different colors of card stock creates totally different patterns!


These two cards also have the same layout, but for the card on the left the circles are composed of quarter-circle pieces. For the card on the right I didn't glue the circles onto the map because I wanted to have them on a different color background. I did use the map to lay them out, then I picked up the circles with Press and Seal, applied glue to the backs and adhered them to the gray card base.


I also tried making a few mini slim cards. For the card on the top, I die cut the word "celebrate" out of the middle of the glitter card stock that's layered behind the main panel. I drew a border around the focal layer on the bottom card because it seemed like it needed a little "something."


For my last two cards I decided to make something other than birthday cards. I want to try to send more cards "just because," and I think these fit the bill nicely.

Thanks for stopping by!