Sunday, June 30, 2024

June Christmas cards: simple snowflakes

The month of June has flown by! We didn't finish our school year until June 10, then we had a couple of weeks off, and now we're into summer school. Whew! I finally sat down to make my Christmas cards yesterday so I could get them posted before the end of the month. And here they are:


I wanted to make something fairly simple (i.e., without a bunch of coloring or die cutting), so I decided to go with snowflakes. And I had received the die-cut panels (Orchid Oasis and Rich Razzleberry, Stampin' Up!) from a friend, so they were all ready to go. Even better! I spritzed the panels with iridescent spray, and then I removed the sprayer from the bottle and tapped the end of the plastic tube over the card stock to get bigger drops. When the panels were dry, I glued them to white card bases.


I used images from several different stamp sets -- I just looked through my stash until I found snowflakes that would fit inside of the circles. For the Orchid Oasis cards, I used Orchid Oasis and Starry Sky inks. It's a subtle difference, but I love this combo. For the Rich Razzleberry cards, I went for more contrast with Rich Razzleberry and Bashful Blue inks. When the stamping was done, I added silver sequins for a little extra sparkle.


I also decided to stamp a few snowflakes with the sentiment inside each card. I don't always decorate the inside of my cards, but sometimes it's nice to fill a little of the white space. And snowflakes are easy to add because they don't have to be perfectly placed or straight.

Thanks for stopping by!


Monday, June 24, 2024

Seaside Notions card sets

A couple of weeks ago at the end of the school year, one of my coworkers asked to purchase some card sets. I had some card sets on hand, but I wanted to make a few more so she would have additional choices. The two card sets I'm sharing today were made with the Seaside Notions stamp set.

I made both sets with the same general technique: I filled an 8-1/2" x 11" piece of cream card stock with stamped images from the Seaside Notions stamp set, using a different color ink for each image. For this set I also splattered the card stock with metallic blue watercolor paint and then cut it into panels for six cards.


I matted each panel before attaching it to a cream card base. I stamped the sentiments on strips of card stock, trimmed the ends of the strips, and attached them to the cards with foam tape. I finished off the cards in this set with clear droplets.

After stamping the sheet of card stock for the second Seaside Notions card set, I spritzed it with iridescent shimmer spray, which is really hard to see in the photo. Again I matted the stamped panels, but before adhering them to the card bases, I wrapped some hemp twine around the panels. (The ends of the twine are taped to the back of the panel so I didn't have any knots.) I glued a wooden seashell embellishment over the twine and attached the panels to colored card bases. I didn't add sentiments to these cards so they can be used for any occasion.

After I finished the card sets, I had two strips of stamped card stock left over, so I made two birthday cards for my stash. I matted each strip and adhered them to colored card bases embossed with a wave texture. I added a "happy birthday" sentiment and a few clear droplets to finish off these bonus cards.

Thanks for stopping by!


Tuesday, June 18, 2024

Father's Day veggies

The last couple of years my dad has become really interested in gardening. He keeps us updated on what he plants, and he shares his harvest with us (and his neighbors). So when I was thinking about what kind of Father's Day card to make for him, I knew the cute veggies from the Rooting for You stamp set(Lawn Fawn) were perfect.


I had an idea of how I wanted the card to look, and when I was looking for inspiration online, I found an amazing card by Chari Moss. I loved Chari's card, so I created my own version. Note: This card was slightly larger than A2 size (I think about 4-1/2" x 6").

I started by stamping and die cutting all the veggies and plant markers. I debated whether or not to add the little smiley faces, but I think they're pretty cute, so I went with it. I used the Chick Dies (Stampin' Up!) to make the Father's Day sign. I didn't have a sentiment that was the right size, so I wrote "Happy Father's Day" myself. Then I set those pieces aside.

To make the soil, I splattered a panel of brown card stock with two shades of brown ink (one the same shade as the card stock and one that was darker). Then I used a wavy edge die (from Adventure Edges dies from Elizabeth Craft Designs) to cut the panel into five sections. I changed the placement of the die each time to vary the little "hills." I sponged brown ink on the wavy edges of each section to add depth.

As I adhered the sections to a card base, I applied glue to just the left, right, and bottom edges. I started at the bottom and tucked in the pieces as I worked up to check the spacing (I didn't glue them at this point). Once I had the whole background adhered to the card base and all the veggies in an arrangement I was happy with, I went back and attached the veggies and signs with little drops of glue.

Inside the card I stamped the sentiment "Have an upbeet day" and then hand wrote a punny message using the names of the other vegetables. I also added one of the die-cut veggies. I still had some veggies left over (I try to stamp and cut extras, just in case), so I made one more card:

It's a simple card -- four die cuts and a stamped sentiment on a scalloped panel adhered to a kraft and silver background. But I think it's a fun encouragement card that will (I hope) make someone smile when they receive it.

Thanks for stopping by!


Saturday, June 15, 2024

Mixed media graduation cards

A few weeks ago I needed to make two graduation cards. I don't make grad cards often, so I don't have any stamp sets specific to the occasion. I do have an image here and there in all-occasion sets, but rather than search for those I decided to do something a little less traditional: mixed media cards.


I have to say that I'm really pleased with how these cards turned out. I used gel prints for the backgrounds -- I chose prints that were monotone with subtle patterns -- and used a stitched rectangle die to cut them to A2 size. Then I started adding all the creative goodness.

First I used a polka dot stencil from the Art Layers Stencils by Vicki Boutin with sprays to add pattern to the lower right quadrant. For the "celebrate" card I used iridescent spray (Altenew), and for the blue card I used Two-Tone Ocean Blue and Gold Metallic Spray (Hero Arts). The iridescent spray is hard to see in the photo above, but you can see it a little better here:


Then I used the Collage Backgrounds Hero Transfers (Hero Arts) to add bits of the map and text images. With another stencil from the Art Layers Stencils, I added texture with Gold Hero Paste (Hero Arts) to three areas on each card. I also used my finger to lightly rub gold paste directly on each background. It's subtle, but it catches the light in person. 


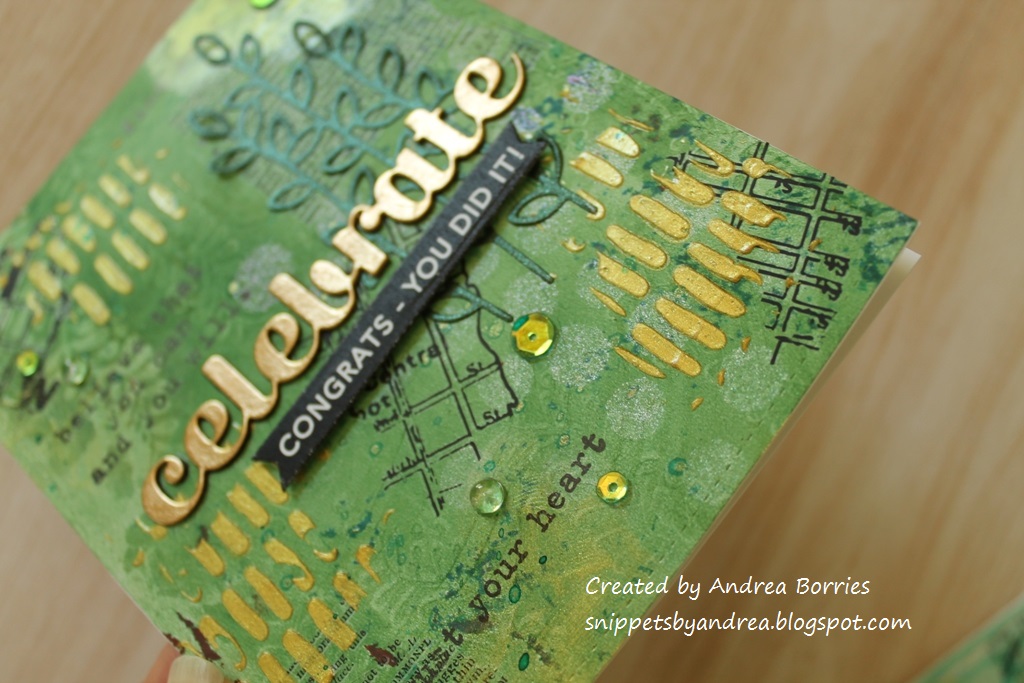
When the paste was dry I used the Empowered Words stamp set (Unity Stamp Company) to add three encouraging sayings to each card: "Trust your heart," "Find your voice," and "Believe that you can and you will." At this point I decided that the green card needed a little something extra since the polka dots are hard to see. I decided to die cut some leafy branches from lightweight metallic green paper. It was perfect. 

For the main sentiments I die cut "hooray" and "celebrate" once from gold card stock and twice from black. I layered the pieces together and glued one to each background. Using foam tape I added a sentiment strip (Taylored Expressions) below each word. I attached each background to a top-folding white A2 card base and finished them off with sequins/clear droplets.

Although it's time-consuming to make mixed media cards (a lot of time deciding and then drying), I had a really good time creating them. I'm even debating doing something like this for my June Christmas cards. I'd better get busy!

Thanks for stopping by!

Wednesday, June 12, 2024

Spring Chickens

When it comes to card making, I like a lot of different image styles. But two things that are always a win for me are cute animals and punny sentiments. So the Spring Chickens stamp and stencil combo from Taylored Expressions was a no-brainer for me.

I used Sprinkles, Toffee, and Watermelon inks (Taylored Expressions) with the layering stencils to create a 6" x 6" panel of colorful chickens, and I added the details using Oreo ink and the coordinating stamp set. When that was done I used the All Planned Out 1 dies (Taylored Expressions) to die cut the panel into two pieces. I also cut a piece of Toffee card stock embossed with a Chicken Wire embossing folder.

Using one piece of the stenciled panel and one piece of the embossed panel, I created two card layouts with Sprinkles card bases. Then I die cut the strips out of Watermelon card stock and circles from white. I stamped the circles with sentiments from the Just Chicken In stamp set (Taylored Expressions). (The small "happy birthday" sentiment is from the Tiny Words Birthday set from Simon Says Stamp.) I finished the cards with red enamel dots.

After the first two cards were done, I still had one narrow strip of stenciled card stock left, so I decided to make one more card. Lately I've been trying to use these leftover bits right away instead of saving them for later. It's much easier for me to use them when the ideas are flowing and the supplies are already out!

Thanks for stopping by!


Wednesday, June 5, 2024

Tie-dye birthday cards

For me it's pretty easy to make cards for young kids, but older kids and teens can be a bit of a challenge. So when I saw the Tie Dye Layering Stencil set from Erin Lee Creative, I thought it would make a great background on cards for that age group (or anyone, really). Here are the first two cards I created with these stencils:


For the card on the left, I chose a blue and green color palette. To make the focal point I die cut "it's your day!" out of holographic card stock. (I saved the to letters that fell out to use on another card.) I also added a very narrow strip of holographic card stock along the bottom edge of the card. To finish I added a few clear confetti sequins. 

For the card on the right, I used a palette of dark pink, yellow, and purple. For the sentiment I cut a birthday cover plate die out of holographic card stock. I glued the letters that fell out to the tie-dye background, using the rest of the die-cut panel as a guide for placement (and then I saved that panel for another card). I added a few of the clear confetti sequins for the finishing touch.

Thanks for stopping by!

Saturday, June 1, 2024

Two-for-one cards

I don't do a ton of stenciling or ink blending when I'm making cards, but a few weeks ago I decided to have a little stenciling session. I pulled out a few stencils I hadn't used yet and got to work. Today's cards are a two-for-one special featuring the Abstract Floral layering stencils from Erin Lee Creative.


This stencil set creates a design with three large flowers -- and with the colors I chose it has a definite 70s vibe. I intended to cut the panel down to an A2 size and create one card. But when I was trying to decide how to trim it, I realized that I could cut it roughly in half and get two cards. Bonus! (I also think the two pieces would be perfect to turn into bookmarks.)

Once the panel was cut in half I rounded the corners of each piece and doodled a border around the edges to mimic the "happy birthday" sentiment I decided to use. I wanted to add some gold, so I splattered gold watercolor on green card bases and used a small paint brush to add gold accents to the petals and centers of the flowers. I adhered a flower panel to the left side of each card, added the sentiment with foam tape, and finished them with a few sequins.

Thanks for stopping by!