I did it -- three posts in one week! Whew! I knew I could do it, since I've done it before, but knowing and doing are often two different things. At any rate, today I have a simple card to share that would be good for many different occasions -- or no occasion at all. I used it as a get well card for my aunt who had ankle surgery, but you'd just need to change or omit the sentiment as needed.
Supplies (all Stampin' Up! unless otherwise noted):
Stamps: Treemendous (Raisin Boat)
Paper: Thick Whisper White, Hello Honey card stock
Ink: Chocolate Chip, Garden Green, Mint Macaron, So Saffron, Flirty Flamingo, stardust clear Gelly Roll pen (Sakura)
Accessories: Beautiful Wings Embosslits die, pearls, Glue Dots, sponge
This card is mostly basic stamping, so there's not much to explain. But I will point out a few details that may be hard to notice:
- The leaf stamp for the trees is the same image I used for the leaves on the flower stems.
- I colored over the flower buds on the tree with a clear glitter pen to add a little sparkle. Originally I had also used the glitter pen on the centers of the larger flowers, but I didn't like how it looked, so I covered it up with pearls.
- The sentiment is actually one long stamp. To break it up, I used pieces of washi tape to cover parts of the sentiment, inked the rest of the stamp, took of the washi tape and then stamped the words on the card. Then I cleaned the stamp and repeated the process with the next part of the sentiment. With a photopolymer stamp it's easy to do this and still keep everything lined up.
Sometimes simple cards like this, with just simple stamping, are some of my favorite ones to make. What about you? Thanks for stopping by!
Thursday, July 28, 2016
Monday, July 25, 2016
Pocketful of Sunshine card set
Obviously, I love to make cards. I love to send them, too. But most of the cards I send are for specific occasions, such as birthdays, and I'd like to get better at sending cards "just because." Are you the same way? Well, here's a set of cards perfect for sending a quick note or letting someone know you're thinking about them.
Supplies (all Stampin' Up! unless otherwise noted):
Stamps: Pocketful of Sunshine stamp and die combo (Taylored Expressions), Just Jeans
Paper: 110-lb white (Recollections), Dapper Denim card stock; Let's Polka in the Meadow paper (Lawn Fawn)
Ink: Memento Tuxedo Black, Dapper Denim, Crumb Cake, Real Red, Daffodil Delight, Pool Party, Pear Pizzazz, Lucky Limeade, Pumpkin Pie
Accessories: Sweet Buttons Embosslits die, linen thread, googly eyes (Inkadinkadoo), Mono Multi liquid glue
Aren't they cute? I used the Pocketful of Sunshine stamp and die combo (from Taylored Expressions) with some basic coloring and paper piecing to make these clean and simple cards.
To start, I stamped the Just Jeans background stamp using Dapper Denim ink on Dapper Denim card stock and then die cut the pockets. I love the extra detail the background stamp adds to the pockets.
Once I decided where on the card I wanted to place the pockets, I stamped the main images directly on the card bases. I colored the image of the envelopes and flowers, adhered the die-cut pockets to the cards and stamped the sentiment below the pocket on each card.
After I colored the flowers I didn't like the color combination I'd used on the largest flower, so I added a die-cut button in the middle. Just another opportunity for embellishment, right? I also decided the pockets needed a little embellishment, so I added a small linen thread bow to each one.
For the cards with the frog and chick, I decided to paper piece the animals to add a little pattern and visual interest to the images. After I stamped the images on the card bases I stamped them again on patterned paper. I cut out the patterned images, glued them over the images on the card bases and colored in a few details with markers.
Both of the little critters have big round eyes that are perfect for googly eyes, so I had to add those for the cuteness factor. I think it's impossible to look at something with googly eyes and not smile -- at least it is for me.
I think the pocket die that came in this set is very versatile, and there are many ways it could be used without the coordinating stamps. You could make a back-to-school card (or accent for a scrapbook page) by having a couple of punch-art pencils and/or a ruler sticking out of the pocket. Small die-cut flowers could make a three-dimensional bouquet to tuck inside the pocket. And mini silver brads at the top corners of the pocket would look like rivets. I guess I have some ideas to try!
Thanks for stopping by!
Supplies (all Stampin' Up! unless otherwise noted):
Stamps: Pocketful of Sunshine stamp and die combo (Taylored Expressions), Just Jeans
Paper: 110-lb white (Recollections), Dapper Denim card stock; Let's Polka in the Meadow paper (Lawn Fawn)
Ink: Memento Tuxedo Black, Dapper Denim, Crumb Cake, Real Red, Daffodil Delight, Pool Party, Pear Pizzazz, Lucky Limeade, Pumpkin Pie
Accessories: Sweet Buttons Embosslits die, linen thread, googly eyes (Inkadinkadoo), Mono Multi liquid glue
Aren't they cute? I used the Pocketful of Sunshine stamp and die combo (from Taylored Expressions) with some basic coloring and paper piecing to make these clean and simple cards.
To start, I stamped the Just Jeans background stamp using Dapper Denim ink on Dapper Denim card stock and then die cut the pockets. I love the extra detail the background stamp adds to the pockets.
Once I decided where on the card I wanted to place the pockets, I stamped the main images directly on the card bases. I colored the image of the envelopes and flowers, adhered the die-cut pockets to the cards and stamped the sentiment below the pocket on each card.
After I colored the flowers I didn't like the color combination I'd used on the largest flower, so I added a die-cut button in the middle. Just another opportunity for embellishment, right? I also decided the pockets needed a little embellishment, so I added a small linen thread bow to each one.
For the cards with the frog and chick, I decided to paper piece the animals to add a little pattern and visual interest to the images. After I stamped the images on the card bases I stamped them again on patterned paper. I cut out the patterned images, glued them over the images on the card bases and colored in a few details with markers.
Both of the little critters have big round eyes that are perfect for googly eyes, so I had to add those for the cuteness factor. I think it's impossible to look at something with googly eyes and not smile -- at least it is for me.
I think the pocket die that came in this set is very versatile, and there are many ways it could be used without the coordinating stamps. You could make a back-to-school card (or accent for a scrapbook page) by having a couple of punch-art pencils and/or a ruler sticking out of the pocket. Small die-cut flowers could make a three-dimensional bouquet to tuck inside the pocket. And mini silver brads at the top corners of the pocket would look like rivets. I guess I have some ideas to try!
Thanks for stopping by!
Sunday, July 24, 2016
No matter how you slice it
I've been trying to keep up with my two-posts-a-week goal, and then last night I was busy with other computer work and completely forgot about my post until just after midnight. Poo. So I'll try to get three posts done this week. I actually have plenty of things to share right now; it's just a matter of making the time to write the post. So without further ado, here is a fun pizza-themed birthday card:
Supplies (all Stampin' Up! unless otherwise noted):
Stamps: Pizza My Heart (Lawn Fawn), Perfect Pairings
Paper: Thick Whisper White, Creamy Caramel, So Saffron, Watermelon Wonder, Smoky Slate card stock; Collectable "Unforgettable" Designer Paper Pad (My Mind's Eye)
Ink: Watermelon Wonder, Close to Cocoa, So Saffron, Wild Wasabi, Sahara Sand, Cajun Craze, Smoky Slate, Memento Tuxedo Back, Project Life journaling pen
Accessories: Large Stitched Rectangles Stackables dies (Lawn Fawn), Woodgrain embossing folder, sponge, Dimensionals, Mono Multi liquid glue
I'm always on the lookout for fun stamp sets that work for kids' birthday cards, and this one fits the bill. It's definitely whimsical, but not strictly "kiddish." It includes some great sentiments, and it's fun to be able to customize the pizza however you want.
For my pizza and slices, I stamped the main image in Close to Cocoa ink on Creamy Caramel card stock. Then I stamped it again with Watermelon Wonder ink on So Saffron card stock. (It sounds like an odd combination, but it was the perfect colors to look like tomato sauce and cheese.) I cut out the second image around the wavy line and then lightly sponged a bit of Watermelon Wonder ink along the edge. I glued it onto the first image and then stamped my pizza toppings: mushrooms, pepperoni, green peppers and shredded cheese.
For the background, I wanted to use a red gingham printed paper to look like a tablecloth at an Italian restaurant. Unfortunately I didn't have any red gingham, but I think this one works well. To add the stitched border, I cut the patterned paper with a stitched rectangle die. Then I shifted the paper and partially cut it again to make a stitched square. I adhered the paper to the top of the card base, added the pizza, slice, and pizza cutter with Dimensionals and then stamped a little steam image above the pizza.
For the bottom of the card front, I added a strip of Watermelon Wonder card stock embossed with the Woodgrain embossing folder and sponged around the remaining white edges. I stamped the greeting using two colors to add another pop of red. (And shout out to Lawn Fawn customer service here. I realized while making this card that I had a tiny flaw in one of my stamps. It didn't really affect the use of the stamp, but I contacted them and they promptly sent out a replacement stamp. Awesome!)
Inside the card -- and I apologize for the weird lighting on this photo -- I stamped a couple more sentiments and added two more pizza slices. Did you notice that the pizza slices all have different faces? I love that Lawn Fawn stamp sets come with separate face images so you can decide which face you want to use -- or leave off the faces altogether.
That's one post down and two more to go. Thanks for stopping by!
Supplies (all Stampin' Up! unless otherwise noted):
Stamps: Pizza My Heart (Lawn Fawn), Perfect Pairings
Paper: Thick Whisper White, Creamy Caramel, So Saffron, Watermelon Wonder, Smoky Slate card stock; Collectable "Unforgettable" Designer Paper Pad (My Mind's Eye)
Ink: Watermelon Wonder, Close to Cocoa, So Saffron, Wild Wasabi, Sahara Sand, Cajun Craze, Smoky Slate, Memento Tuxedo Back, Project Life journaling pen
Accessories: Large Stitched Rectangles Stackables dies (Lawn Fawn), Woodgrain embossing folder, sponge, Dimensionals, Mono Multi liquid glue
I'm always on the lookout for fun stamp sets that work for kids' birthday cards, and this one fits the bill. It's definitely whimsical, but not strictly "kiddish." It includes some great sentiments, and it's fun to be able to customize the pizza however you want.
For my pizza and slices, I stamped the main image in Close to Cocoa ink on Creamy Caramel card stock. Then I stamped it again with Watermelon Wonder ink on So Saffron card stock. (It sounds like an odd combination, but it was the perfect colors to look like tomato sauce and cheese.) I cut out the second image around the wavy line and then lightly sponged a bit of Watermelon Wonder ink along the edge. I glued it onto the first image and then stamped my pizza toppings: mushrooms, pepperoni, green peppers and shredded cheese.
For the background, I wanted to use a red gingham printed paper to look like a tablecloth at an Italian restaurant. Unfortunately I didn't have any red gingham, but I think this one works well. To add the stitched border, I cut the patterned paper with a stitched rectangle die. Then I shifted the paper and partially cut it again to make a stitched square. I adhered the paper to the top of the card base, added the pizza, slice, and pizza cutter with Dimensionals and then stamped a little steam image above the pizza.
For the bottom of the card front, I added a strip of Watermelon Wonder card stock embossed with the Woodgrain embossing folder and sponged around the remaining white edges. I stamped the greeting using two colors to add another pop of red. (And shout out to Lawn Fawn customer service here. I realized while making this card that I had a tiny flaw in one of my stamps. It didn't really affect the use of the stamp, but I contacted them and they promptly sent out a replacement stamp. Awesome!)
Inside the card -- and I apologize for the weird lighting on this photo -- I stamped a couple more sentiments and added two more pizza slices. Did you notice that the pizza slices all have different faces? I love that Lawn Fawn stamp sets come with separate face images so you can decide which face you want to use -- or leave off the faces altogether.
That's one post down and two more to go. Thanks for stopping by!
Saturday, July 16, 2016
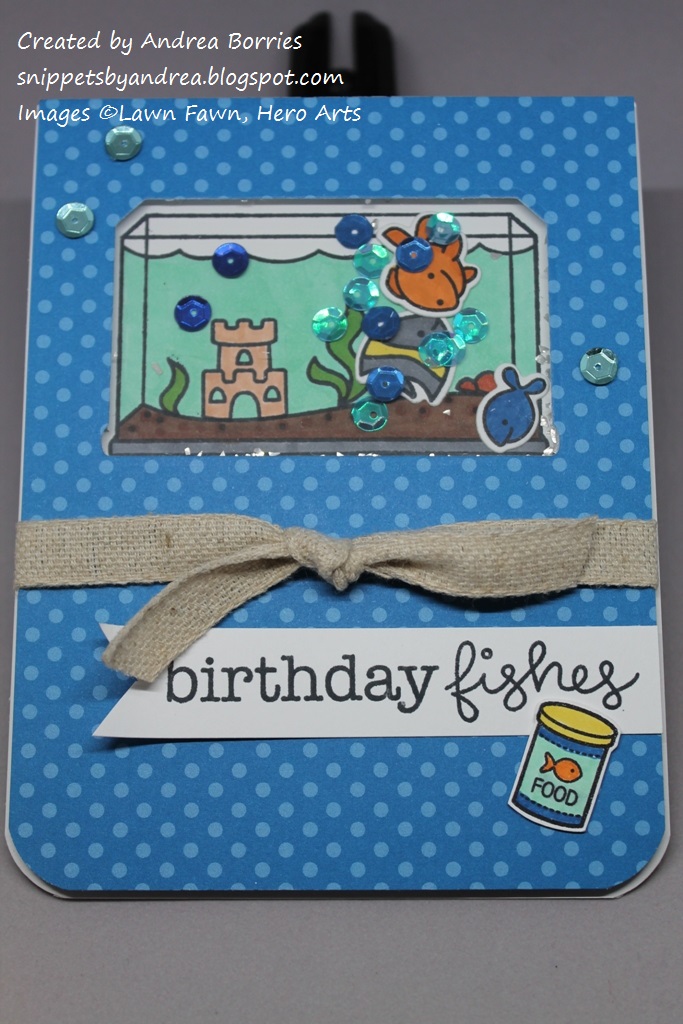
Fintastic birthday fishes
In case you couldn't guess from the post title, today I have a couple of "fishy" birthday cards to share with you.
Supplies (all Stampin' Up! unless otherwise noted):
Stamps: Fintastic Friends, Year Four (both Lawn Fawn)
Paper: Watercolor paper (Strathmore); Brilliant Blue, Tempting Turquoise card stock
Ink: Jet Black StazOn; ZIG Clean Color Real Brush pens - 050, 061, 020, 024, 037, 036, 066, 803, 080 (Kuretake); Project Life journaling pen
Accessories: Fintastic Friends Lawn Cuts dies (Lawn Fawn), Tide embossing folder (Lifestyle Crafts), Rhythm 'n Blues sequins (Craft Medley), Corner Chomper (We R Memory Keepers), water brush with detail tip (ZIG), Glue Dots, Dimensionals
I had fun watercoloring these images with my ZIG Clean Color Peal Brush pens. My technique is getting better, although I wish I'd made the water a little darker. I am especially proud of the orange fish because I had to blend together red and yellow pens. I think the color turned out perfectly.
To add a birthday aspect to the card I stamped a balloon on a scrap of watercolor paper, colored it and cut it out. I attached it to the focal image above the fishbowl and hand-drew the string to make it look like the balloon is tied to the fish's tail. I embossed the card base so it looks like waves or water and added a few blue sequins for bubbles.
Supplies (all Stampin' Up! unless otherwise noted):
Stamps: Fintastic Friends (Lawn Fawn), Essential Messages (Hero Arts), Remembering Your Birthday
Paper: Thick Whisper White card stock; Designer Series Paper (DSP) Patterns Stack - Brights, window sheets (Judi-Kins)
Ink: Memento Tuxedo Black; Jet Black Staz On; Pumpkin Pie, Pacific Point markers; Blendabilities markers: Skin Tone, Smoky Slate, Old Olive, Daffodil Delight assortments; BT4 marker (Spectrum Noir); E19, YG09 markers (Copic)
Accessories: Fintastic Friends Lawn Cuts dies (Lawn Fawn), Rhythm 'n Blues sequins (Craft Medley), silver glass glitter, natural ribbon trim, Corner Chomper (We R Memeory Keepers), foam adhesive strips, Glue Dots
The fish tank image is great for a little shaker element on this card. To make the shaker, I first die cut the tank shape out of a piece of DSP that was slightly smaller than the card front. I place the DSP on the card (without adhering it) and then stamped the image onto the card front through the opening. I stamped a few images in the tank, as well as the fish and food canister on scratch card stock, and colored everything.
I taped a piece of window sheet on the back of the DSP and then added pieces of foam adhesive strips all around the opening, making sure there weren't any openings where sequins could escape. (I also added pieces of foam strip on a few other places on the DSP so it would be level when attached to the card base.) I placed a few sequins, a bit of glitter and three die-cut fish in the middle of the focal image and then carefully placed the DSP on top.
To finish the front of the card I added a natural ribbon wrapped around the DSP and knotted in front, a stamped greeting (made by combining two different stamp sets) on a banner, a colored die-cut image, and a few additional sequins.
Inside the card I stamped a birthday sentiment and added three more little fish to tie in with the front of the card.
I hope your day goes swimmingly! (Sorry, I couldn't resist.) Thanks for stopping by!
Supplies (all Stampin' Up! unless otherwise noted):
Stamps: Fintastic Friends, Year Four (both Lawn Fawn)
Paper: Watercolor paper (Strathmore); Brilliant Blue, Tempting Turquoise card stock
Ink: Jet Black StazOn; ZIG Clean Color Real Brush pens - 050, 061, 020, 024, 037, 036, 066, 803, 080 (Kuretake); Project Life journaling pen
Accessories: Fintastic Friends Lawn Cuts dies (Lawn Fawn), Tide embossing folder (Lifestyle Crafts), Rhythm 'n Blues sequins (Craft Medley), Corner Chomper (We R Memory Keepers), water brush with detail tip (ZIG), Glue Dots, Dimensionals
I had fun watercoloring these images with my ZIG Clean Color Peal Brush pens. My technique is getting better, although I wish I'd made the water a little darker. I am especially proud of the orange fish because I had to blend together red and yellow pens. I think the color turned out perfectly.
To add a birthday aspect to the card I stamped a balloon on a scrap of watercolor paper, colored it and cut it out. I attached it to the focal image above the fishbowl and hand-drew the string to make it look like the balloon is tied to the fish's tail. I embossed the card base so it looks like waves or water and added a few blue sequins for bubbles.
Supplies (all Stampin' Up! unless otherwise noted):
Stamps: Fintastic Friends (Lawn Fawn), Essential Messages (Hero Arts), Remembering Your Birthday
Paper: Thick Whisper White card stock; Designer Series Paper (DSP) Patterns Stack - Brights, window sheets (Judi-Kins)
Ink: Memento Tuxedo Black; Jet Black Staz On; Pumpkin Pie, Pacific Point markers; Blendabilities markers: Skin Tone, Smoky Slate, Old Olive, Daffodil Delight assortments; BT4 marker (Spectrum Noir); E19, YG09 markers (Copic)
Accessories: Fintastic Friends Lawn Cuts dies (Lawn Fawn), Rhythm 'n Blues sequins (Craft Medley), silver glass glitter, natural ribbon trim, Corner Chomper (We R Memeory Keepers), foam adhesive strips, Glue Dots
The fish tank image is great for a little shaker element on this card. To make the shaker, I first die cut the tank shape out of a piece of DSP that was slightly smaller than the card front. I place the DSP on the card (without adhering it) and then stamped the image onto the card front through the opening. I stamped a few images in the tank, as well as the fish and food canister on scratch card stock, and colored everything.
I taped a piece of window sheet on the back of the DSP and then added pieces of foam adhesive strips all around the opening, making sure there weren't any openings where sequins could escape. (I also added pieces of foam strip on a few other places on the DSP so it would be level when attached to the card base.) I placed a few sequins, a bit of glitter and three die-cut fish in the middle of the focal image and then carefully placed the DSP on top.
To finish the front of the card I added a natural ribbon wrapped around the DSP and knotted in front, a stamped greeting (made by combining two different stamp sets) on a banner, a colored die-cut image, and a few additional sequins.
Inside the card I stamped a birthday sentiment and added three more little fish to tie in with the front of the card.
I hope your day goes swimmingly! (Sorry, I couldn't resist.) Thanks for stopping by!
Tuesday, July 12, 2016
Quick Critters note card set
A couple of weeks ago I posted a piggy hugs card and mentioned that I had used all of the animal shapes in the Quick Critters stamp and die combo (from Taylored Expressions) to make a set of note cards. As promised, here is that set:
Supplies (all Stampin' Up! unless otherwise noted):
Stamps: Quick Critters stamp and die combo (Taylored Expressions)
Paper: 110-lb white card stock (Recollections); Kraft card stock; Beachside, Let's Polka, Mon Amie and Let's Polka in the Meadow patterned papers (Lawn Fawn)
Ink: Early Espresso, Regal Rose, Pumpkin Pie, Crumb Cake
Accessories: Ovals Collection Framelits dies, In Color sequin assortment, Occasions Paper-Piercing Pack, paper-piercing tool and mat, Dimensionals, Fine-Tip Glue Pen
I die cut two of each animal shape out of patterned papers and then stamped their faces with Early Espresso ink and colored them in with markers. A quick note: For the dog, cow and pig, I wanted to reverse the direction of some of the die-cuts, so I made sure to cut one of each with the back side of the patterned paper facing up. Then I flipped it over before stamping the face. (I hope that makes sense.) I grouped the animals into four different pairs and went to work on the rest of the card design.
For the background of each card I die cut a small oval out of kraft card stock and then pierced a border around the edge to add little texture. I adhered the oval just above the middle of the white 3-1/2" x 5" card base and stamped a sentiment below the oval in Early Espresso ink. I used a different sentiment for each card, and there were two additional saying stamps in the set: "You make my heart happy" and "XOXO."
I used Dimensionals to adhere a pair of critter die-cuts over the oval on each card. I wanted a little bit of embellishment on the cards, and I was happy to discover that the colors in the retired In Color sequin assortment coordinated almost perfectly with the papers I had used for the die-cuts. I chose three sequins for each card and glued them on with the Fine-Tip Glue Pen.
And that's it for this clean and simple card set. I included kraft envelopes with the cards because I liked how it coordinated with the kraft ovals. Unless I need this set for some gift-giving emergency, I'll be saving it to use as a prize for my cousin's wedding shower in the fall. I'll have to make at least a few more sets for the occasion, so I may pull out this stamp set and die combo again.
Thanks for stopping by!
Supplies (all Stampin' Up! unless otherwise noted):
Stamps: Quick Critters stamp and die combo (Taylored Expressions)
Paper: 110-lb white card stock (Recollections); Kraft card stock; Beachside, Let's Polka, Mon Amie and Let's Polka in the Meadow patterned papers (Lawn Fawn)
Ink: Early Espresso, Regal Rose, Pumpkin Pie, Crumb Cake
Accessories: Ovals Collection Framelits dies, In Color sequin assortment, Occasions Paper-Piercing Pack, paper-piercing tool and mat, Dimensionals, Fine-Tip Glue Pen
I die cut two of each animal shape out of patterned papers and then stamped their faces with Early Espresso ink and colored them in with markers. A quick note: For the dog, cow and pig, I wanted to reverse the direction of some of the die-cuts, so I made sure to cut one of each with the back side of the patterned paper facing up. Then I flipped it over before stamping the face. (I hope that makes sense.) I grouped the animals into four different pairs and went to work on the rest of the card design.
For the background of each card I die cut a small oval out of kraft card stock and then pierced a border around the edge to add little texture. I adhered the oval just above the middle of the white 3-1/2" x 5" card base and stamped a sentiment below the oval in Early Espresso ink. I used a different sentiment for each card, and there were two additional saying stamps in the set: "You make my heart happy" and "XOXO."
I used Dimensionals to adhere a pair of critter die-cuts over the oval on each card. I wanted a little bit of embellishment on the cards, and I was happy to discover that the colors in the retired In Color sequin assortment coordinated almost perfectly with the papers I had used for the die-cuts. I chose three sequins for each card and glued them on with the Fine-Tip Glue Pen.
And that's it for this clean and simple card set. I included kraft envelopes with the cards because I liked how it coordinated with the kraft ovals. Unless I need this set for some gift-giving emergency, I'll be saving it to use as a prize for my cousin's wedding shower in the fall. I'll have to make at least a few more sets for the occasion, so I may pull out this stamp set and die combo again.
Thanks for stopping by!
Subscribe to:
Posts (Atom)